Packaging Software using SpecOps Deploy in Active Directory Group Policy

So much for trying to keep blog posts coming at a regular pace! Never mind. I’ve been fairly busy in the Learning Technologies Group producing several software application packages deployable across Campus via Group Policy. Most of these have been done using the vendor’s supplied installation executables and silent command line switches (either nicely supplied in the installation documentation, or more usually, after a bit of online investigation). The most common installers I’ve come across are InstallShield (sometimes in conjunction with msi) and nullsoft.

Once I have been able to get as much information about silent installation as possible, together with any pre-installation,  post-installation and uninstallation task detail, I set about creating the installation Group Policy using the SpecOps plug-in.

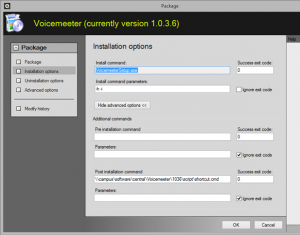
Here’s a screenshot of some of the options available when tailoring a Group Policy software installation in SpecOps. You can specify installation commands, along with any command line switches, and / or paths to scripted commands for pre- and post- installation and uninstallation tasks. This one’s for  Voicemeeter, a freeware multi I/O audio mixing desk.

specop_options

Installation Options for SpecOps Deploy

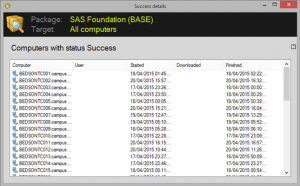
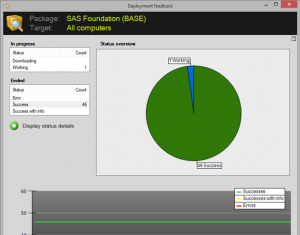
One very nice feature of SpecOps is the ability to get deployment feedback when the Group Policy has been applied, in both text and graphic form, as illustrated in the example screenshots below.

specops_success1 specops_graph1 specops_feedback1

Windows 8.1 in the LRC-to-be …

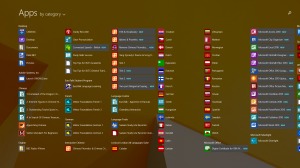
… Well, it’s not quite there. But I’m looking at using the available Windows 8.1 images that the busy ISS (Information Systems and Services) Infrastructure Team have been beavering away developing. This has meant quite a bit of a re-engineering of our language software programs to make use of the Windows 8.1 Apps screen to order them in a (fairly) consistent way, by language category.

At present, there is no way within Active Directory Group Policy settings to auto-create or modify Apps Categories and assign existing software to them. I suspect this will come as a later Microsoft feature.

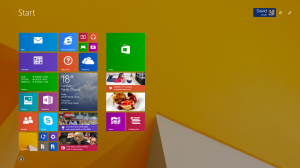
The screenshot below shows how I’ve ordered some of our software into the Windows 8.1 Apps screen view. The Start screen picture has been included to show a bit of how central ISS have customised its look.

Windows 8.1 Apps win8_start_scr

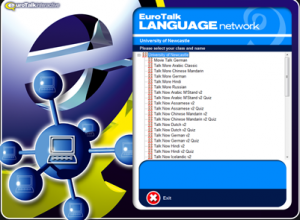
EuroTalk Language Network at the LRC

It’s been a VERY long while since my last post (it’s good to be busy!). Very recently, the LRC purchased a set of user licenses for several European and Asian language learning multimedia programs, from  EuroTalk’s Talk Now, Talk More and Vocab Builder series. Using EuroTalk’s Language Lab Network Manager software, I was very easily able to install all the language material to our dedicated Windows 2008 R2 applications server share. A client GUI in MSI format was provided to connect to and run the programs off the server, installed very conveniently to every client PC using Group Policy (Fancy that – a language package that actually provides MSI’s!). I was quite impressed. I’ve found a few bugs in a couple of the language programs, but nothing that cannot be sorted out by EuroTalk in their next version. Let’s hope we get some good feedback from our students …

EuroTalk Language Network program menu

EuroTalk Language Network program menu


Getting PXE Boot to work on new Toshiba Satellite Pro (C70) laptop range.

I recently purchased a new 17.3 inch widescreen Toshiba Satellite Pro C70 laptop for a senior academic colleague. The device came pre-installed with Windows 8, but, since the requirement was for Windows 7, I decided to completely rebuild it by injecting it with a new network image via WDS and PXE booting over our fast network. Sounds straightforward, right? Wrong! It took me a while to figure out – and I hope this may help anyone who may be coincidentally having similar problems. First, I needed to access the BIOS. Since I had already booted into Windows 8, I found that the bells and whistles of Windows 8 hibernation features  interfered with BIOS access. I overcame this by pressing and holding the SHIFT key down whilst performing a complete system shut down. Only releasing the SHIFT key on COMPLETE shut down (lights off!).  Next, I held F2 key down whilst booting  to enter the BIOS. Since this is a new laptop, it has the UEFI  (Unified Extensible Firmware Interface) boot mode feature, which I needed to change to the legacy CSM (Compatibility Support Module) mode. This was found in Advanced … System Configuration … Boot Mode section of the BIOS.  I saved the changes, again shutting down whilst holding down the SHIFT key. Booting up, I held down the F12 key simultaneously, to enter the Boot Menu. I was then able to pick network (LAN) boot, and successfully PXE network boot to our WDS menu, thereafter choosing the appropriate 64-bit WIndows 7 Enterprise image. Phew! I hope this helps anyone who may find a) problems entering newish Toshiba Satellite BIOSes and b) then finds they cannot PXE boot.

PXE-boots (below) – all the rage at Enterprise outlets these days … 🙂

Automating SDL Trados Studio and Multi-Term Installations

It’s been a fair while since I last wrote anything, as I have been busy during these summer weeks to catch up and perform some much needed lab maintenance while the students are away. So here’s what I’ve been up to this week . I’ve  been automating the installation of SDL Trados 2011, desktop language translation software, and Multiterm 9, which provides a management database of terminology (a “termbase”), for translations.

The software comes compressed as single exe files which can be uncompressed to discreet directory structures containing all the runtime libraries and msi files, which lend themselves to auto deployment (with a bit of tweaking) via Group Policy (GP). GP administrative templates are also provided which can be used to further tailor the install – specifically, to enable or disable automatic updating. I’ve chosen to disable automatic updating and disallow users the ability to do this, as I want to manage this centrally.

The installation has been done via VBscript within a Group Policy Object (yes, I know Powershell is here, but I’ll stick to what I;m more familiar with – for the moment).

I wrote a script to download copies of the uncompressed installation files from our software server to every local client, do the install, and clean up the local environment later. Here’s a snippet of the code to install a couple of core components:

Set WshShell = CreateObject(“WScript.Shell”)
.
.
.

WshShell.Run “msiexec /i C:\SDLTrados2011\SDLTradosStudio2011_SP2_3046\modules\TranslationStudio2.msi /qn /l*v C:\temp\sdltrados.log”,1,true
.
.
.

C:\SDLTrados2011\SDLMultiTermDesktop2011_SP2_361\modules\MTCore9.msi /qn /l*v C:\temp\sdlmultiterm_core.log CLIENTINSTALL=1″,1,true

The boolean parameter ensures that the run command completes before the script continues to execute.

I’ve tested the install in one of our digital language labs, and I plan to deploy the software to all five labs before our students return. I may also need to put this on most of our Language Resource Centre cluster machines.

 Postscript: Since my time of writing the original article, The Trados and Multtiterm Software has now been been successfully deployed to every language lab. in our School.

Repackaging tool musings

A lot of my time in the LRC is spent considering how to tailor the existing catalogue and steadily growing portfolio of language learning software for automatic deployment in our Windows Active Directory Enterprise environment. I use the traditional snapshot technology  (via Scalable’s Wininstall LE freeware tool) to effectively re-package software into Microsoft Installer (msi) format. Other tools exist where installations are relatively simple, such as Caphyon Advanced Installer (we purchased the Professional Version). I used the Caphyon software to produce the LRC software menu deployed to every PC in the Centre. The great thing about this software is how simple it is to use; wizards guide you through various production steps, and for me, the UI is clean, simple and easy to follow. Which is just what you need to be able to get to grips with the software quickly, and quickly produce results.