My first Raspberry Pi…
Raspberry Pi Type A with WiPi
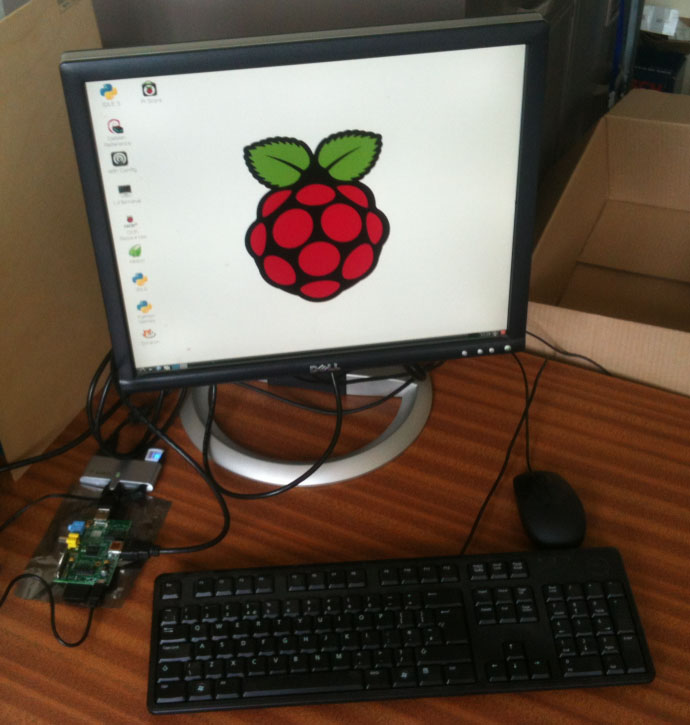
The setup:
- Raspberry Pi Type A (one USB slot, no ethernet) that came with an 8GB SD card with Raspbian; supplied by RS Online (785-8645).
- A Dell LCD, keyboard and mouse salvaged from a workstation purchased in… 2005, I think; has DVI and VGA inputs.
- 1 powered USB hub: Belkin F5U415UK, 4 USB 2.0 ports; supplied by RS Online (480-217).
- 1 power supply for the Raspberry Pi; supplied by Farnell (2254792).
- 1 USB WiFi (WiPi) dongle; supplied by Farnell (2133900).
- 1 HDMI-to-DVI lead: Pro Signal PSG02574; supplied by Farnell (1813133).
The Type A has no ethernet port, so I needed to get the WiFi working. The WiFi configuration tool was able to pick up the Newcastle University WiFi network, but was unable to maintain a connection.
Update (15/3/21)
I have received some official advice from the university about how to connect to the university without plain-text passwords.
Connecting Raspberry Pi to Enterprise Wi-Fi
(newcastle-university/eduroam)
Connecting to enterprise standard WiFi on a raspberry pi requires some additional setup in order to be able to connect.
- Whoever will be using/is responsible for it, will need to generate a password hash, otherwise they would be storing and transmitting their password in plain text over Wi-Fi. They can do this with:
echo -n USERS_PASSWORD | iconv -t utf16le | openssl md4- They then need to update the wpa_supplicant.conf file with the details below. To open the file, run:
sudo nano /etc/wpa_supplicant/wpa_supplicant.conf- Update that file to match the following details:
network={ ssid="newcastle-university" scan_ssid=1 key_mgmt=WPA-EAP group=CCMP TKIP eap=PEAP identity="USERS_NID" password=hash:USERS_PASSWORD_HASH phase1="peapver=0" phase2="MSCHAPV2" }- Press Ctrl + O followed by Enter to save, then Ctrl + X to close the file
- Run the following command to apply and save the config:
wpa_cli –i wlan0 reconfigure- Wait for the Pi to show as connected to the WiFi network. At this point, you may need to restart for the connection to work.
Original Post – Non-Secure, Non-Recommended Method
(I think it can work if you do it right. The second Raspberry Pi that I set up picked up the settings automatically but I made the mistake of selecting MSCHAPV2 from the drop-down menu instead of PEAP, which resulted in the configuration line in the file below becoming “eap=MSCHAPV2” rather than “eap=PEAP”.)
I edited /etc/wpa_supplicant/wpa_supplicant.conf by hand afterwards to:
ctrl_interface=DIR=/var/run/wpa_supplicant GROUP=netdev
update_config=1

network={
	ssid="newcastle-university"
	proto=RSN
	key_mgmt=WPA-EAP
	pairwise=CCMP
	auth_alg=OPEN
	eap=PEAP
	phase2="auth=MSCHAPV2"
	identity="username"
	password="password"
}
You’ll need to use your username and password (plain text, unfortunately) there.
On reboot, the Raspberry Pi connected automatically to the university’s network and even the web proxy was detected and configured automatically.
I did this on Wifi Config. Hope it helps 🙂
http://farm3.staticflickr.com/2828/13626451445_e2aa77af63_b.jpg <– if html tag isnt working
Thanks for this. I had difficulty with WiFi Config the first time and did everything the wrong way round, but I’ve got myself a new Pi to try it out on.
No worries 🙂 Glad it worked out.
hi i am using my raspberry pi for my project and at the moment i just cant get it to connect to uni net work . . . .can you help
This was very helpful, thanks! Bookmarked 🙂