Embedding into Canvas: Twitter Feeds and iFrames

I thought I’d share in this latest update two very quick and dirty ways to add a bit of colour and pizazz to your Canvas site with some very easy embeds. These are much less technical in their nature than the previously discussed FT Headline API, and very fast to implement.

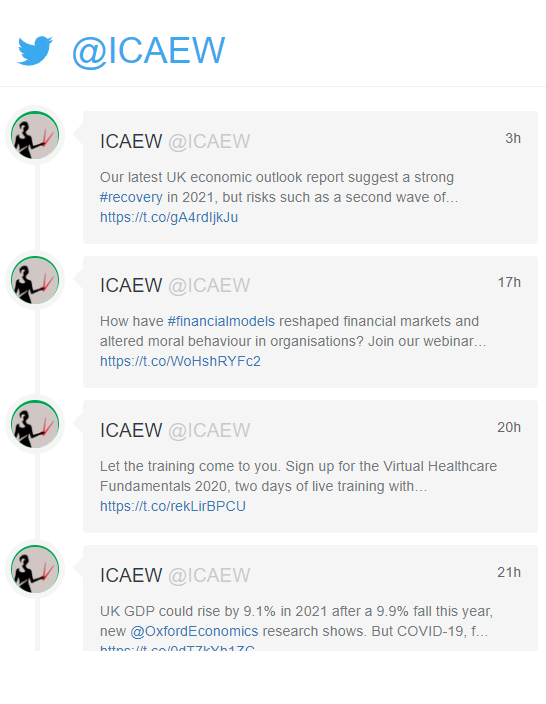
The first is Twitter embeds, which is the ability to use the Twitter App in Canvas to have a constantly updating feed from a particular Twitter account. This can be particularly useful to highlight Professional Body news, for example ICAEW below, or specialist news feeds, for example Marketing Today etc.. It is less targetd or searchable than a specific tailor made widget like the FT Headline, but very fast and lightweight to impliment.

Instructions:

  1. Go to Settings in your Canvas Course itself and add the Twitter app to your module (Apps in top tab, search Twitter) – this takes a couple of minutes to sync the very first time you do it, so I’d suggest going away, grabbing a coffee and then coming back to the rest of the instructions.
  2. Open/Create the page where you want the Twitter feed to appear
  3. Click on the “Apps” icon and select Twitter (you’ll need the first time to select “view all” but in future you can select from the fav. drop down as it’ll remember)
  4. Complete the form and click embed.

I’d strongly suggest avoiding using the #hashtags element to it, because you’re at the whim of fate as to who may hashtag anything, but certainly linking to an authoritative news Twitter account or professional body account should normally be useful and to embed to add context, professional insights or current events for students.

The second type of embed which I’m going to discuss is very much an “embed any webpage” in a window in your page solution. By adding an iFrame. Now usually adding an iFrame might be a concern to individuals who have no experience (or desire!) to understand HTML coding. However in this case, we’re going to make it very easy by using a website tool which will automatically do the coding for you. No coding experience is necessary.

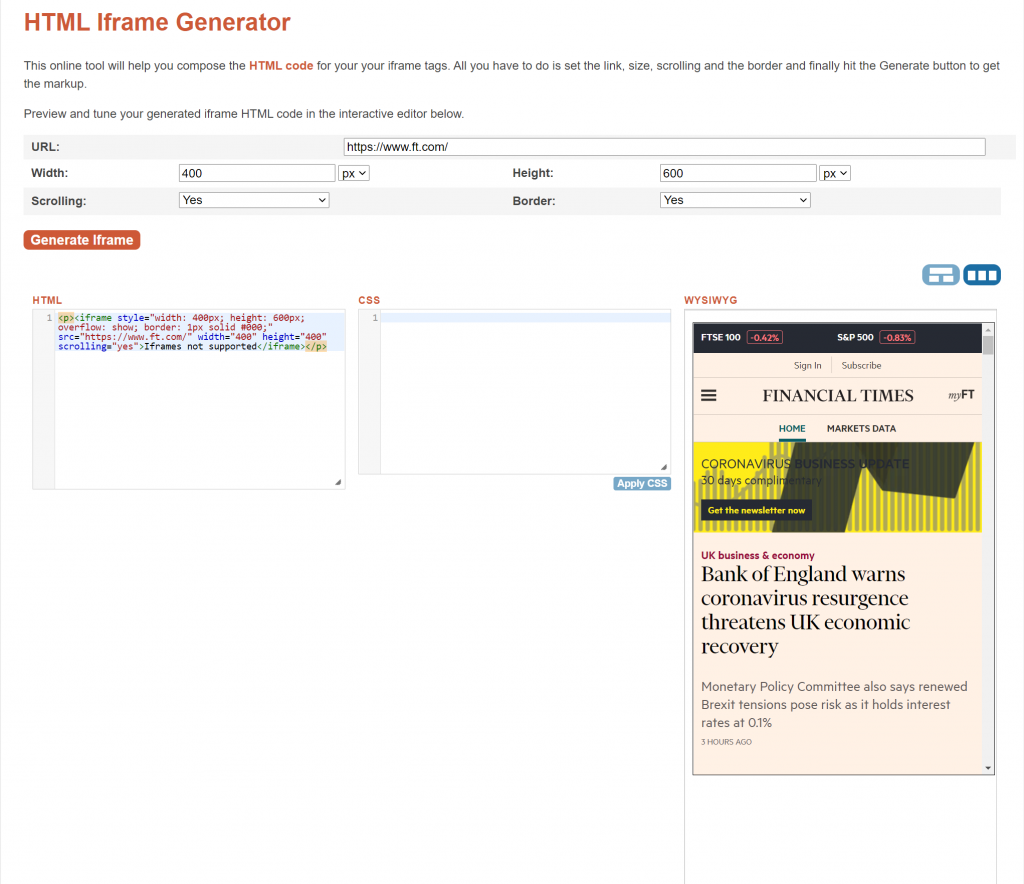
I use this website here, but there are a number of very similar iFrames generator websites available. An iFrames generator tool effectively delivers the necessary code to you to copy and paste into your website (or in this case Canvas site).

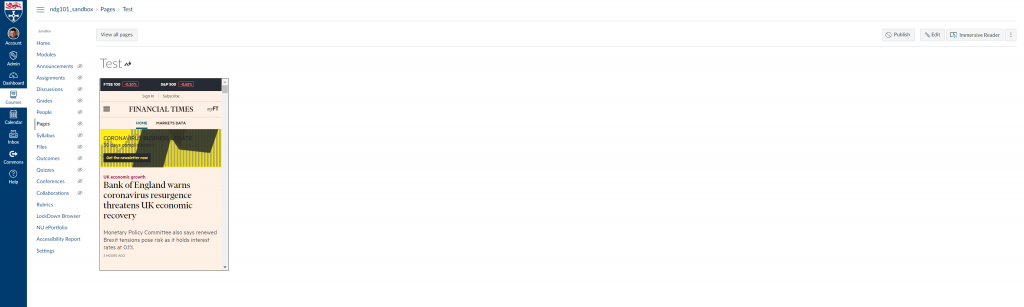
Simply copy and paste the website you want to create a window from your Canvas page to. For example if you want a page which links directly to the Financial Times webpage, I would enter the URL, and then change the width and hieght to how I wanted them. In this particular tool above I’ve found it’s easier to work in px (pixels) than percentages (%) so change both to px. 400px by 600px is generally a good window size for Canvas. This particular iFrame generator is very useful as it has a WYSIWYG tab for you to automatically see what it will look like when it pulls through.

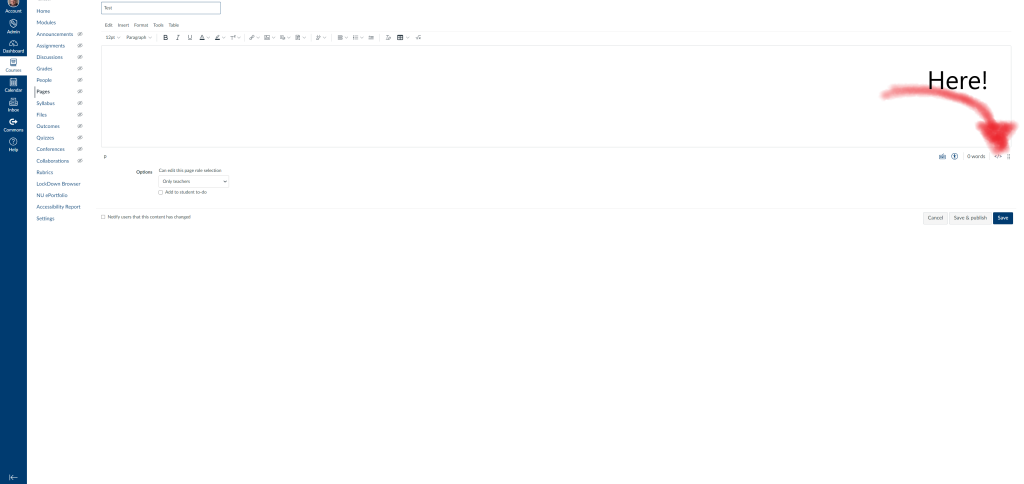
The next step is simply to copy and paste that HTML code. No coding needed. Copy. Go to your page in Canvas and press in the bottom right hand corner Switch to Raw HTML and then simply paste your code in and save.

Your webpage should now have a little “window” to the other site embedded in it. As a tip, iFrame links to the landing page of a website usually work well, beyond that they often will not work well at all, so linking to the main FT page is fine, but attempting to put a window to the markets data section of the website in a page fails. The WYSIWYG screen will give you a good indication as to whether it’s working or not before you copy it over of course.

Turnitin marking for numerical based 24 hour take home exams – Dr Andy Holden

Prior to April this year my experience of using Turnitin was limited to attending the training courses organised by NUBS and run by LTDS mainly as the modules i taught were assessed through 100% end of course exams. I had no practical hands-on experience of how to set up or mark using Turnitin.

The reality of having to use Turnitin for the upcoming 24 hour take home exams led me to find a way of marking summative exams online that was both pragmatic and gave me the basic statistical information I needed. This short blog is intended to disseminate how I mark with Turnitin through two short videos and provide links where further information can be found.

My first video shows the type of submissions we are likely to get in A&F (being a mixture of some type, some scanned images, some cut and pasted Excel) and how I marked them using QuickMarks.

The LTDS resources are excellent and I recommend:

This method of using QuickMarks within Turnitin to create a bank of marks that i could ‘drag and drop’ was fine but it meant I had a lot of manual adding up to do and it did not give me a breakdown of marks per question or section unless I kept a separate spreadsheet. As a consequence I looked for a solution to this and found Grading Form.

My second video shows how I use Grading Form to reduce the amount of manual additions and also remove the need for keeping a separate spreadsheet.  The Grading Form can be set up so that a mark can be entered for as many questions and sub questions as required and then Turnitin will automatically add these up to give a total. In addition, a spreadsheet can be exported with the mark per question or sub question detail. The Grading Form can be attached to an assessment and then is available for all scripts submitted. Please note care is needed with this as a Grading Form should only be attached once to an assessment. If a second Grading Form is attached to the same assessment then any prior marking done on that assessment will be deleted.

Unfortunately there is no LTDS screencast on Grading Form at present but LTDS are running regular webinars and hold regular drop in sessions where they are happy to answer any queries – i know because i have used them a lot!

Happy to help with queries but also don’t forget LTDS are the experts in this and are very friendly!

Experiences of Remote Delivery: Dr Benjamin Bader

It is not easy to deliver a two-hour lecture remotely. Especially, if the lecture was not designed for online delivery in the first place and in its original version does have interactive elements with the students and draws on their live input. Hence, simply narrating the slides with a voice-over and put them online is sometimes not the best option. Dr Benjamin Bader explains how using Camtasia software helped him to tackle this challenge:

When thinking about how to best move my content online, I quickly realized that ReCap is not the best option. While this allows for simply recording the lecture “in one go”, it is hard to include additional elements and overall, a bit inflexible. I was mentioning this to a colleague from Germany during a research call and he asked me, why I am not using Camtasia. Although I am generally interested in tech and thought I was up to date, I must have looked quite puzzled when I heard “Camtasia”. So my colleague went on with his “sales pitch” that eventually got me hooked. Just a disclaimer, neither he or me are affiliated with Camtasia or do get any sort of commission. Just two academics dealing with the same problem (How on earth do I get my class online quickly and with a good learning experience for students?!) and helping each other out. If you are dealing with the same problem I was, I am more than happy to share my experience with you.

Essentially, Camtasia is a hybrid between a video editor and graphics software that comes with an integrated screen recorder. The core benefit here is that you can do both, include slides in a video and narrate as you would do in the lecture – or do a mix of both. At the same time, you can insert additional content such as quizzes, text, music, animations, and so on. Camtasia offers very good tutorials and besides that, the software is really intuitive and easy to learn. If you have ever worked with a video editor before, you will find yourself at home quite quickly. And if not, don’t worry. Besides a lot of online tutorials, it comes with a demo project where you can test everything and experiment before you take on your first live project.

After playing around with the demo for a while, I decided to get started making an intro, just to get used to how the software works and to have a visually appealing start of my lecture. If you want to check out the result, please visit here. The music and the moving background are included in Camtasia and there is a decent library with content available. Slides are mine, as you can see, I also added a little box which I am making use of during the online lecture to add content. This works by simply adding a text box in the software and leave it for as long as you need it. You can also include other things, such as the smiley in the video, completely up to you. Just like a large puzzle, piece by piece you add elements, slides, audio, and build your lecture. When you are done, you can create an .mp4 video or export directly to Youtube etc.

Another benefit for me was that after having put together the visuals, I could add my narration where I needed it when I needed it. So even for one single slide, I could create several shorter audio files, explaining different parts. That way, I could re-record if I had made a mistake. And it is easier to think about the overall storyline. A process of think – record – pause – think – record – pause (and a good number of takes for some parts, so if you are a perfectionist, you need patience). In the end, the viewer of the video won’t be able to tell the difference. For them, it is one continuous audio track. Now, if you are thinking the re-recording is time-consuming: yes, a bit, but it would have taken me much more time to record everything in one go because I probably would have done several takes of the entire lecture and still been much less happy with the end result.

If you’re hooked too, what do you need to get started? Eventually, other than the software itself, I guess three things. First, you need to get comfortable hearing your own voice on tape. For me, that’s still somewhat odd, but I am getting used to it. Second, you need to be willing to experiment and give some thought to how you adapt your content for a better student experience. If you simply want to give the lecture as you would do in the classroom, you better stick with ReCap. There is nothing wrong with doing so, however, you will only unfold Camtasia’s potential, if you use its features. And finally, this shall not be omitted here, you need some proper hardware, especially if you do longer lectures. I realized that in my first one hour lecture, with each additional minute of content the software responded a bit slower and the final rendering process (no worries, the software does all that for you and compiles one usable file) took quite a while. However, there’s an easy fix: break it down into 30ish-minute bits and create separate projects. You can easily combine the parts later on.

If you are interested in learning more, please reach out to me. I will be offering a webinar on Camtasia as well and am happy to share my experiences with you. For further details from the software publisher, please visit https://www.techsmith.com/video-editor.html.

Many thanks to Dr Benjamin Bader for sharing those experiences. If you wish to share your own experiences of moving to remote & online delivery please do get in touch to share your personal story. Finally, if you haven’t already done so please join the Education and Technology Forum Microsoft Teams site for more information and frequent updates.

Experiences of Remote Delivery: Dr Rebecca Casey

Sometimes when starting out it’s useful to have a bit of advice from someone who has already gone through the experience. In the following Blog post Dr Rebecca Casey shares some of her practical and technical lessons learnt so far from her move to remote delivery:

Recording synchronous teaching sessions can be tricky. On Day 2 my home bandwidth was dismal and therefore experienced trouble downloading the slide deck from Blackboard. One of the students kindly offered to share their screen so that the rest of the class could follow the slides on MS Teams. It was the only thing I did differently to the previous teaching session and therefore it is possible this may have interfered with the successful recording of the session. Usually the recording will appear in the chat feed a few minutes after the session has finished. If you cannot see it then log into MS Stream and go to ‘My Content’ – you should see a copy of it here. If you are using Zoom there is an option for ‘automatic recording’ when you are setting up the meeting – definitely do this so that is one less thing to think about during synchronous delivery;

Establish a convention for managing conversation because i) if too many people have their mics switched on it will create an awful echo and ii) people will be constantly talking over one another. You will be focussed on your lecture so it is worth nominating one of your students as a facilitator. If students have a question or want to comment they can signal using ‘Question’ or ‘Comment’ in the chat feed. The facilitator can then field these to you one by one.

I tried using ‘Notes’ to encourage students to post their own contributions/thoughts/reflections during and after class but this is proving patchy – only a couple of students use it. It requires more structure if it is going to work successfully e.g. incorporate such activities into the learning aims for the session so that expectations are clear.

Many thanks to Dr Rebecca Casey for sharing those experiences. If you wish to share your own experiences of moving to remote & online delivery please do get in touch to share your personal story.

Finally, if you haven’t already done so please join the Education and Technology Forum Microsoft Teams site for more information and frequent updates.

Experiences of Remote Delivery: Professor Johnathan Sapsed

Remote delivery of a session designed to be taught as a three-hour block module on Managing for Innovation for the MBA is a real challenge but as Professor Johnathan Sapsed explains:

I set up the class as a channel in MS Teams and organised participants into groups. Their task was to generate present ideas and design an app and underlying business model for people self-distancing and quarantined.

The students quickly learned how to video-meet and collaborate on the slide deck within Teams. They did a wonderful job with the three presentations, which we all viewed and discussed in a Teams meeting. 

It was really quite inspiring the ideas they came up with for community support, showing local supply chain data to reassure panic buyers, and online mental health services. Although the session was different from that initially planned, the students were really grateful that the module was still running and appreciated the adaptability of the tutor and class. Remote delivery required collaborative learning as we went along, and overall the session was a great success. I asked students to reflect on the online experience compared to the co-located class, and one even said he thought it was better, as he felt everybody could contribute more easily, including the more introverted

Many thanks to Professor Johnathan Sapsed for sharing those experiences. If you wish to share your own experiences of moving to remote & online delivery please do get in touch to share your personal story.

Finally, if you haven’t already done so please join the Education and Technology Forum Microsoft Teams site for more information and frequent updates.

LinkedIn Learning: Free Resources for Educators

LinkedIn Learning have contacted NUBS to let us know they have made a large number of training videos free and available for all educators worldwide. They have posted a very useful Blog post here which outlines their offering and the background. In addition they have made available a full course for everyone on remote working.

Clearly at this time this is very, very welcomed. I have picked through some of the videos and drawn up a list of possible “Essential” videos below for staff unfamiliar with some key tools:

Office 365 for Educators

Learning Microsoft Teams for Education

Microsoft Teams Tips and Tricks

Learning Zoom

Teaching with Technology

Managing Virtual Teams

Finally, if you haven’t already done so please join the Education and Technology Forum Microsoft Teams site for more information and frequent updates.

Remote Delivery: Updated Lecturers Toolkit + Content Providers

A key resource on this Blog is the Lecturers Toolkit tab above, which we will try and keep as clear as possible to the key links which staff may need. In the latest update I have tried to concentrate on the core links coming from our colleagues in LTDS for Lectures and Seminars, and a useful video on Online Teaching options here & LTDS Support (including drop-ins and webinars for remote teaching delivery (link here).

Furthermore I’ve provided links to Key Tools for Online Delivery including Staff Office 365 Professional Plus download (link here) and the Panopto Software Download (Video: link here & main staff guide here)

In addition to internally provided resources, external commercial providers of content such as Pearson have kindly contacted us to offer free access to there resources. Please do explore these offers of free options as online supplementary material from reputable large providers such as Pearson to your online provision. However I would suggest that you also consider the module learning outcomes, the objectives of the resources and what learning outcomes they better enable, the time students have left to engage with them and the student learning experience overall before deployment.

Finally, if you haven’t already done so please join the Education and Technology Forum Microsoft Teams site for more information and frequent updates.

Preparing for Remote Delivery of Teaching and Learning: Training links for synchronous delivery using Microsoft Teams

For synchronous delivery with less than 150 students Microsoft Teams could be a viable platform to consider for seminars, tutorials and other small group activities (Microsoft say it will take up-to 250, but I’ve read reports of instability at numbers over 200). The University Microsoft 365 Learning Pathways site has a number of excellent guides on the use of Teams, including:

• Video guides on remote and home working– collaborating and scheduling virtual meetings.

• How to record meetings for asynchronous distribution after the event (link here)

Microsoft For Education themselves also have some very helpful free on-demand webinars on using Teams for classrooms. (Link: https://microsoftteams.eventbuilder.com/TeamsEducation). In particular of interest will probably be:

• Online classes & lectures with all your students: Continue instruction and coursework with an online Class Team https://microsoftteams.eventbuilder.com/event/15026

• Online meetings with student groups or anyone via their email: Arrange ad-hoc meetings with anyone across your institution https://microsoftteams.eventbuilder.com/event/15027

In addition to those on-demand sessions, there is a Microsoft For Education webinar on 17th of March at 3pm (GMT) called “Teams Introduction for Educators and Staff”. I would strongly if at all possible consider registering for that webinar if you’re considering using teams in your teaching: https://microsoftteams.eventbuilder.com/event/15315

If you would like to find out more about using Teams to support your delivery the Getting Started with Teams guide is a great starting point.

Finally, if you haven’t already done so please join the Education and Technology Forum Microsoft Teams site for more information and frequent updates.

Migration to Canvas at Newcastle University Business School

The roll-out of information and training as we as an institution move from Blackboard to migrate our VLE to Canvas has begun. The main Canvas site for the University is now live (link here) with all academic staff having access to an orientation course their own “sandbox” module to practice with. In addition the Canvas training sessions which will be running from April to June are now available to book (link here).

In addition to the orientation course and the face-to-face training, staff also have on the LTDS Digital Learning site (link here) a large number of highly useful help resources (link here), with in particular excellent written Canvas guides (link here). In addition there are also a large number of extremely detailed and high quality video guides (link here) on all sorts of common features.

This is all backed up with 24/7 help from Canvas itself via live chat within the platform, phone or email for all of your ‘How do I’ questions. I would encourage you to engage with the Canvas help team if you have any platform queries as I’ve found them to be very helpful and quick to respond. Finally if you are interested in using Canvas more creatively I would encourage you to look into the Canvas Communities (link here). The Higher Education Canvas community discussion group for example (link here) is a fast moving discussion group with HE academics and worth looking into.

Within Newcastle University Business School our priority is to support our teams exposure to LTDS training opportunities and access to Canvas support. Starting in mid-May and continuing weekly through to July we will be holding small group and 1-2-1 drop-in sessions start led by David Grundy. These are sessions for those who have received the LTDS training and would like some further advice and 1-2-1 support in.

We also want to make the most of this opportunity to enhance our learning provision with this exciting new platform, and so we hope to be contacting you soon with further details of enhancement orientated sessions in May and June.

If you have any queries or questions please do either drop in to have a chat or e-mail me at david.grundy@newcastle.ac.uk or if you have any questions for the Canvas team themselves please contact canvas@ncl.ac.uk

Bett 2020 – ExCel London

Overview

I secured funding from the Digital Innovation in the Curricula Fund to attend Bett 2020 at the ExCel Centre in London in January 2020. The event, run over four days, is the largest EdTech show in the UK and as part of the conditions for the funding I agreed to write a brief report (below) and make a short video of the experience.

Project Aims

To disseminate via a short report and video, highlights of Bett2020 that may be of interest to colleagues within NUBS. In so doing, the value of attending future Bett conferences can be gauged, and potentially new teaching and learning technologies can be trialled within NUBS.

Introduction

Established in 1985, the British Educational Training and Technology show (now just known as Bett) has taken place annually at ExCel London every January since 2012. Spread over four days Bett2020 incorporates exhibits and stands from over 800 EdTech providers as well as delivering 150 CPD content sessions for the expected 34,000 visitors. The show is aimed at education providers at all stages – from primary through to university level, and has expanded internationally with Bett shows now taking place in UAE, Malaysia and Latin America.  

I was at the conference for the first two and a half days, during which time I attended ten seminars, talked to many exhibitors, and gained two Microsoft educator certificates! I have structured this brief report under these three themes. 

Seminars

With over 150 seminars and demonstrations taking place there were many interesting talks – some of which I could attend, others I could not due to timing. London South Bank University are experimenting with using voice technology, specifically Amazon Alexa, to simplify how students are obtaining information. University of Surrey have developed in conjunction with students an online feedback portfolio which collates feedback, highlights areas needing attention and helps to produce an action plan. Adobe provided a demonstration on Rush – a simple video editing software tool which could be useful for staff and students and was the software I used to make the accompanying video.  

Cloud based computing was heavily in vogue, with impressive talks from Alex Butler, Chief Digital Officer at Bath University, explaining how the university are using cloud based computing, in particular Azure from Microsoft, to place digital at the core of everything they do. This message was backed up, perhaps not surprisingly by Ken Eisner from Amazon Web Services (AWS), a key competitor of Microsoft Azure, who’s talk was entitled “The Future of Work requires a Future of Learning: AWS Workforce Development in the Cloud.” Both Microsoft, through Microsoft Learn, and Amazon through AWS Educate, produce free content on cloud based computing along with digital certificates which could be of interest to our students.

Perhaps the most interesting talk, with the exception of course of the Newcastle University talk on MS Teams (!), was entitled “DigiLearn: Empowering Transformational Change in Education.”  Presenters Chris Melia and Kevin Williams (Technology Enabled Learning & Teaching Manager) discussed the transformation of digital skills at UCLan. Their pitch was in order to create work ready graduates then you need to start with staff. Introduced MS Surface pros for all staff with docking stations (to replace work station, laptop and tablets), delivering many training sessions and utilising MS Teams provided a digital community. They are piloting a program for staff – DigiLearn, incorporating three different levels (Practitioner, Advocate & Champion) to provide recognition for promotion purposes, and progression for CPD. They plan to roll out a similar program for students, DigiReady, next year. There is also a DigiLearn Sector Community run through Teams which anyone can join – looks really interesting and they also run mini conferences and events. Anyone interested in EdTech should join their community.

Exhibitors

With over 800 exhibitors the following caught my eye as potentially being useful to us at NUBS (some of these I know are already used here).

  • ClickView – Sold as Netflix for education. They produce original educational videos, mainly for secondary schools but a growing number for HE. One function I really liked was the access to freeview TV recordings which you could search using key words, edit and keep. ClickView can be embedded within Canvas and is available for a free trial.
  • Zoom– a video conferencing webinar tool, similar to Skype.
  • Quizlet – a good mobile revision tool app with flash cards and quizzes. They are linked to some book publishers eg McGraw-Hill.
  • Sli.do – App that enables an audience to raise questions on their mobiles which are displayed anonymously on the screen. This was used extensively at this conference and was really impressive.
  • Unity – A coding company that provides free on line coding courses, starting from complete beginner.
  • Revas Business Simulation – They demonstrated a travel agency business – choosing staffing including wages and HR issues, impact of marketing, finance, and general profitability. Other businesses were available. It was difficult to assess the level but a free trial is available.
  • MindView – The University currently have this software which can be accessed in the app store and is predominantly used for producing mind maps. Useful for students, and potentially for staff as the mind maps can be exported to Word and also Powerpoint to produce a presentation.  
  • Whiteboards – there were many, many smart whiteboards on show including Samsung Flip. These could be useful for seminars and also for staff meetings eg Boards of Study, Board of Examiners as the whiteboards offer more flexibility than projection. They are expensive though.
  • Magic Whiteboard – a Dragons Den winner! Paper thin whiteboards that stick to any wall through static electricity – cheap and could be useful in seminar rooms, offices etc.

MS Office 365

There were numerous presentations demonstrating the full potential of Office 365 – quite an eye opener. They have a monthly electronic education newsletter which is free to sign up. The following are some of the features of direct relevance to NUBS.

  • MS Teams featured heavily in many seminars, especially as a tool to bring together individuals from different organisations. It is great for group work and apparently can now incorporate Turnitin. Need to be careful though that Teams is used in the right context – no one wants to be a member of 50+ Teams.
  • OneNote – is in effect a digital notebook but there was a great demonstration of OneNote Live Capture where students can get an instant transcript of a spoken lecture – they can highlight, add notes, pause, rewind then catch up again. Looked amazing. Demonstration can be seen from 12 min 40.
  • Immersive Reader – is included in OneNote and helps support students with dyslexia
  • Flipgrid – facilitates a form of video discussion. A good example can be found within Teams.
  • Powerpoint – Demonstration of Powerpoint (from 11 min 33) live that is coming soon. Students log into a session and then the presenters slides appear on their devices, together with in time transcript.   

Digital Education Certificates

Microsoft were the headline sponsors and as a result had the largest presence at the conference. There are other providers of free digital education certificates, notably Google and Amazon, but I only had time to look at the Microsoft offerings.

Microsoft Educator Centre contains a wealth of online free to access training resources. As mentioned above UCLan integrate these into a formal CPD programme for staff and at a time when we are trying to engage our students with digital literacy then we as educators should look to upskill. This resource provides a fantastic opportunity to do this.  

Conclusions   

This short report with embedded hyperlinks I hope disseminates what I thought to be useful ideas for colleagues within NUBS. On reflection I was a little bit underwhelmed by the exhibitors at the conference, with the exception of perhaps ClickView and the new hardware. I think its encouraging that many of the apps I saw we are already using. I found the seminars really informative and new this year was a theatre dedicated to HE/FE presentations which was a welcome addition. In the past and still to some extent the conference is geared more towards Schools than universities but this is gradually changing. I was blown away by the current (or soon to be introduced) functionality of the apps within MS Office 365. I also think the digital education certificates are another avenue to investigate further, both in terms of staff CPD and student engagement.

Should staff from NUBS go next year? I think anyone with an interest in EdTech would be wowed and energised by attending and as the conference is free (travel and accommodation still needed) I think it’s a great opportunity to see what is on offer, both from EdTech providers and from other universities. It is also a great opportunity to see the classroom technology our future students are using in their secondary education as this will establish expectations for their university experience.

Andy Holden 28 Jan 2020