Academia 2.0 – Blended learning as opportunity for digital innovation “The Dissertation Channel”

by Dr Klara Scheurenbrand and Dr Robin Pesch

Every successful project starts with a good idea, but sometimes all it needs is a great colleague. In our case, we were extremely lucky to meet as NUL/NUBS counterparts on the UG dissertation module.

The transformation to online teaching during the pandemic inspired us to think about the meaning of blended learning more in-depth and soon we were discussing ideas on how to make our recordings more engaging. Being aware of the digital formats used by our ‘millennial’ students, we tested how far these formats could be applied to our content. Of course, expectations are high when target audiences are more familiar with their digital world than we are.

While Klara experimented with intro videos in the form and length of an Instagram ‘reel’, Robin compiled dos and don’ts of a dissertation in a dynamic ‘YouTuber’ style. We both liked our approaches and gradually intensified our mutual encouragement and discussions about how to transform our ‘home cooked’ experiments into a more professional layout. A dedicated channel treating the various stages of the dissertation lifecycle was to be the result of our ambition. The dissertation channel with 7 seasons and 35 episodes was our big idea. Now we needed big funds.

The school’s call for applications for the digital innovation fund was our opportunity to give our project wings. Productive days were spent in preparing our pitch until we submitted: fingers crossed. After a couple of weeks of waiting, a first positive response required us to break the project down. The panel wanted to see a ‘pilot’ plan rather than the monster version we had initially presented. And a pilot it shall be, if that’s what it takes to bring the idea to life. In retrospect, we are very happy to have committed to an initial pilot as it was a lot, A LOT of work to produce it.

Conceptually, we had already made our mind up about which topic our pilot should handle. “How to write a literature review” was our baby from the beginning. And unintentionally, we had been scripting the storyboard all along as we developed lectures and seminars playing with a ‘table’ metaphor that transformed into the ‘city’ narrative, which guides our video today.

As much as we loved our idea, we realized quickly that our animation skills were insufficient to achieve the expectations set by our ambitions. We decided to include professional support but due to the limited budget, it was difficult to find someone sympathetic to our situation. Doors were slammed in our faces until we were finally able to find someone we could win over to our idea.

Working with our external support required 4 rounds of revision, which entailed refining details like atmosphere, mood, content and camera shots as well as equality and diversity for each scene. We chose ethnically neutral faces to guarantee an ‘everybody’ approach to emphasise a variety in gender and skin colour of the characters seen in the video. We thought to voice over the initial version of the video ourselves. However, our German accent decreased the quality of the watching experience. With some more extra funding from NUL, we were able to recruit a professional voiceover service with native speakers.

We have enjoyed the execution of this project enormously. We are very happy with the outcome and the production process towards the final version of the video was extremely fruitful and enriching. We hope this pilot project will yield future success as we would love to continue working on our bigger plan behind this pilot video, which is to produce a full “Netflix”-type Dissertation Channel.

Learning OBS: Prof. Nils Braakmann

As a number of our teams get used to the more advanced functionality of the tools we have for education recording, it becomes apparent that our Tools like Panopto can’t do things like split screening and other more advanced functionality. Our very own Prof. Nils Braakmann has therefore written a very helpful guide on getting to grips with OBS Studio, a free application which allows for more advanced features.

You can find the guide here, and my thanks to Nils for taking the time to share with us all.

Embedding into Canvas: Twitter Feeds and iFrames

I thought I’d share in this latest update two very quick and dirty ways to add a bit of colour and pizazz to your Canvas site with some very easy embeds. These are much less technical in their nature than the previously discussed FT Headline API, and very fast to implement.

The first is Twitter embeds, which is the ability to use the Twitter App in Canvas to have a constantly updating feed from a particular Twitter account. This can be particularly useful to highlight Professional Body news, for example ICAEW below, or specialist news feeds, for example Marketing Today etc.. It is less targetd or searchable than a specific tailor made widget like the FT Headline, but very fast and lightweight to impliment.

Instructions:

  1. Go to Settings in your Canvas Course itself and add the Twitter app to your module (Apps in top tab, search Twitter) – this takes a couple of minutes to sync the very first time you do it, so I’d suggest going away, grabbing a coffee and then coming back to the rest of the instructions.
  2. Open/Create the page where you want the Twitter feed to appear
  3. Click on the “Apps” icon and select Twitter (you’ll need the first time to select “view all” but in future you can select from the fav. drop down as it’ll remember)
  4. Complete the form and click embed.

I’d strongly suggest avoiding using the #hashtags element to it, because you’re at the whim of fate as to who may hashtag anything, but certainly linking to an authoritative news Twitter account or professional body account should normally be useful and to embed to add context, professional insights or current events for students.

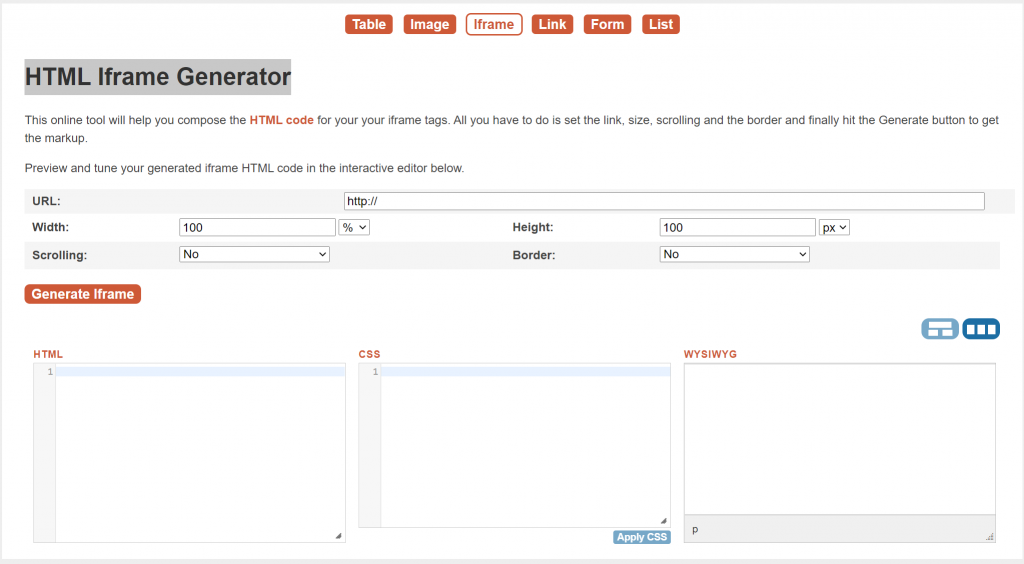
The second type of embed which I’m going to discuss is very much an “embed any webpage” in a window in your page solution. By adding an iFrame. Now usually adding an iFrame might be a concern to individuals who have no experience (or desire!) to understand HTML coding. However in this case, we’re going to make it very easy by using a website tool which will automatically do the coding for you. No coding experience is necessary.

I use this website here, but there are a number of very similar iFrames generator websites available. An iFrames generator tool effectively delivers the necessary code to you to copy and paste into your website (or in this case Canvas site).

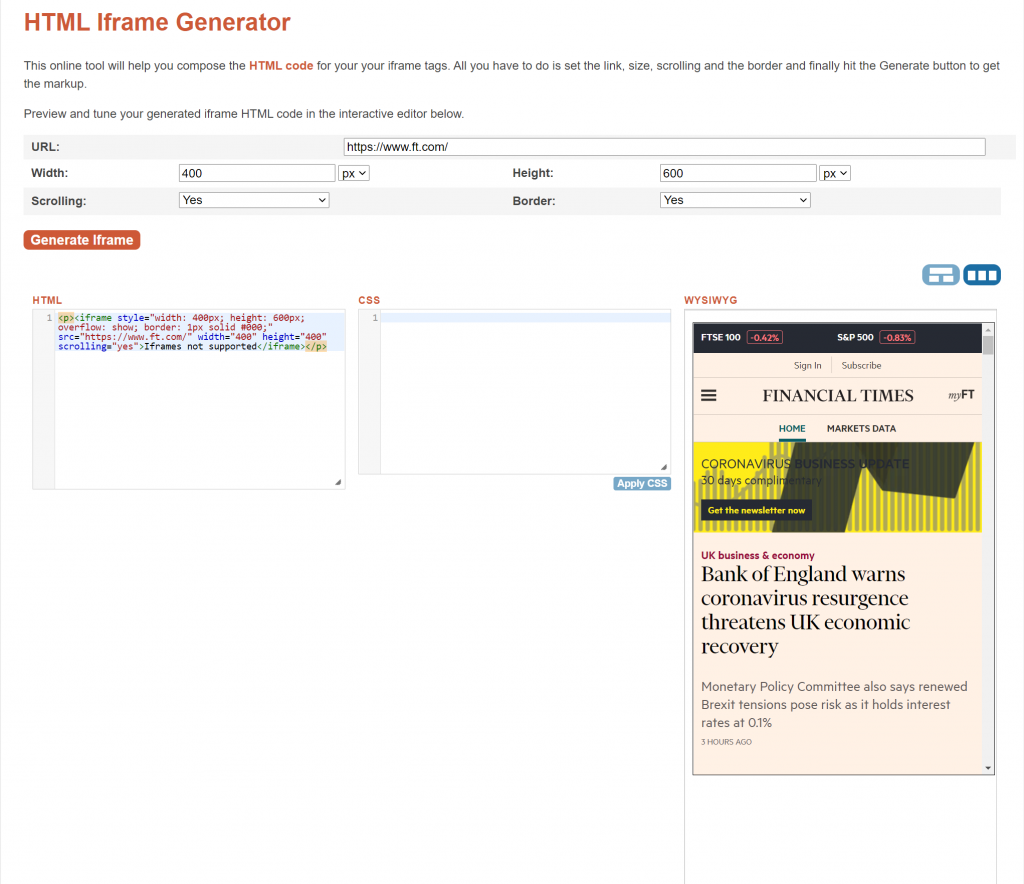
Simply copy and paste the website you want to create a window from your Canvas page to. For example if you want a page which links directly to the Financial Times webpage, I would enter the URL, and then change the width and hieght to how I wanted them. In this particular tool above I’ve found it’s easier to work in px (pixels) than percentages (%) so change both to px. 400px by 600px is generally a good window size for Canvas. This particular iFrame generator is very useful as it has a WYSIWYG tab for you to automatically see what it will look like when it pulls through.

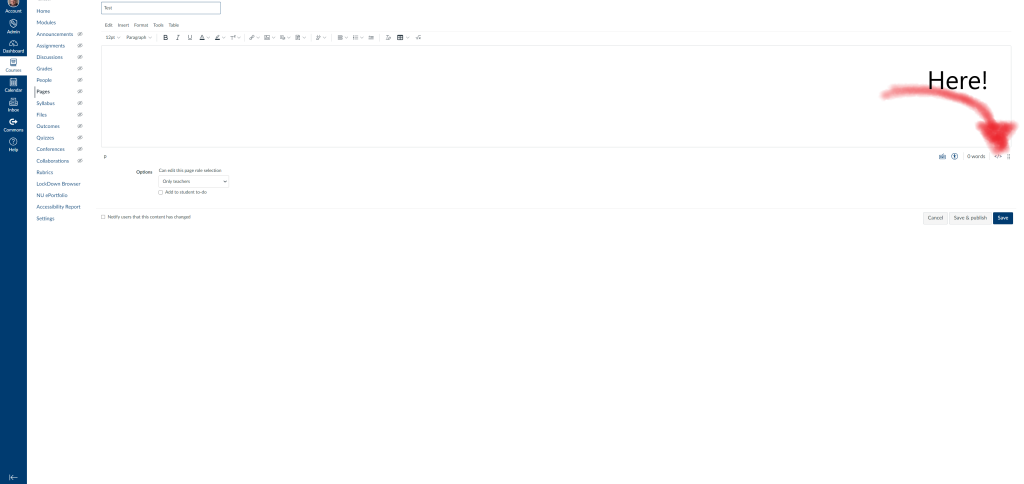
The next step is simply to copy and paste that HTML code. No coding needed. Copy. Go to your page in Canvas and press in the bottom right hand corner Switch to Raw HTML and then simply paste your code in and save.

Your webpage should now have a little “window” to the other site embedded in it. As a tip, iFrame links to the landing page of a website usually work well, beyond that they often will not work well at all, so linking to the main FT page is fine, but attempting to put a window to the markets data section of the website in a page fails. The WYSIWYG screen will give you a good indication as to whether it’s working or not before you copy it over of course.

Turnitin marking for numerical based 24 hour take home exams – Dr Andy Holden

Prior to April this year my experience of using Turnitin was limited to attending the training courses organised by NUBS and run by LTDS mainly as the modules i taught were assessed through 100% end of course exams. I had no practical hands-on experience of how to set up or mark using Turnitin.

The reality of having to use Turnitin for the upcoming 24 hour take home exams led me to find a way of marking summative exams online that was both pragmatic and gave me the basic statistical information I needed. This short blog is intended to disseminate how I mark with Turnitin through two short videos and provide links where further information can be found.

My first video shows the type of submissions we are likely to get in A&F (being a mixture of some type, some scanned images, some cut and pasted Excel) and how I marked them using QuickMarks.

The LTDS resources are excellent and I recommend:

This method of using QuickMarks within Turnitin to create a bank of marks that i could ‘drag and drop’ was fine but it meant I had a lot of manual adding up to do and it did not give me a breakdown of marks per question or section unless I kept a separate spreadsheet. As a consequence I looked for a solution to this and found Grading Form.

My second video shows how I use Grading Form to reduce the amount of manual additions and also remove the need for keeping a separate spreadsheet.  The Grading Form can be set up so that a mark can be entered for as many questions and sub questions as required and then Turnitin will automatically add these up to give a total. In addition, a spreadsheet can be exported with the mark per question or sub question detail. The Grading Form can be attached to an assessment and then is available for all scripts submitted. Please note care is needed with this as a Grading Form should only be attached once to an assessment. If a second Grading Form is attached to the same assessment then any prior marking done on that assessment will be deleted.

Unfortunately there is no LTDS screencast on Grading Form at present but LTDS are running regular webinars and hold regular drop in sessions where they are happy to answer any queries – i know because i have used them a lot!

Happy to help with queries but also don’t forget LTDS are the experts in this and are very friendly!

Experiences of Remote Delivery: Dr Benjamin Bader

It is not easy to deliver a two-hour lecture remotely. Especially, if the lecture was not designed for online delivery in the first place and in its original version does have interactive elements with the students and draws on their live input. Hence, simply narrating the slides with a voice-over and put them online is sometimes not the best option. Dr Benjamin Bader explains how using Camtasia software helped him to tackle this challenge:

When thinking about how to best move my content online, I quickly realized that ReCap is not the best option. While this allows for simply recording the lecture “in one go”, it is hard to include additional elements and overall, a bit inflexible. I was mentioning this to a colleague from Germany during a research call and he asked me, why I am not using Camtasia. Although I am generally interested in tech and thought I was up to date, I must have looked quite puzzled when I heard “Camtasia”. So my colleague went on with his “sales pitch” that eventually got me hooked. Just a disclaimer, neither he or me are affiliated with Camtasia or do get any sort of commission. Just two academics dealing with the same problem (How on earth do I get my class online quickly and with a good learning experience for students?!) and helping each other out. If you are dealing with the same problem I was, I am more than happy to share my experience with you.

Essentially, Camtasia is a hybrid between a video editor and graphics software that comes with an integrated screen recorder. The core benefit here is that you can do both, include slides in a video and narrate as you would do in the lecture – or do a mix of both. At the same time, you can insert additional content such as quizzes, text, music, animations, and so on. Camtasia offers very good tutorials and besides that, the software is really intuitive and easy to learn. If you have ever worked with a video editor before, you will find yourself at home quite quickly. And if not, don’t worry. Besides a lot of online tutorials, it comes with a demo project where you can test everything and experiment before you take on your first live project.

After playing around with the demo for a while, I decided to get started making an intro, just to get used to how the software works and to have a visually appealing start of my lecture. If you want to check out the result, please visit here. The music and the moving background are included in Camtasia and there is a decent library with content available. Slides are mine, as you can see, I also added a little box which I am making use of during the online lecture to add content. This works by simply adding a text box in the software and leave it for as long as you need it. You can also include other things, such as the smiley in the video, completely up to you. Just like a large puzzle, piece by piece you add elements, slides, audio, and build your lecture. When you are done, you can create an .mp4 video or export directly to Youtube etc.

Another benefit for me was that after having put together the visuals, I could add my narration where I needed it when I needed it. So even for one single slide, I could create several shorter audio files, explaining different parts. That way, I could re-record if I had made a mistake. And it is easier to think about the overall storyline. A process of think – record – pause – think – record – pause (and a good number of takes for some parts, so if you are a perfectionist, you need patience). In the end, the viewer of the video won’t be able to tell the difference. For them, it is one continuous audio track. Now, if you are thinking the re-recording is time-consuming: yes, a bit, but it would have taken me much more time to record everything in one go because I probably would have done several takes of the entire lecture and still been much less happy with the end result.

If you’re hooked too, what do you need to get started? Eventually, other than the software itself, I guess three things. First, you need to get comfortable hearing your own voice on tape. For me, that’s still somewhat odd, but I am getting used to it. Second, you need to be willing to experiment and give some thought to how you adapt your content for a better student experience. If you simply want to give the lecture as you would do in the classroom, you better stick with ReCap. There is nothing wrong with doing so, however, you will only unfold Camtasia’s potential, if you use its features. And finally, this shall not be omitted here, you need some proper hardware, especially if you do longer lectures. I realized that in my first one hour lecture, with each additional minute of content the software responded a bit slower and the final rendering process (no worries, the software does all that for you and compiles one usable file) took quite a while. However, there’s an easy fix: break it down into 30ish-minute bits and create separate projects. You can easily combine the parts later on.

If you are interested in learning more, please reach out to me. I will be offering a webinar on Camtasia as well and am happy to share my experiences with you. For further details from the software publisher, please visit https://www.techsmith.com/video-editor.html.

Many thanks to Dr Benjamin Bader for sharing those experiences. If you wish to share your own experiences of moving to remote & online delivery please do get in touch to share your personal story. Finally, if you haven’t already done so please join the Education and Technology Forum Microsoft Teams site for more information and frequent updates.

Experiences of Remote Delivery: Dr Rebecca Casey

Sometimes when starting out it’s useful to have a bit of advice from someone who has already gone through the experience. In the following Blog post Dr Rebecca Casey shares some of her practical and technical lessons learnt so far from her move to remote delivery:

Recording synchronous teaching sessions can be tricky. On Day 2 my home bandwidth was dismal and therefore experienced trouble downloading the slide deck from Blackboard. One of the students kindly offered to share their screen so that the rest of the class could follow the slides on MS Teams. It was the only thing I did differently to the previous teaching session and therefore it is possible this may have interfered with the successful recording of the session. Usually the recording will appear in the chat feed a few minutes after the session has finished. If you cannot see it then log into MS Stream and go to ‘My Content’ – you should see a copy of it here. If you are using Zoom there is an option for ‘automatic recording’ when you are setting up the meeting – definitely do this so that is one less thing to think about during synchronous delivery;

Establish a convention for managing conversation because i) if too many people have their mics switched on it will create an awful echo and ii) people will be constantly talking over one another. You will be focussed on your lecture so it is worth nominating one of your students as a facilitator. If students have a question or want to comment they can signal using ‘Question’ or ‘Comment’ in the chat feed. The facilitator can then field these to you one by one.

I tried using ‘Notes’ to encourage students to post their own contributions/thoughts/reflections during and after class but this is proving patchy – only a couple of students use it. It requires more structure if it is going to work successfully e.g. incorporate such activities into the learning aims for the session so that expectations are clear.

Many thanks to Dr Rebecca Casey for sharing those experiences. If you wish to share your own experiences of moving to remote & online delivery please do get in touch to share your personal story.

Finally, if you haven’t already done so please join the Education and Technology Forum Microsoft Teams site for more information and frequent updates.

Experiences of Remote Delivery: Professor Johnathan Sapsed

Remote delivery of a session designed to be taught as a three-hour block module on Managing for Innovation for the MBA is a real challenge but as Professor Johnathan Sapsed explains:

I set up the class as a channel in MS Teams and organised participants into groups. Their task was to generate present ideas and design an app and underlying business model for people self-distancing and quarantined.

The students quickly learned how to video-meet and collaborate on the slide deck within Teams. They did a wonderful job with the three presentations, which we all viewed and discussed in a Teams meeting. 

It was really quite inspiring the ideas they came up with for community support, showing local supply chain data to reassure panic buyers, and online mental health services. Although the session was different from that initially planned, the students were really grateful that the module was still running and appreciated the adaptability of the tutor and class. Remote delivery required collaborative learning as we went along, and overall the session was a great success. I asked students to reflect on the online experience compared to the co-located class, and one even said he thought it was better, as he felt everybody could contribute more easily, including the more introverted

Many thanks to Professor Johnathan Sapsed for sharing those experiences. If you wish to share your own experiences of moving to remote & online delivery please do get in touch to share your personal story.

Finally, if you haven’t already done so please join the Education and Technology Forum Microsoft Teams site for more information and frequent updates.

LinkedIn Learning: Free Resources for Educators

LinkedIn Learning have contacted NUBS to let us know they have made a large number of training videos free and available for all educators worldwide. They have posted a very useful Blog post here which outlines their offering and the background. In addition they have made available a full course for everyone on remote working.

Clearly at this time this is very, very welcomed. I have picked through some of the videos and drawn up a list of possible “Essential” videos below for staff unfamiliar with some key tools:

Office 365 for Educators

Learning Microsoft Teams for Education

Microsoft Teams Tips and Tricks

Learning Zoom

Teaching with Technology

Managing Virtual Teams

Finally, if you haven’t already done so please join the Education and Technology Forum Microsoft Teams site for more information and frequent updates.

Remote Delivery: Updated Lecturers Toolkit + Content Providers

A key resource on this Blog is the Lecturers Toolkit tab above, which we will try and keep as clear as possible to the key links which staff may need. In the latest update I have tried to concentrate on the core links coming from our colleagues in LTDS for Lectures and Seminars, and a useful video on Online Teaching options here & LTDS Support (including drop-ins and webinars for remote teaching delivery (link here).

Furthermore I’ve provided links to Key Tools for Online Delivery including Staff Office 365 Professional Plus download (link here) and the Panopto Software Download (Video: link here & main staff guide here)

In addition to internally provided resources, external commercial providers of content such as Pearson have kindly contacted us to offer free access to there resources. Please do explore these offers of free options as online supplementary material from reputable large providers such as Pearson to your online provision. However I would suggest that you also consider the module learning outcomes, the objectives of the resources and what learning outcomes they better enable, the time students have left to engage with them and the student learning experience overall before deployment.

Finally, if you haven’t already done so please join the Education and Technology Forum Microsoft Teams site for more information and frequent updates.

Preparing for Remote Delivery of Teaching and Learning: Training links for synchronous delivery using Microsoft Teams

For synchronous delivery with less than 150 students Microsoft Teams could be a viable platform to consider for seminars, tutorials and other small group activities (Microsoft say it will take up-to 250, but I’ve read reports of instability at numbers over 200). The University Microsoft 365 Learning Pathways site has a number of excellent guides on the use of Teams, including:

• Video guides on remote and home working– collaborating and scheduling virtual meetings.

• How to record meetings for asynchronous distribution after the event (link here)

Microsoft For Education themselves also have some very helpful free on-demand webinars on using Teams for classrooms. (Link: https://microsoftteams.eventbuilder.com/TeamsEducation). In particular of interest will probably be:

• Online classes & lectures with all your students: Continue instruction and coursework with an online Class Team https://microsoftteams.eventbuilder.com/event/15026

• Online meetings with student groups or anyone via their email: Arrange ad-hoc meetings with anyone across your institution https://microsoftteams.eventbuilder.com/event/15027

In addition to those on-demand sessions, there is a Microsoft For Education webinar on 17th of March at 3pm (GMT) called “Teams Introduction for Educators and Staff”. I would strongly if at all possible consider registering for that webinar if you’re considering using teams in your teaching: https://microsoftteams.eventbuilder.com/event/15315

If you would like to find out more about using Teams to support your delivery the Getting Started with Teams guide is a great starting point.

Finally, if you haven’t already done so please join the Education and Technology Forum Microsoft Teams site for more information and frequent updates.