Arron

Nov 302020
 

Install Fail2Ban and configure some default settings:

sudo yum update
sudo yum install epel-release
sudo yum install fail2ban
sudo nano /etc/fail2ban/jail.local

A typical template for jail.local looks like this:

[DEFAULT]
bantime = 43200
findtime = 600
maxretry = 3
banaction = iptables-multiport
backend = systemd

[sshd]
enabled = true

ignore = a list of I.P address that you do not wish to ban

bantime (seconds) – typical values are:
3600 (1 hour); 10800 (3 hours); 21600 (6 hours)
43200 (12 hours); 86400 (24 hours)

maxretry is the number of failures before a host is banned. Default value is 3.

findtime (seconds) and maxretry are related. Combined, they dictate the number of attempts (maxretry) within a given timeframe (findtime) which results in a ban. Default value of findtime is 600, which means that when fail2ban counts 3 failed attempts, within the last 10 minutes, it will ban the querying IP address.

Good values for findtime are:
300 or 600 (300 seconds = 5 minutes, 600 = 10 minutes)
3 for maxretry

Enable Fail2Ban at reboot, start the service, and check status:

systemctl start fail2ban
systemctl enable fail2ban
systemctl status fail2ban
fail2ban-client status
fail2ban-client status sshd
Nov 302020
 

Render spaces as dots – useful for sanity-checking files.
Go to settings; type “white space”
In the first option – “Render Whitespace” – change this from “selection” to “all”

The default colour scheme can make it difficult to see the dots. The colour can be changed. The following is from https://thenetworktransit.com/whitespace-in-vs-code/
who did all the heavy lifting here i.e. scouring the correct VS setting that is required.

Go to settings; type “Color Customization”
3rd option down – Workbench: Color Customization – click “edit in settings.jason”
Add the line:

"editorWhitespace.foreground": "ffa500"

E.g. it should look like this:

{
"editor.renderWhitespace": "all",
"workbench.colorCustomizations": {
"editorWhitespace.foreground": "ffa500"
}
}

Quit and relaunch Visual Studio

__________________________________

Jun 072018
 

These instructions are for University provisioned Windows 10 laptops.

Please note that University Common Desktop PCs (both Windows 7 and 10) will automatically add the photocopiers as a printer called ‘IGM Copier’.

If you are using a private/personal laptop (Windows 7, Windows 10, Apple, or Linux), please come and see us in room B245, 2nd floor, BioMedicine West building, for further advice.

Ensure that you have an internet connection
Click on Windows logo
Click settings icon (cog)
Click Devices
Click Printers & Scanners
Click +Add a printer
Wait, while Windows lists every possible printer it can see. This is not helpful, in this case!
Scroll down the list and click ‘The printer that I want isn’t listed’
Click ‘Select a shared printer by name’
In the box underneath, carefully type \\medson\
When you press that final \ key, a drop-down menu will appear. Scroll down the list and choose ‘IGM Copier’
The address/name of printer should now read as \\medson\IGM Copier
Click Next
Wait, while Windows configures the printer
Click Next
Click Finish

Feb 212018
 

* Confirm NIC id/link speed info:

dmesg | grep -i duplex

______________________________________

* ** To add – how to configure network settings from command line/minimum install only * ***

______________________________________

* Use iPERF for ‘real world’ connection stats:

yum install iperf

Place one PC in server mode:

iperf -s

On client PC:

iperf -c <ip.address.of.server>

______________________________________


Dec 062017
 

*** Install the Windows Subsystem for Linux:

https://msdn.microsoft.com/en-us/commandline/wsl/install-win10
(Ubuntu, Ope*S*se, and SL*S are currently available. Fedora is due at some stage)

It is possible that the WLS should mount any pre-existing Windows drives automatically. This was not the case for me, so below are workarounds. It is possible that, as WLS matures, these steps are not required.

*** Add your *existing* Windows drives e.g. your University research folders

In this example, our Windows 10 PC automatically adds the Institute Z: and O: drives at login. We can use these pre-existing Windows drives and mount them.

IGM example – O: and Z: drives:

$ sudo mkdir /mnt/o
$ sudo mount -t drvfs O: /mnt/o

$ sudo mkdir /mnt/z
$ sudo mount -t drvfs Z: /mnt/z

OR directly mount University drives. In this example, we will mount the Flow Cytometry drives (amend your drive letters; these are what we use here at the IGM). S: drive represents the live/instrument data; R: drive represents archived FC data.

Example 1:

$ sudo mkdir /mnt/s
$ sudo mkdir /mnt/r

$ sudo mount -t drvfs '\\fsarchive.ncl.ac.uk\IHGScratch\FLOWCF' /mnt/s
$ sudo mount -t drvfs '\\fsresearch2-dbx.ncl.ac.uk\IGM_FLOWCF' /mnt/r

Example 2:

$ sudo mkdir /mnt/s
$ sudo mkdir /mnt/r

$ sudo mount -t drvfs '\\campus.ncl.ac.uk\scratch\IHGSCRATCH\FLOWCF' /mnt/s
$ sudo mount -t drvfs '\\campus.ncl.ac.uk\IGM\FLOWCF' /mnt/r


Dec 062017
 

This is currently just a list of resources kindly provided by Gary Wright, Karen Bower, and Gavin Younger.

We hope to add our own content, as we investigate EasyBuild further.

EasyBuild:

NCL EasyBuild sharepoint
https://newcastle.sharepoint.com/pss/nuit/infrastructure/isg/Services/HPC/easybuild/

EasyBuild official documentation
http://easybuild.readthedocs.io/en/latest/Introduction.html

EasyBuild community github
https://github.com/easybuilders

EasyBuild easybuild-easyconfigs
https://github.com/easybuilders/easybuild-easyconfigs

EasyBuild verdurin/easybuild-easyconfigs-devel: Development
https://github.com/verdurin/easybuild-easyconfigs-devel

NCL Rocket HPC Service
http://www.ncl.ac.uk/itservice/research/hpc/


Nov 062017
 

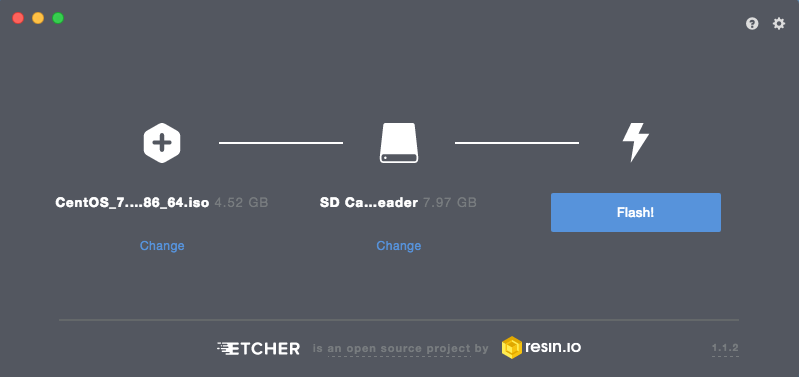
Etcher website  < https://etcher.io/ > allows you to quickly and easily create bootable USB flash drives, based on ISOs. There are installers for Mac OS X (native app and homebrew); Windows; Linux (AppImage, deb, and rpm). There is also a command line version available for Mac/Linux and Windows.

We have used Etcher for creating CentOS installers and have found it to be very reliable. A superb, no fuss, cross-platform solution.

Etcher Mac OS X version