A Cross-School Multidisciplinary Forum for Promoting, Supporting and Celebrating Excellence and Innovation in Education and Technology at Newcastle University Business School
As a number of our teams get used to the more advanced functionality of the tools we have for education recording, it becomes apparent that our Tools like Panopto can’t do things like split screening and other more advanced functionality. Our very own Prof. Nils Braakmann has therefore written a very helpful guide on getting to grips with OBS Studio, a free application which allows for more advanced features.
I thought I’d share in this latest update two very quick and dirty ways to add a bit of colour and pizazz to your Canvas site with some very easy embeds. These are much less technical in their nature than the previously discussed FT Headline API, and very fast to implement.
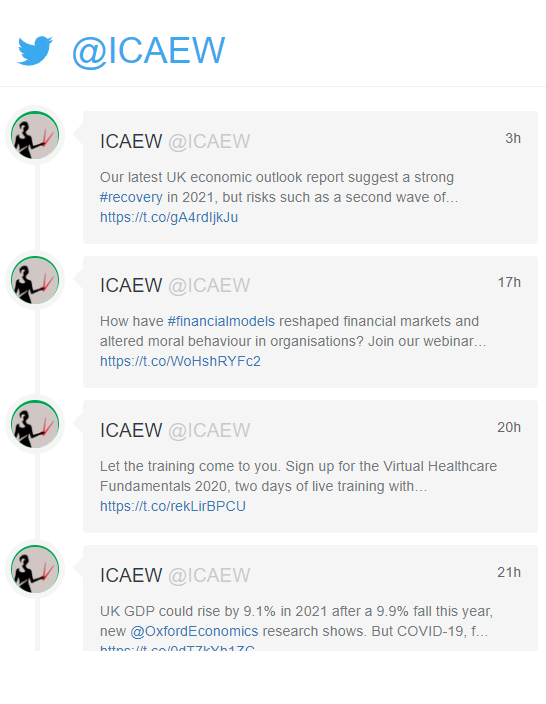
The first is Twitter embeds, which is the ability to use the Twitter App in Canvas to have a constantly updating feed from a particular Twitter account. This can be particularly useful to highlight Professional Body news, for example ICAEW below, or specialist news feeds, for example Marketing Today etc.. It is less targetd or searchable than a specific tailor made widget like the FT Headline, but very fast and lightweight to impliment.
Instructions:
Go to Settings in your Canvas Course itself and add the Twitter app to your module (Apps in top tab, search Twitter) – this takes a couple of minutes to sync the very first time you do it, so I’d suggest going away, grabbing a coffee and then coming back to the rest of the instructions.
Open/Create the page where you want the Twitter feed to appear
Click on the “Apps” icon and select Twitter (you’ll need the first time to select “view all” but in future you can select from the fav. drop down as it’ll remember)
Complete the form and click embed.
I’d strongly suggest avoiding using the #hashtags element to it, because you’re at the whim of fate as to who may hashtag anything, but certainly linking to an authoritative news Twitter account or professional body account should normally be useful and to embed to add context, professional insights or current events for students.
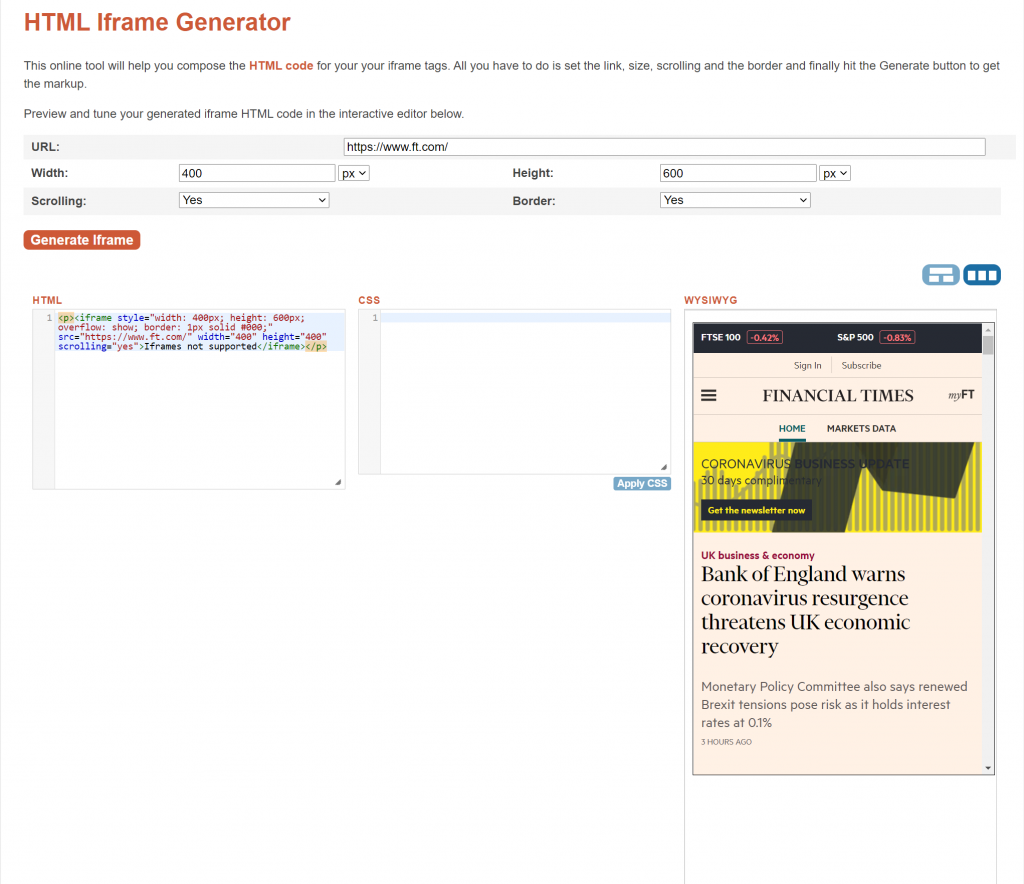
The second type of embed which I’m going to discuss is very much an “embed any webpage” in a window in your page solution. By adding an iFrame. Now usually adding an iFrame might be a concern to individuals who have no experience (or desire!) to understand HTML coding. However in this case, we’re going to make it very easy by using a website tool which will automatically do the coding for you. No coding experience is necessary.
I use this website here, but there are a number of very similar iFrames generator websites available. An iFrames generator tool effectively delivers the necessary code to you to copy and paste into your website (or in this case Canvas site).
Simply copy and paste the website you want to create a window from your Canvas page to. For example if you want a page which links directly to the Financial Times webpage, I would enter the URL, and then change the width and hieght to how I wanted them. In this particular tool above I’ve found it’s easier to work in px (pixels) than percentages (%) so change both to px. 400px by 600px is generally a good window size for Canvas. This particular iFrame generator is very useful as it has a WYSIWYG tab for you to automatically see what it will look like when it pulls through.
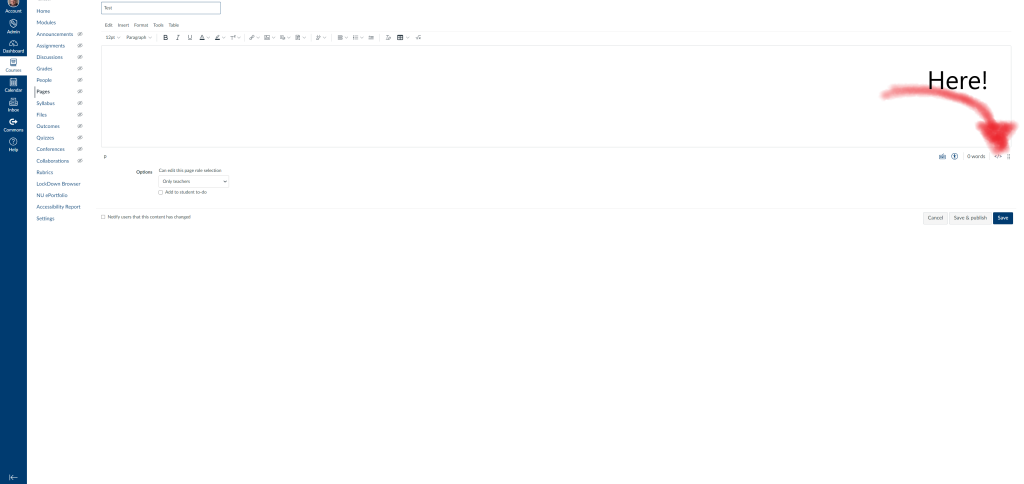
The next step is simply to copy and paste that HTML code. No coding needed. Copy. Go to your page in Canvas and press in the bottom right hand corner Switch to Raw HTML and then simply paste your code in and save.
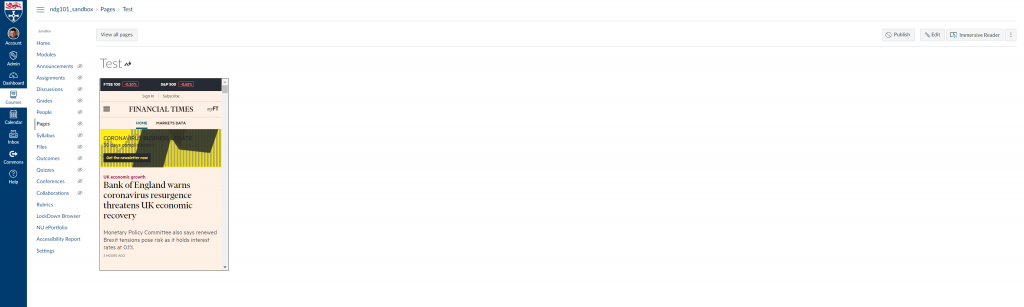
Your webpage should now have a little “window” to the other site embedded in it. As a tip, iFrame links to the landing page of a website usually work well, beyond that they often will not work well at all, so linking to the main FT page is fine, but attempting to put a window to the markets data section of the website in a page fails. The WYSIWYG screen will give you a good indication as to whether it’s working or not before you copy it over of course.
Prior to April this year my experience of using Turnitin was limited to attending the training courses organised by NUBS and run by LTDS mainly as the modules i taught were assessed through 100% end of course exams. I had no practical hands-on experience of how to set up or mark using Turnitin.
The reality of having to use Turnitin for the upcoming 24 hour take home exams led me to find a way of marking summative exams online that was both pragmatic and gave me the basic statistical information I needed. This short blog is intended to disseminate how I mark with Turnitin through two short videos and provide links where further information can be found.
My first video shows the type of submissions we are likely to get in A&F (being a mixture of some type, some scanned images, some cut and pasted Excel) and how I marked them using QuickMarks.
This method of using QuickMarks within Turnitin to create a bank of marks that i could ‘drag and drop’ was fine but it meant I had a lot of manual adding up to do and it did not give me a breakdown of marks per question or section unless I kept a separate spreadsheet. As a consequence I looked for a solution to this and found Grading Form.
My second video shows how I use Grading Form to reduce the amount of manual additions and also remove the need for keeping a separate spreadsheet. The Grading Form can be set up so that a mark can be entered for as many questions and sub questions as required and then Turnitin will automatically add these up to give a total. In addition, a spreadsheet can be exported with the mark per question or sub question detail. The Grading Form can be attached to an assessment and then is available for all scripts submitted. Please note care is needed with this as a Grading Form should only be attached once to an assessment. If a second Grading Form is attached to the same assessment then any prior marking done on that assessment will be deleted.
Unfortunately there is no LTDS screencast on Grading Form at present but LTDS are running regular webinars and hold regular drop in sessions where they are happy to answer any queries – i know because i have used them a lot!
Happy to help with queries but also don’t forget LTDS are the experts in this and are very friendly!
At Newcastle University Business School all staff and students have free access to the Financial Times through the library . This allows staff and students to access a number of features of the Financial Times, including developing article lists which can be shared with students, having keyword news alerts for stories on certain subjects, high quality newsletters e-mailed to your inbox on a selection and range of issues.
One of the more powerful tools at a lecturers disposal is the ability to use the free FT Headline API functionality to embed a scrolling and live, constantly updated feed of news stories into a VLE (Be that VLE Canvas or Blackboard). This potentially puts alongside your lecture materials a large amount of contextual, real world, news stories about what is perhaps happening regarding the issues explored in your lecture that week.
The above picture is an example of a widget you can embed into your Blackboard site. The rest of this Blog post will lead you through the three main areas to embed this into your Blackboard site.
How to get your free FT Headline API Code
The first thing you’ll need is a FT Developers Key for creating a Headline API. This sounds a lot more grandiose than it really is, and takes just a few straightforward steps:
The first thing you’ll need to do is go here: https://developer.ft.com/portal/ and sign in. Enter your e-mail address and press next, on the next page saying sign in press under the box saying SSO Sign In “Or use your FT password”, press that. Then sign in using your FT password.
This takes you to the FT for Developers page. On the right hand side under dashboard it says API Catalogue, click that, the click “Request an API Key”.
Your new API Headline key will now be shown to you, it will look like a very long line of letters and numbers. Save that and keep it safe. FT will also send you an e-mail with it in to make things easier.
Openft.org is itself is a straightforward and surprisingly user friendly website for creating FT Headline widgets. The first thing you need need to do is copy and paste you FT API Code into the box saying API Key and then press reset to clear the form. Pressing reset after inputting the API key is important, and problems can occur if you don’t.
The website should now be ready to create widgets for you. The website has two clear sides to it. The left hand side is the input side in which you’ll input all your desired search options. The right hand side is the visualisation of the output, and contains all the tools to further adjust and customise the widget you’re creating.
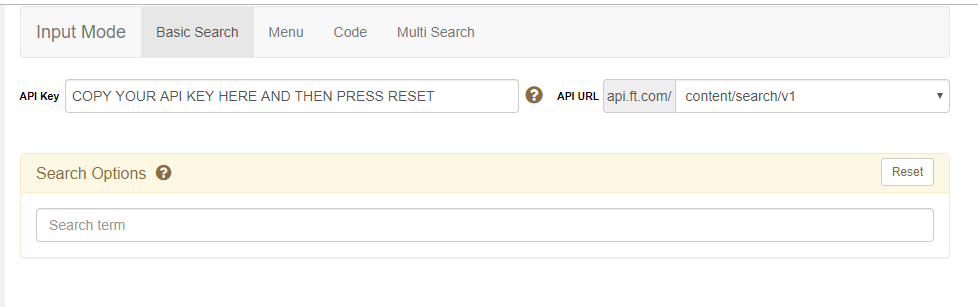
You now have a number of different search options. The main three you might use are Basic Search, Menu and Multi-search.
Menu is useful if you have particular themes you’re interested in. Just Click on Menu and then you have a number of tick boxes you can click to create a custom widget on Brexit (or similar). Basic Search is useful if you have a straightforward concept or issue you’re wanting to drill into.
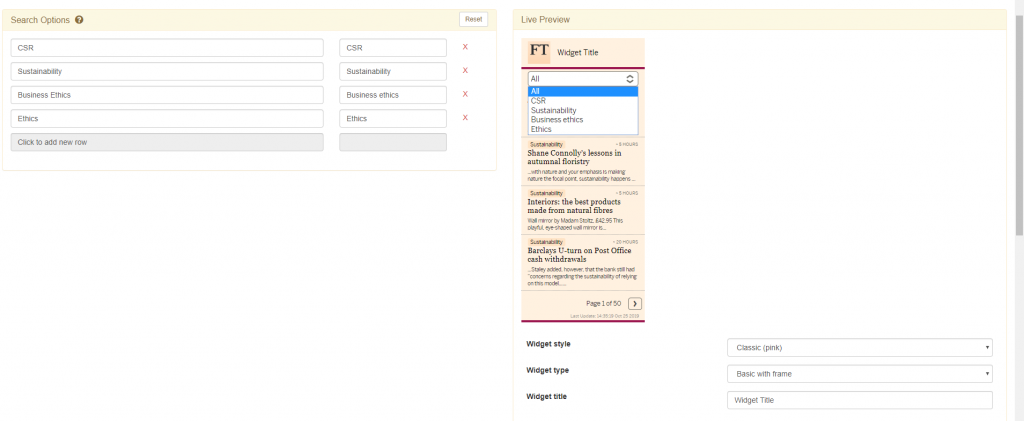
Increasingly I find myself using Multi-Search. Multi-Search allows you to search a range of keywords which could bring up articles you’re interested in. So for example if I was giving a lecture on Ethics and CSR. I may have a range of 4-5 different search terms which I might want the widget to bring back results on. The second search box is a categorisation box which is helpful look at a particular search term, it defaults to “All”.
On the right hand output panel the element you’ll definitely want to use is Widget Title to give your output search box a name, however there are a wide range of other customisation options for you to explore.
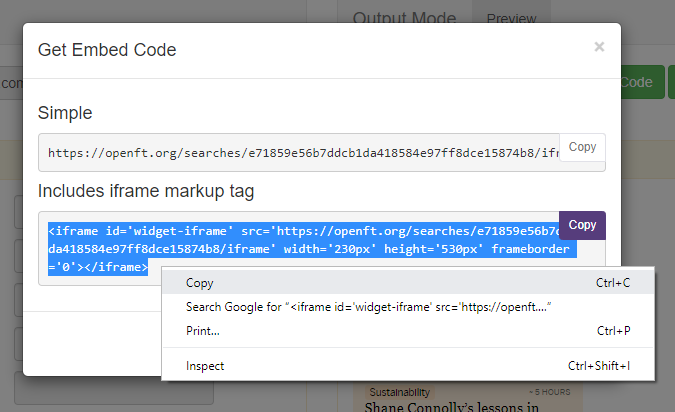
Once you have the widget just how you want it. Simply click Get Embed Code and copy the bottom box (don’t worry at all about how complex it looks, you don’t need to know any coding at all, this is simple copy and paste of this code).
Embedding your Widget into Blackboard
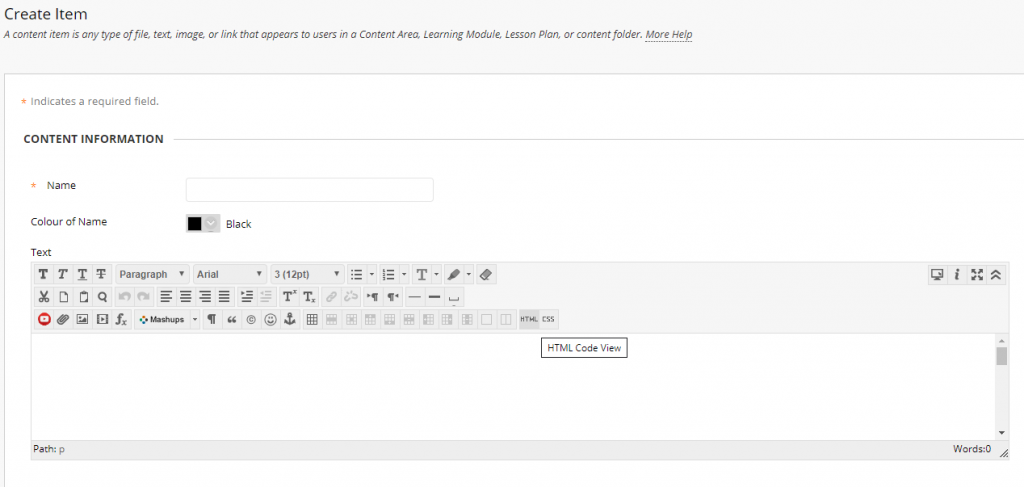
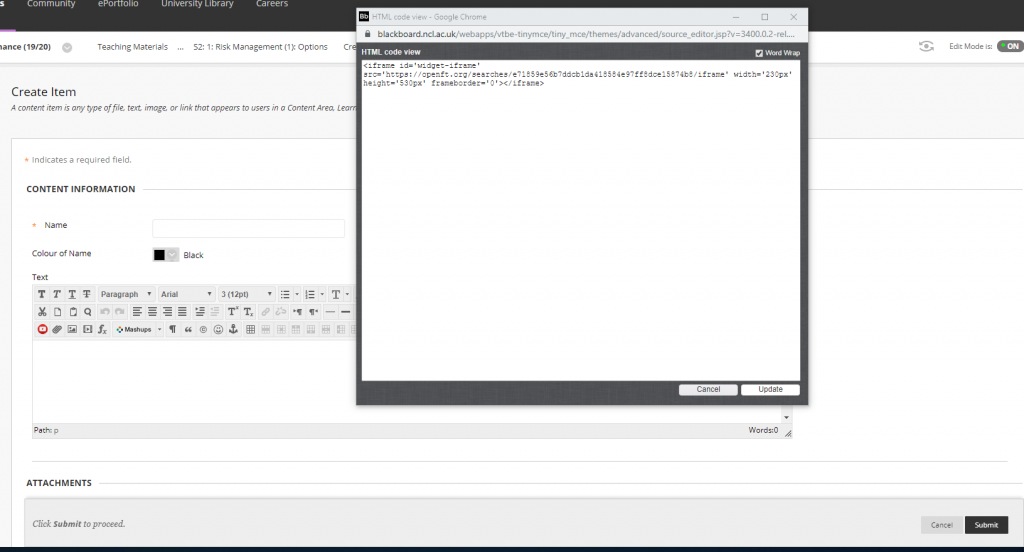
Deciding where to place your widget it perhaps the best place to start. I personally place it beside the lecture materials to add some context. The process now you have your embed code is very straightforward. Simply click Build Content, then Create Item.
In the text box now press the HTML Button (see below):
Now simply paste your embed code from the Openft.org site into the box which pops up and then press Update.
Then just name your Item (Context: Business Ethics in the News or similar), and press Submit. You can now move this item around just like you would any other Blackboard or VLE item.
I hope you’ve found this “How-to” Guide useful! Please leave any tips or comments in the comments section below.