Outdoor Recording

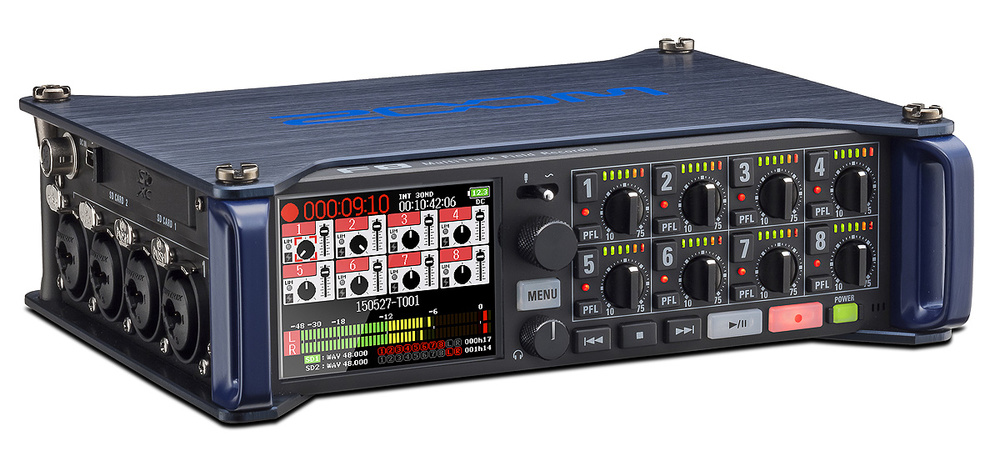
As a music student at Newcastle University, you have access to a wide range high-quality microphones and recording equipment. While these are mostly intended for use in the recording studio or live performance, we also have a range of battery-powered recording devices which enable you to record outdoors. These range from handheld devices with built-in microphones like the Zoom H1n, right up to the Zoom F8, which has 8 XLR inputs for recording with whichever mics you choose.

These devices are largely intended for applications such as field recording, film audio, documenting interviews etc., but in this post we will look at a setup that can be used to make a high quality recording of instruments and vocals, without needing to be near any plug sockets!

The video above is a live recording of an EP by three of our alumni: Ben Fitzgerald (AKA Memphis Gerald) accompanied by Anna Hughes and Sam Baxter. We were able to capture a nice high-quality recording using a setup consisting entirely of equipment that is available to you during your time in the department. The mixing and processing of the audio was fairly minimal thanks to the choice and placement of microphones.

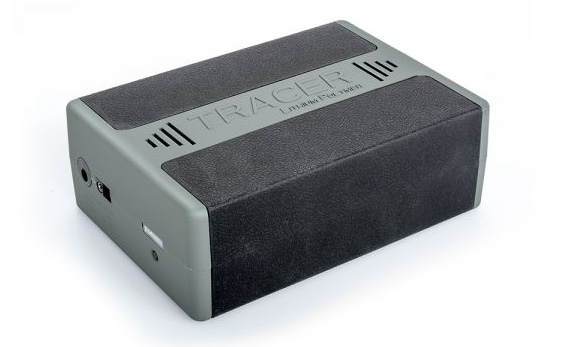
I used a Zoom F8 powered by a Tracer battery pack. The F8 gave me 8 inputs to play with and the Tracer was still close to fully charged after a couple of hours of recording. If you book out 2 Tracers you should have more than enough power for most recording sessions!

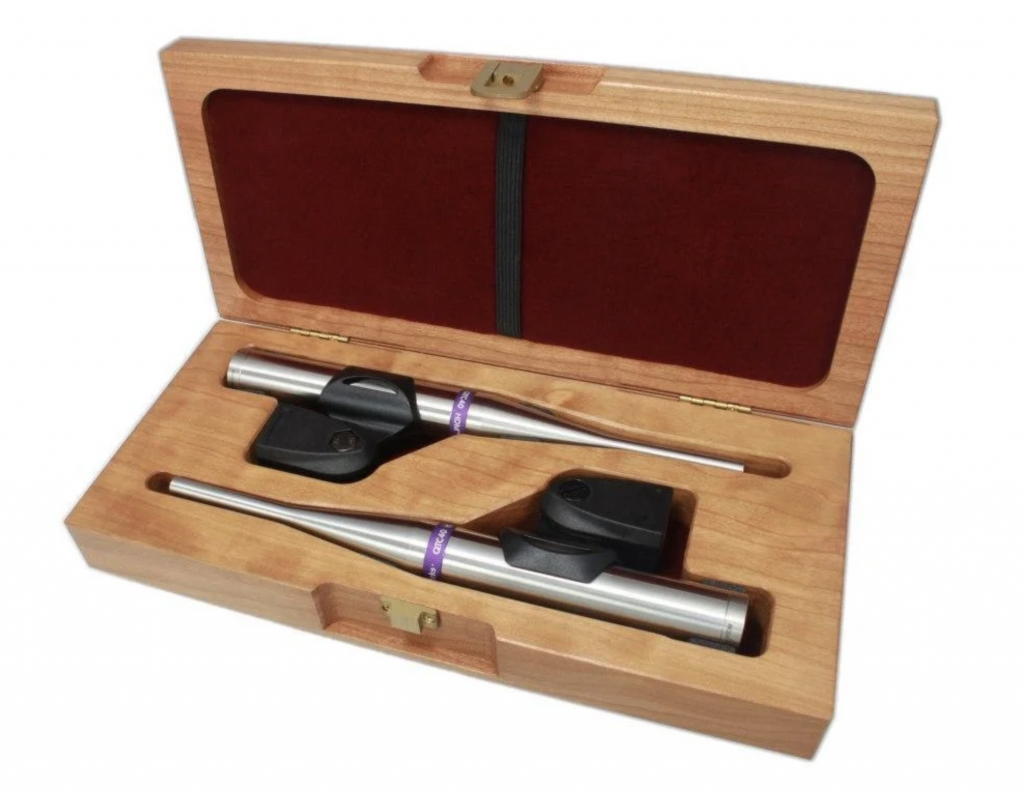
I used a pair of Earthworks QTC40s as a stereo pair in the first two channels of the F8. These are extremely good quality omnidirectional reference microphones with a very flat, ‘uncoloured’ frequency response (meaning they should sound pretty much the same as what you are hearing with your ears). These acted as an ambient stereo pair, fulfilling a similar purpose to a pair of drum overheads or room mics. I placed these quite far from the musicians (about 15 feet away, pointing towards them) in order to capture a decent amount of ambient sound as well as a nice stereo image of the group as a whole (skip to 9.38 for nice bit of birdsong!). I could/should have used a proper windshield like the Rode Blimp, but to keep everything compact and easy to transport I just used small foam windshields, held in place with elastic bands.

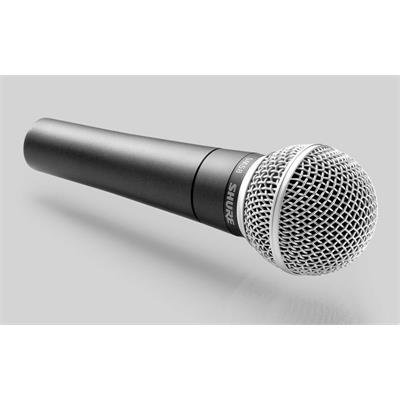
For the vocals, I used 3 Neumann KMS105s. These are hand-held condenser mics, similar in size and shape to a Shure SM58 but with a higher quality sound overall, particularly in the high-end detail. An SM58 might be better outdoors, as they have a more focused polar pattern and so pick up less background noise, but I found KMS105 worked well on this occasion since it wasn’t too windy. I also added basic foam windshields to help minimise unwanted noise (these are not bookable but just ask at the loans hatch if you need any).

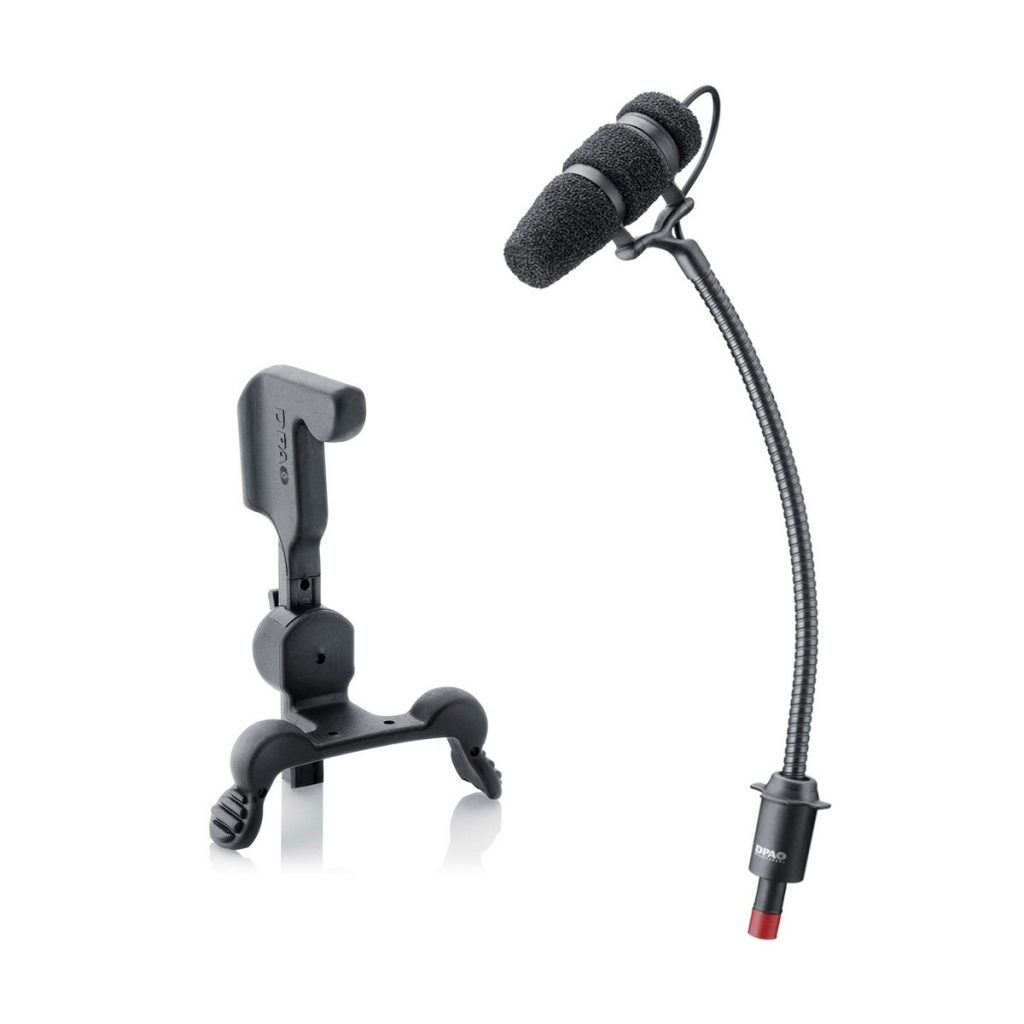
For guitar and violin, I used DPA 4099s. These are also condenser microphones, but in a very small form which allows them to be placed very close to the source without being intrusive to the player. This proximity helps with the relative levels of background noise that can be an issue with condenser microphones. These microphones come in a set of four, along with various different clips that allow them to be easily attached to most instruments.

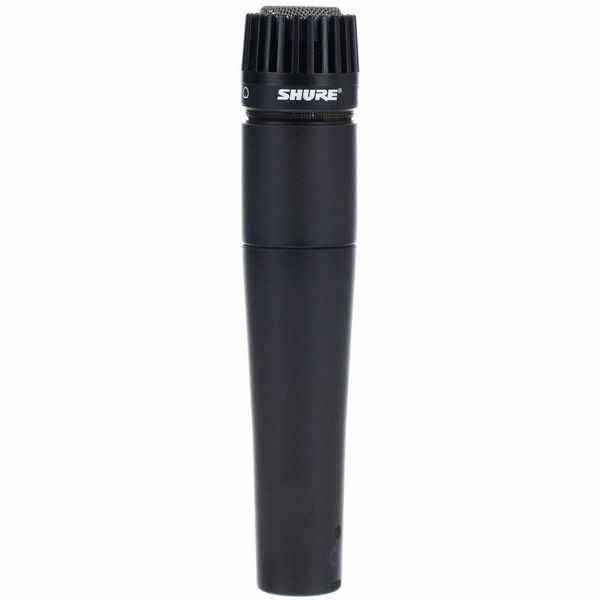
For the harmonium, I used the old faithful Shure SM57, again with a basic foam windshield just to help with any wind noise. Ideally, I would have used a stereo pair of microphones to capture the richness of the instrument’s sound, but this was a reasonable compromise I only had 8 channels to work with.

If you have any questions about how to use the equipment in this post, or need help or advice with microphone choices for different applications, please get in touch with me at rob.blazey@ncl.ac.uk or Fred at fred.hollingsworth@ncl.ac.uk

Using the DJ Room Speakers


Turn on the Mixer (1) and turntables (2).


Turn on the Main Power switch (3) and Sequence switch (4) on the power conditioner at the top of the rack. Once the three LEDs have lit up, the amp and speakers should be working.


If there is still no sound, check the rack amplifier power button (5), volume controls (6), the power switches on the back of the speakers (7) and the mixer Master Output (8).

  • Please power off in the reverse order:  

– Sequence switch

– Main Power switch

– Turntables and mixer

If you are having any issues please ask for Rob or Fred in the studios office, 

or contact music.technicians@ncl.ac.uk

Studio One – Basic Operation

Contents:

Turning On The Equipment

Ignoring these steps could result in permanent damage to equipment!

Power up Rack 1 and Rack 3 by turning on the power conditioners. To do this, press the Main Power switch, followed by the Sequence switch.

Press the power button for the Mac (you should hear the Mac start-up sound to confirm that this has worked).

Once the sequences for Rack 1 and Rack 3 are on (indicated by three green lights on the left of the power conditioners), power up Rack 2 in the same way.

To turn off the studio, reverse the process, as follows:

  • Rack 2 Sequence off (wait for three green lights to go off).
  • Rack 2 Main Power off.
  • Rack 1 and Rack 3 Sequence off (wait for three green lights to go off).
  • Rack 1 and Rack 3 Main Power off.

You can shut down the computer at any point in this process.

Computer Login

Login to the computer using the Student account. Password is ‘student’

Launching Pro Tools

Launch Pro Tools by selecting it on the hidden dock which can be found by hovering the mouse at the bottom of the screen.

Initialising the Neve 8424

Before beginning any session, initialise the Neve 8424 Console by following these instructions:

  1. Select [SYSTEM] on the small screen using the arrow > keys
  2. Press the [RETURN] button to accept
  3. Select [LOAD], then [RETURN]
  4. Ensure LOAD # is [1], then select [OK] and accept This will load the default console settings for Studio One.

The Dashboard & Pro Tools Session Templates

There are two templates created for Studio One, both available in the ‘CREATE’ tab of the Pro Tools Dashboard.

  • HYBRID WORKFLOW: Discrete channels are output from Pro Tools to the Neve console, allowing for an analogue-style workflow and enabling outboard gear to be inserted into the signal flow. In this mode, you are somewhat limited to the number of physical channels on the desk.
  • IN THE BOX WORKFLOW: ‘In the box’ (ITB) mode uses the console like a control surface, with the main output from Pro Tools routing direct to the Mix Bus. It is also possible to route groups to the Neve 8424 in order to utilise the ‘sound’ of the desk’s transformers.

It is also possible to combine these workflows, but the two templates provided are good starting points.

Correct I/O Settings

This stands for ‘in/out settings’. Select ‘Studio 1’ from the dashboard when starting your session to ensure that the internal and external routing is correct.

Switching Inputs on the Neve 8424

The Neve 8424 has two sets of inputs – ‘Channels A’ and ‘Channels B’. To change between them, use the switch found in the ‘master’ section (see pic)

INPUT CHANNEL B : The buttons will turn ORANGE, indicating the desk channels will receive audio from the analogue domain (i.e. pre-amps, mics, line inputs and external rack equipment).

You will need to change this depending on whether you are tracking (i.e. recording) or playing back tracks already recorded into Pro Tools.

How To Create A Headphone Mix

Typically, headphone (or Cue) mixes are sent PRE-FADER to the artist. This means that signals are sent before they get to the main faders. In this way, two independent mixes can be set. One for the performer, another for the engineer/producer.

The Headphone Cue mix in Studio One can be assigned in numerous ways.

Within the software. Pro Tools has the Headphone Cue configured on SEND A. Any level adjustments made with the small fader in Pro Tools will be reflected in the headphone mix ONLY.

This mix is sent equally to all headphones connected in the LIVE ROOM.

Using STEREO CUE from the desk. If you are monitoring channels through the desk, it is possible to send a Cue Mix using the ST CUE pots. By default, these are PRE-FADER. The send just needs to be activated by pressing the ST CUE pot until the green LED shows ON (see picture, left)

This mix is sent equally to all headphones connected in the LIVE ROOM, and can additionally be monitored in the CONTROL ROOM using the Engineer Headphone 2 (EHP2) socket found under the righthand side of the console.

Getting Audio Out Of Pro Tools

All outputs from Pro Tools are returned through the Neve 8424.

Generic Stereo Output

The ‘Stereo Output (stereo)’, found in the I/O dropdown, sends audio direct to the Mix Buss. This can be found directly above the master fader and allows you to utilise the unique width and EQ shelving functions, both found on the mix buss.

Discrete Channel Output (Hybrid Mode)

In the HYBRID template, each channel is routed out of Pro Tools to discrete channels on the console. In this case, the user must select the output routing on the desk.

Selecting MIX will route the audio to the Mix Buss.

Selecting GRP 1 (for example) will route the audio to a sub-mix named Group 1, which must then be routed to the Mix Buss.

Control Room Monitoring

The ‘CONTROL ROOM MONITOR’ section controls the final output stage (i.e. the master volumelevel, and which set of monitor speakers are being output to).

When the Neve 8424 is initialised, the output will be CUT to prevent accidental damage to monitor speakers. Press the CUT button to unmute.

Listening Through Different Speakers

There are 3 pairs of stereo monitors, which can be selected as follows:

A = Genelec 8341As

M1 = Focal Twin 6 BEs

M2 = Avantone CLA-10s

Trouble-Shooting/Other Notes

Neve 8424 Console software pop-up

This controls the connection between the desk and the external Neve 1073-OPX rack. Everything should be automatically configured. If not, click ‘Scan & Link’ and all should be well.

Setting the Sample Rate

Various bit depth and sample rate options are available on the Pro Tools dashboard. Most of the time, you should follow the setting in the screenshot below (24bit, 44.1kHz).

The Pro Tools Dashboard. Note the Sample Rate and Bit Depth Selectors at the bottom of the window.

IMPORTANT: check that the sample rate on the Antelope Galaxy 32 interface matches exactly the sample rate of the Pro Tools session. For audio production this will commonly be 44.1kHz, but occasionally 48kHz or higher.

The sample rate can be viewed on the Antelope Galaxy 32 in the second equipment rack.

If you need to change the sample rate, open ANTELOPE LAUNCHER from the computer. This will open a software window, with the sample rate shown at the top. Change this to match what is set in the Pro Tools dashboard.

FAILURE TO FOLLOW THIS STEP WILL RESULT IN A RECORDING WHICH PLAYS BACK AT THE WRONG SPEED/PITCH. THIS CANNOT BE FIXED AFTER THE FACT.

Technical Details (to be updated)

SIGNAL FLOW

The signal flow is as follows:

In LIVE ROOM:

Microphone -> XLR cable to LIVE ROOM patchbay (ch 1-32) -> feeds to CONTROL ROOM patchbay

In CONTROL ROOM:

Patchbay routes signal to various pre-amp -> pre-amp patched to audio interface, as outlined below -> interface linked to 8424 console -> to Pro Tools

I/O Configuration

INPUTS:

1-8: Neve 1073, via OPX rack

9-16: RME Octamic

17-18: Console based 1073 pre amps

19-20: UA 2-610

21-22: Drawmer 1960

23-24: DACS Mic-amp

OUTPUTS:

Headphone Cue are sent on channels 31/32. The Main LR outputs are on channels 63/64.

INSERTS:

Software Inserts are available on channels 33-52 (Galaxy AFX plugins)