Crown PZM – 30D

Microphone TypeCondenser – Pressure Zone Microphone
Polar PatternHemispherical
Frequency Response20Hz – 20KHz
+48v Phantom Power Required:Yes
ManualManualsLib.com

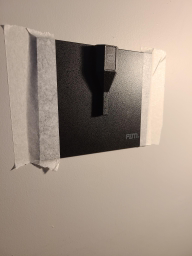
The Crown PZM-30D is a pressure zone microphone that stands out from the crowd with its innovative design and versatile capabilities. Unlike traditional condenser microphones, pressure zone microphones such as the PZM-30D record sound from both the source and the sound that is reflected off a reflective plate, resulting in recordings that are free from phase interference and sound clear and vivid. To achieve the best results, the microphone must be placed on a hard, non-absorbent surface such as a table, floor, or even the underside of a grand piano lid.

The PZM-30D is equipped with a switchable dual frequency response, R and F, providing users with the flexibility to choose between a flatter frequency response for a natural sound (F) or a brighter, snappier attack (R) for a more vibrant recording. With this feature, the PZM-30D is ideal for capturing a wide range of musical performances, including percussion.

The Crown PZM-30D is a unique microphone, its innovative design and versatile capabilities make it a great addition to any recording setup and provide a unique opportunity to experiment with new recording techniques.

Put the microphone onto a flat surface, (sometimes this involves using tape to ensure the microphone’s stability). Then, plug the XLR into the connection at the bottom of the microphone and the other end into the patch bay. Switch on the 48V Phantom power on the preamp or mixer and select the correct input in Pro Tools (the number of the input on the patch bay) or on your mixer and set the gain.

Blue Baby Bottle

Microphone TypeCondenser
Polar PatternCardioid
Frequency Response20Hz – 20KHz
+48v Phantom Power Required:Yes
ManualManualslib.com

The Blue Baby Bottle is a microphone that provides a classic warmth and presence to a wide range of instruments. It is known for its versatility and ability to capture a rich and clear recording, whether you’re recording electric and acoustic guitars, drums, brass, or vocals.

One of the standout features of the Baby Bottle is its -20dB pad and built-in 100hz high pass filter. This allows it to accommodate different performance styles while still delivering a clear recording free of distortion. It’s especially useful when recording in a studio setting, where its very present midrange and smooth top end can produce a warm and classic sound that complements its vintage appearance.

The Baby Bottle is designed to accommodate a wide range of instruments and performance styles, making it a versatile choice for studio recording. Whether you’re recording a guitar, drums, brass, or vocals, this microphone provides a warm and clear recording with a classic presence. With its built-in 100hz high pass filter and -20dB pad, the Baby Bottle can handle different performance styles without distorting the sound. Overall, if you’re looking for a microphone that can deliver a rich, classic sound, the Blue Baby Bottle is a great option.

To use the Baby Bottle, start by attaching the microphone cradle to a stable microphone stand before putting the microphone securely into the clip. Then, plug the XLR into the connection at the bottom of the microphone and the other end into the patch bay. Switch on the 48V Phantom power on the preamp or mixer and select the correct input in Pro Tools (the number of the input on the patch bay) or on your mixer and set the gain.

Audio-Technica AT815B

Microphone TypeCondenser
Polar PatternShotgun (Line and Gradient)
Frequency Response30Hz – 20KHz
+48v Phantom Power Required:Yes
ManualManualsLib.com

The Audio-Technica AT815B is a shotgun microphone that is widely used in broadcast and video production recording. It excels in recording clear audio over long distances, while effectively reducing unwanted sounds from the sides and back of the microphone. This is due to its directional pickup pattern, which focuses on capturing audio from the front of the microphone while rejecting sound from other directions.

One of the key features of the AT815B is its low frequency roll-off switch. This switchable filter reduces the presence of ambient noise such as traffic or footsteps, which can significantly impact the quality of your audio recordings. By cutting out these low-frequency sounds, the AT815B provides a cleaner and more focused sound.

Another benefit of the AT815B is its versatility. It can be used in a variety of recording environments, from field recordings to in-studio sessions. Its directional pickup pattern allows it to capture a wide range of sounds while isolating them from background noise. This, combined with its low-frequency roll-off switch, makes the AT815B an excellent choice for those who require high-quality audio in challenging recording conditions.

However, despite its many benefits, the AT815B may not be the ideal microphone for every situation. For example, the microphone’s directionality can be a disadvantage as it only captures sound from the front, which means that it might not pick up the full sound of a space, should ambience be desired.

Another consideration is the microphone’s length and design, which can make it difficult to use in tight spaces or when working with limited mobility. It may also be more challenging to use the AT815B for handheld recording, as its length and weight may cause hand fatigue. It may be paired with a Rycote handle or windshield in these situations.

To use this microphone attach the clip to a stable stand before securing the microphone in the clip. Connect the XLR cable to the bottom of the microphone and the other end to a patch bay. Then, switch on the 48V Phantom power on the preamp or mixer and select the correct input in your recording software or mixer.

Audio-Technica AT8022

Microphone TypeCondenser
Polar PatternStereo (X/Y) Cardioid
Frequency Response20Hz – 15KHz
+48v Phantom Power Required:Yes
ManualAudio-Technica

The Audio-Technica AT8022 is a highly versatile X/Y stereo microphone with a low signal to noise ratio and low cut switch, making it a great tool for capturing clear and accurate stereo recordings.

To use the microphone, begin by attaching the microphone clip to a stable stand and securing the microphone in the clip. Connect the 5-pin XLR cable to the bottom of the microphone and the left and right XLR connectors to two channels on the patch bay/interface. Then, switch on the 48V Phantom power on the preamp or mixer and select the correct input in your recording software or mixer. This microphone can also be powered by an internal battery.

Its two outputs, which are necessary to achieve the X/Y stereo polar pattern, allow for clear stereo imaging with very little noise of its own.

In addition, the AT8022 has a low-cut switch of 80Hz, which is perfect for removing unwanted low-frequency noise from your recordings. Whether you’re recording in the studio or in the field, the AT8022 is the perfect tool for capturing accurate and high-quality stereo recordings.

AKG Perception 150

Microphone TypeCondenser
Polar PatternCardioid
Frequency Response20Hz – 20KHz (dips at 50Hz)
+48v Phantom Power Required:Yes
ManualManualsLib.com

When it comes to recording music, choosing the right microphone can be the difference between a mediocre and an exceptional performance. The Perception 150 by AKG is a versatile microphone that can accommodate various recording scenarios and deliver high-quality results.

This all-purpose microphone is designed to handle high volume sounds of up to 145dB, making it ideal for recording drums, brass instruments, and other loud sources. Its switchable pre-attenuation control of 10dB allows you to position the microphone closer to the sound source, providing you with greater freedom and flexibility in your recordings.

While the Perception 150 does not have built-in high pass or bass cut filters, this can be easily compensated for by adjusting the mixer and preamp settings. This adaptability makes the Perception 150 an excellent option for a wide range of recording situations.

To get started with the AKG Perception 150, it’s important to properly set it up. First, attach the microphone clip to a stable stand and secure the microphone in the clip. Connect the XLR cable to the bottom of the microphone and the other end to a patch bay. Then, switch on the 48V Phantom power on the preamp or mixer and select the correct input in your recording software or mixer.