Newcastle University’s Digital Exams Service in LTDS is a finalist for Best University Digital Assessment Programme at the 2026 International E-Assessment Awards. Recognised for its ambition, collaboration and impact, the team – Maddie Kinnair, Kimberly May-O’Brien, Susan Barfield, Michelle Waters and Katy-Rose Brennan – were recognised for building a digital exams service that is sustainable, secure, accessible and trusted across the University. Continuously improved through staff and student feedback, the service has transformed assessment delivery at scale while making exam administration and marking more efficient. We’ll hear the result on Tuesday June 9th!
Inspera have developed a new digital drawing tool which has increased functionality beyond the existing drawing tool. In terms of what is new, the new tool allows you to enable the drawing tool at a question level, rather than at a test level. Colleagues can choose what questions they wish to enable the drawing tool on for their students to use in their Inspera digital exam.
The new Digital Drawing Tool is now available to use on Inspera as of Friday 27th February 2026.
Within this blog post you can find out how you can enable the new drawing tool on your Inspera exam questions in your question sets and the functionality available within the tool.
Within Inspera, the standard exam set up is a secure locked-down exam environment where students are only able to access their Inspera Digital exam. They are unable to access internet search engines, their own notes or other applications.
Web pages and PDF documents can be ‘allow listed‘ so that they can be accessed securely within an Inspera Digital Exam. Allow listing of web pages or documents is completed while creating your Question Set.
The resources (when allow listed) are made available for students in locked down Inspera Digital Exams. A network filter ensures students are not able to navigate away from the page specified. All links, except allow listed resources, are blocked.
This blog post has been created to share some best practice around allow listing use in order to ensure the best experience for our students.
Colleagues in the Inspera Digital Exams Team of the Learning and Teaching Development Service (LTDS) invited colleagues from Inspera Assessment to visit Newcastle University for the third year in a row to host an on campus event with our users.
Fiona Orel and Ishan Kolhatkar visited Newcastle on Wednesday 5th November for this year’s ‘Inspera: Sharing Best Practice’ Event.
Our Inspera users were invited to come along to find out updates about using Inspera at Newcastle and upcoming features on the Inspera roadmap. The event is a great opportunity for colleagues to learn about how they can enhance their use of Inspera and ensure best practice. The Inspera Digital Exams Team arranged for some demonstrations on features and functionality listed in the agenda below.
The agenda included:
Welcome and Introduction – An update from the Inspera Digital Exams Team and update from Inspera Assessment around their Roadmap
Inspera demonstration – Rubrics Functionality, Manually Marked Multiple Attempts Assessments and Feedback Release Features
Questions and Discussion – Colleagues submitted their questions for Inspera to answer.
We’d like to share an important update about how student engagement data is presented in NULA. The metric previously labelled ‘Attendance’ has now been renamed to ‘On campus engagement’.
This change is now live in the system.
Why we’ve made this change
The ‘Attendance’ metric in NULA shows a student’s engagement across all in-person, timetabled sessions available to them in their active modules — including both monitored and non-monitored activities.
Because this metric reflects more than just formal attendance, we felt that ‘On campus engagement’ better captures the full picture of a student’s participation in scheduled learning opportunities.
What this means for staff and students
Students will notice only a label change — from ‘Attendance’ to ‘On campus engagement’. There are no changes to the underlying data or calculations.
We’ve updated this terminology consistently across:
We’ve also expanded our messaging to students to make it clear that the on campus engagement metric is not a formal attendance record and will not impact academic records.
What this looks like
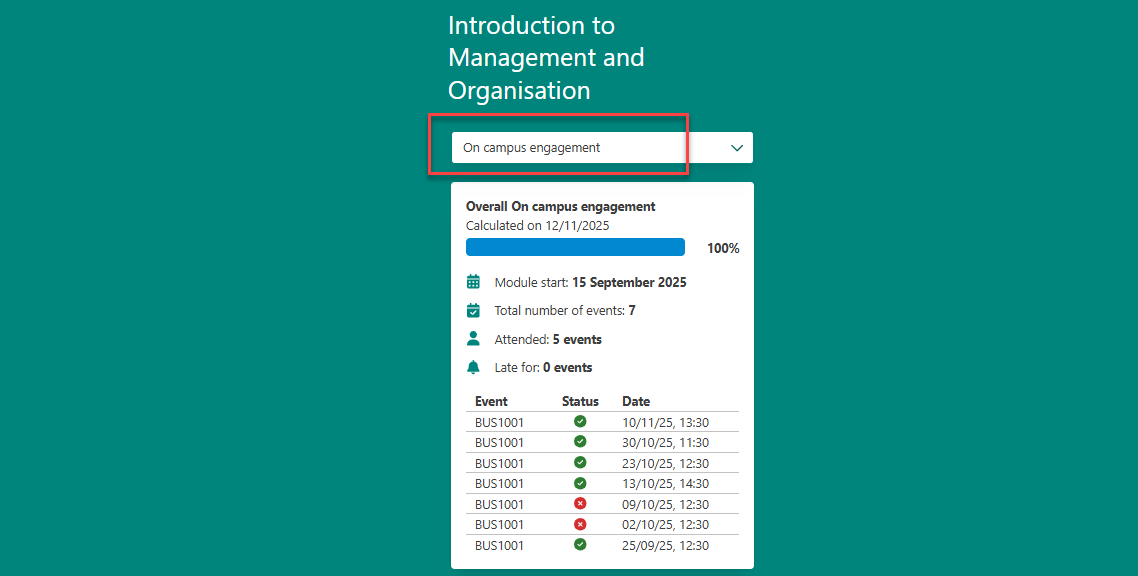
In the student interface:
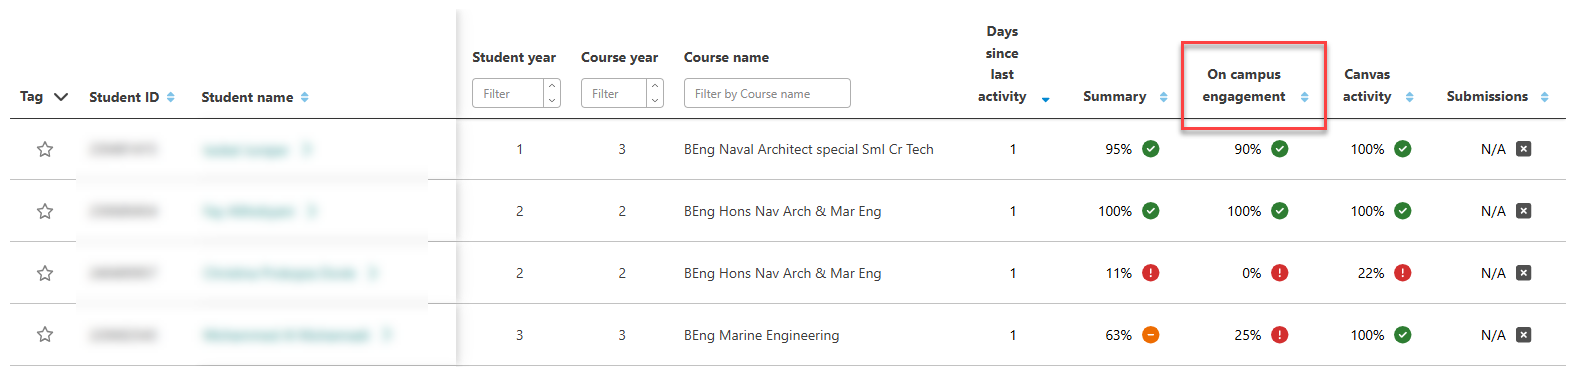
In the staff interface:
Supporting student understanding
We will be communicating this update through our student channels, but if students come to you with questions, please feel free to use or adapt the message below:
Your ‘on campus engagement’ in NULA shows the opportunities available to you to take part in all timetabled events in your active modules. This gives you a clearer picture of your overall engagement and can help you notice any gaps so you can make informed choices about how you learn.
Please note that ‘on campus engagement’ data in NULA is not your formal attendance record and will not impact your academic record.
The system is designed to give you real-time insights that support your learning and any conversations with your personal tutor or support teams. It is not used in a punitive way.
If something does not look as expected, it may be due to data processing delays or how activities have been recorded.
For more information, please visit the NULA pages on the Academic Skills Kit website.
Vevox have made a series updates to their features in their October product update. Find out more about the new features available and improvements to existing features, including:
Over the summer, work took place to improve the security, functionality, and performance of Turnitin assignments in Canvas. This means there is a slight change of workflow when setting up a new Turnitin assignment.
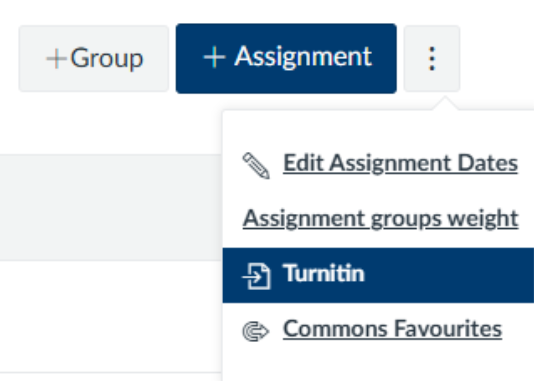
You are no longer be required to select Turnitin as an “External Tool” from the Submission Type assignment settings. This step occurs on the assignment homepage instead, select Turnitin from the Assignment Settings (3 dots) button when creating a new assignment.
Please note that change will only affect how you create new Turnitin assignments; any pre-existing Turnitin assignments will still be available and any Turnitin assignments already set up for 2025/26 will not need to be changed.
It is now possible to submit a Turnitin assignment on behalf of a student, via the Turnitin inbox. Simply select ‘Submit on behalf of student’, and a drop down menu appears of all students attached to the course in Canvas. Select the student you wish to submit for, confirm your selection by clicking continue, then follow the steps to choose a file and upload the submission.
At the start of Semester 1 and Semester 2, the Inspera Digital Exams Team contact the Module Leader of any centrally supported summative Inspera exams that are due to happen that Semester. We will request that a Digital Exams Form is completed to provide the team with lots of useful information.
You can find out more about the process of using an Inspera Digital Exam from start to finish for Semester 1, Semester 2 and for mid-semester exams, which we refer to as ad-hocs In our Digital Exam Journey PDFs.
In the Gradebook Settings of the Canvas Gradebook area, a View Hidden Grades indicator option is available. This will allow Teachers and Admins to see an icon marking any grades that have not yet been posted to students.
This will help you quickly identify which grades are hidden from students, reducing confusion and ensuring more accurate communication about grade visibility.
This feature is available for use from 25th September 2025.
How do I use this feature?
To use this feature, you would navigate to the Gradebook area of your course in Canvas.
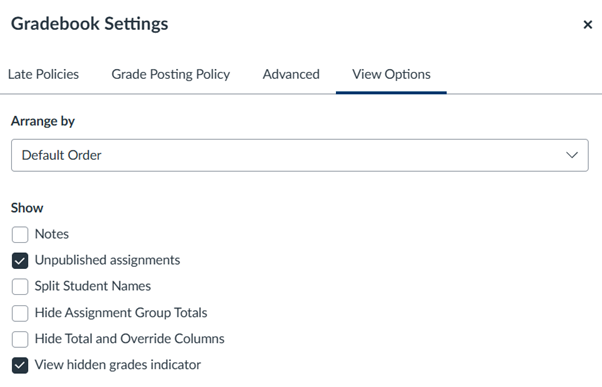
You would then locate the ‘Gradebook Settings’ by selecting the settings option (cog icon) in the top right corner of the screen. Once here, you will navigate to the ‘View Options’ tab where you will be able to select the ‘View hidden grades indicator’. This enables the hidden grades indicator within the Gradebook of the particular course you are in.
The gradebook settings area in Canvas Gradebook where you can enable ‘view hidden grades indicator’.
What does the feature look like in action?
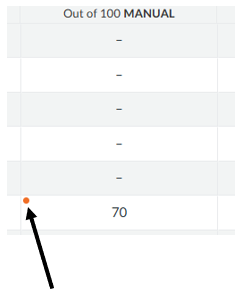
In the Gradebook, an orange indicator displays which grades have not been posted next to each grade where this is applicable.
An orange dot shown against a grade in the Canvas Gradebook to indicate the grade has not been posted.
Find out more
You can find out more about the functionality of the Canvas Gradebook on the Canvas Course Navigation website, under the heading ‘Grades’.