Adding engaging and interactive content to your online course materials just got easier with H5P.
This new online tool allows you to create custom learning resources such as branching scenarios, accordions, interactive images and videos, 360 degree virtual tours, simple formative quizzes, and so much more.
The feedback we have from colleagues is that it is easy to use and that the built-in tutorials walk you through what to do. No coding or software is required – all you need is a web browser.
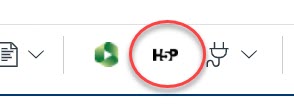
In Canvas you can work with H5P from the Rich Content Editor.
Example H5P Hotspot item – click the + to try it out
Adding engaging and interactive content to your online course materials will get easier very soon. The University has bought an enterprise licence for H5P for use by colleagues for a year. Towards the end of August we’ll be making it available to all Canvas and MLE Teachers giving them the ability to make accessible interactive widgets, like the ones on this post. H5P isn’t just restricted to Canvas and MLE, it can be used on web sites too.
We’re particularly excited about H5P! Once it is turned on there will no longer be a need to be an HTML guru to do things like:
Add accordions
Add single question formative quiz questions
Generate branching scenarios
Create 360 degree virtual tours … and much more
H5P has been successfully used by our friends in other universities– it’s very well documented and each content type has its own tutorial.
We will be using the fully supported (H5P.com) version of H5P and, while we are plumbing this in, if you would like to have a peek at what is in store do check out H5Ps web pages for their documentation. We would recommend holding fire on creating accounts on H5P.org and wait instead until we have our Newcastle H5P site up and running. It won’t be long!
How you can help us?
We have H5P for a one-year pilot initially – so we will need feedback on how you are using it, how your students are finding it, and how you would like our H5P support to develop.
If you would like to get early access to H5P, receive updates, or help our evaluation please JOIN OUR H5P COMMUNITY by filling out this form.
Sample H5P Course Presentation – try moving between the slides and answering the questions
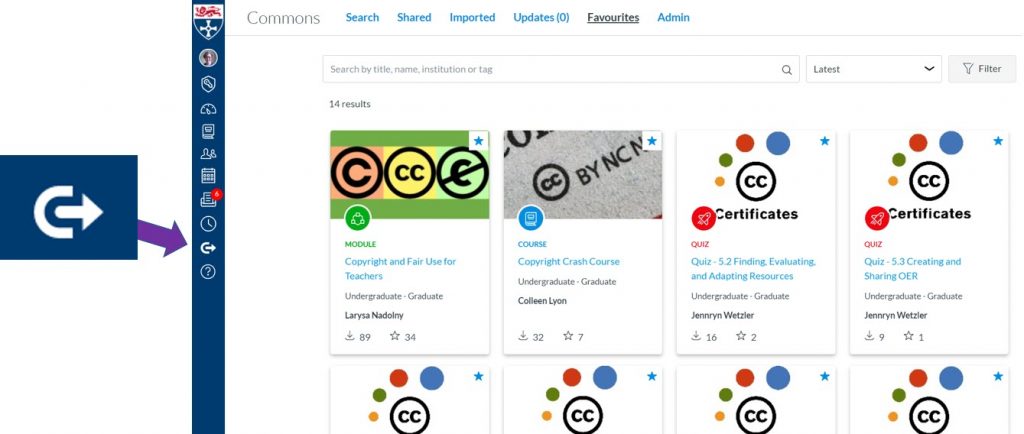
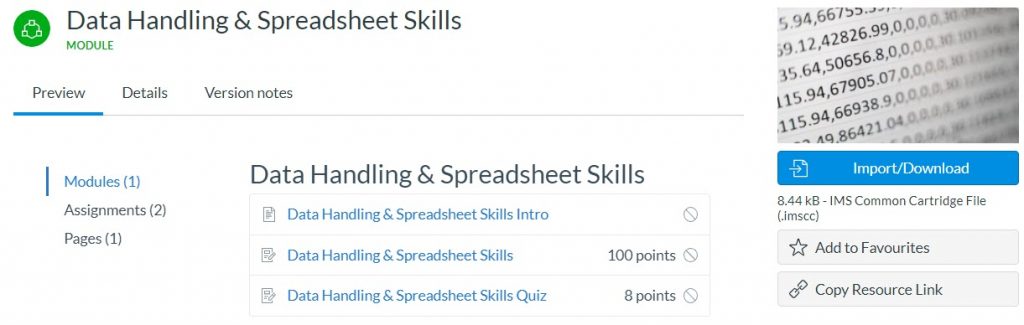
All colleagues who have a Teacher role in Canvas can access and contribute to a huge repository of content in Canvas Commons. You can use Commons to share content with the global Canvas community or choose to restrict its visibility to teachers at Newcastle University. You can also share content with yourself!
For the Art of the Possible we hosted workshops to explore Commons with Colleagues. Our participants got stuck in enthusiastically.
What we liked:
Commons is a great way to access generic content e.g. getting started with the library, or to share content across programmes. (Our induction project team are using Commons to share induction materials with schools this year.)
Even if you don’t want to use the content it’s helpful to see how others have approached teaching your subject – it can give ideas and inspiration
The ability to gather quiz questions to adapt
It could help improve consistency between modules / courses
Commons is a good way to hold content that needs to be included in all/some courses – assignment templates, school policies, supports consistency.
You can use Commons to hold content that is private to you – making it easy to add content into multiple courses.
It makes it easy share content across the institution – rather than importing/exporting or adding permissions
A way of sharing effective practice, building your reputation, and that of the University
Evidence your impact / influence for promotion
Building in consistency
When you don’t know who specifically will need to access the content
By sharing you are contributing to the educational community
To share knowledge and expertise
Some Cautions
Several participants commented on the huge amount of material in Commons, we saw how we could filter this by stage (UG/PG) or restrict our searches to content shared just with the Newcastle University. We saw how we could share permalinks to content elements in Commons to make finding resources easier.
Canvas Commons content isn’t policed so we had good discussions about the need to check content for accuracy, and also to look out for international differences (eg prescribing guidance, legal regulations etc…). We spoke about how different creative commons licenses could be added to support reuse and about how to give attribution to Commons Content shared with CC licenses.
In an earlier post we showed demonstrated how to host videos on ReCap and Stream and then add them to Canvas. But how do they compare?
Let’s take a student perspective what are the differences between these two as a consumer? If you are making notes from video you’ll value things like variable playback speed, the ability to view full screen and the option of viewing or searching the caption/transcript — all of these are easy to find whether video is hosted on Stream or ReCap.
ReCap
ReCap has a handy rewind facility – if you miss something you can go back 10 seconds with one click. It also lets you make private timestamped notes on the video – so you can mark places you want to go back to. If the video is long you can help students find their way around by adding Content items.
Stream
Stream videos can be added to a watchlist, they can be liked and, if you permit it, students can add comments to the videos. These will be visible by anyone with permissions to view the video. Stream helps you find your way around content by converting any timestamps you put in comments or the video description into clickable links.
There are good reasons to turn comments for particular circumstsances – eg are providing feedback, pointing out helpful sections or taking part in peer review.
Permissions
Stream videos are only available to people with @newcastle.ac.uk email addresses, so you’ll need to sign in to view the content above. ReCap videos are normally shared with those on a particular course, but you can make them public as we have done with the first video here.
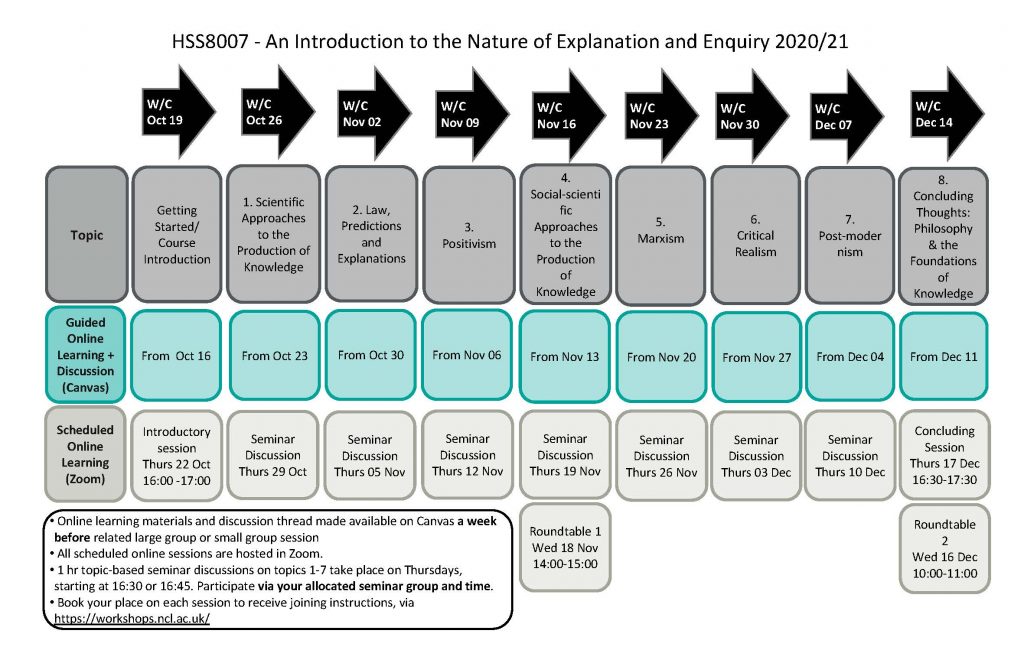
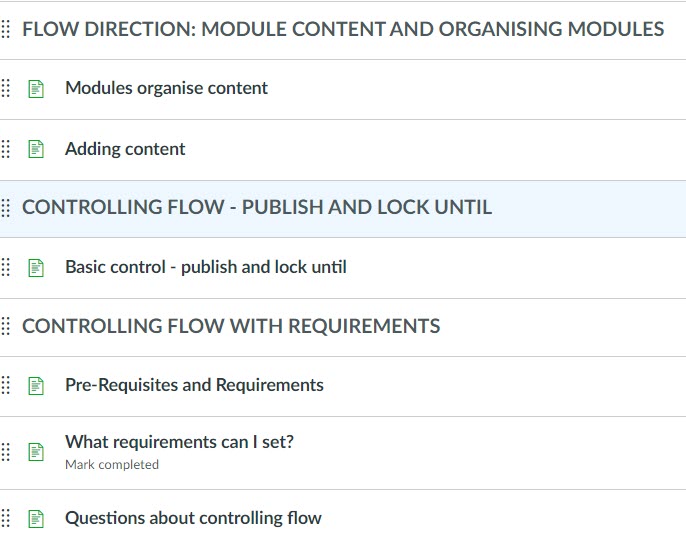
2. Use Canvas modules to set a flow through your course
Use your Canvas modules to direct student’s activity week by week or topic by topic. Every Canvas course has a sample structure that you can adapt to match your teaching pattern. You can hide or lock materials that aren’t yet relevant and even set requirements so that student need to view or complete certain conditions before they can move on.
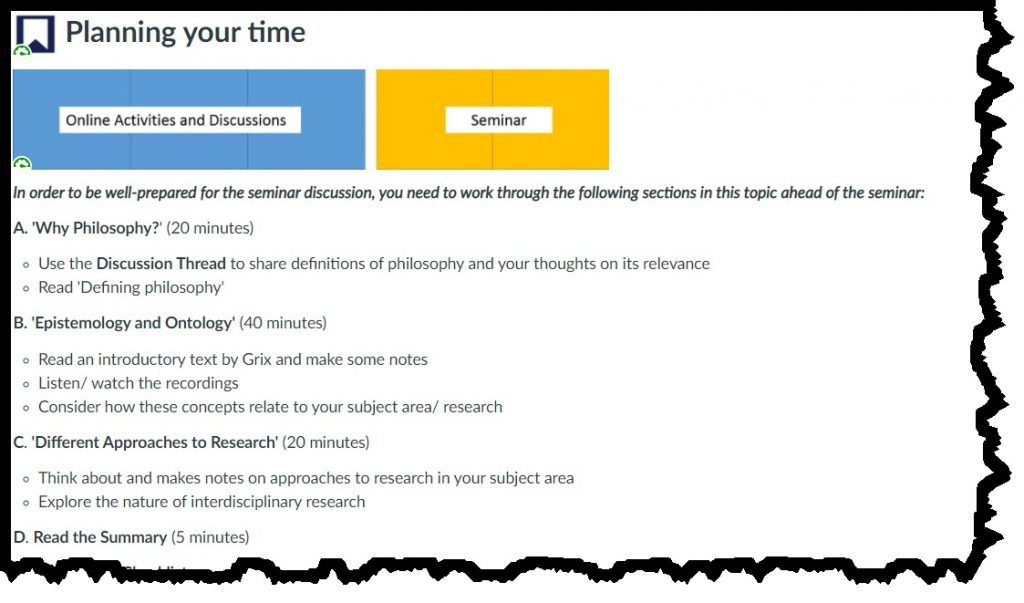
Without the normal structure of face to face time on campus it’s harder for many students to structure their time.
HSS8007 indicationg timings on activities
Add a weekly overview to give students an idea of your expectations for how much time to spend on the activities for a given week. This will help them plan their time, and make sure they give their attention to the things that you signpost as being most important.
From overwhelmed to ordered
It will take a bit of time to consider ordering, signposting, and setting a flow in your modules, but this need not be onerous and it’s one way you can help your students feel less overwhelmed in these strange times.
There are lots of different ways of making videos and generating captions. In this blog post we’ll present two of these recipes – think of them as starting points that you can adapt and develop – they use existing University systems – so all you need is a web browser.
When we make recordings and videos for student to watch before or after scheduled teaching sessions we need to add captions to these videos. Captions are a text alternative that makes the video meaningful to someone with hearing difficulties. We also know that they are used significantly by non-native speakers, and those working in noisy environments.
When a video has captions applied the person watching the video can turn them on and off – this is normally done by clicking on a “CC” (closed captions) button.
The captions for a video are held in a text file that contains segments of text along with timestamps.
Video files are large, and your Canvas course is limited to 20GB of file attachments. So, it makes sense to add videos to one of our University Video Platforms (ReCap or Stream) and embed them into Canvas from there. ReCap and Stream both have Automatic Speech Recognition (ASR) capabilities and can add machine generated captions to videos. These won’t be 100% accurate, but they can be edited.
In overview the process is:
Upload your video
Add, edit and publish the machine generated captions
Publish the video in your Canvas course
ReCap
You can view all the content that you have access to on ReCap by going to your campus ReCap site (Newcastle, London and NUMED/NUIS)
Do I have to edit automatic captions for my videos?
The university has recently agreed text for a captions disclaimer for students. This makes it clear that automatically generated captions aren’t 100% accurate and that students need to be use these alongside their wider reading. Students requiring accurate captions as part of their reasonable adjustments should contact their disability adviser.
If time permits, light touch editing of captions will help many students.
We start 2020 with our new VLE, Canvas, and a rich array of digital learning tools that can be used to support teaching. There are so many possibilities and it could easily be overwhelming.
This is a short post to begin to answer one of the questions I heard last week “What tools should I invest in?”.
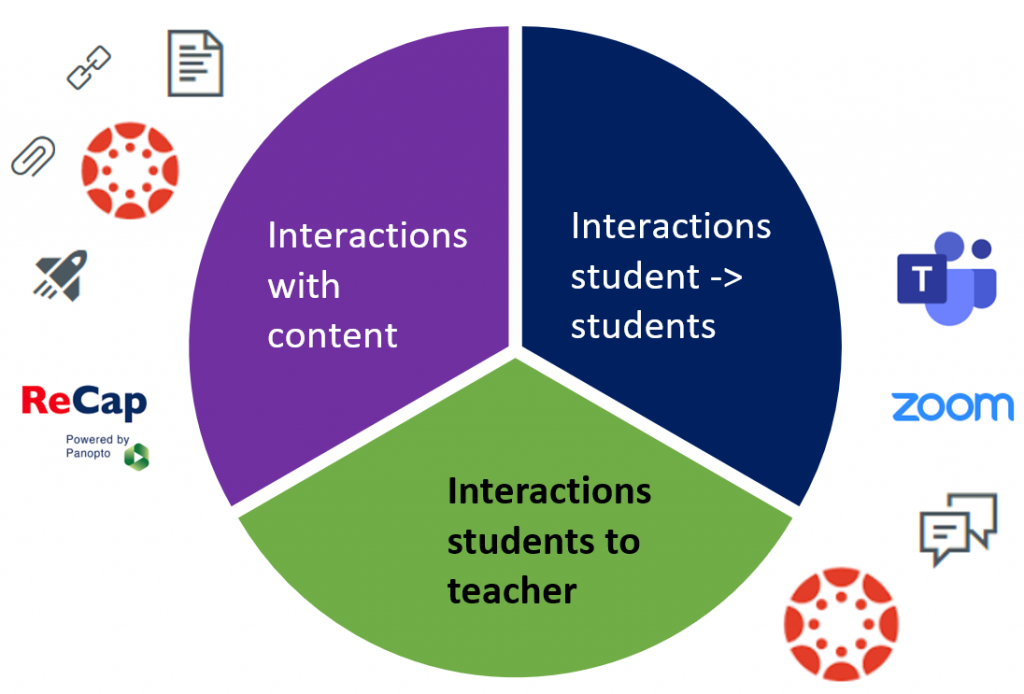
But, let’s back up a bit, before considering tools we need to think about what we want these tools to help us to achieve? Way back in 1998 Anderson and Garrison described three more common types of interaction involving students:
Student-content interactions
Student-teacher interactions
Student-student interactions
Let’s use this to come up with our list…
Student-content interactions
Your starting point here is Canvas itself. You can present information on pages, embed documents, link to resources on library reading list, include videos, audio and ReCap recordings.
Canvas support a wide range of question types: multiple choice, gap fill, short answer, matching, multiple answer. Quizzes can help students practice skills, check their learning and encourage them revisit material.
For short PowerPoint narrations the easiest place to start is the recording features that come as part of ReCap. We tend to think of ReCap as a lecture recording tool, but there is also a fabulous ReCap Personal Capture tool that you can use to record yourself, and publish in Canvas. There are several bonuses with using ReCap – you have the ability to do make simple edits, you can use automatic speech recognition to generate captions, and students have the ability pause, rewind and make notes on the recordings that you publish. ReCap personal capture comes in as tool #3 – you can install on your computer, or if you prefer you can use the new browser based recorder – Panopto Capture (beta).
Outside the limited amount of PiP time you are likely to be meeting your students online. For synchronous meetings there is increasingly little to choose from between Zoom and Teams – the only significant factor being that Zoom permits people to connect by phone – so supports those on lower bandwidth.
Now is a great time to become confident with the online meeting tool you are planning on using throughout your module. I’ll leave it to you if #4 for you is Teams or Zoom – it would be sensible to settle on one, for you and your students. Teams could be a strong contender if you plan to use this as a collaboration space over the module/stage, in which case do review the article on Building an online community using Teams.
Once you setting on your meeting tool, now is a great time to explore options for using whiteboards, polling, breakout rooms in these spaces and to begin to plan active online sessions.
For tool #5 I’d go with Canvas Discussions – these are easy to use, work really well in the Canvas Student and Teacher apps and are great for Q&A sessions, introductions, crowd-sourcing activities, and of course discussions!
Learning at university is a social! There are huge limitations on what we can do in person – but what can we do to help learning be as social as it can be? This isn’t so much about tools, but about the activities we design in: break out room discussions, group tasks, peer reviews, debates – things that might start in a timetabled session and then spill out.
For synchronous meetings and study sessions all our students have access to Zoom and Teams. We can model how to use these, build students’ confidence in these spaces and show them how they can collaborate in Microsoft 365 collaborative spaces (Word documents, OneNote…). I’ve already mentioned Teams and Zoom (#4), so for tool #6 I’ll pitch for Microsoft 365 with an emphasis on collaboration.
In our recent Pizza Pop and Practice event, Dr Ahmed Kharrufa and Dr Tom Bartindale from OpenLab let us loose on an app that Tom has been developing over the last few years called Bootlegger.
Bootlegger makes it easy to help people make videos together using mobile applications. One person creates a “Shoot” and invites others “the crew” to contribute. The Shoot contains a template with the set of shots required in the video. The crew sign into Bootlegger, join the shoot and then choose the shot to take from the template.
We used a template that Ahmed had offered to his students – one designed to help them capture feedback on Ahmed’s teaching. (A uniquely student centred view!)
Our film crew of 21 experimented and happily collected over 47 clips. Each person could then view all the clips in the shoot and curate a video by adding clips to a timeline.
Bootlegger made the process really easy and engaging.
You can find out more information about Bootlegger here:
Ahmed also introduced us to how the Event Movement site https://eventmovement.co.uk/ site could be used to enable students to co-design teaching sessions.
Ideas in Event Movement move through stages Promote -> Get involved -> Plan it. Students were invited to contribute ideas for a teaching session, they could vote on the proposed topics and once the topic of the event was selected could get involved in co-designing the session – proposing and voting on different ideas. Ahmed’s slides from the session give further details.
To hear about future NUTELA events sign up to our mailing list.
LTDS hosted the first of our Feeling Connected events last week. The series is all about how to help to engage large students cohorts in the classroom and beyond. In this initial session we considered how to engage students in the lecture.
Tony Chapman-Wilson brought an actors perspective on how to get the best out of, and look after our voices. He had us humming, thinking about our diaphragms and tripping over tongue twisters.
Sue Gill spoke about Powerpoint as an aid; we presented feedback from the recent TEA awards from NUSU on what student appreciate; heard top tips from colleagues via podcasts and Dr Alison Graham rounded the session off with real examples and insights from her use of the OMBEA student response system.
Thanks to all who attended and contributed to a lively session, and to and to colleagues who gave up their time to contribute before and after.
Insights from NUSU Teaching Excellence Awards (TEAs)
Rowan South and Dr Joe Barton from NUSU talk about what students value:
Next in the series…staying connected
Our next Feeling Connected event will focus on how to stay connected between lectures. It will take place on Tuesday 19 September in the Herschel Learning Lab and have a hands-on feel. You can book via our web-page: http://www.ncl.ac.uk/ltds/about/training/feelingconnected/
The start of a new year is always a great time to consider problems you would like to solve and changes you would like to make.
On 23 January 2017, Newcastle University opens The Enterprise Shed: Making Ideas Happen, our free online course, to a new group of learners. The four week course recreates the creative atmosphere of a shed – or any other place where you do your best thinking and doing. It promises to be a great place for you to work on those new year challenges and ideas.
Here, Katie Wray, Lead ‘Sheducator’, explains why you should all be joining her in The Enterprise Shed.
Lead Sheducator, Katie Wray
Enterprise and entrepreneurship at a grassroots level
Firstly, let me unpack ‘enterprise’. For me, enterprise is about making creativity, problem solving and ideas practical. This makes it relevant across all areas of education, not just business. Where enterprise is applied to creating a new venture, it is commonly known as ‘entrepreneurship’.
The Enterprise Shed challenges a variety of definitions of the entrepreneur, and looks at enterprise and entrepreneurship at a grassroots level. On the course, you will be introduced to a whole bunch of entrepreneurial individuals and teams, not all of whom refer to themselves as ‘an entrepreneur’.
How to make change in your own context
We are committed to exploring this question with you throughout the course, supporting you to draw your own conclusions about how you can make change in your own context.
Our other commitment is to exploring your ideas – collecting insights into what a solution looks like and helping you to turn that idea into something tangible. Finally, we are committing to developing your network, through which you can share your ideas, and put them into action once the course has finished.
That’s where you come in. This course is about you; it is about your role, through your ideas, in creating change. There are three main reasons why you should join us in The Enterprise Shed:
Develop confidence in yourself as a “doer”
You will do this by analysing the behaviours of other entrepreneurial people who you will be introduced to on the course. You will draw conclusions about the way that they “do” and what you might “do” when approaching your own challenges, problems and projects.
Address problems you want to change
You will do this through identifying problems, sharing them with others, creating and collaborating on ideas generation, and developing solutions together with peers on the course.
Meet people and build networks
We will do this by forming virtual networks around the globe, which can outlive the end of the course. You will meet people that share your passions and drivers to make change in your world, find out where you can go for help, and collaborate to achieve impact.
The Enterprise Shed is not just a course, but a place where you can go to think, and critically, to do.


