
There are lots of different ways of making videos and generating captions. In this blog post we’ll present two of these recipes – think of them as starting points that you can adapt and develop – they use existing University systems – so all you need is a web browser.
When we make recordings and videos for student to watch before or after scheduled teaching sessions we need to add captions to these videos. Captions are a text alternative that makes the video meaningful to someone with hearing difficulties. We also know that they are used significantly by non-native speakers, and those working in noisy environments.

When a video has captions applied the person watching the video can turn them on and off – this is normally done by clicking on a “CC” (closed captions) button.
The captions for a video are held in a text file that contains segments of text along with timestamps.
Video files are large, and your Canvas course is limited to 20GB of file attachments. So, it makes sense to add videos to one of our University Video Platforms (ReCap or Stream) and embed them into Canvas from there. ReCap and Stream both have Automatic Speech Recognition (ASR) capabilities and can add machine generated captions to videos. These won’t be 100% accurate, but they can be edited.
In overview the process is:
- Upload your video
- Add, edit and publish the machine generated captions
- Publish the video in your Canvas course
ReCap
You can view all the content that you have access to on ReCap by going to your campus ReCap site (Newcastle, London and NUMED/NUIS)

- Upload your video: Upload content to Recap (.docx) or record content with ReCap Personal Capture (.docx)
- Add automatic captions to the recording
- Publish the recording in Canvas
The ReCap integration makes sure that all students and teachers on the course have access to the recording – you do not need to adjust permissions.
Stream
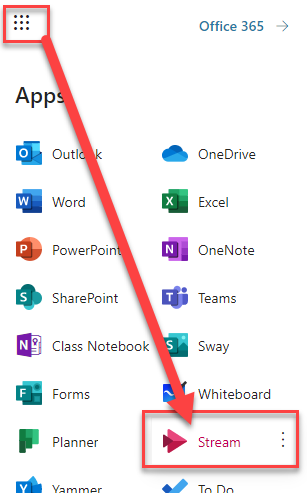
You can explore Stream by logging into Office365.ncl.ac.uk.
Click on the App Launcher and select Stream.
If you are already signed in you can navigate to https://web.microsoftstream.com/
- Upload a video to Stream or Record the Screen
- Generate automatic captions for your Microsoft Stream videos and Edit the transcript
- Publish videos in Canvas
Do I have to edit automatic captions for my videos?
The university has recently agreed text for a captions disclaimer for students. This makes it clear that automatically generated captions aren’t 100% accurate and that students need to be use these alongside their wider reading. Students requiring accurate captions as part of their reasonable adjustments should contact their disability adviser.
If time permits, light touch editing of captions will help many students.
More information
See the video guides on the Digital Learning Site
Captions disclaimer for students