Video annotation – the collaborative way

Creating videos by putting together clips from a collection of recordings is a time consuming task.  Our colleagues in Digital Media help us by providing a rough cut of the raw footage with a hard-baked timestamp on the recording.  Our job is to sift through this to find the bits we want. You’ll imagine though that this involves a lot of seeking backward and forward through a video with frequent pauses to note down timestamps. Our colleague Mike Cameron (now at Bristol) battled with this last year and cleverly anticipated that ReCap had the potential to make life easier.

What we want to do is not that dissimilar from a group of students collaboratively annotating a lecture.  Things that really help us, like our undergraduate counterparts, are searchable bookmarks, the ability to play content fast (never let it be said that students would ever listen to lecturers at 2x speed), and the ability to rewind.

Following a speedy consult with colleagues in team ReCap we requested a PCAP folder with permissions at the folder level for all of the team – that’s Digital Media, LTDS and Academic colleagues.

pcap screenshot

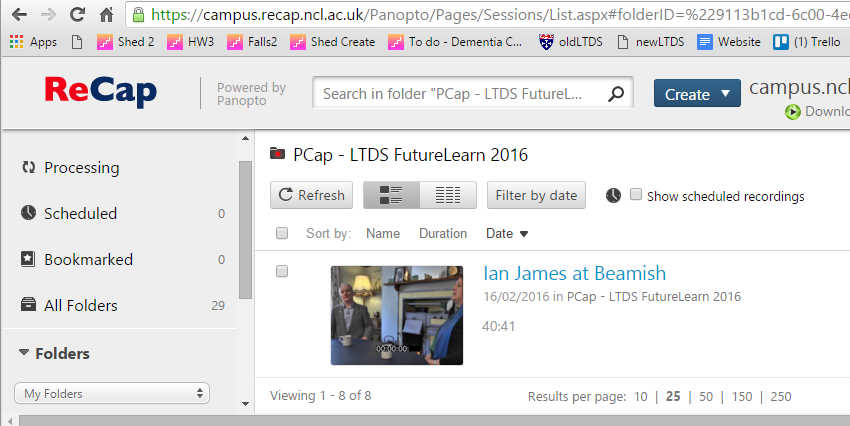
Uploading video was a doddle using the “Create” button, then we needed some conventions for the “Channel” we planned on using for collaborative notetaking.  Channel names aren’t listed (presumably some form of security by obscurity thing) so we decided to name our shared annotations “team” (in lowercase) and to annotate the start of any piece of dialogue with the speakers initials, the topic, and whether the delivery was good. If Nuala Davis gave a poor answer on Widgetology we’d put

ND-widgetology-no

In  a 40 minute interview it’s great to be able to scan and jump to the real gen on Widgetology just by clicking on the annotation.  By way of example here’s what we get one of our videos using the keyword “good”.

pcap screenshot 3

What’s particularly great about this is

  • we can jump straight in at particular annotation points without the pain of seeking backwards and forwards.
  • Our team annotations are in one place, we’re not struggling to keep up to date with the latest version.
  • Because the footage is on ReCap we can get at it anywhere (on and off campus), and we know that only our team can access it, and if we choose to we can permit other campus users viewing rights.
  • We can adjust the playback speed to skim through footage (1.5 – 1.75 is workable)
  • We can also use private notes to create personal annotations, and when we move between personal notes and shared channel, ReCAP (gloriously) stays at the same timestamp.

And one or two learning points about these channels.

  • it’s nice that ReCap shows who has made an annotation, and quite properly, permissions are such that Angela can’t edit one of my notes in our shared channel.  If we wished to do this we’d need to sign in to ReCap with a suitable role account used for the project.
  • I mentioned that channels aren’t listed.  We’ve spotted that they are case-sensitive, so it would be easy for two people to work on “team” and “Team” without twigging that they were duplicating effort.


An ode to the illustrated transcript

For each course we start with a blank canvass, we don’t have a fixed idea of x articles, y discussions and z videos, rather we attempt to make the learning needs define the mix. When video is best we are lucky in having a fantastic digital media team who have created amazing video content for previous courses.  But we know that each minute of footage is costly to produce.

So how do we decide whether something should be a video or an article?  A particularly troublesome area is the “talking head” the piece to camera without any additional visuals to consider alongside the audio.  Ant and Dec can make this look easy, but not everyone can look chilled as they try to talk succinctly, remember key points and look straight into an expressionless lens.   Yes, autocue may help, as may bullet points, but it’s still difficult to deliver well, and we can easily require multiple takes to get a good, natural and engaging result.  Without preparation it’s easy to fail the “Just a Minute test” (deviation, hesitation and repetition) – resulting in fragmented content that may not foreground the most important points before viewers tune out.

Talking head’s have their place, for example:

  • Where we need to build relationships. Video has a key role in establishing our lead educators as real people with a passion for their subject and a desire to draw learners into their enthusiasm.  Learner comments thanking the subject lead at the end of courses give testimony to their connectedness – they’ve watched the videos, and had regular emails, but the educator may not have even read any of their comments.  (We’ve created the illusion of Educator presence!)
  • Where the subject matter is sensitive or nuanced and a paper based approach would not convey this effectively. We can pick up tone, facial expressions, changes in rate and pitch to draw emphasis to key points, alert us to things to be wary of and absorb examples (stories) that illustrate.

On the surface video can be more appealing in situations where there is some associated visual content to talk though:  a plan, diagram, artefact.  But I’d like to challenge this also.

Let me explain …We know that not everyone will be able to consume video content, learners may have hearing impairments, have bandwidth issues, or maybe even have a computer without sound.  To get around this it’s our norm (oh that it was everbody’s norm) to create a transcript.

On a recent run of Hadrian’s Wall we got into discussion with a few learners who relied on the transcripts, but felt they were missing out by not being able to tie up the text to the images contained in the video.

hwilltrans

I sounded them out about whether an illustrated transcript would help, and took the 18 likes as a definitive  “Yes please”. So we set about working through the transcripts for the 45 videos on the course, adding screen grabs and pictures to around 2/3rds of the transcripts.  The learners applauded us, but we were had to gasp at the irony involved in the process:

  1. Plan video
  2. Write script
  3. Reconnaissance location
  4. Arrange for media team and educators to be on site for filming
  5. Set up
  6. Make several takes
  7. Identify additional pictures to illustrate the content
  8. Produce video rough cut
  9. Provide feedback
  10. Produce final cut
  11. Gain signoff from the course team
  12. Produce transcripts
  13. Insert screenshots from the video to make the illustrated transcript

The document we referred to as an “illustrated transcript” was really just an article with pictures in it.  If our goal was to create this in the first place, then the production tasks are *much* simpler and fit on one line:   write article, identify pictures, get feedback, publish.

We need to be confident to make judgments on where video is really good.  There are places where it really is:   I learned how to felt a shed roof via a browse around YouTube, but I’d rather follow a recipe in a book.  The nature of the thing to be learned should inform the choice of medium of communication.  Let’s think about the “learning power” when making these judgments and broaden it out too – it’s not just video vs article, but maybe even – what else can we do to help learners to discover things for themselves?

Foregrounding this latter point not only helps us avoid the passive/transmissive criticism of x-MOOC, but also means that we can harness the strengths of social learning and all that technology can do to make this easy this over time and distance.