Layout examples: a sliding banner and two columns

This post explains how to create a page with a sliding banner header and two columns for content below it.

two-columns-and-a-banner-fw

Firstly, to create the sliding banner, you’ll need to create a hidden section inside the section you want the banner to appear in called “Section Banner” and put some All Purpose Content in it.

section-banner-fw

Images should be 950px wide by 250px tall and the content needs to have the class “swipe”.  Each image in the sliding banner needs to be in its own piece of All Purpose Content.

banner-slide-fw

“Update and Approve” the content and the banner will appear on your page in Preview and be published at the next scheduled publish.

To add the two columns of content below, create two pieces of All Purpose Content in your section:

two-columns-fw

and use the class field to give both pieces of content the class “nosidebar twocol”.

left-column-fw

“Update and Approve” both pieces of content and they will be visible in Preview and be published at the next scheduled publish.

The first piece of content will apear in the left column, the second will appear in the right column.

Scrollable News

In the new Research and Confernces template, you can collect all the news and events from a Section of your site and put a scrollable set of links to them on any page.

scrollable-news-fw

To do this, you’ll need to have a Section with all your news and events in (this is setup as part of the template site):

news-section-fw

On the page you want to drop the sliding news into, add a “News Slider” piece of content.  Give the piece of content a name, then click the Select link on the right hand side to choose the Section to get your news from.

news-slider-content-fw

Add the content by clicking “Update and Approve” and then preview the section to see your news items on the page.

Visitor Tracking with Google Analytics

The best way to track visitors to your T4 site is through Google Analytics  This allows you to track where (country, city, website) visitors came from as well as what kind of device they were using, how long they stayed on your site and which are your most popular pages.

Note that it’s only possible to do this once your site has been made live (moved from a dev-research/something address to just research.ncl.ac.uk/something)

A tutorial on google anaytics is out of scope for this blog – there are plenty elsewhere, but here’s how to set it up within your T4 site:

Firstly, get an account: http://www.google.com/analytics/

google-analytics-1-getaccount

…and enter the website Name and URL that you wish to track:

google-analytics-2-choosesite


This will give you a Tracking ID and some code:

google-analytics-3-trackingid

Copy this code (CTRL+C), as we’ll need it later.

Return to T4 and click ‘Add Content’ to your Section Footer. You’ll have the option to add a content type called ‘Raw HTML/Javascript’

This content type needs a name (“Google Analytics” is as good a name as any) and also gives you a box to paste in the code from above (CTRL+V).

Click “Update and Approve” and then next time your site publishes, the Google tracking code will appear in the footer of every page and Google Analytics can start tracking your site.

This may take a few hours, but once it’s working you’ll be able to return to Google Analytics and see the real time tracking working on your site:

google-analytics-6-live


Hidden Sections from the Navigation

For various reasons, you may want part of your site to be hidden from the regular navigation structure.

Hiding Sections

Sections can be hidden quite easily. This means that they will not appear in the navigation bars no the site, but they can still be linked to using a section link and can still be found by anyone who is given the web address.

All you need to do is create a new section (or choose an existing one if you’ve set it up already), and uncheck the ‘Show in Navigation’ box.

Hidden-Section

When you’ve added the section it appears in the site structure except that it is shaded grey.

Hidden Sections are grey

These folders will no longer show in the navigation on the site, but as mentioned above can still be linked to and found (and are very likely to be found by search engines).

This method is not secure and it is still likely that Google and other search engines WILL find and link to this content.

Restricted Sections

We do not password protect or secure sections of websites built in T4: it is extremely unwise to have a public website containing private or sensitive material.

We recommend instead using the Office 376 Suite for project collaboration – specifically Teams, which provides filestore, chat, planning tools and collaborative editing of documents.

Please email it.servicedesk@ncl.ac.uk for advice on using these tools.

Font Picker

For research and conference sites using the old template only, we have provided a font picker.

Fonts are assigned on a template wide basis, so are not picked paragraph by paragraph.

For now, this font picker makes use of fonts available from Google Fonts and allows some facility to change their size. We’ll add more options as they are requested and tested.

First things first:

Go to your site and find the grey section called ‘Section Styles’ – click ‘Add Content’ using the yellow dropdown box to the right of it.

Font-Picker-1

Choose the content template called ‘Font Picker’

Font-Picker-2

Give the Font Picker a name. ‘Font Picker’ will do.

You can specify the fonts for three areas of the template: the banner, which contains the name of your site, the headings within the content area, and the font used for paragraphs and lists.

Font-Picker-3

The trends, both because screen resolutions are much larger than they used to be, and also to help enable pages to be viewable on mobile and tablet platforms, are to make the fonts larger than we currently have by default on the template for university sites.

Some fonts are more suitable for large sizes than others, but as a good place to start, make your Banner Header Font 38, your Content Header font 22 (lower level headers will drop in size by 2px for each header level below this) and your Content Body Font 16.

Click Update and Approve. You can preview these changes – the next time the whole site publishes, your fonts will be updated. Remember to hit F5 to ensure that your browser refreshes the content properly.

Policy and governance Research Data Management Newcastle University

There are quite a few good sites on font pairings:

Note that we don’t currently support the full range of google fonts. If you see one you’d like added, email us at it.servicedesk@ncl.ac.uk.

Making documents available on a web page

There are three main ways to make files available via your website. The assumption is that you are making documents available for public use. If you require any restrictions on the publication of these documents, please contact it.servicedesk@ncl.ac.uk for advice.

  • A list of smallish files (under 5mb) on a single page you can use the File Upload content template. This method is suitable for work package reports and the like and is the method documented below.
  • Slightly larger documents (under 9mb) can be uploaded to the Media Library and then link to them from your page content. This method is suitable for brochures and small print documents.
  • Documents over 9mb or documents whose publication or online sharing must be restricted in some way:
    • If file size is your only concern you may wish to use an external hosting service such as Google Docs or Dropbox, which are designed to handle and share much larger files than T4.
    • For more information on data protection and security issues, you can contact it.servicedesk@ncl.ac.uk for advice.

The File Upload Content Template

Like News and Staff content templates, the File Upload template is designed to display multiple files in a formatted list on a single page.

Go to the Section Hierarchy, and using the yellow dropdown box to the right of the section you want to upload the file into, select ‘Add Content’.

File-Uploads-1

Select File Upload from the list of available content types (note that the selection available will differ depending on the age and type of site you’re working on).

File-Uploads-2

You’ll have an option to add some information about the file – you’ll need to click  ‘Choose File’ to upload it (There is a second ‘Choose File’ button beneath this one that allows you to upload a thumbnail image of the document if you have one, otherwise it will show a PDF or other document icon).

File-Uploads-3

Click Save and Approve, as you do.

As with Staff Profiles and News items, sections containing multiple content have the facility to re-order them by clicking on the up/down buttons, and also to automatically order the documents by Publish Date or in alphabetical order by Name. If you’re using automatic ordering remember to uncheck the ‘Lock’ icons.

Remember to click ‘Save Changes’.

File-Uploads-4

When you preview this section, you should see all of the pieces of File Upload content in a list. You can mix and match this with regular ‘All Purpose Content’.

file_uploads_6-fw

As with all individual pieces of content, you can Move, Mirror or Copy it into another section if you need to.


Styling Content using HTML and CSS

Content on webpages is described using HTML and the layout and look of it can be styled using a language called CSS: Cascading Style Sheets.

HTML and CSS is largely out of scope for this blog, as it’s well described on a number of other excellent sites (I recommend w3schools) and we largely aim our T4 provision at content providers not designers or developers – if you wish to work with a custom template and designer, please contact us using it.servicedesk@ncl.ac.uk, and we’ll discuss your requirements.

Please note that CSS and HTML coding is not supported by ISS beyond providing this documentation and links – site owners are expected to develop their own knowledge of HTML/CSS or have an appropriate budget to work with a designer/developer.

CSS by Example

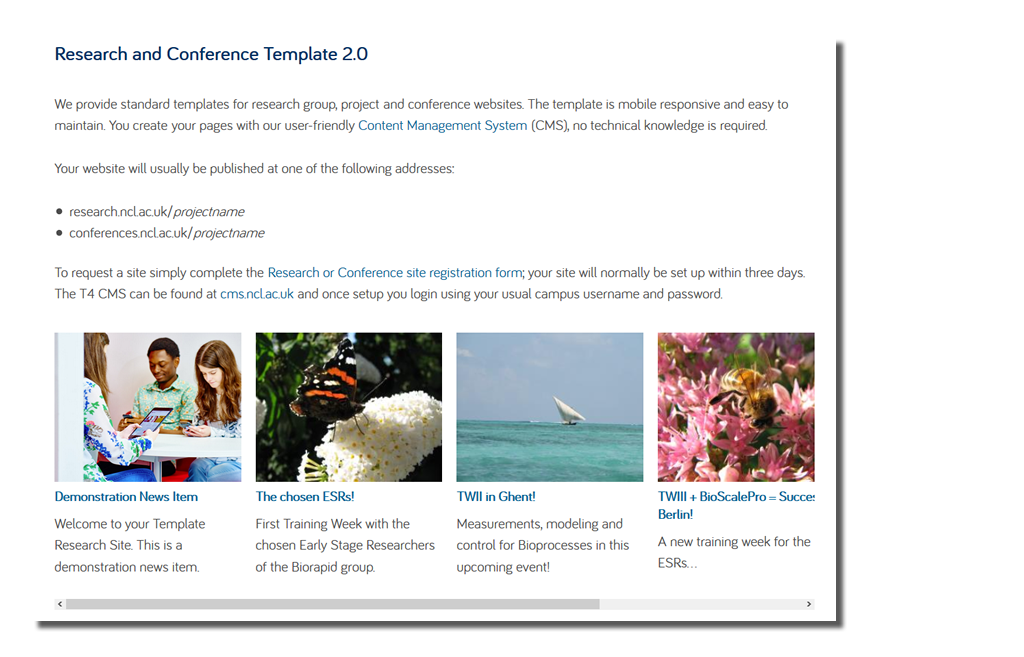
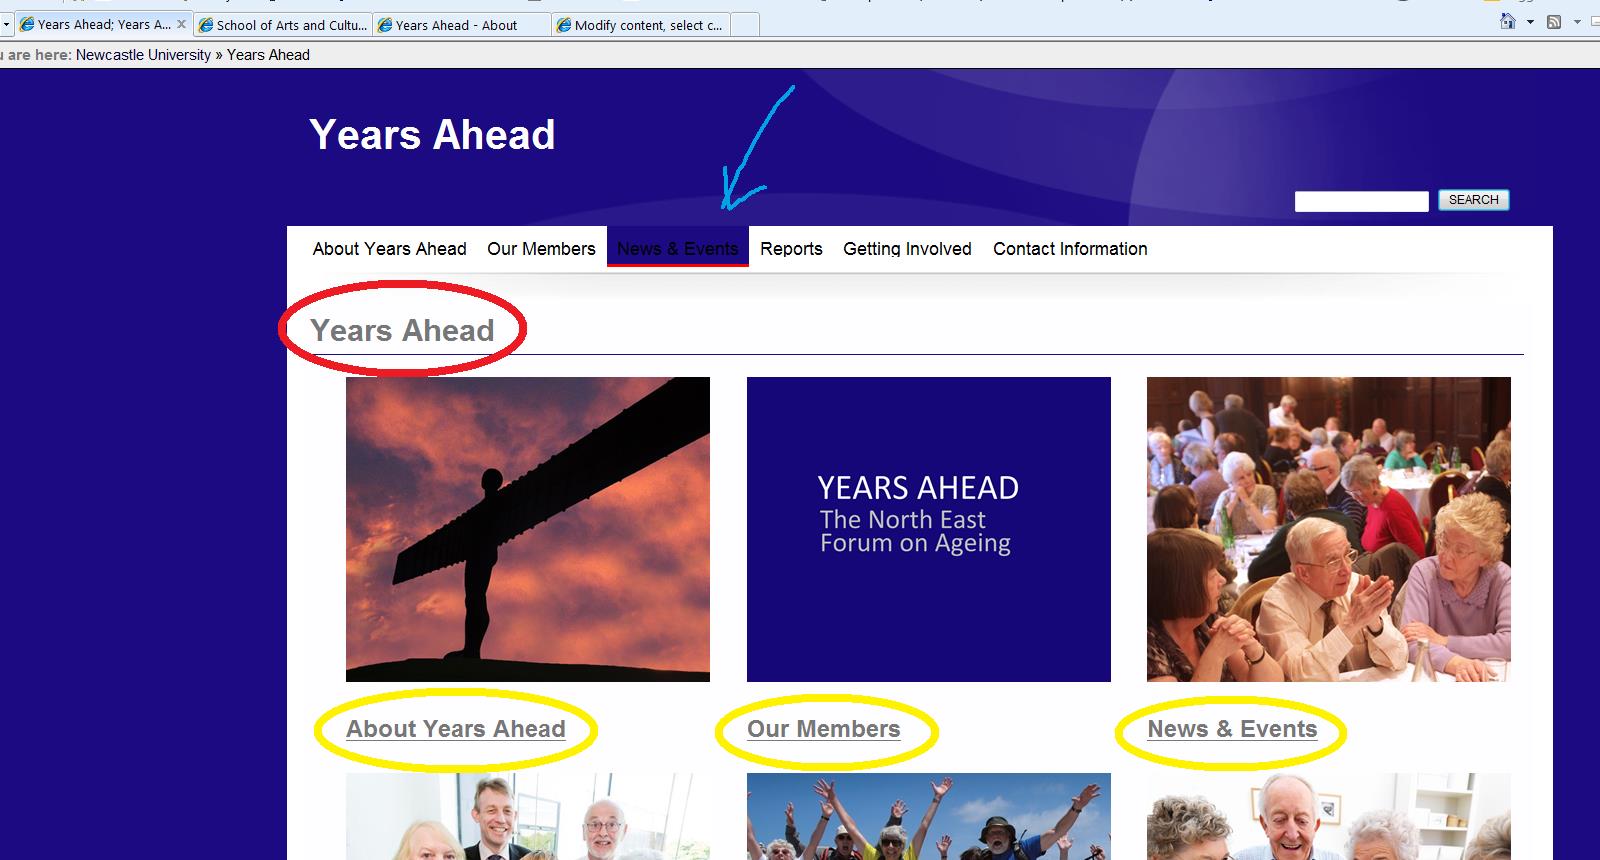
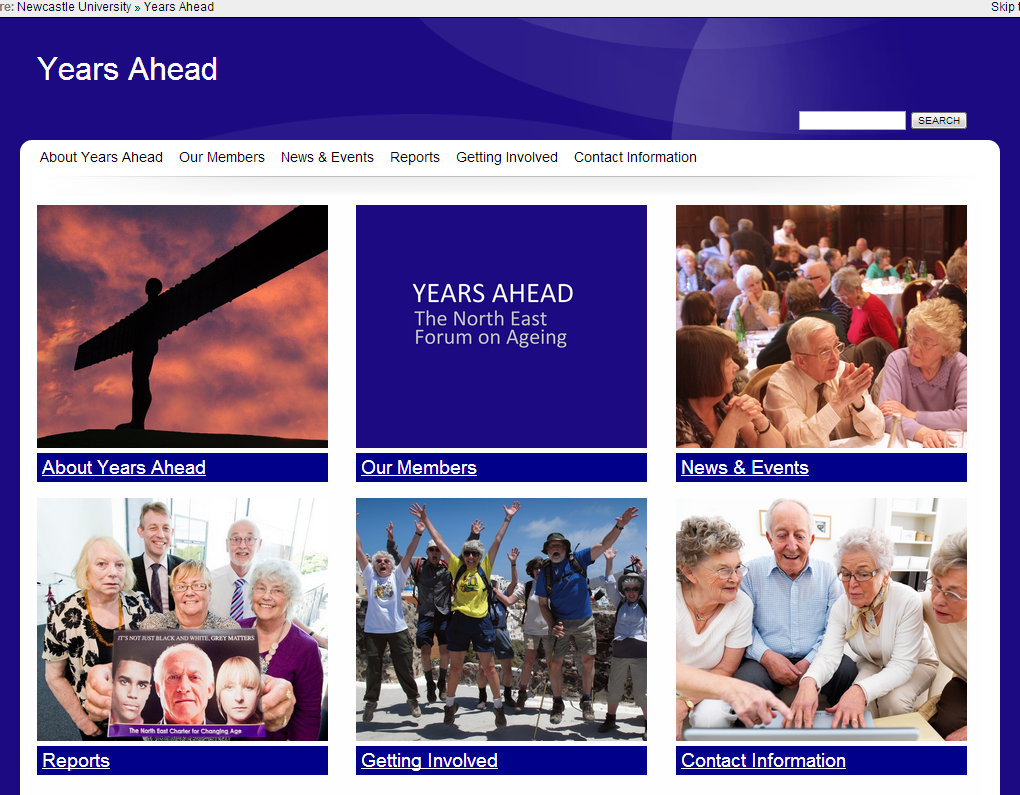
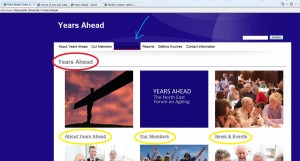
The site below (Years Ahead) has three requirements:

  1. Remove the Header from the page as it duplicates the Banner (highlighted in red)
  2. Change the links under the pictures so that they’re in coloured blocks joined to the images (highlighted in yellow). The grid has been created using the threecol class.
  3. Amend the style of the navigation buttons as the dark blue template makes them difficult to read (highlighted in blue)

Years Ahead

1: Hiding the Header on the Homepage

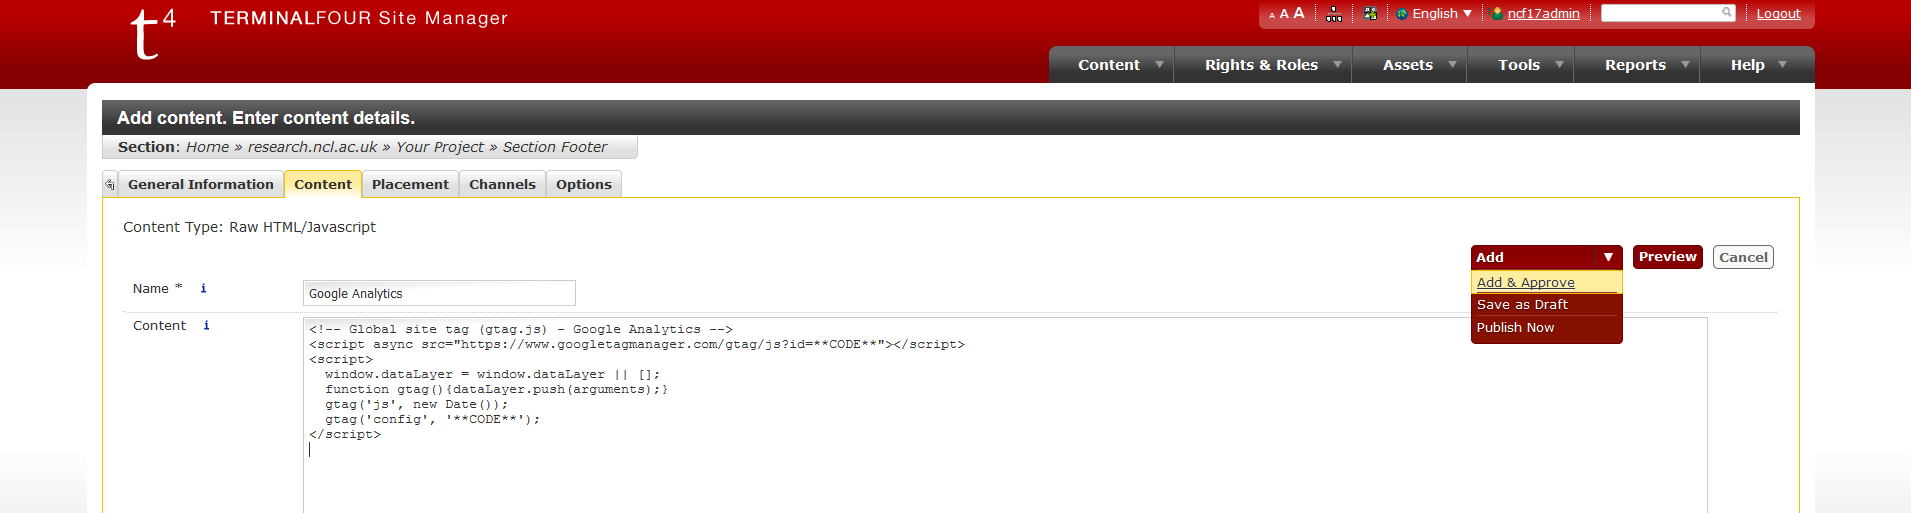
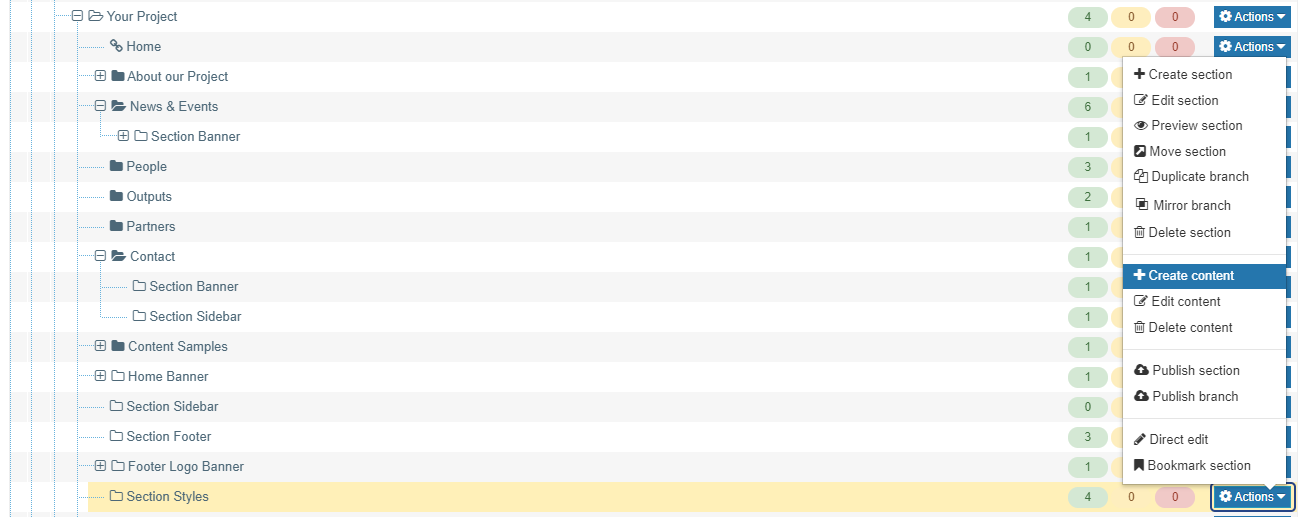
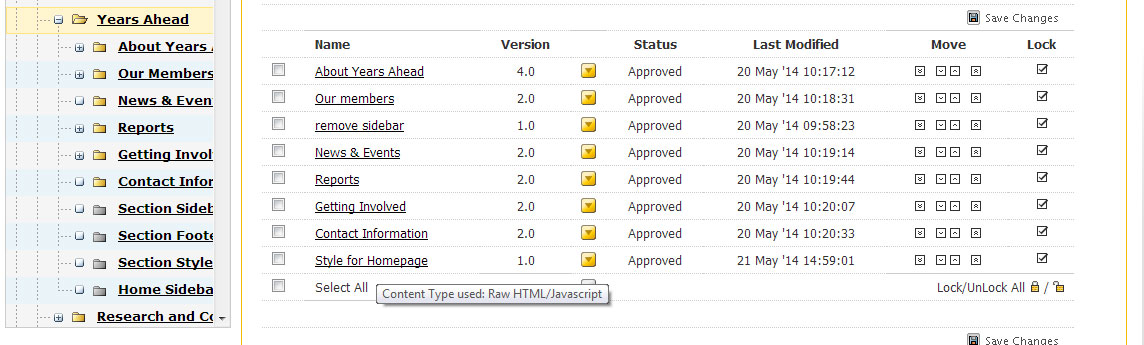
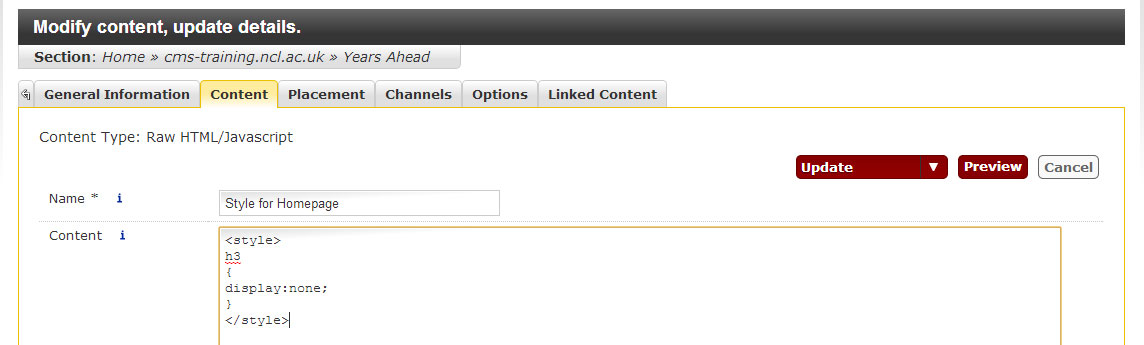
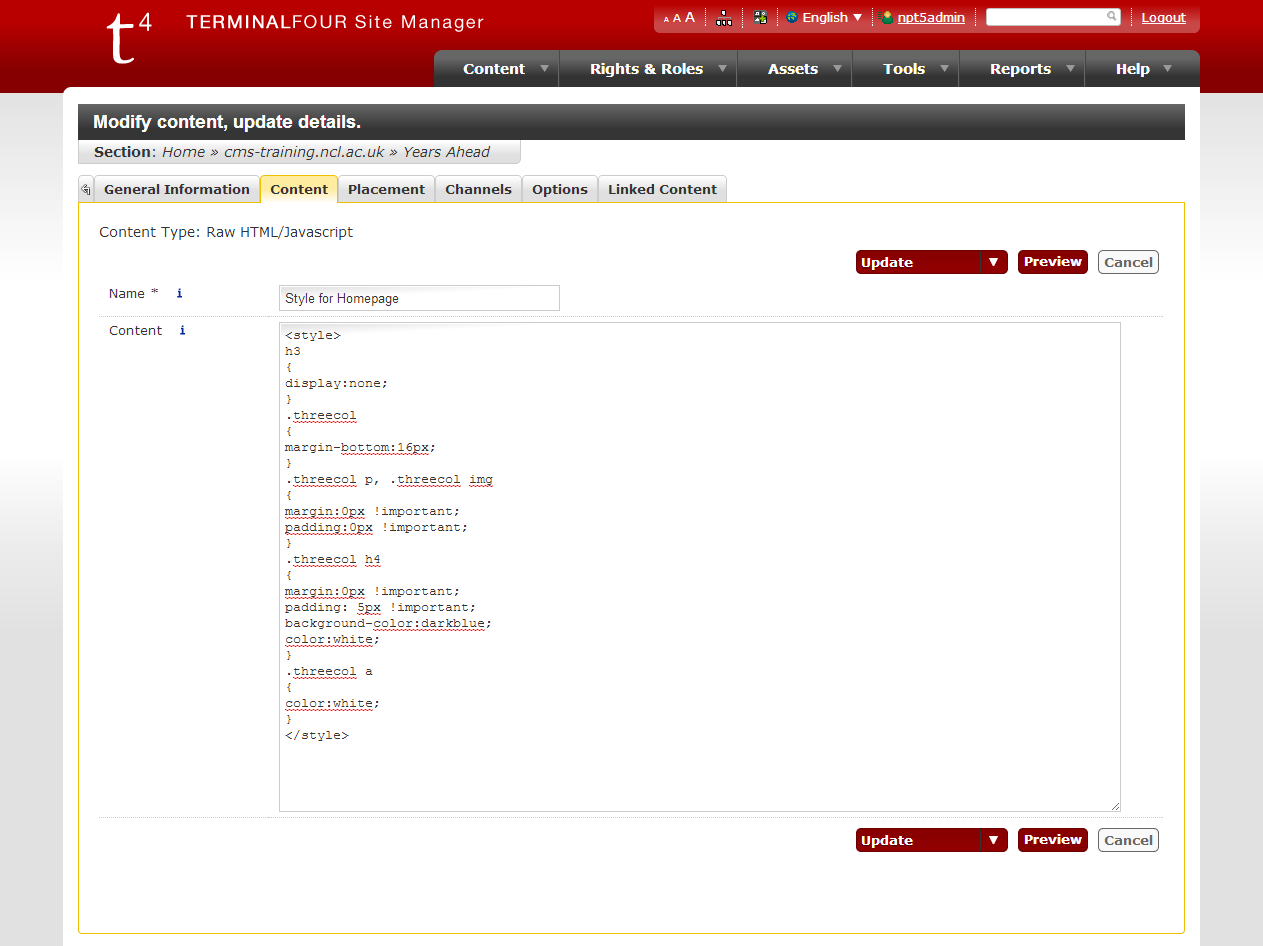
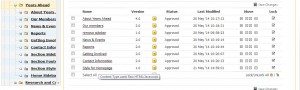
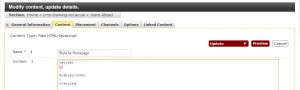
Go to the homepage section, and add a piece of content of the type Raw HTML/Javascript. Give it a name – “Styles for Homepage” is a good name. Note that these styles will only effect the section in which they’re added.

rawhtml


Paste the following into the content area:

<style>
h3
{
display:none;
}
</style>

CSS-Remove-Header

What does this mean?

  • <style> is a html tag that says we’re editing the stylesheet.
  • h3 is a css selector that represents header level 3 – which is what the page content titles usually are in our template.
  • The curly brackets contain the rules, and display:none; is the rule we’re applying.
  • </style> closes the html tag.

Publish and approve – you’re done, the header is removed.

Years Ahead  Years Ahead  Newcastle University


2: Changing the boxes so that they contain a colour.

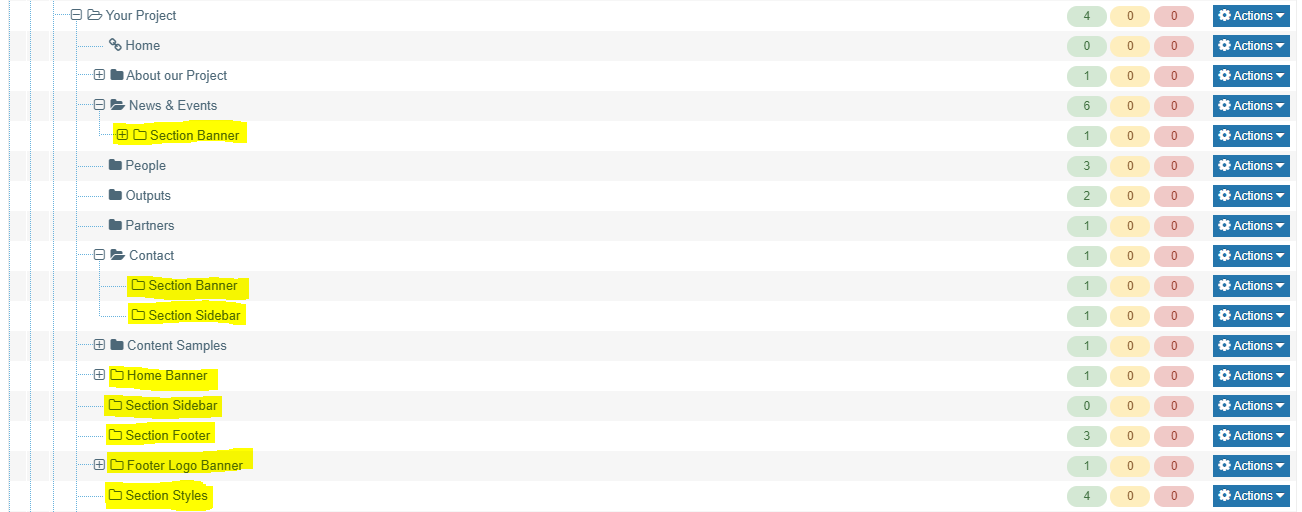
As described on the columns and grids and layout page, these six boxes have been created using the threecol class. Each box is its own piece of content within that section:

rawhtml

Return to the Styles for Homepage content type and add the following code above the closing </style> tag:

.threecol
{
margin-bottom:16px;
}
.threecol p, .threecol img
{
margin:0px !important;
padding:0px !important;
}
.threecol h4
{
margin:0px !important;
padding: 5px !important;
background-color:darkblue;
color:white;
}
.threecol a
{
color:white;
}

All of the above adds new styling rules to any content contained in boxes with the class threecol. Classes are referred to in CSS using a full stop, so we apply style rules to our threecol content using .threecol.

  • The first margin-bottom:16px; makes sure that the boxes are separated from each other.
  • margin:0px !important; and padding:0px !important; remove any existing padding or margin styles from the images (img) or paragraphs (p) within the threecol boxes.
  • The links are within header level 4, so the next bit (beginning .threecol h4) targets them and gives them a dark blue background and white text colour.
  • Finally, .threecol a (stands for anchor) refers to the link text colour: it’s going to be white.

css classes

Previewing the page, it now looks like this:

Years Ahead Boxed  Newcastle University


3: Updating the Styling on the Navigation Bar

The navigation bar across the top has an ID: top-nav. ID’s are selected using a # symbol, so we can apply rules to it using #top-nav.

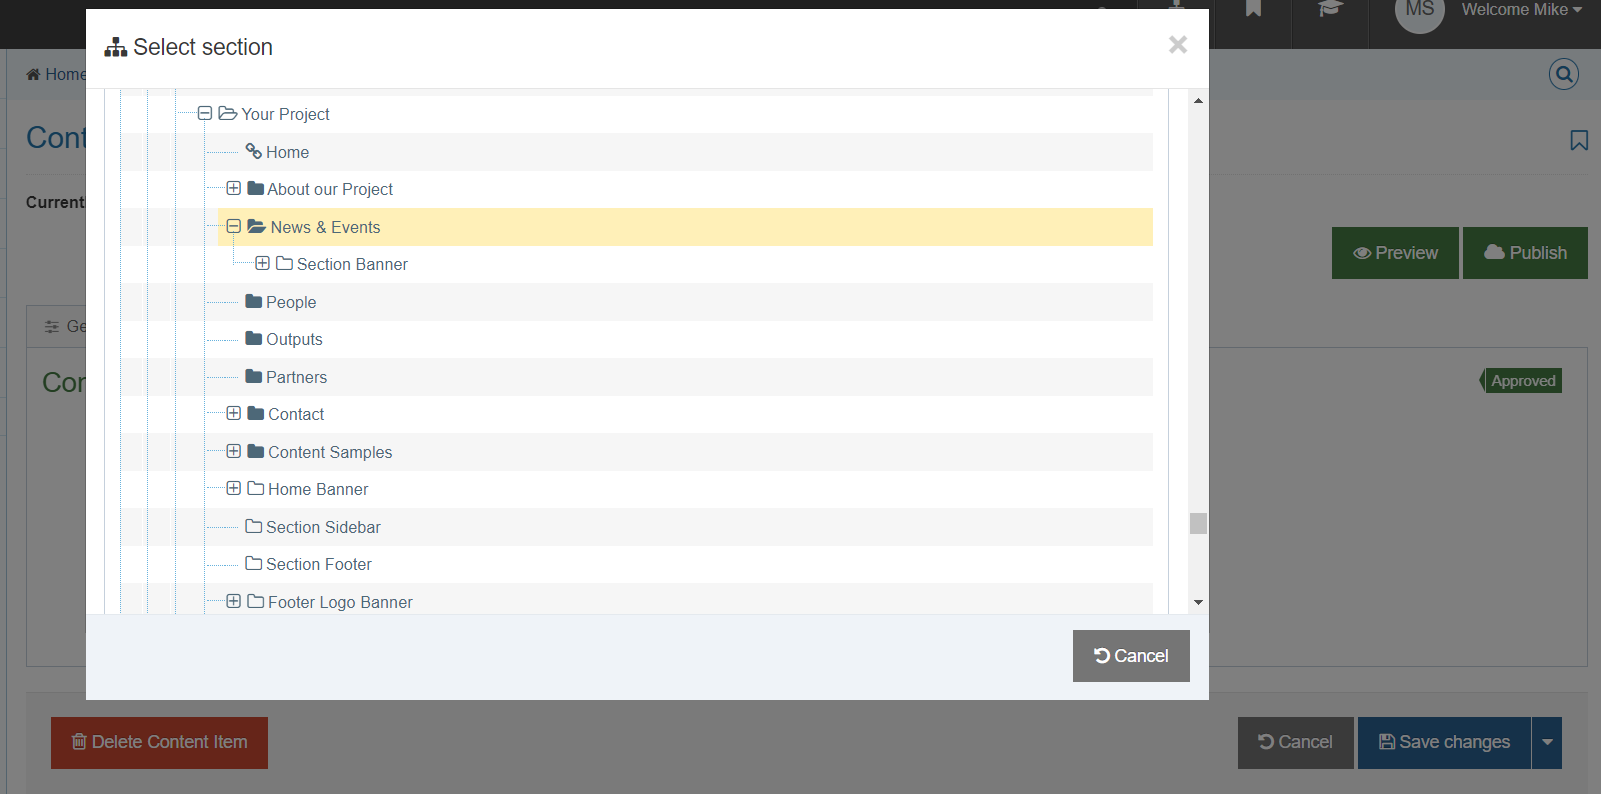
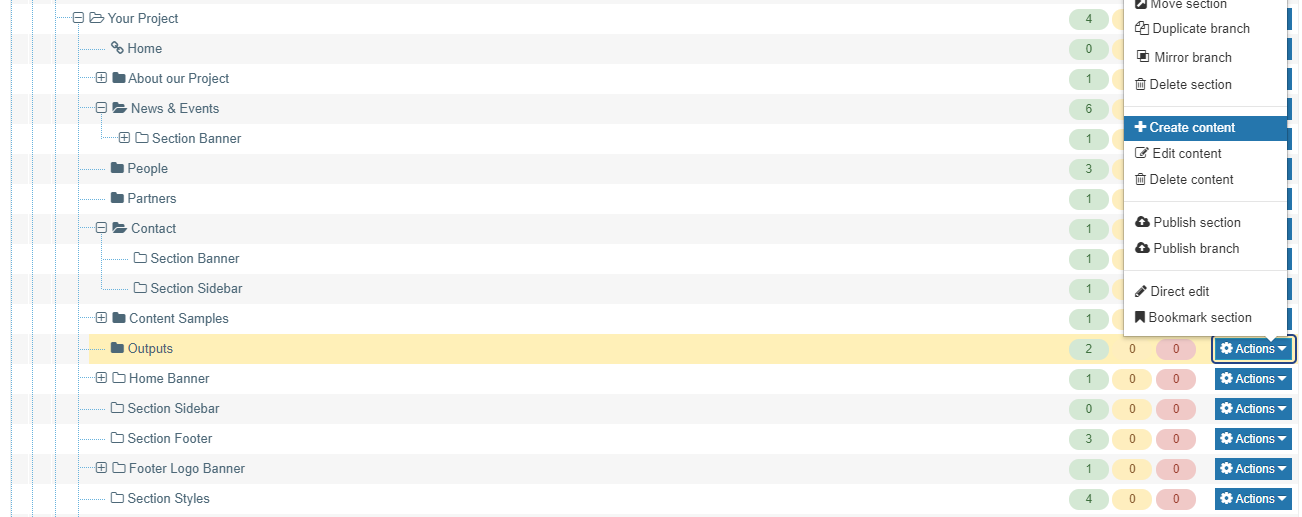
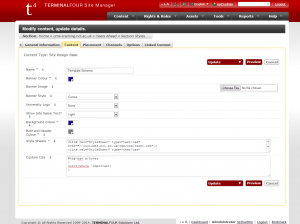
Since we want these CSS rules to apply to the whole site, not just the homepage, we should put them in the section styles folder, which contains a piece of content called ‘template scheme’.

templatescheme


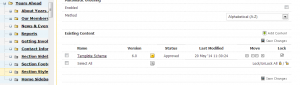
The template scheme content contains the facility to choose colours and upload an image for the sites top banner, but for now we’re interested in the final Custom CSS field. Add the following code to this field.

#top-nav a:hover
{
color:white !important;
}

Custom CSS

  • #topnav targets the ID of the navigation bar.
  • a refers to the hyperlink (anchor)
  • :hover refers to the state of the link when a mouse is hovering over it.

Update and Approve the content. Because this style rule refers to the entire site, not just a single page, preview won’t work and you may have to wait until the entire site publishes to see the results.


Basic Image Editing in Photoshop

While it is possible to crop and resize images within the T4 media library and resize them within the content area, higher quality results will be obtained by resizing them in photoshop, which is available on RAS in the folder labeled Graphics Software.

Images for use in the News or Staff templates may need to be resized before uploading as modern cameras take images that are far too big to be uploaded to a website.

Open Photoshop in RAS

Firstly, save all of your images to your H or other shared Drive so that they can be accessed from within RAS.

ras

Go to ras.ncl.ac.uk and open the folder labelled Graphics Software. Then click on photoshop. Once photoshop appears, go to File -> Open and locate your file.

Cropping and Resize the Image

If you need to crop the file you’ll find the crop tool in the vertical tool bar on the left – it looks like a dashed square, and will allow you to drag a box within the image you wish to crop.

photoshop_0008_Layer 1

Select Image -> Crop from the top menu bar.

photoshop_0007_Layer 2

Once you have the crop of the image you like, you’ll need to resize it to better fit webpages (your phone or camera will probably have taken images designed for much higher resolution than is available on websites).

photoshop_0006_Layer 3

The content area of most websites built using T4 is around 710 pixels wide so set this as the width.

photoshop_0005_Layer 4

Contrast and Colour Balance

Many images will benefit from a little ‘warming up’. If you visit Image -> Adjustments -> Color Balance, you might want to experiment with increasing the Red in the image by +10 to +20 – don’t overdo it or the image will look artificial.

Iphotoshop_0004_Layer 6

If you visit Image -> Adjustments -> Auto Contrast you may find that the image looks better on screen than your original, though this does depend on the type and quality of your camera.

photoshop_0002_Layer 8

Save for Web and Devices

When you’re happy with your image, go to File -> Save for Web & Devices.

photoshop_0001_Layer 9

You’ll be given an opportunity to choose file format and quality in the right hand panel: 70% is more than adequate for web publishing.Photography is best saved as JPG and line art or diagrams as PNG.

photoshop_0000_Layer 10

Once you’re done, click Save, being careful to choose a new file-name and not overwrite your originals.

And once you’ve done that, upload the image into the T4 Media Library.


Form Builder

Microsoft Forms to Replace Form Builder 

Form Builder has been used by the University for form creation for over 10 years, and has became increasingly difficult to support and maintain. To ensure your data remains as secure as possible, Form Builder will be retired from service later this year. In preparation for this, from 12 August 2022, you will no longer be able to create new forms in Form Builder.

https://services.ncl.ac.uk/itservice/collaboration-services/form-builder/form-builder-retirement/