Thing 22: Exploring private browsing

This post in unashamedly reused from our recent Cyber Security: Safety at Home, Online, in Life free online course. It appeared in week 1 and is an open step – so anyone can see it. You might like to share the link with others if you find the idea of private browsing appealing. Thanks to the team in Computing Science who wrote this article, for allowing us to share with you (they did a much better job than I could have done).

At the end of the article I have added a section on how private browsing might be useful to us every day at work and something to remember in terms of University use of the internet and forthcoming legislation relating to privacy online.

Cyber Security: Safety at Home, Online, in Life: Exploring private browsing

We use a range of tools which have options to protect our privacy online every day. Can we use these tools better knowing exactly what they protect?

Private browsing

Modern web browsers provide an optional privacy mode for browsing. Although privacy is increased, some features which make browsing easier, such as caching, are removed. ‘Privacy mode’ has different names in different browsers, but operates in a similar way.

How does private browsing work in your web-browser?

Let’s examine the official information provided by the major browsers on their privacy mode of browsing and how they work.

Choose the documentation for the browser you use the most.

Finding out about browsing terms

If some of the terms used are unfamiliar to you you may want to find out a little more about them.

  • Browsing history: What is it? What information exactly does each record in the history include? Where is it stored? Does a website I visit have access to my browsing history?
  • (HTTP) Cookies: What are cookies? What are they used for and how? Where are they stored? Which websites have access to which cookies?
  • Web cache: What is it and what is it used for? Where is it stored? Who has access to it?

Some possible places to start with are:

What are the advantages and disadvantages of using private browsing mode?

How might private browsing be useful to me?

Do you have more than one email account you need to use at work? Have you tried to log in to Office 365 to access another account other than your personal work one and got frustrated that you are automatically logged in to your work account?

This is one example where private browsing can help you out. By switching into incognito or private browsing mode you can avoid the auto login feature built into campus desktop and access that group email account you find frustrating to access. Try using your usual browser in private browsing mode – and if that is still frustrating choose another browser (is you usually use Internet Explorer, try using Chrome, for example). By choosing incognito or private browsing mode, the browser does not store your browsing history, and you won’t therefore be automatically logged in next time.

If you are using a computer that is not your own desktop machine, or you share a computer at work, then private browsing could be useful, especially if you forget to log out, as it won’t keep you logged in, does not save passwords, and erases your browsing history. At home this might be handy if you are trying to surprise the person you share a home computer with….

Can you think of other examples where private browsing might be useful?

One thing to remember….

Here at work, private browsing does not mean that our friends and colleagues in NUIT don’t have countless other ways of seeing what you’re doing on your computer. The University’s rules of use, with guidance outlined in a statement on internet use and a corresponding policy, which should still be followed in line with the Computer Users Agreement that everyone signs before being given access to University IT facilities.

And at home, your ISP (Internet Service Provider) could, if required, be required to retrieve any browsing history under specific legal circumstances. The so called ‘Snooper’s Charter’ – Investigatory Powers Bill is in its final parliamentary stages. The final reading in the House of Lords takes place on 25 October, and once amendments have been considered it will go for Royal Assent before being entered into the statute and becoming law.

Thing 21: Typing less – building blocks, autocorrect and fields

Fed up with typing out long phrases like “Learning and Teaching Development Service”? Why not get Word to do the work for you….read on to explore a couple of approaches.

Part 1: AutoCorrect

We can harness Word’s Autocorrect feature to do this – the one that automatically converts “necesary” to “necessary” when you press space bar.

Let’s make ltdsx expand to “Learning and Teaching Development Service”

Here’s how to do it:

In Word

  • click File/ Options / Proofing
  • click AutoCorrect options

autocorrect options 1

  • Add a new entry
  • Click Add, then OK

If you have some pet typos you can also add them in here.  A notable plus is that these autocorrect entries are saved with Outlook.

Part 2: Quick Parts/ Building Blocks

You may have noticed if you start to type Newcastle University that Word will predict this and give you the chance to press Enter to finish typing it.

autotext offered 3

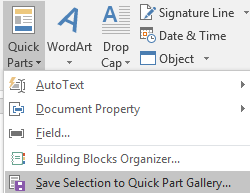
This comes from Quick Parts – on Word’s Insert menu.

quick parts 4

Let’s add a new one to the list

University Learning, Teaching and Student Experience Committee (ULTSEC)

What would be nice would be for this to offer to autocomplete this after you typed “Univer “

Here’s what to do

  • Type out the phrase you want to store
  • Select the text

then either

  • Press Alt-F3  (the speedy keyboard shortcut way to do it …

Or

  • Click the insert tab
  • Select Quick Parts
  • Click “Save Selection to Quick Part Gallery”save to gallery 5

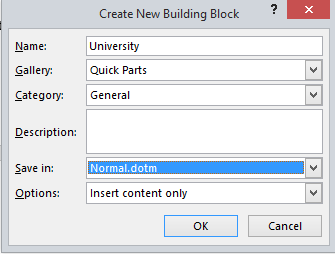
Both routes will take you to the “Create New Building Block”,

in the name field type in the name you want to use for this quick part….we’ll just go with the default.

create new building block 6

Click Ok and try it out, you should see….

autotext offerered ultsec

You can add whole blocks of text to quick parts. If you don’t want to wait for the prompt box to come up you can press F3 to insert the autotext.

Outlook and Word save building blocks in different locations (bah!), I’ve only found faffy ways to copy them between programs.  If it is easy though please say!

Part 3: Fields

Via Word’s Quick Parts you can also add useful fields, such as the filename and location, the page number, the save date etc. These can often be helpful in document footers.

Try this:

  • Double click in a document footer
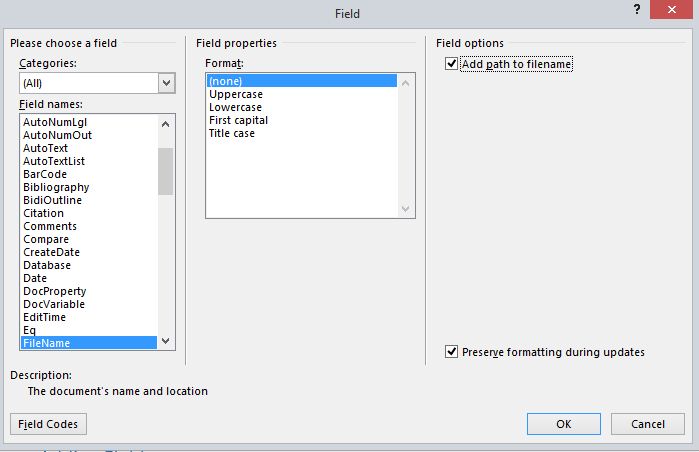
  • Click on Insert ribbon, then Quick Parts, then field
  • Select Filename and tick “Add path to filename”
  • Click OK

field 9


If I do that on this document, I see:

path11

Putting these things together

You can add fields into the building blocks you create.

For example you may want to have a quick way of adding the filename + path and page number to the bottom of a document.

Here’s a final challenge:

  • Create a new building block called “footerbits” which adds the following fields: filename and path, page number.
  • Test it out by typing footerbits and then pressing F3

Hint: Generate the field codes first, select the text, press Alt-F3 and give it a name “footerbits”

Thing 20: Using online forms

Using online forms is a really handy way of collecting information, organising events and taking bookings and means that all of the responses are automatically collated in one place.

Form builder

The university’s form builder service is available here: http://forms.ncl.ac.uk/

To get started click “Create New Form!”Create new form

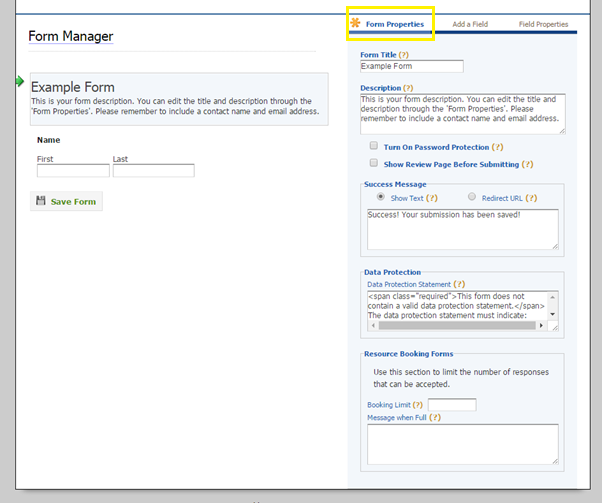
Click on the form title to edit the form properties, here you can add a title, description and message that will appear after people have submitted the form.

Form Manager

All forms must have a relevant data protection statement added:

e.g. “All information that we hold concerning you as an individual will be held and processed by Newcastle University strictly in accordance with the Data Protection Act 1998. We will not, without your consent, supply your name and addresses to any third party except where (1) such transfer is a necessary part of the activities we undertake, or (2) we are required to do so by operation of law. Newcastle University’s data protection policy is available at www.ncl.ac.uk/data.protection/

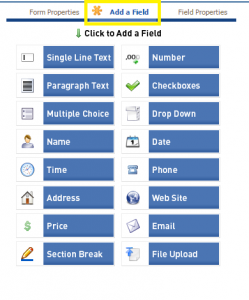
You can then choose from a number of different fields to add to your form:    

Add a field

Once you have built and saved your form, it will appear in a list on your homepage:

Form builder list

Click “Publish Form” to get the url which you can either send via email or include in a website and you can set the entries to be emailed to a particular email address by clicking “Emails”.  You can also download a spreadsheet of the results by clicking “Entries”.

Once you have made a form, you can easily duplicate it to reuse it for another event or delete it.

Top Tip! Use a shared account to create your form, this means they can be easily duplicated or edited by anyone in your team

Typeform

Typeform makes a very pretty form which you can customise. It also allows you to apply calculations and logic steps. You can have a go using the free trial option which also has lots of handy How To videos.

You can access it here: https://www.typeform.com/

Click “Create a new typeform” to get started and you can choose to start from scratch or use a template.

New Typeform

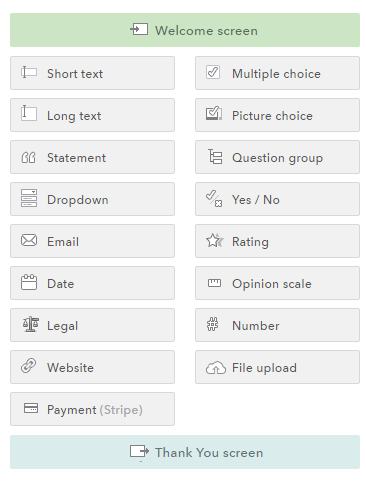
On the left hand side, you will see that you can add a welcome screen, a thank you screen and choose from loads of different question types.
typeform menu

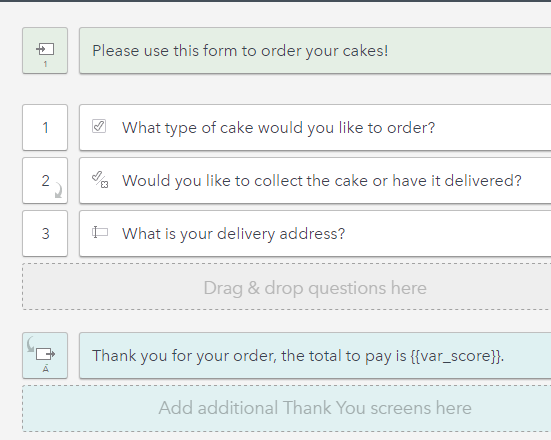
Have a go at creating a form to order some cakes using this spreadsheet. Add the welcome text, questions and thank you screen then we will add the calculations and logic jump.

typeform questions

Adding a Calculation

Now we are going to add a calculation that will give the user a total price for their cake and delivery. On the multiple choice “What type of cake would you like to order?” question click the calculatorcalculator

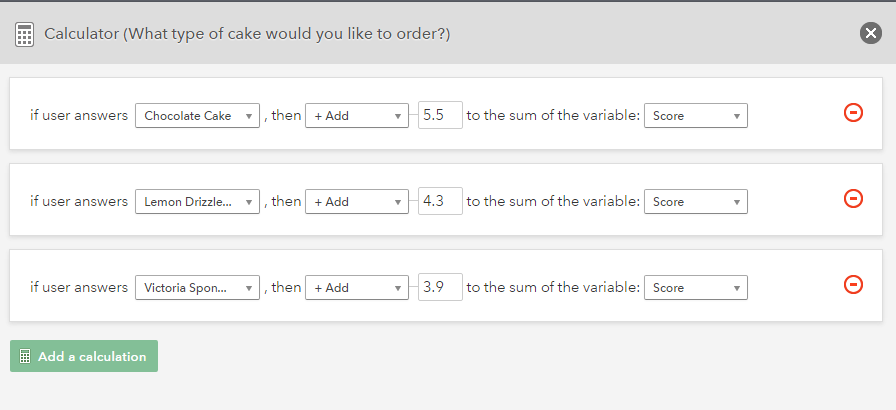
Then you can assign a price for each cake by clicking “Add a calculation”

typeform calculation

Then do the same for the delivery question and add the price for delivery when they answer “Yes” (You don’t want it to charge them if they said no!)delivery calc

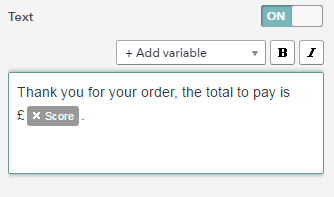
Finally in the Thank you screen, you can add the variable of “Score” which will show them their total at the end of the form:

Thank you screen

Adding a Logic Step

We want to skip the delivery address question if they are collecting their cake and go straight to the end of the form.
So click the logic jump icon on the “Would you like your cake delivered?” question:

logic jump
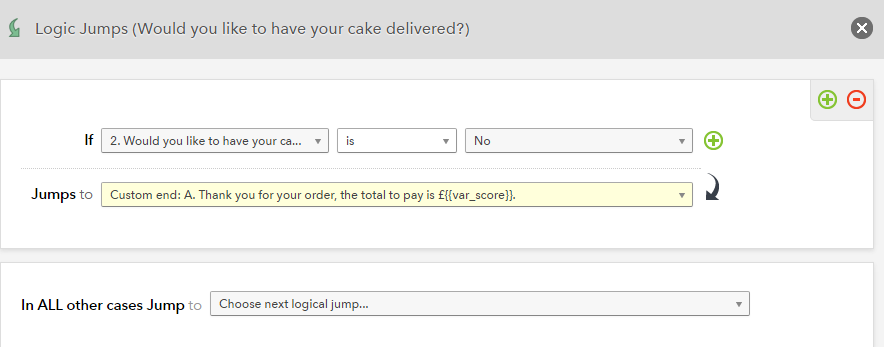
Here you can set it so if they answer “No” it jumps to the Thank you screen.

logic jump step

View type form

Now you can check your form is working by viewing it.

You can also use the “Design” tab to change how the form looks and the “Analyze” tab to view the results and other info. You can download your results as an excel spreadsheet and you can also view a report which gives you stats for each question.

typeform tabs

Thing 19: Writing a reflective blog using ePortfolio

‘It is not sufficient simply to have an experience in order to learn. Without reflecting upon this experience it may quickly be forgotten, or its learning potential lost. It is from the feelings and thoughts emerging from this reflection that generalisations or concepts can be generated. And it is generalisations that allow new situations to be tackled effectively.’ (Gibbs, 1988)

ePortfolio is a tool that can be used to encourage and improve your reflective practice. The ownership of the blog is with you. You decide what posts to share, and with whom to share them. This can help encourage deep reflection including writing about mistakes you have made, your fears, and hopes, confident that only you can see the post unless you choose to share it.

To write a blog post, follow these instructions:

Blog entries can be made from several areas of ePortfolio. You will see the adding blog entry graphic on the frontpage, the blog page, communities, and the skills section.Capture

  • Title – This is the title of your blog post.
  • Blog Text – This is where you should type the main content of your blog post.
  • Everyone in the University – tick this box to make the blog post public.
  • Tags – this is where you would enter keywords to describe your blog posts. Use accurate keywords as this will enable more effective indexing and searching.
  • Communities – Communities are online collaborative spaces, where ePortfolio users can share blogs and comment on other members’ blogs. If the blog post is to be shared with any of the communities, use this area to select which communities can see the post. You will only see Communities that you are a member of.
  • Skills – you can align a blog post with a skill from a skill set, or competency framework. All undergraduate students will be subscribed to the Graduate Skills Framework
  • Shared group – if you wish to share this post with any of your share groups, ensure that group is ticked. If you do not see this option, you are not a member of any share/supervision groups.
  • Upload a file – You can add a file to go along with your post. Your file will be shared with any of the groups you are sharing the blog post with.

Note: If you save a partially completed blog post and have some sharing options enabled (either share group, supervision group, or community), the partially saved blog post would be seen by those you are sharing with. They will see a live link to your post, so if you edit it later, they will see the updated version.

If you are looking to further explore the reflective process I would recommend reading some articles from Jenny Moon, Graeme Gibbs, and Donald Schon.

Gibbs, G. (1988) Learning by Doing: A guide to teaching and learning methods. Oxford: Oxford Polytechnic Further Education Unit.

Why is this useful to me?

The ePortfolio system is automatically available to anyone in the University to use. You already have an account there. There are already easy ways to tag your posts with skills relating to the UK Professional Standards Framework if you are working towards HEA Fellowship, or with categories relating to Staff Skills including Success Factors. Both os which you might find useful in logging things you have done as you go along, so that when you come to prep for your PDR, or to write your fellowship application, you have material ready and available to draw upon.

Neat eh?