Thing 22: Exploring private browsing

This post in unashamedly reused from our recent Cyber Security: Safety at Home, Online, in Life free online course. It appeared in week 1 and is an open step – so anyone can see it. You might like to share the link with others if you find the idea of private browsing appealing. Thanks to the team in Computing Science who wrote this article, for allowing us to share with you (they did a much better job than I could have done).

At the end of the article I have added a section on how private browsing might be useful to us every day at work and something to remember in terms of University use of the internet and forthcoming legislation relating to privacy online.

Cyber Security: Safety at Home, Online, in Life: Exploring private browsing

We use a range of tools which have options to protect our privacy online every day. Can we use these tools better knowing exactly what they protect?

Private browsing

Modern web browsers provide an optional privacy mode for browsing. Although privacy is increased, some features which make browsing easier, such as caching, are removed. ‘Privacy mode’ has different names in different browsers, but operates in a similar way.

How does private browsing work in your web-browser?

Let’s examine the official information provided by the major browsers on their privacy mode of browsing and how they work.

Choose the documentation for the browser you use the most.

Finding out about browsing terms

If some of the terms used are unfamiliar to you you may want to find out a little more about them.

  • Browsing history: What is it? What information exactly does each record in the history include? Where is it stored? Does a website I visit have access to my browsing history?
  • (HTTP) Cookies: What are cookies? What are they used for and how? Where are they stored? Which websites have access to which cookies?
  • Web cache: What is it and what is it used for? Where is it stored? Who has access to it?

Some possible places to start with are:

What are the advantages and disadvantages of using private browsing mode?

How might private browsing be useful to me?

Do you have more than one email account you need to use at work? Have you tried to log in to Office 365 to access another account other than your personal work one and got frustrated that you are automatically logged in to your work account?

This is one example where private browsing can help you out. By switching into incognito or private browsing mode you can avoid the auto login feature built into campus desktop and access that group email account you find frustrating to access. Try using your usual browser in private browsing mode – and if that is still frustrating choose another browser (is you usually use Internet Explorer, try using Chrome, for example). By choosing incognito or private browsing mode, the browser does not store your browsing history, and you won’t therefore be automatically logged in next time.

If you are using a computer that is not your own desktop machine, or you share a computer at work, then private browsing could be useful, especially if you forget to log out, as it won’t keep you logged in, does not save passwords, and erases your browsing history. At home this might be handy if you are trying to surprise the person you share a home computer with….

Can you think of other examples where private browsing might be useful?

One thing to remember….

Here at work, private browsing does not mean that our friends and colleagues in NUIT don’t have countless other ways of seeing what you’re doing on your computer. The University’s rules of use, with guidance outlined in a statement on internet use and a corresponding policy, which should still be followed in line with the Computer Users Agreement that everyone signs before being given access to University IT facilities.

And at home, your ISP (Internet Service Provider) could, if required, be required to retrieve any browsing history under specific legal circumstances. The so called ‘Snooper’s Charter’ – Investigatory Powers Bill is in its final parliamentary stages. The final reading in the House of Lords takes place on 25 October, and once amendments have been considered it will go for Royal Assent before being entered into the statute and becoming law.

Thing 14: Staying safe online – spotting suspicious emails, viruses, and scams

We all have emails that get through to us from time to time which we might have some doubts about, and a small proportion of those even look genuine (!). We have all seen the messages that come out from NUIT to all staff when someone has opened an email which contained a virus….. but how do we recognise those rogue emails? And how do we stop ourselves from clicking on something that might turn out to be malicious and result in our identity being used fraudulently?

How do I know if an email is spam, a scam or contains a virus?

In the development of the forthcoming Cyber Security: Safety at Home, Online, in Life free online course, we have, in our little office, become even more acutely aware of the increasing sophistication of our online adversaries. There is a lot of brief and helpful  guidance available. Here are a couple of pointers:

Many of these scams are about criminals trying to get more information about you – including personal details like bank card and account details. This can lead to identity fraud.

Have you been or do you know anyone who has been a victim of identity fraud?

CIFAS has been doing a lot of work to raise awareness of identity fraud.

Watch this film about how easy it is to piece together details of people from something as simple as buying a coffee:

What surprised you?

There is an online fraud risk profiler to assess how at risk you are. Have a go at it.

Will you do anything differently as a result?

The Information Commissioner’s Office (ICO) has a really good page on Identity Theft with advice on what to do if you have been a victim.

I want to learn more!

There will be more advice on managing your online professional profiles in a forthcoming thing, and on how you can manage your campus desktop, email and general electronic housekeeping soon.

In the meantime here are a few online courses which may be of interest:


Thing 12: Using styles and templates in Word, an introduction

Consistency in document presentation is something that has come up several times recently, alongside using document templates.

One way of ensuring that documents we produce have the same consistent approach is to use styled templates in Word.

What are the advantages of using styles?

By agreeing to use styled templates we can ensure that we are consistent in presentation. When styled documents are converted into PDFs, the software uses the styles as a way to generate indexes, bookmarks etc that have a cascading hierarchy. This makes navigating longer documents easier for the reader, and for screenreaders.

  • You can auto-generate a table of contents.
  • You can move pages and numbered paragraphs around within a document and the page and paragraph numbers change automagically saving you time and frustration.
  • You can move well formatted text easily between Word, PowerPoint, Excel and even websites.
  • If you receive a styled document and want to take content from it into another document, using the paste and match styles function in word makes it match the rest of your document beautifully.

Mastering styles is worth doing as it will save you a lot of time in future.

Your task

There is a good online tutorial from FMS on using styles effectively in Word.

Work through it, and then think about whether or not a styled set of LTDS templates would be useful or not, and why or why not.  Add a comment to this post with your thoughts, and as Mrs Merton might say “Let’s have a heated debate…”

Thing 11: Writing for the web, the LTDS website and blog

With the migration to a revamped website, and the relatively recent advent of the learning and teaching blog with its related host of social media accounts, it’s probably about the right sort of time to have a little reminder of good practice in how to alter your writing style for presenting information on the website, or for putting together a blog post for the learning and teaching blog.

Whilst Katie C and Claire are our blog and social media leads in the team, there is nothing to stop anyone in the team putting up something on the blog, and most of us probably have some area of responsibility on the website. So getting into practice with writing for the web and blogs is something we should all be doing.

This thing is not a technical how to. It’s more about when you know you have something to add to the website or blog, how you identify what goes where, and a reminder of the guidance which has already been put together, which you might like to bookmark for future reference. Go to /TeamSecure/Website/Website_content_update September_2015 – this folder contains a great deal of useful information about the website including guidance on writing for the internet and a writing a blog post.

Website, blog or email?

  • As a general rule of thumb, if what you want to tell people about is fairly time specific, its probably best on the blog.
  • If your content is fairly ‘newsy’ its definitely the blog.
  • If there is some long standing or non time specific content its probably best on the website. But you might want to tell people about it, which might warrant an explanatory blog post pointing to the website.
  • Consider if your message/content relates to a very specific audience. If it might be relevant to more that one group of people, a blog post might be better than writing an email, and then composing a short email pointing to the blog post.
  • Writing blog posts rather than sending out emails endorses our values of transparency too – content is public rather than ring fenced to certain groups.
  • Are you sending out a set of slides from something? Put them in a blog post, and you can point more people to them.

I’ve got nothing interesting to say

All of us have interesting things to say about what we do. Our job is about communicating. And the more we tell people about what we do and how we can work together, the better our colleagues will understand what the service does, and what its value is to the organisation.

Communicating what we do isn’t down to one person who has that word in their job title. It’s down to every single one of us.

Have a go

Think about what you are doing in your job currently. Is there an aspect of it that people should know about? Using the blog you set up on day one of 23 Things and have a go at using the guidance to help you to write an update on one thing you are currently working on.

If you would like some feedback on it, you can talk to Katie, Claire, Graeme, Nuala or Suzanne.

If you hear someone else talking about their work and you think its interesting, you might like to suggest a blog post to them.

Thinking about putting stuff on the blog is a mindset. And it takes a little while to get into thinking about blogs as a primary mode of communication. But don’t be put off – posts can be really short.

Here’s a good example from one of our colleagues in Computing Science who has written briefly about developing the Cyber Security free online course.

There are loads of good examples from this blog, so scroll through and see what kinds of content is being added.

I need more help

Talk to Katie, Claire, Graeme, Nuala or Suzanne.

Thing 10: Attribution matters

cc_by_cake

cc-by cake © Suzanne Hardy, 2005 CC-BY 3.0 Unported© © © ©

You’ll probably all have heard me blether on and on (and on) about copyright in the three years I’ve been with LTDS. It’s a passion of mine. No idea why. I think it might be because I think giving credit when you use someone else’s work is really important. And just plain good manners.

The Copyright, Designs and Patents Act 1988, is the current UK copyright law (the UK Copyright Service has a really good user friendly summary). It gives the creators of literary, dramatic, musical and artistic works the right to control the ways in which their material may be used. And in the UK copyright always exists. If something is recorded, copyright exists automatically. You don’t have to register it anywhere. It just exists. You can register copyright with the UK Copyright Service, but it isn’t a requirement. 

Giving credit – acknowledging whose work you have used, where and how – is known as attribution.

In academic written work attribution is generally given via referencing, citation, quotation or reproduction (especially in the case of a visual piece of work) – and substantial quotation or reproduction would fall under copyright law. There is a really good guide to referencing by the Library. And that’s usually fine as long as you follow referencing guidance. Where you are using a substantial portion of someone else’s work then you should seek permission to use it, unless fair use is covered by licensing. The University has many licenses in place to allow for using copyrighted work in education. There is another excellent libguide on copyright and IPR that is definitely worth bookmarking.

Attribution is just as important with teaching materials, and even with administrative documentation.  It’s just good manners, and since the most recent changes to copyright legislation, a legal requirement.

So how do I attribute the work of others in non academic documentation/resources?

Wherever possible we should adopt the Harvard at Newcastle style of referencing outlined in the library guide. This includes guidance on citing newspapers, web pages, secondary referencing (where you’ve come across a summary or a mention of another author’s work in the source you are reading) and has some interactive examples and FAQs.

When should I give credit?

Always. As Nuala says a good way to win friends and influence people.

By consistently given credit where it’s due, you avoid claims of plagiarism, you demonstrate your understanding of a subject/area of work, illustrate good practice – something we should all strive for in the service – and comply with UK copyright law.

Yes, even with openly licensed materials (such as those licensed under Creative Commons). As we don’t have the concept of ‘copyright free’ in the UK I’d even go so far as to give credit even when using CC0 materials.

How do I give credit to openly licensed materials?

However the copyright owner has specified. There is excellent attribution guidance on the Creative Commons website.

What is fair use?

An oft-asked question is Doesn’t education fall under fair use? My response is always It depends, if in doubt ask for permission. In the case of potential copyright infringement its best to ask up front. See the UK Copyright Service factsheet on Understanding Fair Use.

With the 2014 changes to copyright law, some exceptions were introduced. Exceptions to copyright: education and teaching is a short 16 page document – basically its now a legal requirement to attribute others work in exchange for being able to use it under licensed circumstances, or under fair use.

This is further complicated by the tendency for people to share on the worldwide web. Fair use would probably never apply to anything that appears on a web page. So its important to seek permission in this case.

I’d like to know more

The Top 10 Copyright Myths page from the UK Copyright Service are a good place to start. Or you can use the teachingcopyrightadvice@ncl.ac.uk email.

Thing 9: Images in PowerPoint

Being able to use images in PowerPoint can really enrich any slides you put together, enable better visual storytelling, and make for more compelling and memorable presentations. But adding lots of images and video clips can make your presentation file size grow very large very quickly. There are a few tips and tricks we can use to ensure that we make sending presentations to others and presenting elsewhere as easy as possible. But before we get to that we should consider the visual identity for the team and representing LTDS.

How should my slides look? Is there a LTDS template?

We should be using the recommended University PowerPoint templates in the Conference Toolkit for everything we do, so you might like to bookmark these links. The template generally change year on year, so its worth downloading a new template from these links every now and again to make sure you are using the most up to date version.

What if I don’t use PowerPoint?

Online presentation tools such as Google slides. Prezi or the paid for version of Haiku Deck also have options for using PPT templates, so that we can maintain a consistent visual identity for the service, and for reducing file sizes, which can make your presentation load more quickly.

Practice makes perfect

Download the current Key Facts and Figures template. This is a visually rich template that you can play around with. We are going to add some images and video.

Adding, cropping and resizing images

There is a good Microsoft tutorial on reducing file sizes of pictures. Take a read. You might like to bookmark this too.

After reading it, try the following:

  • Crop the picture on the last slide to focus on the two figures walking towards you, and delete the cropped areas only for this picture.
  • Change the default picture resolution for the whole presentation to 150ppi.

Learning more about using PowerPoint well

Thing 7: Sending big files

We often have to send large files to folks by email. And I’ll bet you have had either bouncebacks telling you the recipients mailbox is full, or a message saying the email failed to send, or you get a phone call from the recipient saying they haven’t had the attachment, or even the email.

Frustrating, eh?

There are lots of easy ways around this, which mean you can send big files (without clogging up yours or anyone elses mailbox) like graphics heavy PDFs, high resolution images, image heavy PowerPoints or video/audio files really easily.

Can you think of a time when this would have been useful?

Why is this important?

Avoiding sending big files by email is a good thing. Even though many companies are moving towards cloud based email solutions with gigabytes more space per person than ever before, a couple of video files can easily eat up a great deal of space, which is annoying for the person whose inbox is being filled up, and furstrating for you as you may have to try sending the file more than once. And even then the quality may have been compromised.

By using a specific service for sharing big files you can ensure that the version of the file your recipient gets is the same quality as the one you send. Your email will sometimes compress the files without you necessarily being aware of this, which can mean that time (and inbox space!) is wasted as you attempt to ensure the recipient gets what is expected.

If you use a service like Dropoff, you will get a receipt to tell you that your file has been sent successfully, and when it has been picked up.

How can I send big files, then?

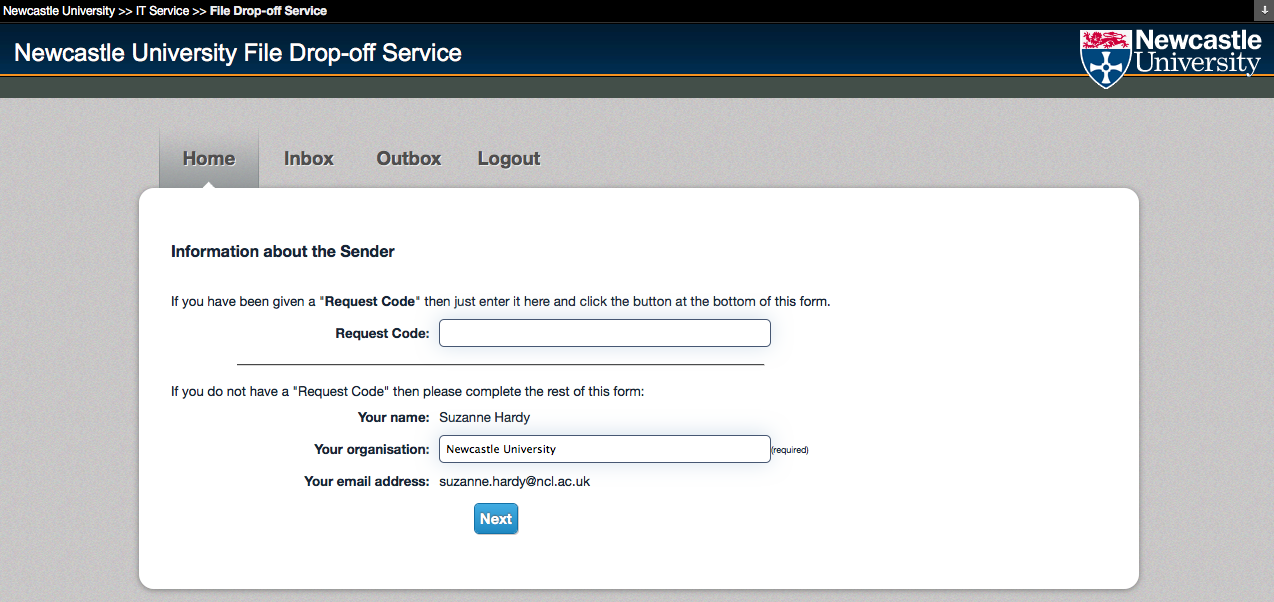
  1. You can use the University’s own Dropoff service: dropoff.ncl.ac.uk It works best with your campus login. One logged in you get three options. Usefully, you can also use the service to request big files from other people too!
    Choose Drop-off. You’ll get a screen like this:
    Screen Shot 2016-03-15 at 14.15.10
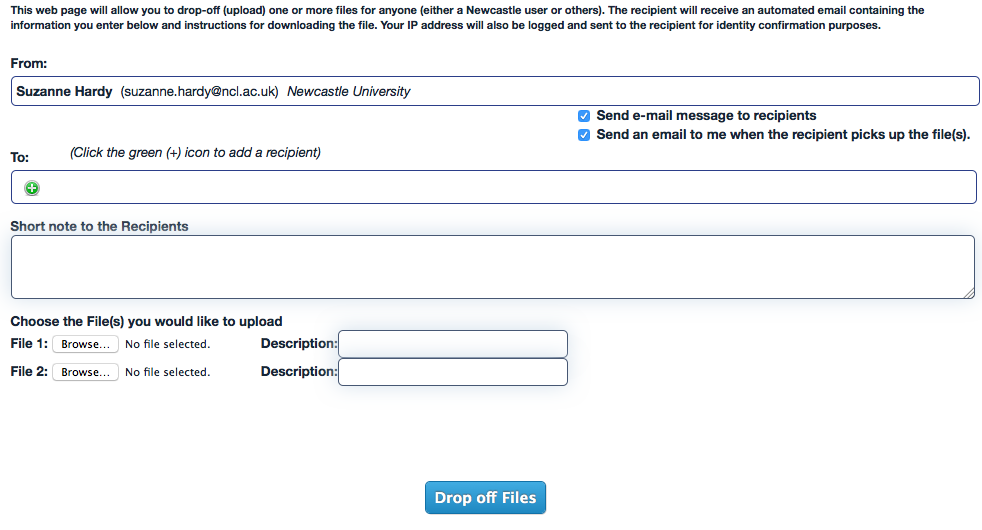
    Choose Next.
    You’ll get this:
    Screen Shot 2016-03-15 at 14.16.38Fill in the form, browsing to the file/s you want to send. Then click Drop off files and you’re away. You’ll get a drop off summary screen and once the file/s have been picked up you will get an email notification telling you who picked them up and when. There is further information on the NUIT website.
  2. You can also use Skype for Business/Lync. This is useful if you are involved in a Skype/Lync call and need to share a file quickly.  You can attach the file to a meeting in a couple of ways.
    sendingFilesWithSkype
  3. There are lots of other options like:
    1. Dropbox – this is popular and very easy to use, though for University business it is recommended to use the Dropoff service.
    2. Use a shared drive/filestore, save the relevant files to it and send a link by email to navigate to it – though the recipient must also have access to the shared space for this work.
    3. Create the files from scratch with collaboration in mind – see Thing 3

Practice sending and picking up big files

Pair up with someone in your office. Try sending a big file to each other using Dropoff or Skype for Business. Was it difficult? How easy is it to pick them up?

Thing 2: Bring news to you

Having to go off and look at websites/blogs for updates is a right old pain the neck.

Did you know that you can have them bring news to you?

Watch this video about something called RSS.

RSS_icon_largeYou might have seen this icon on websites, or in the address bar of your browser (Internet Explorer, Firefox, Chrome etc).

This indicates that a feed is available from that site for you to subscribe to.

Find some sites you might like to subscribe to (hint: The Learning and teaching blog…. or this blog…). What about BBC Education News? Or HEFCE? What about the @ncllt Twitter?

Using a feed reader

You might prefer to collect all your news into one place. Options include:

Both are easy to set up and use and have free options. You can also set each one to email you when there is new content to read. So you don’t even have to remember to check out your Feedly/Flipboard/Netvibes account.

To subscribe from your browser

You can also subscribe from your browser:

  • Internet Explorer
  • Firefox – find the RSS feed of the site you want to subscribe to. Click on it. You will get a dialog box like this:
    Screen Shot 2016-03-14 at 12.17.07


Click on Subscribe now, save to a folder and that’s it. To access your feeds go to Bookmarks in the Firefox toolbar and go to the folder you saved your feed to.

Your own blog that you set up in Thing 1 will also have a RSS feed, if it is not a private blog. You might like to share it with friends/colleagues. Why not jot down your thoughts/notes on having the news come to you on your blog? You might like to have a look at Nuala’s post on this Thing.

If you want to find out more about how RSS, the Library has written a comprehensive LibGuide: Keeping up to date with new information

What’s this all about then?

  • It’s about skill sharing.
  • It’s about upskilling the team and our collective personal digital capabilities.
  • It’s about committing to 15-30 minutes a week to personal development and learning or refreshing a digital skill.
  • It’s about learning how to use the tools at our fingertips more efficiently, to help us do our jobs better.
  • And it’s about getting a bit more practical knowledge about some of the services we support on a day to day basis.

Welcome to the LTDS Digiskills blog, which has been set up to allow us to learn together, at a time convenient to you, by learning 23 things to increase our digital capability.

  • One ‘thing’ a week will appear on this blog.
  • Each ‘thing’ should take between 15-30 minutes to complete.
  • The ‘things’ that have been chosen are based on skills which will benefit everyone in the team, help us all do our jobs better and use the technology at our fingertips more effectively.
  • You may already know how to do many of the things that come up. That’s OK. we don’t think that anyone will know how to do all of the 23 Things.

It is designed to contribute to and support everyone’s personal development, aligning with the Registrar’s wish to have everyone put an objective into their PDR related to increasing their digital literacy/capabilities.

Our 23 LTDS Digiskills things will appear on this blog. Contributing is restricted only to our team. The blog is not indexed by search engines (like Google) so no one is likely to find it unless they have the link. We will be seeking feedback on how it all went at the end of the course and discussing it at a future team awayday.

What is 23 things?

See http://23teaching.com/  and https://tda23things.wordpress.com/course-schedule/ as examples.

This is an approach first used in libraries to share skills and build capability across a team. It is blog based, so everyone will learn how to blog, with one blog post appearing a week based on one topic from a central team 23things blog.

The idea is that each topic/week should be easily manageable in about 15-30 minutes, and that each topic is very practically focussed. Having 23 things on a blog means that should anyone want to revisit/refresh a skill, it is all there, and if staff change, new staff can work through developing their skills in agreement with line managers.

We will augment this online approach with 3 whole team meeting/workshops and look at how it has worked at the next staff awayday.

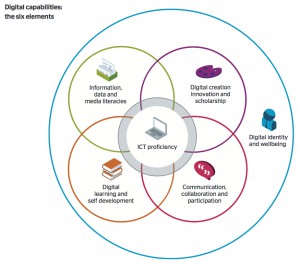
Jisc Digital Capability Framework

See https://www.jisc.ac.uk/rd/projects/building-digital-capability and http://digitalcapability.jiscinvolve.org/wp/ )

The areas have been mapped:

The Jisc Digital Capabilities Framework

Now it’s time to move on to the first ‘thing’……

Thing 1: What is a blog?

noun: blog; plural noun: blogs
a regularly updated website or web page, typically one run by an individual or small group, that is written in an informal or conversational style.
verb: blog; 3rd person present: blogs; past tense: blogged; past participle: blogged; gerund or present participle: blogging
add new material to or regularly update a blog.
“it’s about a week since I last blogged”

Take a look at this Common Craft video:

The first ‘thing’ we are going to do is create a blog each for our 23 Things.

  • Only people with the link can see or comment on this LTDS Digiskills blog.
  • It is not indexed by search engines (such as Google).
  • So do feel free to comment – share your thoughts with our team. It is unlikely that anyone else will stumble across the blog.

We hope this gives you confidence to play around with blogging, but we’ll show you how to keep your own blog private if that’s what you would prefer. Blogs can also be used as reflective diaries (though we’ll be talking about reflective diaries, which form part of ePortfolio, in Thing 15). After all a reflective diary could also be thought of as your own personal news, recorded for yourself to come back to.

Why do I need a blog?

It’s important to have an understanding of what a blog is, and how they can be used so that if asked, any one of us could update or edit the Learning and Teaching Blog.

This is necessary as the Learning and Teaching blog contains a great deal of material, and anyone in the team should be able to respond quickly to requests for changes, or if we spot any inaccuracies ourselves.

We’ll be using this LTDS Digiskills blog to present each of our 23 digiskills things, and by having your own blog, we hope to encourage you to practice writing and editing for the web, as well as perhaps reflecting on your own learning as you progress.

You might find it useful in collecting material for your PDR, or indeed in updating your CV.

Before you create your own blog, we’d like you to get used to how commenting works.

  • Make a comment on this post. You can say anything. Scroll to the bottom of the post until you see Leave a reply. Click the link. Fill in the comment box, don’t forget to click Leave Comment!
  • We’ll have to manually approve your first comment. After that your comments will not need approval. Try refreshing your page. What has changed?

How do I create my blog?

There are several options:

  • If you already have a blog, you might like to check your settings and see how public or private you prefer to have it.
  • If it is a University provided blog, its link will probably start with https://blogs.ncl.ac.uk.
  • If you don’t already have a blog, you can create one easily on the University blogging service. This is free to staff, managed by the University and uses software called WordPress.

Your blog is yours:

  • You can decide how public or private you prefer to keep it.
  • No one is going to need to look at it.
  • You won’t be marked on it.
  • It can remain private to you, alone.

Or you can share it so that others can comment. It is up to you. If you do decide to share your blog, then add another comment below with the link, and we’ll add it to the Blogroll in the menu at the top of this page.

Make sure you read the whole page before creating your blog. When you click on the link you may be asked for your campus username and password again.

Next – edit your profile

Up in the top right of your screen you will see a message like this:

Screen Shot 2016-03-10 at 11.17.21


If you hover over it you’ll see this drop down:

Screen Shot 2016-03-10 at 11.17.42


Click on Edit your profile and update the information about yourself.

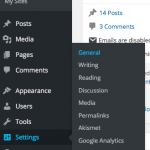
To change your settings, go to Settings/General in the menu to the left:

Screen Shot 2016-03-10 at 11.24.46

Here you can change the title and tagline for your blog.

You might like to change the site language here to English (UK) too.


Next go to Settings/Reading.

Here you can change who can read your blog.

Scroll down to Site visibility:

Screen Shot 2016-03-10 at 11.29.41


Choose the setting you prefer from the options.

  • Allow search engines to index this site: your blog is public. Google will find and index it. I is likely to appear in search results.
  • Discourage search engines from indexing this site: your blog is public but generally, the people who will be able to find it are the people you give the link to.
  • Visible only to registered users of this network: anyone in the University can see your blog. It is not visible to the outside world.
  • Visible only to registered users of this site: Useful for group blogs. Only people registered with the blog can see it. It is private to this group.
  • Visible only to administrators of this site: only you and selected NUIT staff can see your blog. It’s essentially private. No one in NUIT will be looking at it. Unless you break the terms of use.

If you find it hard to choose, talk to your neighbour – what are the advantages of each setting?

Click Save Changes.

Now have a go at writing your first post

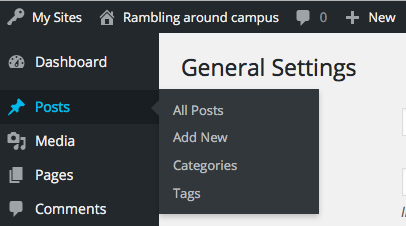
You can either click on Posts/Add New in the left menu, or click on  +New in the menu at the top of the page:

Screen Shot 2016-03-10 at 11.33.49


If you are struggling for something to write, you can perhaps think about how you think a blog may or may not be useful in your role, or if you have an idea for something to go on the Learning and Teaching blog, then you could draft it on your own blog first.

There is a Newcastle University Blog Service User Guide. Download the PDF and save it somewhere. Then have a go at changing some other settings. You could change the theme, add a photo to your profile,

We are here in this session to help too – do ask Nuala, Suzanne, Graeme, Claire or Katie if you have any questions.