Thing 22: Exploring private browsing

This post in unashamedly reused from our recent Cyber Security: Safety at Home, Online, in Life free online course. It appeared in week 1 and is an open step – so anyone can see it. You might like to share the link with others if you find the idea of private browsing appealing. Thanks to the team in Computing Science who wrote this article, for allowing us to share with you (they did a much better job than I could have done).

At the end of the article I have added a section on how private browsing might be useful to us every day at work and something to remember in terms of University use of the internet and forthcoming legislation relating to privacy online.

Cyber Security: Safety at Home, Online, in Life: Exploring private browsing

We use a range of tools which have options to protect our privacy online every day. Can we use these tools better knowing exactly what they protect?

Private browsing

Modern web browsers provide an optional privacy mode for browsing. Although privacy is increased, some features which make browsing easier, such as caching, are removed. ‘Privacy mode’ has different names in different browsers, but operates in a similar way.

How does private browsing work in your web-browser?

Let’s examine the official information provided by the major browsers on their privacy mode of browsing and how they work.

Choose the documentation for the browser you use the most.

Finding out about browsing terms

If some of the terms used are unfamiliar to you you may want to find out a little more about them.

  • Browsing history: What is it? What information exactly does each record in the history include? Where is it stored? Does a website I visit have access to my browsing history?
  • (HTTP) Cookies: What are cookies? What are they used for and how? Where are they stored? Which websites have access to which cookies?
  • Web cache: What is it and what is it used for? Where is it stored? Who has access to it?

Some possible places to start with are:

What are the advantages and disadvantages of using private browsing mode?

How might private browsing be useful to me?

Do you have more than one email account you need to use at work? Have you tried to log in to Office 365 to access another account other than your personal work one and got frustrated that you are automatically logged in to your work account?

This is one example where private browsing can help you out. By switching into incognito or private browsing mode you can avoid the auto login feature built into campus desktop and access that group email account you find frustrating to access. Try using your usual browser in private browsing mode – and if that is still frustrating choose another browser (is you usually use Internet Explorer, try using Chrome, for example). By choosing incognito or private browsing mode, the browser does not store your browsing history, and you won’t therefore be automatically logged in next time.

If you are using a computer that is not your own desktop machine, or you share a computer at work, then private browsing could be useful, especially if you forget to log out, as it won’t keep you logged in, does not save passwords, and erases your browsing history. At home this might be handy if you are trying to surprise the person you share a home computer with….

Can you think of other examples where private browsing might be useful?

One thing to remember….

Here at work, private browsing does not mean that our friends and colleagues in NUIT don’t have countless other ways of seeing what you’re doing on your computer. The University’s rules of use, with guidance outlined in a statement on internet use and a corresponding policy, which should still be followed in line with the Computer Users Agreement that everyone signs before being given access to University IT facilities.

And at home, your ISP (Internet Service Provider) could, if required, be required to retrieve any browsing history under specific legal circumstances. The so called ‘Snooper’s Charter’ – Investigatory Powers Bill is in its final parliamentary stages. The final reading in the House of Lords takes place on 25 October, and once amendments have been considered it will go for Royal Assent before being entered into the statute and becoming law.

Thing 20: Using online forms

Using online forms is a really handy way of collecting information, organising events and taking bookings and means that all of the responses are automatically collated in one place.

Form builder

The university’s form builder service is available here: http://forms.ncl.ac.uk/

To get started click “Create New Form!”Create new form

Click on the form title to edit the form properties, here you can add a title, description and message that will appear after people have submitted the form.

Form Manager

All forms must have a relevant data protection statement added:

e.g. “All information that we hold concerning you as an individual will be held and processed by Newcastle University strictly in accordance with the Data Protection Act 1998. We will not, without your consent, supply your name and addresses to any third party except where (1) such transfer is a necessary part of the activities we undertake, or (2) we are required to do so by operation of law. Newcastle University’s data protection policy is available at www.ncl.ac.uk/data.protection/

You can then choose from a number of different fields to add to your form:    

Add a field

Once you have built and saved your form, it will appear in a list on your homepage:

Form builder list

Click “Publish Form” to get the url which you can either send via email or include in a website and you can set the entries to be emailed to a particular email address by clicking “Emails”.  You can also download a spreadsheet of the results by clicking “Entries”.

Once you have made a form, you can easily duplicate it to reuse it for another event or delete it.

Top Tip! Use a shared account to create your form, this means they can be easily duplicated or edited by anyone in your team

Typeform

Typeform makes a very pretty form which you can customise. It also allows you to apply calculations and logic steps. You can have a go using the free trial option which also has lots of handy How To videos.

You can access it here: https://www.typeform.com/

Click “Create a new typeform” to get started and you can choose to start from scratch or use a template.

New Typeform

On the left hand side, you will see that you can add a welcome screen, a thank you screen and choose from loads of different question types.
typeform menu

Have a go at creating a form to order some cakes using this spreadsheet. Add the welcome text, questions and thank you screen then we will add the calculations and logic jump.

typeform questions

Adding a Calculation

Now we are going to add a calculation that will give the user a total price for their cake and delivery. On the multiple choice “What type of cake would you like to order?” question click the calculatorcalculator

Then you can assign a price for each cake by clicking “Add a calculation”

typeform calculation

Then do the same for the delivery question and add the price for delivery when they answer “Yes” (You don’t want it to charge them if they said no!)delivery calc

Finally in the Thank you screen, you can add the variable of “Score” which will show them their total at the end of the form:

Thank you screen

Adding a Logic Step

We want to skip the delivery address question if they are collecting their cake and go straight to the end of the form.
So click the logic jump icon on the “Would you like your cake delivered?” question:

logic jump
Here you can set it so if they answer “No” it jumps to the Thank you screen.

logic jump step

View type form

Now you can check your form is working by viewing it.

You can also use the “Design” tab to change how the form looks and the “Analyze” tab to view the results and other info. You can download your results as an excel spreadsheet and you can also view a report which gives you stats for each question.

typeform tabs

Thing 19: Writing a reflective blog using ePortfolio

‘It is not sufficient simply to have an experience in order to learn. Without reflecting upon this experience it may quickly be forgotten, or its learning potential lost. It is from the feelings and thoughts emerging from this reflection that generalisations or concepts can be generated. And it is generalisations that allow new situations to be tackled effectively.’ (Gibbs, 1988)

ePortfolio is a tool that can be used to encourage and improve your reflective practice. The ownership of the blog is with you. You decide what posts to share, and with whom to share them. This can help encourage deep reflection including writing about mistakes you have made, your fears, and hopes, confident that only you can see the post unless you choose to share it.

To write a blog post, follow these instructions:

Blog entries can be made from several areas of ePortfolio. You will see the adding blog entry graphic on the frontpage, the blog page, communities, and the skills section.Capture

  • Title – This is the title of your blog post.
  • Blog Text – This is where you should type the main content of your blog post.
  • Everyone in the University – tick this box to make the blog post public.
  • Tags – this is where you would enter keywords to describe your blog posts. Use accurate keywords as this will enable more effective indexing and searching.
  • Communities – Communities are online collaborative spaces, where ePortfolio users can share blogs and comment on other members’ blogs. If the blog post is to be shared with any of the communities, use this area to select which communities can see the post. You will only see Communities that you are a member of.
  • Skills – you can align a blog post with a skill from a skill set, or competency framework. All undergraduate students will be subscribed to the Graduate Skills Framework
  • Shared group – if you wish to share this post with any of your share groups, ensure that group is ticked. If you do not see this option, you are not a member of any share/supervision groups.
  • Upload a file – You can add a file to go along with your post. Your file will be shared with any of the groups you are sharing the blog post with.

Note: If you save a partially completed blog post and have some sharing options enabled (either share group, supervision group, or community), the partially saved blog post would be seen by those you are sharing with. They will see a live link to your post, so if you edit it later, they will see the updated version.

If you are looking to further explore the reflective process I would recommend reading some articles from Jenny Moon, Graeme Gibbs, and Donald Schon.

Gibbs, G. (1988) Learning by Doing: A guide to teaching and learning methods. Oxford: Oxford Polytechnic Further Education Unit.

Why is this useful to me?

The ePortfolio system is automatically available to anyone in the University to use. You already have an account there. There are already easy ways to tag your posts with skills relating to the UK Professional Standards Framework if you are working towards HEA Fellowship, or with categories relating to Staff Skills including Success Factors. Both os which you might find useful in logging things you have done as you go along, so that when you come to prep for your PDR, or to write your fellowship application, you have material ready and available to draw upon.

Neat eh?

Thing 18: Focus on Windows Shortcuts

1keyboard
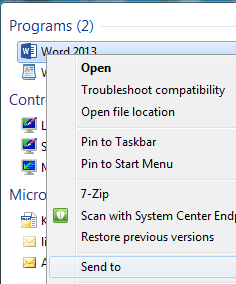
There are loads of things you can do in Windows with keyboard shortcuts, some of which will be faster than:

  • Take hands off keyboard
  • Grab mouse
  • Move the mouse
  • Click
  • Go back to keyboard

So, if you are fast on the keys, you may find it useful to consider what things you do regularly and have a look for a new keyboard shortcut or two.

In this thing, we invite you to find keyboard shortcuts to add to your repertoire.  Drop a line in the comment with your favourites. (And we know that you can drive a Mac from the keyboard, so Mac-o-philes can join in too.)

Here are mine:

  • Windows – left arrow – send the window to the left of the screen
  • Windows-M – clear the desktop
  • Windows-tab – cycle through open programs, a bit like alt-tab but more fun

Web Browsers

  • Ctrl-J – goes straight to your downloads folder

There are loads that work across many browsers  see http://www.groovypost.com/tips/50-universal-web-browser-hotkeys/

Word

  • Ctrl-M indents (cntrl-shift-M unindents)

For more see: https://support.microsoft.com/en-gb/kb/290938

Explorer

  • Windows- E opens my computer

More shortcuts here https://technet.microsoft.com/en-us/magazine/ee851673.aspx

Outlook

  • Ctrl-N New message
  • Ctrl-Enter Send
  • Ctrl-Shift-M move message to a folder

And there are many more on this Microsoft article

Starting programs

What if you find yourself continually needing to open a particular program or folder?  You can add these to your start menu, or to the quick launch area.  But, you can also add your own shortcuts to start something off.

Eg.  I want to be able to open Microsoft Word with Ctrl-Alt-W

Search for Word

2searchword

Right click on it, select “send to

3sendto

  • then select “desktop (create shortcut)”

Find your new shortcut on your desktop, right click and select “properties

4properties

Open the shortcut tab, put your cursor in the Shortcut key box:

5shortcut

Windows will now capture the next keystroke you type as a shortcut key to launch Word.

  • Press Ctrl-Alt-W, then click the Apply Button
  • Try it out!

You can add shortcut keys to any shortcuts you create by other methods.

Over to you:

  • Add a comment with details of any gems you have found.

Thing 14: Staying safe online – spotting suspicious emails, viruses, and scams

We all have emails that get through to us from time to time which we might have some doubts about, and a small proportion of those even look genuine (!). We have all seen the messages that come out from NUIT to all staff when someone has opened an email which contained a virus….. but how do we recognise those rogue emails? And how do we stop ourselves from clicking on something that might turn out to be malicious and result in our identity being used fraudulently?

How do I know if an email is spam, a scam or contains a virus?

In the development of the forthcoming Cyber Security: Safety at Home, Online, in Life free online course, we have, in our little office, become even more acutely aware of the increasing sophistication of our online adversaries. There is a lot of brief and helpful  guidance available. Here are a couple of pointers:

Many of these scams are about criminals trying to get more information about you – including personal details like bank card and account details. This can lead to identity fraud.

Have you been or do you know anyone who has been a victim of identity fraud?

CIFAS has been doing a lot of work to raise awareness of identity fraud.

Watch this film about how easy it is to piece together details of people from something as simple as buying a coffee:

What surprised you?

There is an online fraud risk profiler to assess how at risk you are. Have a go at it.

Will you do anything differently as a result?

The Information Commissioner’s Office (ICO) has a really good page on Identity Theft with advice on what to do if you have been a victim.

I want to learn more!

There will be more advice on managing your online professional profiles in a forthcoming thing, and on how you can manage your campus desktop, email and general electronic housekeeping soon.

In the meantime here are a few online courses which may be of interest:


Thing 13: Team Top Tips on Saving Stuff

This week’s problem:

  • After a lengthy Google Search you find a gem of information
  • A colleague sends you a brilliant link or tip in an email

What do you do with these? How do you ensure that you can find them again when you need them?

With a trusty notebook and pen I pestered LTDS colleagues for ideas…

Bookmarks

Lynsey suggested bookmarks as “saving stuff 101”.

Look for the Star on the IE or Chrome address bar.  If you want to move to the next league you can organise these into folders.  (see Chrome instructions and IE instructions)

My Bookmarks on the Staff Homepage

Have you spotted “Customise My Bookmarks” on the Staff Homepage?  No longer any need to trawl for ages to find the list of active purchasing agreements etc.

Try adding a hard-to-find-University-page as a bookmark – it will take a jiffy and you can even modify the order.  (Carol is our resident expert.)

OneNote

Janice and Carol were keen to include OneNote on our list of great tools.  You may even remember that we had a look at OneNote back in Thing 3.  Carol points out that it works well with other Office Products — I didn’t know that you can  move an email straight to OneNote. Here’s how it goes:

https://youtu.be/-V_hiKHPqr0

And you can email stuff to OneNote notebooks too. And there is a webclipper for Chrome.  And… can you tell I really like OneNote?

Evernote

Evernote is a third party tool that synchronises notes you take between your PC, Mac, tablet, phone.  You need to signup to create an account and it can be used free as long as you only want to use the App on two devices – still OK for most people.  Some of the really neat things about it are:

  • it works really well on a smartphone (OneNote is a bit clunky on phones).
  • text on photos you add to Evernote becomes searchable –  it scans and OCRs the photos for you.  (Yes it does work on photos of business cards!)
  • It is very easy to use – for proof see this much more professionally produced video.

Social Bookmarking Tools (Delicious and Diigo)

How about if you want to share web bookmarks with a bunch of colleagues involved in similar work? For this Graeme suggests a tool like Delicious.  You have to create a free account, and add a bookmarklet to your browser (no need for admin rights to do this thankfully).

Then you can get cracking adding links to Delicious.  You can share your links, as Graeme has done, search other user’s links and follow other people.

Diigo is a similar tool, also giving you a publically visible list (see this list from The Enterprise Shed). We’ve also had a go at presenting some of these links in a more organised manner using Diigo’s Outliner feature.

Other Strategies

Our colleagues suggested:

  • Email the link to yourself (but put something useful in the email other than “useful link”)
  • “Just remember it”
    (you know who you are.. youth must be on your side!)

So, have I missed anything?  If so add it to the comments.  Try out one or more of these ideas and let us know how you got on.

Thing 12: Using styles and templates in Word, an introduction

Consistency in document presentation is something that has come up several times recently, alongside using document templates.

One way of ensuring that documents we produce have the same consistent approach is to use styled templates in Word.

What are the advantages of using styles?

By agreeing to use styled templates we can ensure that we are consistent in presentation. When styled documents are converted into PDFs, the software uses the styles as a way to generate indexes, bookmarks etc that have a cascading hierarchy. This makes navigating longer documents easier for the reader, and for screenreaders.

  • You can auto-generate a table of contents.
  • You can move pages and numbered paragraphs around within a document and the page and paragraph numbers change automagically saving you time and frustration.
  • You can move well formatted text easily between Word, PowerPoint, Excel and even websites.
  • If you receive a styled document and want to take content from it into another document, using the paste and match styles function in word makes it match the rest of your document beautifully.

Mastering styles is worth doing as it will save you a lot of time in future.

Your task

There is a good online tutorial from FMS on using styles effectively in Word.

Work through it, and then think about whether or not a styled set of LTDS templates would be useful or not, and why or why not.  Add a comment to this post with your thoughts, and as Mrs Merton might say “Let’s have a heated debate…”

Thing 11: Writing for the web, the LTDS website and blog

With the migration to a revamped website, and the relatively recent advent of the learning and teaching blog with its related host of social media accounts, it’s probably about the right sort of time to have a little reminder of good practice in how to alter your writing style for presenting information on the website, or for putting together a blog post for the learning and teaching blog.

Whilst Katie C and Claire are our blog and social media leads in the team, there is nothing to stop anyone in the team putting up something on the blog, and most of us probably have some area of responsibility on the website. So getting into practice with writing for the web and blogs is something we should all be doing.

This thing is not a technical how to. It’s more about when you know you have something to add to the website or blog, how you identify what goes where, and a reminder of the guidance which has already been put together, which you might like to bookmark for future reference. Go to /TeamSecure/Website/Website_content_update September_2015 – this folder contains a great deal of useful information about the website including guidance on writing for the internet and a writing a blog post.

Website, blog or email?

  • As a general rule of thumb, if what you want to tell people about is fairly time specific, its probably best on the blog.
  • If your content is fairly ‘newsy’ its definitely the blog.
  • If there is some long standing or non time specific content its probably best on the website. But you might want to tell people about it, which might warrant an explanatory blog post pointing to the website.
  • Consider if your message/content relates to a very specific audience. If it might be relevant to more that one group of people, a blog post might be better than writing an email, and then composing a short email pointing to the blog post.
  • Writing blog posts rather than sending out emails endorses our values of transparency too – content is public rather than ring fenced to certain groups.
  • Are you sending out a set of slides from something? Put them in a blog post, and you can point more people to them.

I’ve got nothing interesting to say

All of us have interesting things to say about what we do. Our job is about communicating. And the more we tell people about what we do and how we can work together, the better our colleagues will understand what the service does, and what its value is to the organisation.

Communicating what we do isn’t down to one person who has that word in their job title. It’s down to every single one of us.

Have a go

Think about what you are doing in your job currently. Is there an aspect of it that people should know about? Using the blog you set up on day one of 23 Things and have a go at using the guidance to help you to write an update on one thing you are currently working on.

If you would like some feedback on it, you can talk to Katie, Claire, Graeme, Nuala or Suzanne.

If you hear someone else talking about their work and you think its interesting, you might like to suggest a blog post to them.

Thinking about putting stuff on the blog is a mindset. And it takes a little while to get into thinking about blogs as a primary mode of communication. But don’t be put off – posts can be really short.

Here’s a good example from one of our colleagues in Computing Science who has written briefly about developing the Cyber Security free online course.

There are loads of good examples from this blog, so scroll through and see what kinds of content is being added.

I need more help

Talk to Katie, Claire, Graeme, Nuala or Suzanne.

Thing 10: Attribution matters

cc_by_cake

cc-by cake © Suzanne Hardy, 2005 CC-BY 3.0 Unported© © © ©

You’ll probably all have heard me blether on and on (and on) about copyright in the three years I’ve been with LTDS. It’s a passion of mine. No idea why. I think it might be because I think giving credit when you use someone else’s work is really important. And just plain good manners.

The Copyright, Designs and Patents Act 1988, is the current UK copyright law (the UK Copyright Service has a really good user friendly summary). It gives the creators of literary, dramatic, musical and artistic works the right to control the ways in which their material may be used. And in the UK copyright always exists. If something is recorded, copyright exists automatically. You don’t have to register it anywhere. It just exists. You can register copyright with the UK Copyright Service, but it isn’t a requirement. 

Giving credit – acknowledging whose work you have used, where and how – is known as attribution.

In academic written work attribution is generally given via referencing, citation, quotation or reproduction (especially in the case of a visual piece of work) – and substantial quotation or reproduction would fall under copyright law. There is a really good guide to referencing by the Library. And that’s usually fine as long as you follow referencing guidance. Where you are using a substantial portion of someone else’s work then you should seek permission to use it, unless fair use is covered by licensing. The University has many licenses in place to allow for using copyrighted work in education. There is another excellent libguide on copyright and IPR that is definitely worth bookmarking.

Attribution is just as important with teaching materials, and even with administrative documentation.  It’s just good manners, and since the most recent changes to copyright legislation, a legal requirement.

So how do I attribute the work of others in non academic documentation/resources?

Wherever possible we should adopt the Harvard at Newcastle style of referencing outlined in the library guide. This includes guidance on citing newspapers, web pages, secondary referencing (where you’ve come across a summary or a mention of another author’s work in the source you are reading) and has some interactive examples and FAQs.

When should I give credit?

Always. As Nuala says a good way to win friends and influence people.

By consistently given credit where it’s due, you avoid claims of plagiarism, you demonstrate your understanding of a subject/area of work, illustrate good practice – something we should all strive for in the service – and comply with UK copyright law.

Yes, even with openly licensed materials (such as those licensed under Creative Commons). As we don’t have the concept of ‘copyright free’ in the UK I’d even go so far as to give credit even when using CC0 materials.

How do I give credit to openly licensed materials?

However the copyright owner has specified. There is excellent attribution guidance on the Creative Commons website.

What is fair use?

An oft-asked question is Doesn’t education fall under fair use? My response is always It depends, if in doubt ask for permission. In the case of potential copyright infringement its best to ask up front. See the UK Copyright Service factsheet on Understanding Fair Use.

With the 2014 changes to copyright law, some exceptions were introduced. Exceptions to copyright: education and teaching is a short 16 page document – basically its now a legal requirement to attribute others work in exchange for being able to use it under licensed circumstances, or under fair use.

This is further complicated by the tendency for people to share on the worldwide web. Fair use would probably never apply to anything that appears on a web page. So its important to seek permission in this case.

I’d like to know more

The Top 10 Copyright Myths page from the UK Copyright Service are a good place to start. Or you can use the teachingcopyrightadvice@ncl.ac.uk email.

Thing 9: Images in PowerPoint

Being able to use images in PowerPoint can really enrich any slides you put together, enable better visual storytelling, and make for more compelling and memorable presentations. But adding lots of images and video clips can make your presentation file size grow very large very quickly. There are a few tips and tricks we can use to ensure that we make sending presentations to others and presenting elsewhere as easy as possible. But before we get to that we should consider the visual identity for the team and representing LTDS.

How should my slides look? Is there a LTDS template?

We should be using the recommended University PowerPoint templates in the Conference Toolkit for everything we do, so you might like to bookmark these links. The template generally change year on year, so its worth downloading a new template from these links every now and again to make sure you are using the most up to date version.

What if I don’t use PowerPoint?

Online presentation tools such as Google slides. Prezi or the paid for version of Haiku Deck also have options for using PPT templates, so that we can maintain a consistent visual identity for the service, and for reducing file sizes, which can make your presentation load more quickly.

Practice makes perfect

Download the current Key Facts and Figures template. This is a visually rich template that you can play around with. We are going to add some images and video.

Adding, cropping and resizing images

There is a good Microsoft tutorial on reducing file sizes of pictures. Take a read. You might like to bookmark this too.

After reading it, try the following:

  • Crop the picture on the last slide to focus on the two figures walking towards you, and delete the cropped areas only for this picture.
  • Change the default picture resolution for the whole presentation to 150ppi.

Learning more about using PowerPoint well