Thing 21: Typing less – building blocks, autocorrect and fields

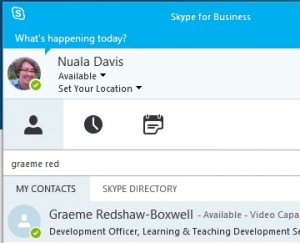
Fed up with typing out long phrases like “Learning and Teaching Development Service”? Why not get Word to do the work for you….read on to explore a couple of approaches.

Part 1: AutoCorrect

We can harness Word’s Autocorrect feature to do this – the one that automatically converts “necesary” to “necessary” when you press space bar.

Let’s make ltdsx expand to “Learning and Teaching Development Service”

Here’s how to do it:

In Word

  • click File/ Options / Proofing
  • click AutoCorrect options

autocorrect options 1

  • Add a new entry
  • Click Add, then OK

If you have some pet typos you can also add them in here.  A notable plus is that these autocorrect entries are saved with Outlook.

Part 2: Quick Parts/ Building Blocks

You may have noticed if you start to type Newcastle University that Word will predict this and give you the chance to press Enter to finish typing it.

autotext offered 3

This comes from Quick Parts – on Word’s Insert menu.

quick parts 4

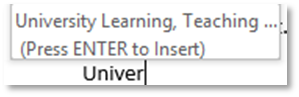
Let’s add a new one to the list

University Learning, Teaching and Student Experience Committee (ULTSEC)

What would be nice would be for this to offer to autocomplete this after you typed “Univer “

Here’s what to do

  • Type out the phrase you want to store
  • Select the text

then either

  • Press Alt-F3  (the speedy keyboard shortcut way to do it …

Or

  • Click the insert tab
  • Select Quick Parts
  • Click “Save Selection to Quick Part Gallery”save to gallery 5

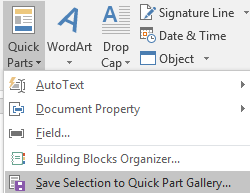
Both routes will take you to the “Create New Building Block”,

in the name field type in the name you want to use for this quick part….we’ll just go with the default.

create new building block 6

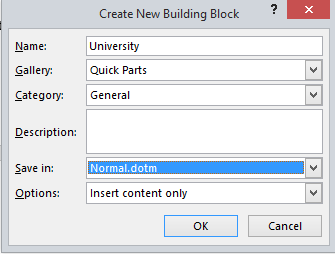
Click Ok and try it out, you should see….

autotext offerered ultsec

You can add whole blocks of text to quick parts. If you don’t want to wait for the prompt box to come up you can press F3 to insert the autotext.

Outlook and Word save building blocks in different locations (bah!), I’ve only found faffy ways to copy them between programs.  If it is easy though please say!

Part 3: Fields

Via Word’s Quick Parts you can also add useful fields, such as the filename and location, the page number, the save date etc. These can often be helpful in document footers.

Try this:

  • Double click in a document footer
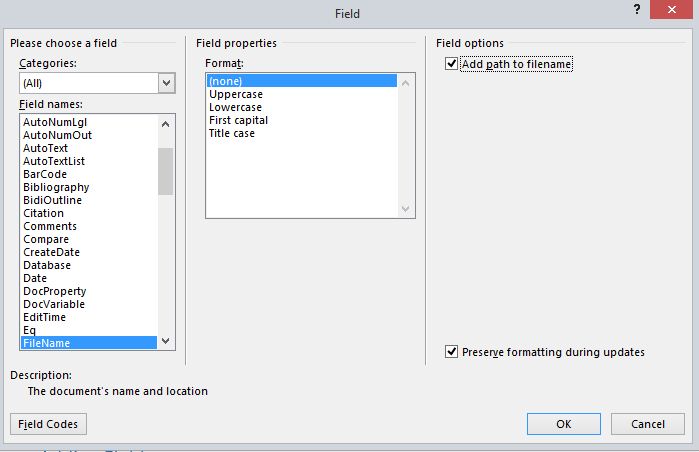
  • Click on Insert ribbon, then Quick Parts, then field
  • Select Filename and tick “Add path to filename”
  • Click OK

field 9


If I do that on this document, I see:

path11

Putting these things together

You can add fields into the building blocks you create.

For example you may want to have a quick way of adding the filename + path and page number to the bottom of a document.

Here’s a final challenge:

  • Create a new building block called “footerbits” which adds the following fields: filename and path, page number.
  • Test it out by typing footerbits and then pressing F3

Hint: Generate the field codes first, select the text, press Alt-F3 and give it a name “footerbits”

Thing 18: Focus on Windows Shortcuts

1keyboardThere are loads of things you can do in Windows with keyboard shortcuts, some of which will be faster than:

  • Take hands off keyboard
  • Grab mouse
  • Move the mouse
  • Click
  • Go back to keyboard

So, if you are fast on the keys, you may find it useful to consider what things you do regularly and have a look for a new keyboard shortcut or two.

In this thing, we invite you to find keyboard shortcuts to add to your repertoire.  Drop a line in the comment with your favourites. (And we know that you can drive a Mac from the keyboard, so Mac-o-philes can join in too.)

Here are mine:

  • Windows – left arrow – send the window to the left of the screen
  • Windows-M – clear the desktop
  • Windows-tab – cycle through open programs, a bit like alt-tab but more fun

Web Browsers

  • Ctrl-J – goes straight to your downloads folder

There are loads that work across many browsers  see http://www.groovypost.com/tips/50-universal-web-browser-hotkeys/

Word

  • Ctrl-M indents (cntrl-shift-M unindents)

For more see: https://support.microsoft.com/en-gb/kb/290938

Explorer

  • Windows- E opens my computer

More shortcuts here https://technet.microsoft.com/en-us/magazine/ee851673.aspx

Outlook

  • Ctrl-N New message
  • Ctrl-Enter Send
  • Ctrl-Shift-M move message to a folder

And there are many more on this Microsoft article

Starting programs

What if you find yourself continually needing to open a particular program or folder?  You can add these to your start menu, or to the quick launch area.  But, you can also add your own shortcuts to start something off.

Eg.  I want to be able to open Microsoft Word with Ctrl-Alt-W

Search for Word

2searchword

Right click on it, select “send to

3sendto

  • then select “desktop (create shortcut)”

Find your new shortcut on your desktop, right click and select “properties

4properties

Open the shortcut tab, put your cursor in the Shortcut key box:

5shortcut

Windows will now capture the next keystroke you type as a shortcut key to launch Word.

  • Press Ctrl-Alt-W, then click the Apply Button
  • Try it out!

You can add shortcut keys to any shortcuts you create by other methods.

Over to you:

  • Add a comment with details of any gems you have found.

Thing 17: Managing your professional profile online

After scouring through lots of pages of “social media top tips” and “how to get a killer LinkedIn profile”, the take home message about managing your professional profile online is: be savvy about balancing professional and personal uses of social media.

The careers service recommends this article to our graduates: Social networking and graduate recruitment: manage your online reputation which advises:

“Separate your personal and professional online personas and actively manage your ‘net rep’.”

So a good place to start, is to think about your target audience and the purpose of your profile. You can then tailor your tone and manage who can view your stuff accordingly.

Checking your digital footprint.

What does your current online profile actually look like? To find out, have a go at checking your digital footprint.

Start by googling your name, or your name and job title, and see what comes up. Is there anything there that you didn’t expect? Or that you wouldn’t want as part of your professional profile?

If you would like to find out more about your digital footprint, there is a great activity in the Cyber Security free online course: Find out about your digital footprint.

Updating your university web profile

You can manage your university web profile via My Impact.

My Impact menu

Here you can add:

  • a profile photo
  • contact details
  • publications
  • research information
  • teaching information

Your profile is then linked to your listing on the uni people search.

This document gives a step by step guide for updating all sections of your profile: MyImpact User Guide To Editing your Web Profile

If you like, you can also add a link to the personal blog that you created in our first 23 Things post, by clicking “Edit Personal Details” and adding a personal website address.

Facebook

As Facebook privacy settings change quite frequently, it is a good idea to check what your profile looks like to the public or to a specific person.

Who can see what information on my profile?

Go to your profile page and then the “View Activity Log” drop down menu and “View As..”

Facebook activity log menu

Not what you expected?? Time to check your privacy settings!

Changing privacy settings

You can change who can view all of your future posts in “Who can view my stuff?”. If you do not want your Facebook profile to appear in search engine results you can stop this happening by clicking “See More Settings” and “Who can look me up”:

Privacy Settings Search engine

LinkedIn

Now how about a few top tips to improve and manage your LinkedIn profile:

Use a professional profile photo!

Profile Photo

Make sure you choose a professional photograph, that is current and sets the tone for your profile. Its probably best not to use a photo of you down the pub, on the beach or posing with giant cardboard teeth!


Control who can see your information by customising your public profile.

Go to your profile and click “Update your public profile settings”:

Linkedin Profile settings

You can then select exactly which sections can be seen publicly:

Customize your public profile

Customise your personal url:

Make it easier for the right people to find you by personalising your url.  Again in your public profile settings, you can edit the link to your profile:

UrlTurning off your activity broadcast

If you haven’t updated your LinkedIn Profile in a while and it needs a major overhaul, you can turn off your activity broadcast so you can quietly update it without notifying everyone in your network!

This can be done from your profile page:

Network

Twitter

There are hundreds of articles out there about how to have an amazing professional Twitter profile, and most of them suggest the following top tips:

  • Make use of your bio section and include key words to help you network with relevant people.
  • Link to your blog or website.
  • Have a professional twitter handle.
  • Do not link to your Facebook account if you use them for different purposes/to reach different audiences.
  • Separate professional and personal! If you have a twitter account which you use as part of your professional profile, that network might not want to see you #GBBO retweets!


(Ellie masquerading as Nuala!)

Thing 16: Loving our Campus Managed Desktop

Filestore

Unlike files stored on mobile and portable disks we know that information stored on University filestore is secure and backed up.

Our files are held on physical storage owned by the University and each day (twice in the morning and twice in the afternoon) files on you Home folder are copied, keeping around 3 weeks of changes safe. Even better, you have the power to restore these Shadow Copies.

1-shadow

Try this:

  • right click on a file you have been working on over the last couple of days
  • Select properties, then the previous versions tab.
  • Go to the page on Shadow Copy to find out more

And… if you can’t remember which Tower your Home folder is stored on click the the Technical Information link on People Search/My Details.

Getting Organised with Filestore

We collaborate therefore we use shared filestore.

Take a moment to think about the places you go to regularly.  If you are spending ages every day navigating to a single folder buried in the PSS share then why not add it to your favorites?  (We can use this even though it is spelt wrong!)

File Favourites

Simply drag the folder from the LTDS filestore to your favourites to have it listed.

2-favourites

Network locations

Or, if you are regularly using a bit of shared filestore from somewhere else add it as a network location.

3-places

Type in the long address eg:

4-path

5-folderthere

Software

Rather than having every single employee updating their versions of Adobe Reader, Chrome, Office, anti-virus.  It all happens automatically, the software updates are packaged up, tested and deployed to PCs so that we all remain up to date.

There is an orderly elegance to it – If the library want to use an updated version of an Endnote file it can be copied to all the managed PCs running Endnote in 90 minutes.

If something nasty happens the whole system can be reset and can be rebuilt in a few hours without the need of feeding in lots of DVDs.

Try this:

  • Click the start menu, then the shield

6-shield

  • Click “Switch to Advanced View”

Scroll down to see a list of software “applied” to your PC, for example.

7-filelist


Free stuff

The University negotiates software purchases for commonly used products centrally.  As members of staff we reap the rewards.

  • You can install Office for free on your home PCs/ tablets and phones
  • Other titles are available for free and at a discount.

See: http://www.ncl.ac.uk/itservice/software/softwaredeals/staff/

Single Signon

7-logongateway

Thankfully you don’t have to remember gazillions of passwords as our IT folk are big fans of Single Sign On.  A downside to this is if you want to access resources via different accounts eg your own account and a role account you may need to do one of the following:

  • Use a different browser for each id (e.g. Internet Explorer for your own id, Chrome for the role account)
  • If you have trouble swapping between identities, close down and open up your browser (to clear the session data); or open an incognito tab in Chrome.

The downsides

“I can’t install software on my own PC.”

This is a two edged sword! To my cost I know that the downside of recklessly installing any new bit of freeware-comes with a -guarantee that once every 6 months a full PC reset will be needed.   Chances are if you would like to use Audacity, then it is already “packaged up” in a way that will work.  You can ask for the software to be installed and it will be updated when the next version comes out.

“I can’t have the latest versions of the software I want to use.”

Sometimes having a safe, tested collection of applications that work together can be better than embracing often aptly named bleeding edge.  Somethings are best upgraded in a managed way, for example it’s helpful to have versions of Office, SPSS, etc in sync across staff and student PCs.  But, if our computing officer trust us we can always ask for local admin rights if we want to live a bit more dangerously!


Thing 15: Weeding and Housekeeping H drive and roaming profile

Analysing your H Drive

If you get one of those emails to tell you your Home folder is full you will be forced down a path of deleting some files.  But how do you know what is hogging the space?

There is a clever little utility on all campus managed PCs that does this for us.  Here’s how to get to it.

  • Click on the start menu
  • Click the Shield
  • Click Analyse my H Drive
  • Go and make a cup of tea/coffee/talk to a colleague for a few minutes.

Once it has finished have a look at the tree map it produces.  You can identify folders taking up most space. Here’s an insight into mine:treemap

Clicking on the largest purple blob, will take you to the name and location of the file. I can quickly see that this is in fact a video (mp4)

northernbridge

And I know from the filename that it’s something that is now on ReCap, so there is absolutely no reason for me to have it.  Then, just right click on the filename and delete it. (If you are really, really sure select Delete (no way to undelete).

nowaytoundelete

WindirStat can be used to examine other file locations too, like shared drives, project filestore and roaming profiles… but more of this later……

Roaming Profiles

Chances are even if you haven’t filled your H drive you will have had a “Profile Over Quota” message.  (If you haven’t seen this, you can simulate it really easily by copying a really large file like the uni powerpoint template to your desktop)

Roaming profiles are a brilliant thing… they give us the ability to go to any PC on campus and still access the same mapped drives, internet shortcuts and application settings.  Your profile is read when you logon to a PC and it is written back to the profile server when you logoff.  When you launch programs for the first time they typically create a new folder in your profile.

Having a look at your roaming profile

The contents of your roaming profile can be found by opening Windows Explorer and going to:

C:\users\<yourcampusid>\AppData\roaming
(eg if your campus id is nfb99 you would type:  c:\users\nfb99\appdata\roaming)

Open this up…You will probably see folders for Adobe, Microsoft, and Google – these hold your settings for Adobe Reader, Microsoft Office, programs in your start menu and Chrome.

Profile Clutter

Your profile can easily get cluttered ……..

  • Following an upgrade to Office 13 your profile may contain information for the new and old versions of office.
  • If you use an application on a different PC, you could then have its bits in your profile. (This in particular is a hazard for those regularly using strange apps on cluster machines!).
  • You may have profile folders for applications you no longer use
  • You may have indavertently saved files to your desktop (do use shortcuts instead)

Deleting Profile Clutter

Let’s take the example of Microsoft Office, try this:

  • Open the folder: C:\Users\<yourcampusid>\AppData\Roaming\Microsoft\Office

You should see a folder here for “15.0” (office 2013)

office15

If you have folders for earlier versions – you can safely delete these – just right click and select delete.

What to do if your profile is over Quota

There are some helpful instructions here in the IT Service article on Profile Over Quota.

If you find the scrolling box a bit too annoying – have a look in the advanced bit below….

Starting from Scratch (Zapping your Profile)

If you are really struggling you can ring the  IT Service to delete your profile from the profile server.  (The nice IT Service people will talk you through this and ask you to logout before they wipe it).

A few more advanced things ….

Another way to weed your profile

We can use Windirstat – but let’s launch it a different way – we are going to create a custom shortcut our desktop for this.

  • From Windows Explorer navigate to c:\program files\cmdinfo\
  • Locate the file windirstat.exe
  • right click on it and select create shortcut (say yes to put the shortcut on your desktop).

Now, go to your desktop and right click on the shortcut you have just created and select properties. We’re going to give it a couple of parameters.

In the target box you’ll see

“C:\Program Files\CMDInfo\windirstat.exe”

  • Add a couple of bits to the end of this line so that the shortcut shows your profile space.

“C:\Program Files\CMDInfo\windirstat.exe” %appdata% /treemap

  • Click OK
  • Rename the shortcut to something that makes sense eg “My Roaming Profile.”

Double click on your shortcut to visualise the space used in your roaming profile.

Avoiding Blowing Your Profile

If you are beleaguered by full profile messages then it is worth getting in touch with the IT Service.

  • If you know what program is causing the problems you can run a script to exclude a particular application from your roaming profile (VideoScribe is a particular culprit)
  • More drastically, if you really only ever use one PC it is possible to save all your settings locally rather than to and from the profile server.  (But this requires a policy to be added to your local PC).

Thing 13: Team Top Tips on Saving Stuff

This week’s problem:

  • After a lengthy Google Search you find a gem of information
  • A colleague sends you a brilliant link or tip in an email

What do you do with these? How do you ensure that you can find them again when you need them?

With a trusty notebook and pen I pestered LTDS colleagues for ideas…

Bookmarks

Lynsey suggested bookmarks as “saving stuff 101”.

Look for the Star on the IE or Chrome address bar.  If you want to move to the next league you can organise these into folders.  (see Chrome instructions and IE instructions)

My Bookmarks on the Staff Homepage

Have you spotted “Customise My Bookmarks” on the Staff Homepage?  No longer any need to trawl for ages to find the list of active purchasing agreements etc.

Try adding a hard-to-find-University-page as a bookmark – it will take a jiffy and you can even modify the order.  (Carol is our resident expert.)

OneNote

Janice and Carol were keen to include OneNote on our list of great tools.  You may even remember that we had a look at OneNote back in Thing 3.  Carol points out that it works well with other Office Products — I didn’t know that you can  move an email straight to OneNote. Here’s how it goes:

https://youtu.be/-V_hiKHPqr0

And you can email stuff to OneNote notebooks too. And there is a webclipper for Chrome.  And… can you tell I really like OneNote?

Evernote

Evernote is a third party tool that synchronises notes you take between your PC, Mac, tablet, phone.  You need to signup to create an account and it can be used free as long as you only want to use the App on two devices – still OK for most people.  Some of the really neat things about it are:

  • it works really well on a smartphone (OneNote is a bit clunky on phones).
  • text on photos you add to Evernote becomes searchable –  it scans and OCRs the photos for you.  (Yes it does work on photos of business cards!)
  • It is very easy to use – for proof see this much more professionally produced video.

Social Bookmarking Tools (Delicious and Diigo)

How about if you want to share web bookmarks with a bunch of colleagues involved in similar work? For this Graeme suggests a tool like Delicious.  You have to create a free account, and add a bookmarklet to your browser (no need for admin rights to do this thankfully).

Then you can get cracking adding links to Delicious.  You can share your links, as Graeme has done, search other user’s links and follow other people.

Diigo is a similar tool, also giving you a publically visible list (see this list from The Enterprise Shed). We’ve also had a go at presenting some of these links in a more organised manner using Diigo’s Outliner feature.

Other Strategies

Our colleagues suggested:

  • Email the link to yourself (but put something useful in the email other than “useful link”)
  • “Just remember it”
    (you know who you are.. youth must be on your side!)

So, have I missed anything?  If so add it to the comments.  Try out one or more of these ideas and let us know how you got on.

Thing 8: Excel – some quick reminders

This week brings a tapas of excel goodies, do feel free to try out one or more of these offerings to suit your appetite.  You’ll need to download the thing8 sample worksheet [ thing8excel ] – but by all means do try this on your own data too.

Setting print areas

thing8-printareas

Be kind to the person you send your lovely data to.  Define the print areas and repeat the row titles if it spans more than one page.

Try this out on the Biscuits Consumed sheet

  • Set the print area to the first 4 columns
  • Use print titles to repeat the first row
  • Use View/Page break preview to check it is good.

Autofilter

Autofilter can help you explore your data. The “Biscuits consumed” sheet holds data from a follow on study catalysed from the biscuit world cup – this time participants chose one biscuit per day and gave it a score.

  • Select the 4 columns making up the table and click “sort and filter” and select “filter”

thing8-sortandfilter

  • Use the drop down menu on the column headings to try a few things out eg:

thing8-filter

  • sort the biscuits A-Z
  • select just the Fruit Club results
  • On the comments heading use “Text Filter” to look for all rows containing “choc”
  • Clear all filters before you go on…

Pivot Tables

We often get information that we need to summarise. Pivot tables can make this really easy.

On our biscuit example we might like to ask “how may times was each biscuit chosen?” and “what was the average score for each biscuit?”.

Here’s what to do:

  • select the first three columns
  • Click on the Insert Menu and select Pivot Table
  • accept the defaults to create a new worksheet

thing8-pivot

  • Drag “biscuit” from the field list to the rows area and drag score to the values area
  • If you like drag, score into the values area a second time, click on it and change the “value field settings” to give average of score.
  • See if it matches the Answer to Biscuits Consumed sheet.

Absolute and Relative Referencing

If I have not yet exhausted your appetite for Excel tapas, here’s one that has its own shortcut key (F4).

By default Excel always uses relative referencing.  If you copy a cell four rows down, any formulas in that cell are updated to point to the corresponding cells four rows down.  You might not always want this, and the good news is that you can override it by using $ in the formula.

To try this out have a look at the sheet labelled MyShares.  (This relates to an alternative reality where you have enough spare cash to have some shares and time to ponder how they will grow in a variety of scenarios).

We need to copy the formula in cell E5 to fill the other areas and work out how our shares may grow.  At the moment the formula is

=D5*E4

A fruit club goes to the first 3 people who can tell me by email where to add two $ signs!

(See this Microsoft article if you need a hint!)


Thing 6: Get Outlook to work for you

outlook1

Is email a headache? This thing is a chance to step back from your inbox and think about what you could do to make it work for you.

A quick poll of LTDS colleagues  suggest that the following techniques work:

  • Use folders to hold emails on different topics
  • Colour code items to indicate whether actions are needed
  • Set reminder flags
  • Use rules to delete or move messages that fit particular conditions

Here are three scenarios by way of examples:

  1. You anticipates lots of emails from a particular source that you only need to look at once or twice a day.
    eg:  You have created a form that sends you an email or a Doodle poll and want to keep track of responses, but only want to look at this once every couple of days while it is open.
  2. You want to watch out for certain routine and regular communications and make sure you read them
    eg: You want to make sure you jump on Richard’s weekly update from the Strategy Group
  3. You are part of a small project team of 5 people and want to easily identify communications about this project.
    eg: I work with Angela and Catherine on the Dementia Care free online course, and with Steve, Kovila and Martin on the Cyber Security one. We sometimes use a mailing list and other times communicate with each other individually.

I’ve used these scenarios to illustrate a few things that are possible with rules.  Work through one or two, translating them to your own context. Or, if you like consult with one of the team’s uber-organised colleagues to help you fix something immediately useful to you.

If you are new to rules you may want to have a look at one or two Microsoft training videos.

Scenario 1: Lots of emails from a source that you only need to look at infrequently.

This is crying out for a rule.  One option is to create a folder and move all responses automagically to the folder.

  • Right click on the email message

outlook2

And select Rules

outlook3

  • Then fill in the boxes and click OK.

outlook5

Scenario 2: Watch out for important communications and flag them

Let’s highlight all strategy group updates and flag them.

  • First off find one in your inbox and right click on it.
  • Click advanced options

outlook7

  • Click Next to move on to “What do you want to do with the message?” screen and select “flag message”
  • Click “follow up at this time”

outlook6

  • Select when you want it to go red

outlook8

  • Click through the dialogue boxes to make the change.

Now these will be flagged – you can tick them when read and digested and move them to folders if you want to keep them.

Scenario 3: Colour code items from particular people

Outlook  gives us the possibility of creating custom categories.  You can edit categories in use in Outlook and add new categories, by clicking  the arrow at the bottom of the Categorize button.

outlook9

But, helpfully, you can also do this on the fly in the process of creating a rule.

Here’s what I want to do: assign all emails from the Lynne, Catherine and Angela to a new category “Dementia”.

Create the rule;  in the “Which conditions?” box select the “from”

outlook10

You can add extra people to the list in the rule description box by clicking the underlined value:

outlook11

Then  click next to go onto “What do you want to do with the message?”

outlook12

  • Click category in the bottom part

outlook13

  • Add a new category

outlook14

Now, presto, everything from this project team is signaled on my inbox.

For your blog/comments on this post

Which strategies do you use to manage email?  What have you done/will do as a result of thinking about this thing?

Thing 5: naming conventions (aka “The joy of an ordered sock drawer”)

We all know that giving files sensible names when we save them saves time, just as pairing your socks before they go in the drawer brings a certain joy later.

In this thing we’ll dare to look at our own file naming practice and see what we can learn.

First off let’s be realistic:

If you start a new project or venture chances are you’ll give it a folder and then start saving stuff. But, you don’t always know how many things you will need to save as the venture progresses.  So it’s normal for the filing structure to evolve to a degree.

Quiz

I’m going to invite you to have a go at helping me rename some of my files and sort out some ideas.

We’ll use some examples taken from the project we have just started to develop a Cybersecurity MOOC.

dodgyFileNames-NMD

.. and we’ll do this via a Typeform Quiz – so please click this link below before reading on:

GO to Quiz 

A few pointers

  • Filenames should be meaningful, and if you are collaborating with others they need to be meaningful all round.
  • If dates go in the names then do think about these being “sortable” in some way.
  • “2016-03” will often be better than “March”
  • Avoid spaces (totally) on files on the web – they’ll generate URLS with % signs in.
  • Whilst Windows is not fussed if you call something “stuff.txt” or “Stuff.txt”, it’s a different story on many of our unix webservers so lower case filenames are more web friendly.
  • Having a quick strategy for sending someone a pointer to a file is really useful to have up your sleeve.

Ultimately, in teams filenames and directory structures need to be negotiated, perhaps something for your next team meeting!

For you to thing about

Add a comment to this post or write a note in your own blog to share any top tips.  Please add any resources that you have found helpful.

Some of us, like me, know that we can do better. Following the shame of looking at my own sock drawer I have renamed my files.


Thing 4: Screen Sharing

Have you ever spent far too long explaining something to somebody, whilst trying to work out what they were actually seeing? If you have, then screen sharing may make your life easier.

In this thing we’ll have a look at screen sharing using Skype for Business and Skype. You need to team up with a colleague as it’s kind of difficult to screen share with yourself.

Skype for Business

Office2013 is now fairly standard across campus so we can be relatively sure that everyone has access to Skype for Business (previously Lync).  You don’t need a web-cam or microphone to screen share, you just need to both be signed into Skype for Business.

We’re going to share a screens and permit our buddy to take control of our desktop. There are some step by step instructions below.  (If you’d rather dive in go to this Microsoft Article.)

If your buddy is an different office you may want to call them up on the phone while you do this.

  • Launch one of the applications you commonly talk to people about (EvaSys, Policy pages on the website, Blackboard, maybe even eportfolio)
  • Start Skype for Business, by searching for it in your Start Menu or Finder.
  • Sign in using your Office365 address campusid@newcastle.ac.uk  eg:

  • After Skype for Business loads, start typing in the name of your buddy…. I’ll pick on Graeme

skype1

  • Double click on your buddy’s name to start an instant message conversation.
    It’s polite to offer some suitable salutation at this point, you’ll need to press enter to send the message.

skype2

  • Once you have your buddy’s attention, click on the “Present” icon at the bottom of the Skype for Business window:

skype3

You’ll see we can present a variety of things….for now

  • click “Present Desktop”

Your buddy will receive a notification – they’ll need to click to accept the meeting content.

  • Entertain your buddy by clicking on a few things in your chosen application.

Now the scary bit.

  • On the sharing toolbar at the top of the screen click on “give control”  (NB: sadly Mac using colleagues  won’t have this option)

Your buddy will now be able to move around your desktop clicking things at will. If they become a little cavalier remember that you can use the sharing toolbar to Take back Control. 

  • Now, swap roles, ask your buddy to share her/his screen with you and see how they feel as you rearrange their icons.
  • Try out presenting “programs” – you may be more inclined to let someone take control here!

On a more serious note screen sharing (without taking control) can be a most excellent way of talking somebody through a difficult task.  The explainer and explainee get to see the same thing and confusion is much diminished.

Skype (Free)

A few releases back Skype had an update that brought screen sharing into the standard product.  If you haven’t tried this it’s worth giving it a go, check out the instructions

For your blog

Drop a line or two about how you got on with this, where you think this may be useful, and perhaps any notes on other screen sharing apps you may have used.