Thing 10: Attribution matters

cc_by_cake

cc-by cake © Suzanne Hardy, 2005 CC-BY 3.0 Unported© © © ©

You’ll probably all have heard me blether on and on (and on) about copyright in the three years I’ve been with LTDS. It’s a passion of mine. No idea why. I think it might be because I think giving credit when you use someone else’s work is really important. And just plain good manners.

The Copyright, Designs and Patents Act 1988, is the current UK copyright law (the UK Copyright Service has a really good user friendly summary). It gives the creators of literary, dramatic, musical and artistic works the right to control the ways in which their material may be used. And in the UK copyright always exists. If something is recorded, copyright exists automatically. You don’t have to register it anywhere. It just exists. You can register copyright with the UK Copyright Service, but it isn’t a requirement. 

Giving credit – acknowledging whose work you have used, where and how – is known as attribution.

In academic written work attribution is generally given via referencing, citation, quotation or reproduction (especially in the case of a visual piece of work) – and substantial quotation or reproduction would fall under copyright law. There is a really good guide to referencing by the Library. And that’s usually fine as long as you follow referencing guidance. Where you are using a substantial portion of someone else’s work then you should seek permission to use it, unless fair use is covered by licensing. The University has many licenses in place to allow for using copyrighted work in education. There is another excellent libguide on copyright and IPR that is definitely worth bookmarking.

Attribution is just as important with teaching materials, and even with administrative documentation.  It’s just good manners, and since the most recent changes to copyright legislation, a legal requirement.

So how do I attribute the work of others in non academic documentation/resources?

Wherever possible we should adopt the Harvard at Newcastle style of referencing outlined in the library guide. This includes guidance on citing newspapers, web pages, secondary referencing (where you’ve come across a summary or a mention of another author’s work in the source you are reading) and has some interactive examples and FAQs.

When should I give credit?

Always. As Nuala says a good way to win friends and influence people.

By consistently given credit where it’s due, you avoid claims of plagiarism, you demonstrate your understanding of a subject/area of work, illustrate good practice – something we should all strive for in the service – and comply with UK copyright law.

Yes, even with openly licensed materials (such as those licensed under Creative Commons). As we don’t have the concept of ‘copyright free’ in the UK I’d even go so far as to give credit even when using CC0 materials.

How do I give credit to openly licensed materials?

However the copyright owner has specified. There is excellent attribution guidance on the Creative Commons website.

What is fair use?

An oft-asked question is Doesn’t education fall under fair use? My response is always It depends, if in doubt ask for permission. In the case of potential copyright infringement its best to ask up front. See the UK Copyright Service factsheet on Understanding Fair Use.

With the 2014 changes to copyright law, some exceptions were introduced. Exceptions to copyright: education and teaching is a short 16 page document – basically its now a legal requirement to attribute others work in exchange for being able to use it under licensed circumstances, or under fair use.

This is further complicated by the tendency for people to share on the worldwide web. Fair use would probably never apply to anything that appears on a web page. So its important to seek permission in this case.

I’d like to know more

The Top 10 Copyright Myths page from the UK Copyright Service are a good place to start. Or you can use the teachingcopyrightadvice@ncl.ac.uk email.

Thing 9: Images in PowerPoint

Being able to use images in PowerPoint can really enrich any slides you put together, enable better visual storytelling, and make for more compelling and memorable presentations. But adding lots of images and video clips can make your presentation file size grow very large very quickly. There are a few tips and tricks we can use to ensure that we make sending presentations to others and presenting elsewhere as easy as possible. But before we get to that we should consider the visual identity for the team and representing LTDS.

How should my slides look? Is there a LTDS template?

We should be using the recommended University PowerPoint templates in the Conference Toolkit for everything we do, so you might like to bookmark these links. The template generally change year on year, so its worth downloading a new template from these links every now and again to make sure you are using the most up to date version.

What if I don’t use PowerPoint?

Online presentation tools such as Google slides. Prezi or the paid for version of Haiku Deck also have options for using PPT templates, so that we can maintain a consistent visual identity for the service, and for reducing file sizes, which can make your presentation load more quickly.

Practice makes perfect

Download the current Key Facts and Figures template. This is a visually rich template that you can play around with. We are going to add some images and video.

Adding, cropping and resizing images

There is a good Microsoft tutorial on reducing file sizes of pictures. Take a read. You might like to bookmark this too.

After reading it, try the following:

  • Crop the picture on the last slide to focus on the two figures walking towards you, and delete the cropped areas only for this picture.
  • Change the default picture resolution for the whole presentation to 150ppi.

Learning more about using PowerPoint well

Thing 8: Excel – some quick reminders

This week brings a tapas of excel goodies, do feel free to try out one or more of these offerings to suit your appetite.  You’ll need to download the thing8 sample worksheet [ thing8excel ] – but by all means do try this on your own data too.

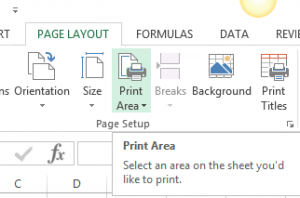
Setting print areas

thing8-printareas

Be kind to the person you send your lovely data to.  Define the print areas and repeat the row titles if it spans more than one page.

Try this out on the Biscuits Consumed sheet

  • Set the print area to the first 4 columns
  • Use print titles to repeat the first row
  • Use View/Page break preview to check it is good.

Autofilter

Autofilter can help you explore your data. The “Biscuits consumed” sheet holds data from a follow on study catalysed from the biscuit world cup – this time participants chose one biscuit per day and gave it a score.

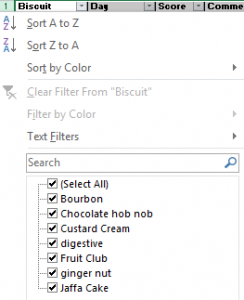
  • Select the 4 columns making up the table and click “sort and filter” and select “filter”

thing8-sortandfilter

  • Use the drop down menu on the column headings to try a few things out eg:

thing8-filter

  • sort the biscuits A-Z
  • select just the Fruit Club results
  • On the comments heading use “Text Filter” to look for all rows containing “choc”
  • Clear all filters before you go on…

Pivot Tables

We often get information that we need to summarise. Pivot tables can make this really easy.

On our biscuit example we might like to ask “how may times was each biscuit chosen?” and “what was the average score for each biscuit?”.

Here’s what to do:

  • select the first three columns
  • Click on the Insert Menu and select Pivot Table
  • accept the defaults to create a new worksheet

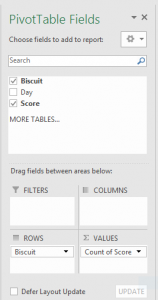
thing8-pivot

  • Drag “biscuit” from the field list to the rows area and drag score to the values area
  • If you like drag, score into the values area a second time, click on it and change the “value field settings” to give average of score.
  • See if it matches the Answer to Biscuits Consumed sheet.

Absolute and Relative Referencing

If I have not yet exhausted your appetite for Excel tapas, here’s one that has its own shortcut key (F4).

By default Excel always uses relative referencing.  If you copy a cell four rows down, any formulas in that cell are updated to point to the corresponding cells four rows down.  You might not always want this, and the good news is that you can override it by using $ in the formula.

To try this out have a look at the sheet labelled MyShares.  (This relates to an alternative reality where you have enough spare cash to have some shares and time to ponder how they will grow in a variety of scenarios).

We need to copy the formula in cell E5 to fill the other areas and work out how our shares may grow.  At the moment the formula is

=D5*E4

A fruit club goes to the first 3 people who can tell me by email where to add two $ signs!

(See this Microsoft article if you need a hint!)