Thing 21: Typing less – building blocks, autocorrect and fields

Fed up with typing out long phrases like “Learning and Teaching Development Service”? Why not get Word to do the work for you….read on to explore a couple of approaches.

Part 1: AutoCorrect

We can harness Word’s Autocorrect feature to do this – the one that automatically converts “necesary” to “necessary” when you press space bar.

Let’s make ltdsx expand to “Learning and Teaching Development Service”

Here’s how to do it:

In Word

  • click File/ Options / Proofing
  • click AutoCorrect options

autocorrect options 1

  • Add a new entry
  • Click Add, then OK

If you have some pet typos you can also add them in here.  A notable plus is that these autocorrect entries are saved with Outlook.

Part 2: Quick Parts/ Building Blocks

You may have noticed if you start to type Newcastle University that Word will predict this and give you the chance to press Enter to finish typing it.

autotext offered 3

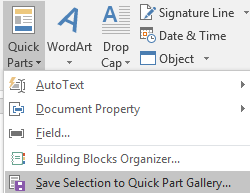
This comes from Quick Parts – on Word’s Insert menu.

quick parts 4

Let’s add a new one to the list

University Learning, Teaching and Student Experience Committee (ULTSEC)

What would be nice would be for this to offer to autocomplete this after you typed “Univer “

Here’s what to do

  • Type out the phrase you want to store
  • Select the text

then either

  • Press Alt-F3  (the speedy keyboard shortcut way to do it …

Or

  • Click the insert tab
  • Select Quick Parts
  • Click “Save Selection to Quick Part Gallery”save to gallery 5

Both routes will take you to the “Create New Building Block”,

in the name field type in the name you want to use for this quick part….we’ll just go with the default.
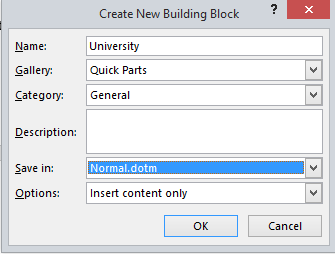
create new building block 6

Click Ok and try it out, you should see….

autotext offerered ultsec

You can add whole blocks of text to quick parts. If you don’t want to wait for the prompt box to come up you can press F3 to insert the autotext.

Outlook and Word save building blocks in different locations (bah!), I’ve only found faffy ways to copy them between programs.  If it is easy though please say!

Part 3: Fields

Via Word’s Quick Parts you can also add useful fields, such as the filename and location, the page number, the save date etc. These can often be helpful in document footers.

Try this:

  • Double click in a document footer
  • Click on Insert ribbon, then Quick Parts, then field
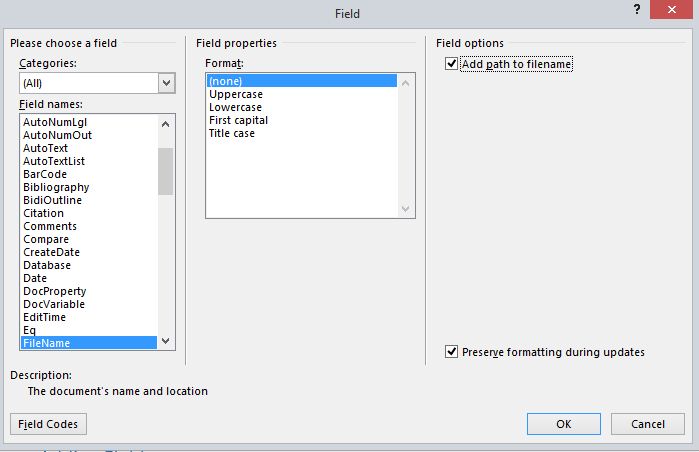
  • Select Filename and tick “Add path to filename”
  • Click OK

field 9


If I do that on this document, I see:

path11

Putting these things together

You can add fields into the building blocks you create.

For example you may want to have a quick way of adding the filename + path and page number to the bottom of a document.

Here’s a final challenge:

  • Create a new building block called “footerbits” which adds the following fields: filename and path, page number.
  • Test it out by typing footerbits and then pressing F3

Hint: Generate the field codes first, select the text, press Alt-F3 and give it a name “footerbits”

Thing 20: Using online forms

Using online forms is a really handy way of collecting information, organising events and taking bookings and means that all of the responses are automatically collated in one place.

Form builder

The university’s form builder service is available here: http://forms.ncl.ac.uk/

To get started click “Create New Form!”Create new form

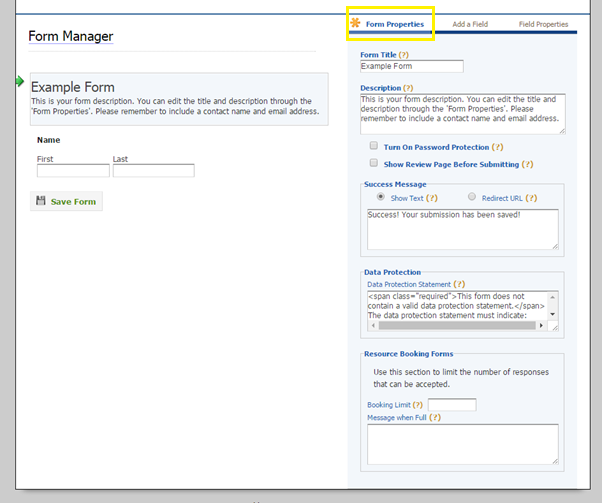
Click on the form title to edit the form properties, here you can add a title, description and message that will appear after people have submitted the form.

Form Manager

All forms must have a relevant data protection statement added:

e.g. “All information that we hold concerning you as an individual will be held and processed by Newcastle University strictly in accordance with the Data Protection Act 1998. We will not, without your consent, supply your name and addresses to any third party except where (1) such transfer is a necessary part of the activities we undertake, or (2) we are required to do so by operation of law. Newcastle University’s data protection policy is available at www.ncl.ac.uk/data.protection/

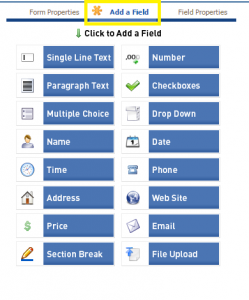
You can then choose from a number of different fields to add to your form:    

Add a field

Once you have built and saved your form, it will appear in a list on your homepage:

Form builder list

Click “Publish Form” to get the url which you can either send via email or include in a website and you can set the entries to be emailed to a particular email address by clicking “Emails”.  You can also download a spreadsheet of the results by clicking “Entries”.

Once you have made a form, you can easily duplicate it to reuse it for another event or delete it.

Top Tip! Use a shared account to create your form, this means they can be easily duplicated or edited by anyone in your team

Typeform

Typeform makes a very pretty form which you can customise. It also allows you to apply calculations and logic steps. You can have a go using the free trial option which also has lots of handy How To videos.

You can access it here: https://www.typeform.com/

Click “Create a new typeform” to get started and you can choose to start from scratch or use a template.

New Typeform

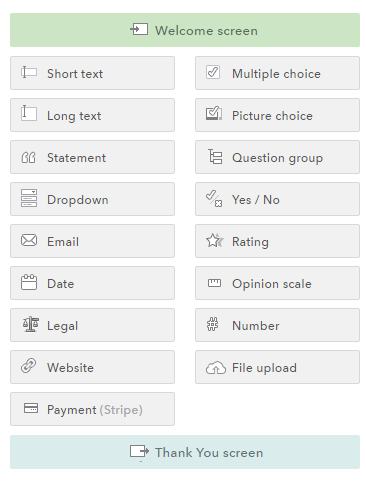
On the left hand side, you will see that you can add a welcome screen, a thank you screen and choose from loads of different question types.
typeform menu

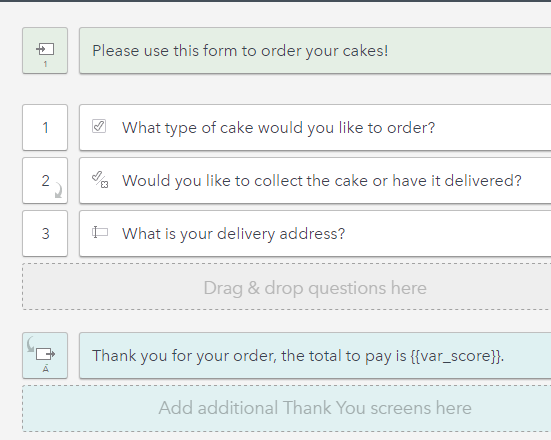
Have a go at creating a form to order some cakes using this spreadsheet. Add the welcome text, questions and thank you screen then we will add the calculations and logic jump.

typeform questions

Adding a Calculation

Now we are going to add a calculation that will give the user a total price for their cake and delivery. On the multiple choice “What type of cake would you like to order?” question click the calculatorcalculator

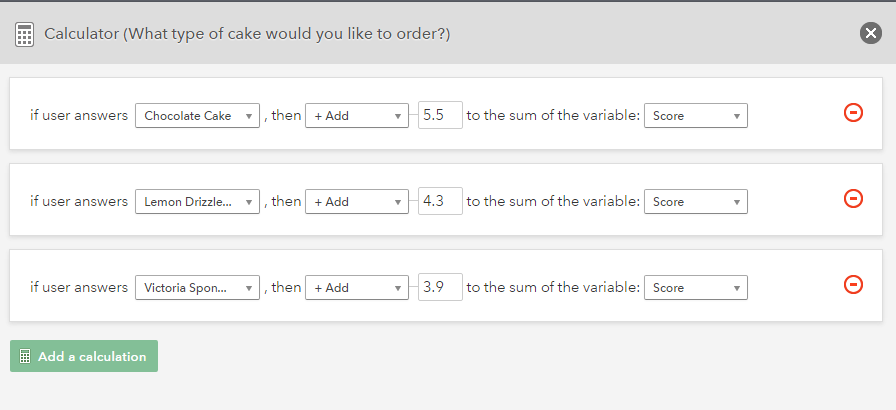
Then you can assign a price for each cake by clicking “Add a calculation”

typeform calculation

Then do the same for the delivery question and add the price for delivery when they answer “Yes” (You don’t want it to charge them if they said no!)delivery calc

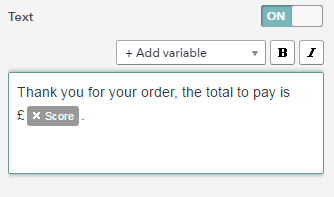
Finally in the Thank you screen, you can add the variable of “Score” which will show them their total at the end of the form:

Thank you screen

Adding a Logic Step

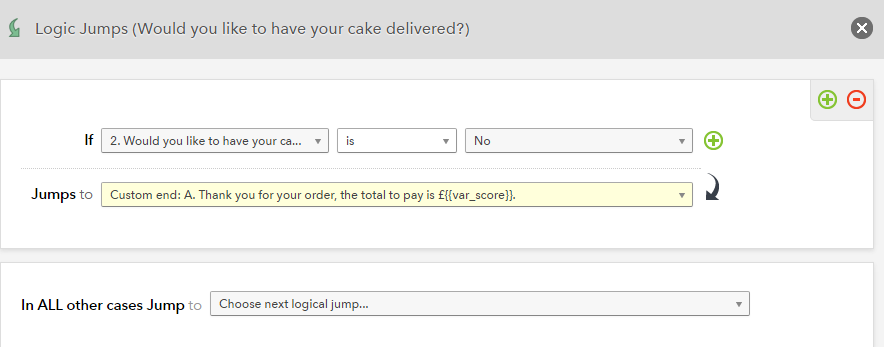
We want to skip the delivery address question if they are collecting their cake and go straight to the end of the form.
So click the logic jump icon on the “Would you like your cake delivered?” question:

logic jump
Here you can set it so if they answer “No” it jumps to the Thank you screen.

logic jump step

View type form

Now you can check your form is working by viewing it.

You can also use the “Design” tab to change how the form looks and the “Analyze” tab to view the results and other info. You can download your results as an excel spreadsheet and you can also view a report which gives you stats for each question.

typeform tabs

Thing 17: Managing your professional profile online

After scouring through lots of pages of “social media top tips” and “how to get a killer LinkedIn profile”, the take home message about managing your professional profile online is: be savvy about balancing professional and personal uses of social media.

The careers service recommends this article to our graduates: Social networking and graduate recruitment: manage your online reputation which advises:

“Separate your personal and professional online personas and actively manage your ‘net rep’.”

So a good place to start, is to think about your target audience and the purpose of your profile. You can then tailor your tone and manage who can view your stuff accordingly.

Checking your digital footprint.

What does your current online profile actually look like? To find out, have a go at checking your digital footprint.

Start by googling your name, or your name and job title, and see what comes up. Is there anything there that you didn’t expect? Or that you wouldn’t want as part of your professional profile?

If you would like to find out more about your digital footprint, there is a great activity in the Cyber Security free online course: Find out about your digital footprint.

Updating your university web profile

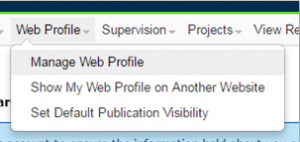
You can manage your university web profile via My Impact.

My Impact menu

Here you can add:

  • a profile photo
  • contact details
  • publications
  • research information
  • teaching information

Your profile is then linked to your listing on the uni people search.

This document gives a step by step guide for updating all sections of your profile: MyImpact User Guide To Editing your Web Profile

If you like, you can also add a link to the personal blog that you created in our first 23 Things post, by clicking “Edit Personal Details” and adding a personal website address.

Facebook

As Facebook privacy settings change quite frequently, it is a good idea to check what your profile looks like to the public or to a specific person.

Who can see what information on my profile?

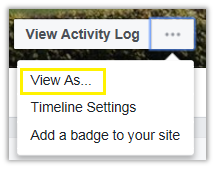
Go to your profile page and then the “View Activity Log” drop down menu and “View As..”

Facebook activity log menu

Not what you expected?? Time to check your privacy settings!

Changing privacy settings

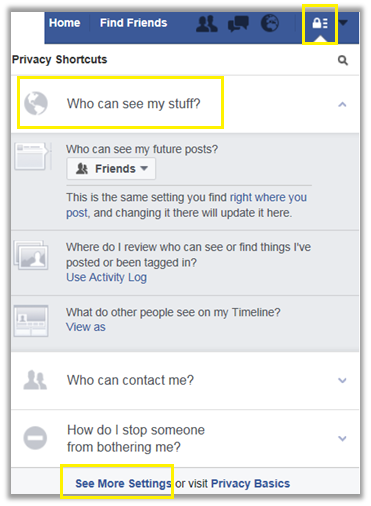
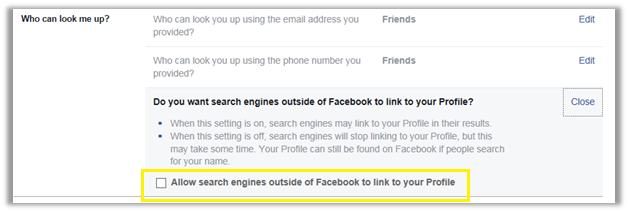
You can change who can view all of your future posts in “Who can view my stuff?”. If you do not want your Facebook profile to appear in search engine results you can stop this happening by clicking “See More Settings” and “Who can look me up”:

Privacy Settings Search engine

LinkedIn

Now how about a few top tips to improve and manage your LinkedIn profile:

Use a professional profile photo!

Profile Photo

Make sure you choose a professional photograph, that is current and sets the tone for your profile. Its probably best not to use a photo of you down the pub, on the beach or posing with giant cardboard teeth!


Control who can see your information by customising your public profile.

Go to your profile and click “Update your public profile settings”:

Linkedin Profile settings

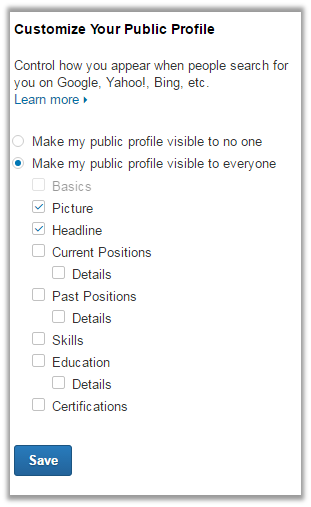
You can then select exactly which sections can be seen publicly:

Customize your public profile

Customise your personal url:

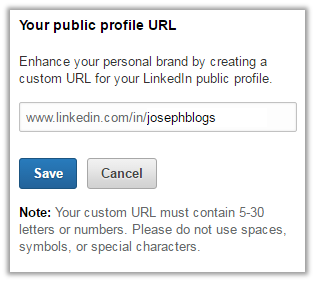
Make it easier for the right people to find you by personalising your url.  Again in your public profile settings, you can edit the link to your profile:

UrlTurning off your activity broadcast
If you haven’t updated your LinkedIn Profile in a while and it needs a major overhaul, you can turn off your activity broadcast so you can quietly update it without notifying everyone in your network!

This can be done from your profile page:

Network

Twitter

There are hundreds of articles out there about how to have an amazing professional Twitter profile, and most of them suggest the following top tips:

  • Make use of your bio section and include key words to help you network with relevant people.
  • Link to your blog or website.
  • Have a professional twitter handle.
  • Do not link to your Facebook account if you use them for different purposes/to reach different audiences.
  • Separate professional and personal! If you have a twitter account which you use as part of your professional profile, that network might not want to see you #GBBO retweets!


(Ellie masquerading as Nuala!)

Thing 16: Loving our Campus Managed Desktop

Filestore

Unlike files stored on mobile and portable disks we know that information stored on University filestore is secure and backed up.

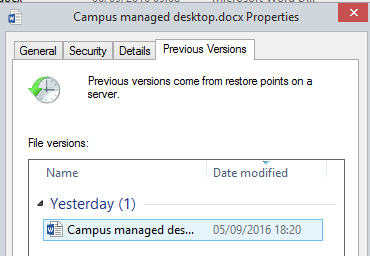
Our files are held on physical storage owned by the University and each day (twice in the morning and twice in the afternoon) files on you Home folder are copied, keeping around 3 weeks of changes safe. Even better, you have the power to restore these Shadow Copies.

1-shadow

Try this:

  • right click on a file you have been working on over the last couple of days
  • Select properties, then the previous versions tab.
  • Go to the page on Shadow Copy to find out more

And… if you can’t remember which Tower your Home folder is stored on click the the Technical Information link on People Search/My Details.

Getting Organised with Filestore

We collaborate therefore we use shared filestore.

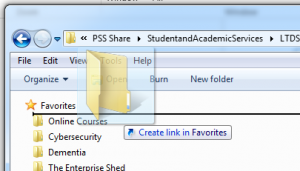
Take a moment to think about the places you go to regularly.  If you are spending ages every day navigating to a single folder buried in the PSS share then why not add it to your favorites?  (We can use this even though it is spelt wrong!)

File Favourites

Simply drag the folder from the LTDS filestore to your favourites to have it listed.

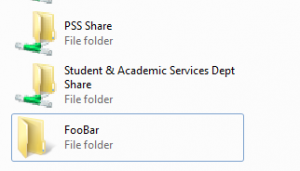
2-favourites

Network locations

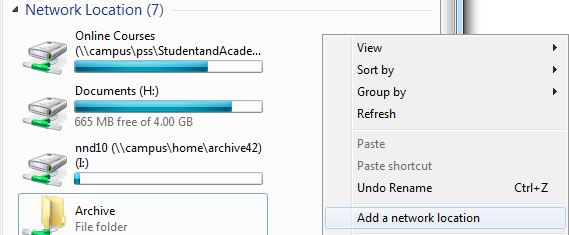
Or, if you are regularly using a bit of shared filestore from somewhere else add it as a network location.

3-places

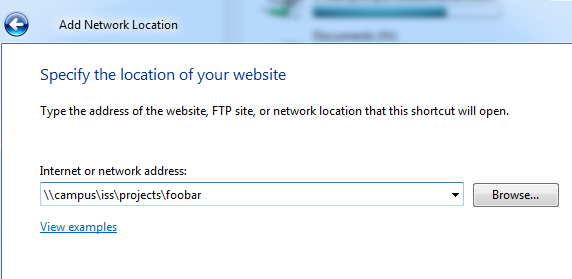
Type in the long address eg:

4-path

5-folderthere

Software

Rather than having every single employee updating their versions of Adobe Reader, Chrome, Office, anti-virus.  It all happens automatically, the software updates are packaged up, tested and deployed to PCs so that we all remain up to date.

There is an orderly elegance to it – If the library want to use an updated version of an Endnote file it can be copied to all the managed PCs running Endnote in 90 minutes.

If something nasty happens the whole system can be reset and can be rebuilt in a few hours without the need of feeding in lots of DVDs.

Try this:

  • Click the start menu, then the shield

6-shield

  • Click “Switch to Advanced View”

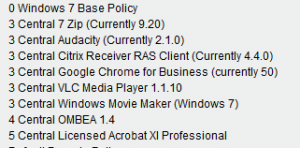
Scroll down to see a list of software “applied” to your PC, for example.

7-filelist


Free stuff

The University negotiates software purchases for commonly used products centrally.  As members of staff we reap the rewards.

  • You can install Office for free on your home PCs/ tablets and phones
  • Other titles are available for free and at a discount.

See: http://www.ncl.ac.uk/itservice/software/softwaredeals/staff/

Single Signon

7-logongateway

Thankfully you don’t have to remember gazillions of passwords as our IT folk are big fans of Single Sign On.  A downside to this is if you want to access resources via different accounts eg your own account and a role account you may need to do one of the following:

  • Use a different browser for each id (e.g. Internet Explorer for your own id, Chrome for the role account)
  • If you have trouble swapping between identities, close down and open up your browser (to clear the session data); or open an incognito tab in Chrome.

The downsides

“I can’t install software on my own PC.”

This is a two edged sword! To my cost I know that the downside of recklessly installing any new bit of freeware-comes with a -guarantee that once every 6 months a full PC reset will be needed.   Chances are if you would like to use Audacity, then it is already “packaged up” in a way that will work.  You can ask for the software to be installed and it will be updated when the next version comes out.

“I can’t have the latest versions of the software I want to use.”

Sometimes having a safe, tested collection of applications that work together can be better than embracing often aptly named bleeding edge.  Somethings are best upgraded in a managed way, for example it’s helpful to have versions of Office, SPSS, etc in sync across staff and student PCs.  But, if our computing officer trust us we can always ask for local admin rights if we want to live a bit more dangerously!


Thing 15: Weeding and Housekeeping H drive and roaming profile

Analysing your H Drive

If you get one of those emails to tell you your Home folder is full you will be forced down a path of deleting some files.  But how do you know what is hogging the space?

There is a clever little utility on all campus managed PCs that does this for us.  Here’s how to get to it.

  • Click on the start menu
  • Click the Shield
  • Click Analyse my H Drive
  • Go and make a cup of tea/coffee/talk to a colleague for a few minutes.

Once it has finished have a look at the tree map it produces.  You can identify folders taking up most space. Here’s an insight into mine:treemap

Clicking on the largest purple blob, will take you to the name and location of the file. I can quickly see that this is in fact a video (mp4)

northernbridge

And I know from the filename that it’s something that is now on ReCap, so there is absolutely no reason for me to have it.  Then, just right click on the filename and delete it. (If you are really, really sure select Delete (no way to undelete).

nowaytoundelete

WindirStat can be used to examine other file locations too, like shared drives, project filestore and roaming profiles… but more of this later……

Roaming Profiles

Chances are even if you haven’t filled your H drive you will have had a “Profile Over Quota” message.  (If you haven’t seen this, you can simulate it really easily by copying a really large file like the uni powerpoint template to your desktop)

Roaming profiles are a brilliant thing… they give us the ability to go to any PC on campus and still access the same mapped drives, internet shortcuts and application settings.  Your profile is read when you logon to a PC and it is written back to the profile server when you logoff.  When you launch programs for the first time they typically create a new folder in your profile.

Having a look at your roaming profile

The contents of your roaming profile can be found by opening Windows Explorer and going to:

C:\users\<yourcampusid>\AppData\roaming
(eg if your campus id is nfb99 you would type:  c:\users\nfb99\appdata\roaming)

Open this up…You will probably see folders for Adobe, Microsoft, and Google – these hold your settings for Adobe Reader, Microsoft Office, programs in your start menu and Chrome.

Profile Clutter

Your profile can easily get cluttered ……..

  • Following an upgrade to Office 13 your profile may contain information for the new and old versions of office.
  • If you use an application on a different PC, you could then have its bits in your profile. (This in particular is a hazard for those regularly using strange apps on cluster machines!).
  • You may have profile folders for applications you no longer use
  • You may have indavertently saved files to your desktop (do use shortcuts instead)

Deleting Profile Clutter

Let’s take the example of Microsoft Office, try this:

  • Open the folder: C:\Users\<yourcampusid>\AppData\Roaming\Microsoft\Office

You should see a folder here for “15.0” (office 2013)

office15

If you have folders for earlier versions – you can safely delete these – just right click and select delete.

What to do if your profile is over Quota

There are some helpful instructions here in the IT Service article on Profile Over Quota.

If you find the scrolling box a bit too annoying – have a look in the advanced bit below….

Starting from Scratch (Zapping your Profile)

If you are really struggling you can ring the  IT Service to delete your profile from the profile server.  (The nice IT Service people will talk you through this and ask you to logout before they wipe it).

A few more advanced things ….

Another way to weed your profile

We can use Windirstat – but let’s launch it a different way – we are going to create a custom shortcut our desktop for this.

  • From Windows Explorer navigate to c:\program files\cmdinfo\
  • Locate the file windirstat.exe
  • right click on it and select create shortcut (say yes to put the shortcut on your desktop).

Now, go to your desktop and right click on the shortcut you have just created and select properties. We’re going to give it a couple of parameters.

In the target box you’ll see

“C:\Program Files\CMDInfo\windirstat.exe”

  • Add a couple of bits to the end of this line so that the shortcut shows your profile space.

“C:\Program Files\CMDInfo\windirstat.exe” %appdata% /treemap

  • Click OK
  • Rename the shortcut to something that makes sense eg “My Roaming Profile.”

Double click on your shortcut to visualise the space used in your roaming profile.

Avoiding Blowing Your Profile

If you are beleaguered by full profile messages then it is worth getting in touch with the IT Service.

  • If you know what program is causing the problems you can run a script to exclude a particular application from your roaming profile (VideoScribe is a particular culprit)
  • More drastically, if you really only ever use one PC it is possible to save all your settings locally rather than to and from the profile server.  (But this requires a policy to be added to your local PC).

What’s this all about then?

  • It’s about skill sharing.
  • It’s about upskilling the team and our collective personal digital capabilities.
  • It’s about committing to 15-30 minutes a week to personal development and learning or refreshing a digital skill.
  • It’s about learning how to use the tools at our fingertips more efficiently, to help us do our jobs better.
  • And it’s about getting a bit more practical knowledge about some of the services we support on a day to day basis.

Welcome to the LTDS Digiskills blog, which has been set up to allow us to learn together, at a time convenient to you, by learning 23 things to increase our digital capability.

  • One ‘thing’ a week will appear on this blog.
  • Each ‘thing’ should take between 15-30 minutes to complete.
  • The ‘things’ that have been chosen are based on skills which will benefit everyone in the team, help us all do our jobs better and use the technology at our fingertips more effectively.
  • You may already know how to do many of the things that come up. That’s OK. we don’t think that anyone will know how to do all of the 23 Things.

It is designed to contribute to and support everyone’s personal development, aligning with the Registrar’s wish to have everyone put an objective into their PDR related to increasing their digital literacy/capabilities.

Our 23 LTDS Digiskills things will appear on this blog. Contributing is restricted only to our team. The blog is not indexed by search engines (like Google) so no one is likely to find it unless they have the link. We will be seeking feedback on how it all went at the end of the course and discussing it at a future team awayday.

What is 23 things?

See http://23teaching.com/  and https://tda23things.wordpress.com/course-schedule/ as examples.

This is an approach first used in libraries to share skills and build capability across a team. It is blog based, so everyone will learn how to blog, with one blog post appearing a week based on one topic from a central team 23things blog.

The idea is that each topic/week should be easily manageable in about 15-30 minutes, and that each topic is very practically focussed. Having 23 things on a blog means that should anyone want to revisit/refresh a skill, it is all there, and if staff change, new staff can work through developing their skills in agreement with line managers.

We will augment this online approach with 3 whole team meeting/workshops and look at how it has worked at the next staff awayday.

Jisc Digital Capability Framework

See https://www.jisc.ac.uk/rd/projects/building-digital-capability and http://digitalcapability.jiscinvolve.org/wp/ )

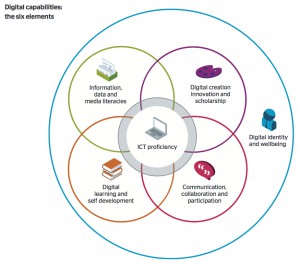
The areas have been mapped:

The Jisc Digital Capabilities Framework

Now it’s time to move on to the first ‘thing’……