Subtitles and captions

Whenever we make a video for our free online courses we also make a transcript and add subtitles.

It’s sensible for us to make sure these digital assets can be used by all our learners, and it is also mandated as a course requirement by FutureLearn.

Thankfully, along with this stipulation is capability.  We have, via FutureLearn, an account with the transcription services of 3playmedia.com to take the pain out transcription.  Here’s how it works:

What’s really interesting is that when these transcripts and subtitles are in place it’s clearly not only learners with hearing difficulties that make use of them.

  • Some learners prefer to read the transcript instead of listening along. Maybe it’s because they can skim the contents and find the pertinent points.
  • Non-native speakers find these transcripts helpful
  • People who can’t listen to videos on their desktop computers or have forgotten their earbuds
  • We find them useful to remind ourselves of the content of the videos, and work out if we can reuse portions later.

Certainly, we have found if they aren’t there, or we’ve uploaded the wrong transcript, learners are quick to point it out.

Transcripts do take time to produce, but, the time and cost is only a fraction of the overall production costs of the video.

IMHO if it is worth spending time and money on making an professional video it is daft not to take a bit more time to add a transcript – especially if the video will be watched by a good number of people.

But to make it normal for those commissioning videos to take the extra trouble we need to make it easy.

  • provide access to easy to use services such as 3playmedia (other services are available).
  • provide an initial seed funding to cover the modest costs of producing transcripts.


Learning@Scale Edinburgh 2016

This 2 day event advertised itself as being at the junction of computer science and learning science brought together researchers involved in a wide variety of practice across the mooc—o-sphere.  The conference welcomed keynotes from Prof Sugata Mitra, Prof Mike Sharples and Prof Ken Koedinger.  Presentations were generally 20 minutes long with 10 minutes scheduled for questions.  Delegates came from all over the US (MIT, Stanford, Carnegie Mellon), Holland, Korea…..

The full proceedings are published here http://tinyurl.com/las2016program and the 5 flipped sessions are here: http://tinyurlcom/las16flipped

Highlights

Unsupported Apps for Literacy

Being something of a socialist I was impressed by the work of Tinsley Galyean and Stephanie Gottwald Mobile Devices for Early Literacy Intervention and Research with Global Reach who had provided apps to groups of children on android tablets to promote literacy development.   An interesting feature of their study was that they used the same approach in three radically different settings.  no school, low quality school and no preschool settings.  Even though the apps were not supervised the students literacy (word recognition and letter recognition) improved.

Rewarding a Growth Mindset

One of the most thought provoking sessions explored how a game was redesigned to promote a growth mindset.  Gamification is not a panacea and badges don’t motivate all students – Dweck’s work shows that if students have a fixed mindset points can become disincentives.  Brain Points: A Deeper Look at a Growth Mindset Incentive Structure for an Educational Game is well worth a read, showing how a game was redesigned to reward resilience, effort and trying new strategies.  One counter intuitive finding was that an introductory animation explaining the rational for the scoring caused players to quit – they seemed much happier just working it out as they went along.  (Perhaps a warning to us not to front load anything with too much explanation!)  I was particularly impreseed with the way the researchers developed  a number of different versions of the game to probe the nuances of motivation.  While rewarding resilient effort based approaches increased motivation, awarding points randomly had no effect at all.

Remember to measure the right thing!

What can we learn about seek patterns where videos have in-video tests? Effects of In-Video Quizzes on MOOC Lecture Viewing  Well not much really apart from the fact that learners tend to use these as seek points either seeking backwards to review content or seeking forwards to go straight to the test.

Learner’s engagement with video was explored using an analysis of transcripts as a proxy for complexity (the language, the use of figure etc).  Bizarrely low and high complexity both increased dwelling time, leaving the authors questioning the value of inferring too much from any measuresExplaining Student Behavior at Scale: The Influence of Video Complexity on Student Dwelling Time  They ended by throwing out a challenge about what we choose to measure and whether it is relevant at all:  for example “are the number of times you pick up a pencil in class meaningful?”. We can measure it but is it of consequence?

Some MOOC platforms suggest that students have video calls using google hangouts using “TalkAbout”.  Stnkewicz and Kulkmari have been exploring automated methods to indicate whether these are good conversations or not.  ($1 Conversational Turn Detector: Measuring How Video Conversations Affect Student Learning in Online Classes) TalkAbout – has a helpful API that has permitted researchers to examine turn-taking in video conversations – using a change of the primary video feed as proxy for who is talking.  They find that students find they learn more when they talk more and when they listen to a variety of speakers.  The system has the capability to identify where calls are being dominated by one voice.  Limitations were: background noise causing the video focus to switch erroneously, facilitating behaviour could be flagged as dominance, screen sharing would fix the video focus.


Cheating

Some MOOC learners use multiple accounts to harvest quiz answers. 
Using Multiple Accounts for Harvesting Solutions in MOOCs
explored their analysis of identifying these behaviours and attempts at minimising it.  They described the “harvesting account” the one used to find answers and the master account the one used to give the right answer and get the certificate. They were able to identify the paired accounts by looking at those where the submitting the right answers shortly after the harvesting account finds out the right answer.  The suspect practice was examined from log data, using the same IP address, where the master account followed the harvesting account within 30 minutes.  In reality right answers were often resubmitted within seconds.  A number of solutions were suggested to get around this

  • Don’t give feedback on summative MCQs
  • Delay feedback
  • Incorporate randomness or variables into the questions (NUMBAS is a good example)

In How Mastery Learning Works at Scale Ritter and colleagues explored whether teachers followed the rules when working with Carnegie Learning’s Cognitive Tutor – a system to present students with maths material.  The concept behind these are that students master key topics before moving on to new “islands” of knowledge.  But doing so will ultimately result a class being distributed across a variety of topics.  The reality is that Teachers can be naughty in violating rules  – they unlock islands so that students study the same material at once – but this means that lower performing students do not benefit from the program – less learning happens, they are forced to move on before they have mastered the topics.

In MOOC conversations do learners join groups that are politically siloed? 
The Civic Mission of MOOCs: Measuring Engagement across Political Differences in Forums
  Well not so apparently – there’s evidence of relatively civil behaviour, with upvoiting applying to those holding contrary view points.  (This would echo our experience of FutureLearn courses being generally civil and respectful).

Automated Grading

A few of the presenters presented work where they were attempting to develop automated approaches for grading of text based work.  Adaptive learning approaches where the focus was on “ranking” rather than grading appeared to be more robust, particularly if the machine learning process could work with gold standard responses and then choose additional pieces of work to be TA graded where these were uncertain.

Harnessing Peer Assessment

Generating a grade from peer marked assignments based on a mean scores was examined via a Luxemburg study where student peer grades were compared with TA grading.  (Peer Grading in a Course on Algorithms and Data Structures: Machine Learning Algorithms do not Improve over Simple Baselines ) Surprisingly no more effective method was found that applying the mean of the peer grades.  There was some student bias (higher marks than TAs) which could be accounted for, but the element that could not easily be overcome was the variability resulting from students’ lack of knowledge.  While TAs marked some assignments poorly due to errors, students did not recognise these errors and provided a higher score.  This led to an interesting discussion on those circumstances where peer grading was valid.

Flipping in a conference?

On day two the afternoon was given over to flipped sessions –  even though most of the jet lagged audience had failed to engage with the materials.  Of those who did it seemed that most were only really prepared to spend 30 minutes working through the content.

Peer assessment was also featured in two of the flipped sessions. In one (Improving the Peer Assessment Experience on MOOC Platforms) we looked at improvements to the workflow to include an ability to rate the usefulness of reviews. In the other (Graders as Meta-Reviewers: Simultaneously Scaling and Improving Expert Evaluation for Large Online Classrooms) the authors presented peer assessments to TAs to enable them to in effect do meta reviews.  Importantly this resulted in better (more comprehensive feedback), they found it was better to present comments, not grades to reviewers to reduce bias.

Although positively received by the audience, not all the flipped presentations worked well. And as one who had tried my best over breakfast to do the preparation I wasn’t too convinced.  Having said that we did find ourselves the subject of  live experiment where we reviewed reviews of conference papers the previous day.   One of the flipped presenters spoke of how preparing the materials in a flipped manner enabled him to make them available in an accessible form – after all not everyone wants to read an academic paper.

Keynotes

Prof Sugata Mitra presented the development of his ideas from hole in the wall through school in the cloud.  The data driven audience admired his zeal but asked questions about data/evidence and visibly flinched at thoughts of times-tables being a thing of the past.  “Can you really apply trigonometry by asking big questions?”  One of them asked me between presentations.  A point of balance came from Mike Sharples (
Effective Pedagogy at Scale: Social Learning and Citizen Inquiry
) who spoke about his exploration of pedagogy at scale, the history of “Innovating Pedagogy” and rationale behind FutureLearn’s design – as a social learning platform. He was keen to point out that not all approaches worked for all domains. The challenge that Mike presented was how we make learner objectives explicit so that they meaningful inferences could be made.  A really great set of slides worth a look.

Ken Koedinger’s session on Practical Learning Research at Scale at the end of the conference rounded the two days off well.  You cannot see learning he posited, so beware illusions

  • students watching lectures
  • instructors watching students
  • students reporting their learning
  • liking is not learning
    low correlation between students course ratings with after training skills
  • observations of engagement or confusion are not strongly predictive

Summary

A fascinating two days in which we did battle with the central problems of how to measure learning; how dialogue can be hard when there are fixed views on what learning is (fundamentally cognitive or a fundamentally social); and the ongoing difficulties of providing meaningful and robust feedback at scale.

 

RSS Thingymajig

We’re into week 2 of our LTDS DigiSkills project – in which we have been given permission to play with a few technologies (in work time) and pocket a few more skills for the future.

Last week we looked at blogging, this week it’s RSS.  I’m an intermittent consumer of blogs – dipping in when I’m forced to do things like wait for a delayed metro.  For this my tool of choice is Feedly which I jumped on when Google Reader had it’s sad demise.  Feedly works really well on my phone and is on hand to help those platform moments slip by.

In my Thing2 time I’ve chosen to have a look at an RSS reader for Chrome. It looks like this:

chrome_rss

Now, I have to admit I quite like this.  It occurs to me that the news I wish to consume on my own time is very different to that I want to read at work.

So maybe I’ll keep this going in Chrome and add a few more worky feeds in!

Video annotation – the collaborative way

Creating videos by putting together clips from a collection of recordings is a time consuming task.  Our colleagues in Digital Media help us by providing a rough cut of the raw footage with a hard-baked timestamp on the recording.  Our job is to sift through this to find the bits we want. You’ll imagine though that this involves a lot of seeking backward and forward through a video with frequent pauses to note down timestamps. Our colleague Mike Cameron (now at Bristol) battled with this last year and cleverly anticipated that ReCap had the potential to make life easier.

What we want to do is not that dissimilar from a group of students collaboratively annotating a lecture.  Things that really help us, like our undergraduate counterparts, are searchable bookmarks, the ability to play content fast (never let it be said that students would ever listen to lecturers at 2x speed), and the ability to rewind.

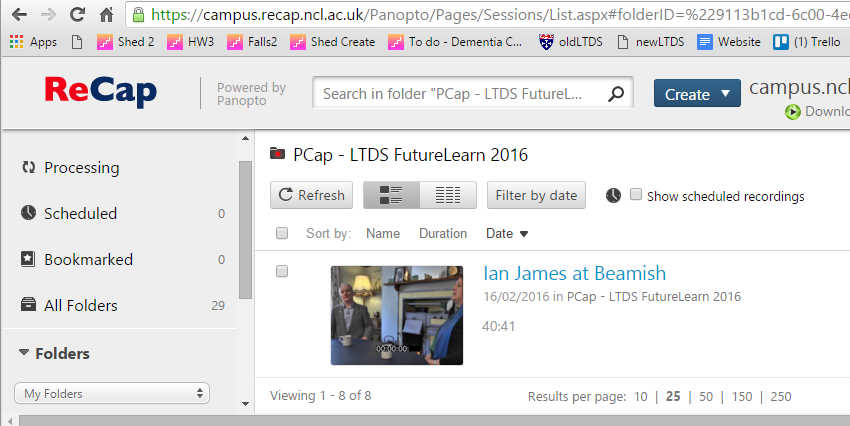
Following a speedy consult with colleagues in team ReCap we requested a PCAP folder with permissions at the folder level for all of the team – that’s Digital Media, LTDS and Academic colleagues.

pcap screenshot

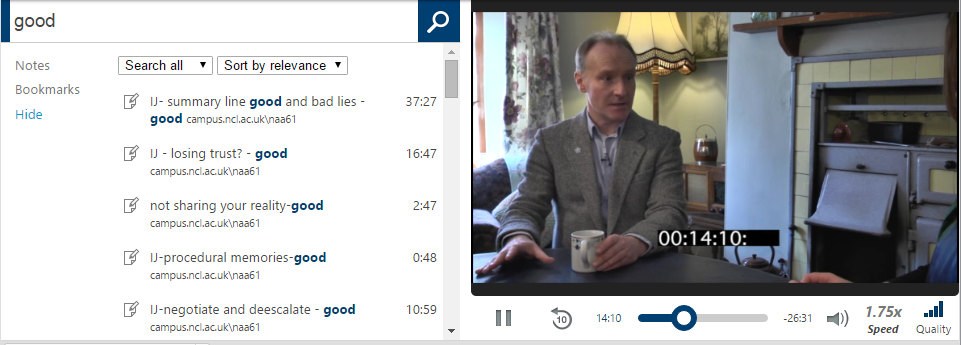
Uploading video was a doddle using the “Create” button, then we needed some conventions for the “Channel” we planned on using for collaborative notetaking.  Channel names aren’t listed (presumably some form of security by obscurity thing) so we decided to name our shared annotations “team” (in lowercase) and to annotate the start of any piece of dialogue with the speakers initials, the topic, and whether the delivery was good. If Nuala Davis gave a poor answer on Widgetology we’d put

ND-widgetology-no

In  a 40 minute interview it’s great to be able to scan and jump to the real gen on Widgetology just by clicking on the annotation.  By way of example here’s what we get one of our videos using the keyword “good”.

pcap screenshot 3

What’s particularly great about this is

  • we can jump straight in at particular annotation points without the pain of seeking backwards and forwards.
  • Our team annotations are in one place, we’re not struggling to keep up to date with the latest version.
  • Because the footage is on ReCap we can get at it anywhere (on and off campus), and we know that only our team can access it, and if we choose to we can permit other campus users viewing rights.
  • We can adjust the playback speed to skim through footage (1.5 – 1.75 is workable)
  • We can also use private notes to create personal annotations, and when we move between personal notes and shared channel, ReCAP (gloriously) stays at the same timestamp.

And one or two learning points about these channels.

  • it’s nice that ReCap shows who has made an annotation, and quite properly, permissions are such that Angela can’t edit one of my notes in our shared channel.  If we wished to do this we’d need to sign in to ReCap with a suitable role account used for the project.
  • I mentioned that channels aren’t listed.  We’ve spotted that they are case-sensitive, so it would be easy for two people to work on “team” and “Team” without twigging that they were duplicating effort.


An ode to the illustrated transcript

For each course we start with a blank canvass, we don’t have a fixed idea of x articles, y discussions and z videos, rather we attempt to make the learning needs define the mix. When video is best we are lucky in having a fantastic digital media team who have created amazing video content for previous courses.  But we know that each minute of footage is costly to produce.

So how do we decide whether something should be a video or an article?  A particularly troublesome area is the “talking head” the piece to camera without any additional visuals to consider alongside the audio.  Ant and Dec can make this look easy, but not everyone can look chilled as they try to talk succinctly, remember key points and look straight into an expressionless lens.   Yes, autocue may help, as may bullet points, but it’s still difficult to deliver well, and we can easily require multiple takes to get a good, natural and engaging result.  Without preparation it’s easy to fail the “Just a Minute test” (deviation, hesitation and repetition) – resulting in fragmented content that may not foreground the most important points before viewers tune out.

Talking head’s have their place, for example:

  • Where we need to build relationships. Video has a key role in establishing our lead educators as real people with a passion for their subject and a desire to draw learners into their enthusiasm.  Learner comments thanking the subject lead at the end of courses give testimony to their connectedness – they’ve watched the videos, and had regular emails, but the educator may not have even read any of their comments.  (We’ve created the illusion of Educator presence!)
  • Where the subject matter is sensitive or nuanced and a paper based approach would not convey this effectively. We can pick up tone, facial expressions, changes in rate and pitch to draw emphasis to key points, alert us to things to be wary of and absorb examples (stories) that illustrate.

On the surface video can be more appealing in situations where there is some associated visual content to talk though:  a plan, diagram, artefact.  But I’d like to challenge this also.

Let me explain …We know that not everyone will be able to consume video content, learners may have hearing impairments, have bandwidth issues, or maybe even have a computer without sound.  To get around this it’s our norm (oh that it was everbody’s norm) to create a transcript.

On a recent run of Hadrian’s Wall we got into discussion with a few learners who relied on the transcripts, but felt they were missing out by not being able to tie up the text to the images contained in the video.

hwilltrans

I sounded them out about whether an illustrated transcript would help, and took the 18 likes as a definitive  “Yes please”. So we set about working through the transcripts for the 45 videos on the course, adding screen grabs and pictures to around 2/3rds of the transcripts.  The learners applauded us, but we were had to gasp at the irony involved in the process:

  1. Plan video
  2. Write script
  3. Reconnaissance location
  4. Arrange for media team and educators to be on site for filming
  5. Set up
  6. Make several takes
  7. Identify additional pictures to illustrate the content
  8. Produce video rough cut
  9. Provide feedback
  10. Produce final cut
  11. Gain signoff from the course team
  12. Produce transcripts
  13. Insert screenshots from the video to make the illustrated transcript

The document we referred to as an “illustrated transcript” was really just an article with pictures in it.  If our goal was to create this in the first place, then the production tasks are *much* simpler and fit on one line:   write article, identify pictures, get feedback, publish.

We need to be confident to make judgments on where video is really good.  There are places where it really is:   I learned how to felt a shed roof via a browse around YouTube, but I’d rather follow a recipe in a book.  The nature of the thing to be learned should inform the choice of medium of communication.  Let’s think about the “learning power” when making these judgments and broaden it out too – it’s not just video vs article, but maybe even – what else can we do to help learners to discover things for themselves?

Foregrounding this latter point not only helps us avoid the passive/transmissive criticism of x-MOOC, but also means that we can harness the strengths of social learning and all that technology can do to make this easy this over time and distance.


Grappling with Time

We were conscious after the first run of our “Hadrian’s Wall: Life on the Roman Frontier” that many learners had struggled with time. The course covered a 400 year timespan and the thematic nature of the some elements of the course meant that we didn’t always move from 0- 400 in a linear way.

So, for subsequent runs we started to have a look at timeline tools, our favourites were TimeLineJS and Tiki-Toki.

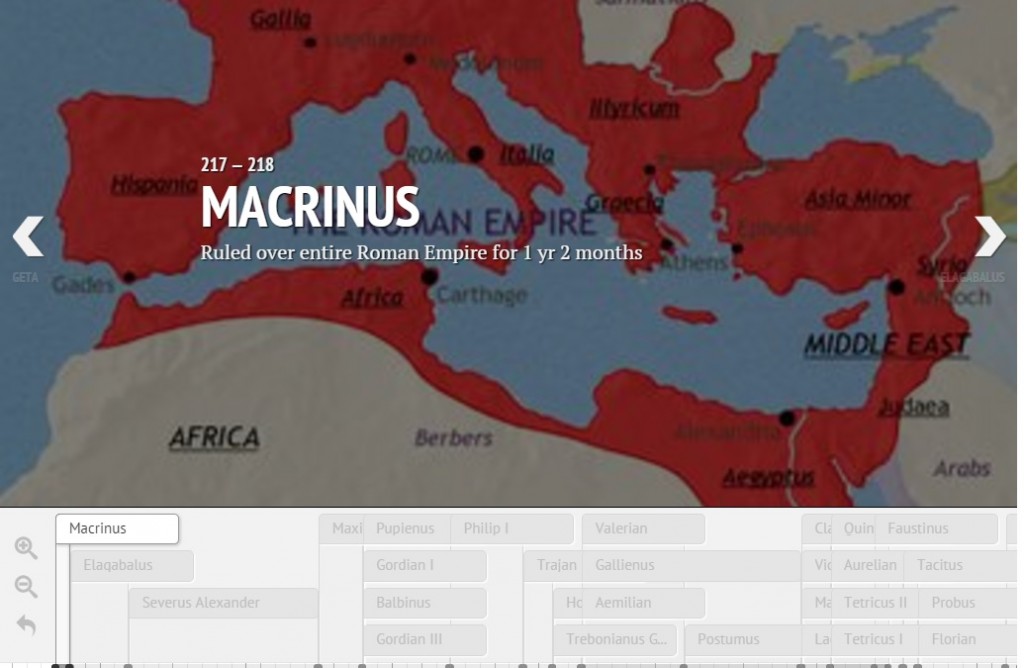
The attraction of TimeLine JS was that it was FREE, and that we could drive it from a Google Spreadsheet.  We wanted to use timelines in two ways, to provide a course overview at the beginning, and to show the ridiculously fast turnover of emperors in the 3rd and 4th centuries.

TImelineJS was easy to set up, but we found that the number of items we wanted to plot meant that it was just a bit too confusing.  The tool would have worked well if we had wanted to give a lot of detail (and had a picture for each item), but for us the space usage on the screen didn’t work so well. There’s a screenshot of our quick test below (you can also see the actual timeline and the google sheet we used to create it).

timelineJS Screenshot

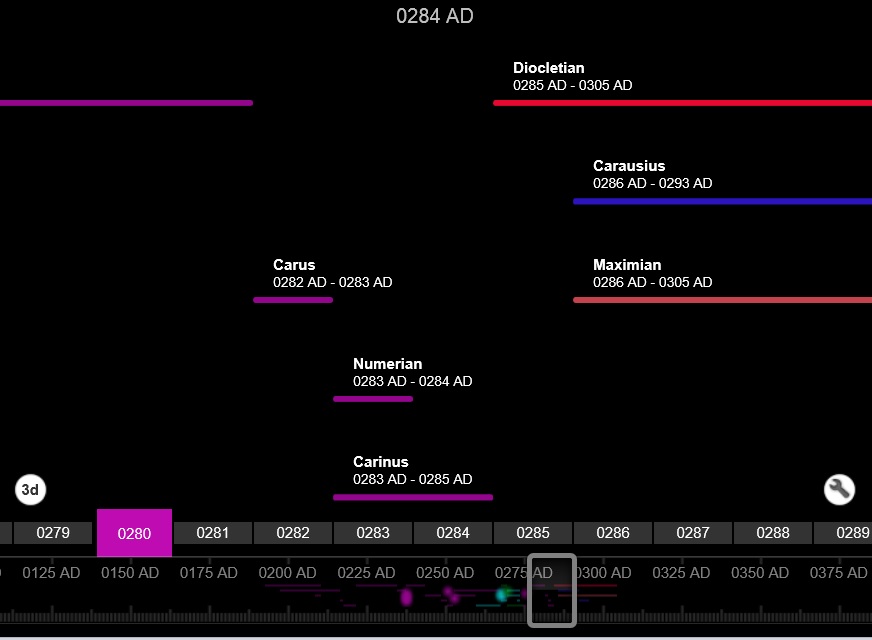
For our purposes Tiki-Toki gave a better learner experience.  We liked a number of things – there were a number of views (we could set a default), it was searchable, and we could categorise our emperors and the more adventurous learners could filter it by these categories.

tikytoky

Here’s a link to the 3rd Century Emperors timeline we published on the course. Our only disappointment was that while it was possible to export the entries as CSV we couldn’t import the data that we (Rob) had so carefully collated.  (That gave an excuse to experiment with AutoIT keyboard macros, but that’s another story).

We can’t prove that the timelines themselves improved the overall learner experience as too many things changed.  Notably, we placed “Timeline: Life on the Northern Frontier”  in a dedicated “step” rather than tagging the time information at the end of a video. So this brought time right to the fore.  We know from the analytics that learners spend time on this new step, and we used bit.ly to track links to the interactive timeline, so we know it was viewed.

Learner comments implied that while some liked the interactive timelines, many of them were  even more happy with the printable pdfs we provided as downloadable reference links.

It took a few days create the interactive timelines. Was it worth it?  My view is yes; but yet again I’m struck that the accessible pdf can be just as valuable a resource as the whizzy clicky shiny thing – I’d see them as complementary.  The most important learning point though, is if the content/concept is important, give it the space.


NUTELA3P Sound

Here are a few resources we’ve pulled together for this part of the session:


Add audio to blackboard

After you have crafted your audio file, you’ll want to share it. Unlike video, audio files are generally very reasonably sized and can be uploaded easily to Blackboard as they are.  Look for the “audio” item in when you use “Build Content”.

A slightly more fiddly way to handle this is to uploading the file to an audio/video site (NUVision, Soundcloud), copy the embed code for this and pasting this into a Blackboard content item. Unless you want to discourage people from downloading the file there’s really no advantage to this longer way round.

You’ll see both of these in the short screenrecording above.

Audacity Basics

Audacity is a really useful tool for creating audio files.  These can be used for podcasts;  audio feedback (as a student I’ve really appreciated “tone” and learning points);  and edit together sound tracks from different sources.

JISC’s guide on the use of Audio Feedback for Assessment gives an excellent summary of the pros and cons of audio feedback.  They also have a helpful page on Creating an Audio Podcast.

Here are some of my examples where I’ve used Audacity for specific purposes:

It’s easy to use – here are some basics:

NB:  If you are interested I recorded this using the screen recording feature that arrived in PowerPoint 2013 this February.


PowerPoint as PhotoStory

Here’s another approach to dismissing those (painful?) memories of lost PhotoStory. We can use good-old PowerPoint to insert pictures in an album and make a video from this. To me this seems much easier!

Rather than my dull screenshots imagine a set of lovely images. If you’d like to follow these instructions then have a look at this pdf of this (movie/ppt): PowerPointAsPhotoStory

Movie Maker as PhotoStory

oopsy….we were thinking about what to show at our next NUTELA and “Photostory” came up.   But, oh dear, although colleagues may have had fond memories of using it, it appears to have expired with XP.

We’ll be looking at Animoto during our session, but here are a couple of other ways of achieving the same thing.  First off Windows Movie Maker (a free download).

You can also see this as a pdf – MovieMakerAsPhotoStory

What do you think?  A bit faffy for me.

Sound Foundations

I’ve recently moved to the worlds most echoey office.

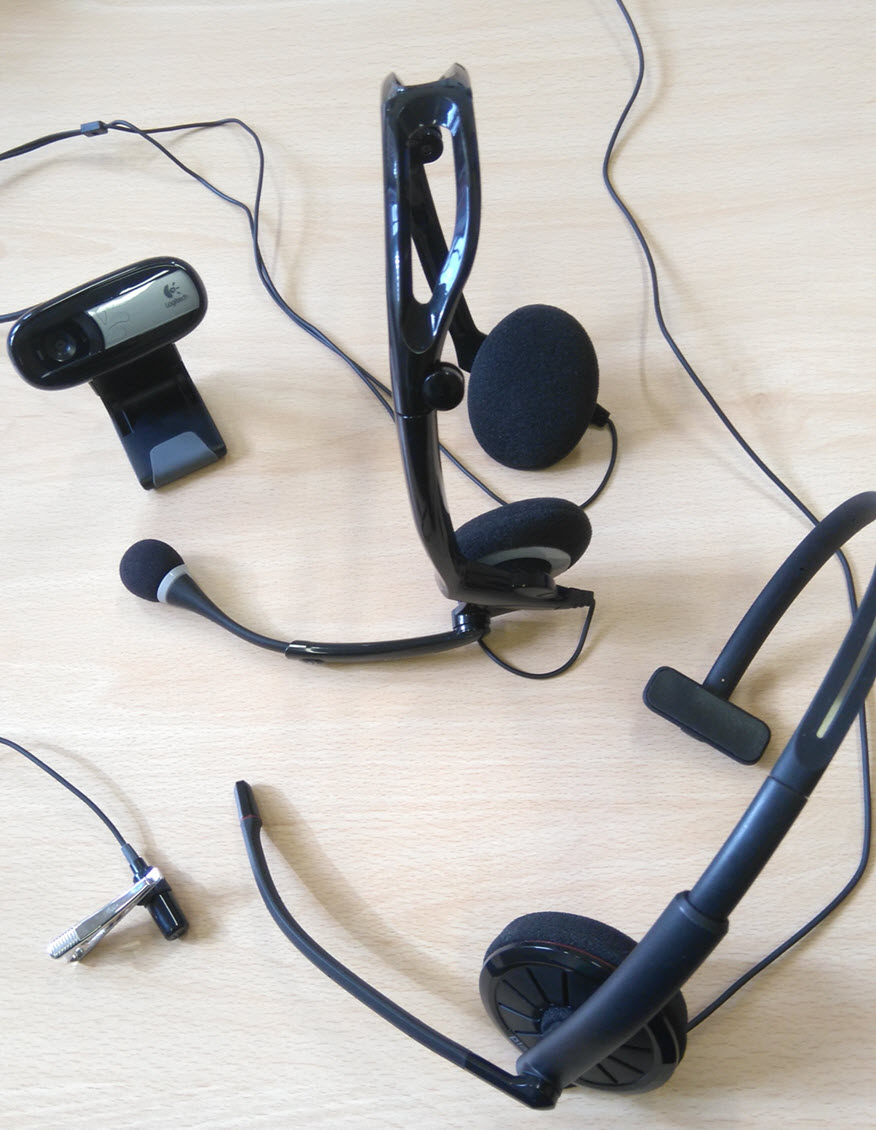
From journeys in the MOOCosphere so far we know that learners really value good quality sound – so I was keen to test out what microphones I could possibly use next time we needed to record a soundtrack for a VideoScribe or Camtasia project.

I had a collection to try out:
microphones

  • A Logitech web cam  (this really shows how nasty the room is)
  • A Plantronics dsp 400 USB mic
  • A lapel mic I got with a digital recorder
  • A Plantronics audio 300 USB mic

You can hear how I got on with this audio track

… and my conclusions – either of the USB headset microphones sounded just fine!

NB: I used Audacity (free) to create this track, saved the file on our streaming server (stream.ncl.ac.uk) and have inserted the track into the blog via the url.