Magpie wireless problems on Windows 7

Thought this might be useful for people trying to connect their Windows 7 laptop/netbook to the Magpie wireless system on campus

Problem: a Windows 7 machine (in our case, Samsung NC10) connects to magpie. The user sets up the VPN as normal; upon clicking “connect” will get the small dialog saying it’s connecting, but nothing else will happen. After some time, it will say something like “connecting via WAN Miniport”, but nothing else will happen.

Solution: For some reason, in certain circumstances Windows 7 doesn’t auto-detect the VPN type. The solution is to go into properties of the VPN connection, then the “Security” tab, then select “Point to Point Tunneling Protocol (PPTP)” from the drop-down titled “Type of VPN”. No other changes need to be made – when confirming the dialogs, the VPN should now connect.

Windows 7 / Windows Server 2008 R2: RemoteApp and Desktop Connection

If you are testing Windows 7 and are a user of one of the ISS Remote Desktop Services Servers you can import all of the applications available to you directly to you Start Menu by following these instructions:

1. Navigate to Control Panel\All Control Panel Items\RemoteApp and Desktop Connections on the Start Menu.

2. Select ‘Set up a new connection with RemoteApp and Desktop Connections

.

3. In the connection box URL type https://servername.ncl.ac.uk/RDWeb/feed/webfeed.aspx

4. Acknowledge the messages at the next 2 screens.

5. You will receive confirmation that the connection has been setup.

.

The applications will now be visible under: Start Menu > Programs > RemoteApp and Desktop Connections

Installing and Configuring Windows XP Mode for Windows 7 (XPM)

Although Windows 7 has several built-in tools to help with application compatibility and Windows XP applications should be installed directly on Windows 7. Windows XP Mode runs some older productivity applications that may not run otherwise on Windows 7.

XP Mode consists of the Virtual PC-based virtual environment and a fully licensed copy of Windows XP with Service Pack 3 (SP3). XPM does not require you to run the virtual environment as a separate Windows desktop. Instead, as you install applications inside the virtual XP environment, they are published to the host (Windows 7) OS as well. (With shortcuts placed in the Start Menu.) That way, users can run Windows XP-based applications (like IE 6) alongside Windows 7 applications under a single desktop.

Note: If you have an older version of Windows Virtual PC e.g. 2007 you will need to uninstall it first.

Install and configure XPM

1. Two installations are required, a special version of Virtual PC and the XP Mode install file itself. These can be found on Microsoft Website or at \\campus\software\iss\Publix\XPMode. There are x86 and x64 versions available. Install the MSU file first and then the Windows XP Mode installer.

2. Restart the machine.

3. Once the machine has restarted installed Windows XP Mode, click the Windows 7 Start button then select All Programs > Windows Virtual PC > Windows XP Mode to begin configuration.

4. Accept the licence agreement and click Next.

5. Specify a password for the XPMUser account. This account is the default account that is used to run Windows XP Mode and the virtual applications you install in the virtual instance of Windows XP with SP3. If you do not want to enter the password each time you start Windows XP Mode, you can store the credentials.

Important: Any application that runs on the host in the context of the user logged on to the host can access the credentials stored for Windows XP Mode.

6. At the next screen turn on Automatic Updates.

7. The next screen displays a message about drive sharing. More information is available if required. You can then start setup. This can take some time.

8. When finished you will be presented with a Windows XP Desktop logged on as XPMUser.

9. At this point you can install applications on the XP PC and they will appear in teh Windows 7 Start Menu.

10. To load the XP VM and install more applications simply select Windows XP Mode from the Start Menu.

Note: Applications installed in XPMode are published in Windows 7 under
Start Menu\Programs\Windows Virtual PC\Windows XP Mode Applications.

The contents of this folder is generated from the ‘All Users’ Start Menu folder in the XP VM located at C:\Documents and Settings\All Users\Start Menu.
For Example creating a shortcut to IE6 in the XPVM All Users start menu folder creates a shortcut in Windows 7 called ‘Internet Explorer 6 (Windows XP Mode)’

UPDATE: You may need to activate Hardware Virtualisation in the machines BIOS for this to work. If you are planning on deploying XPM then make sure the machines fully support hardware virtualisation. Thanks to Chris Letts of ECLS for pointing this out.

Full range of Microsoft offers for UK students

As I posted previously, the special offer for students to purchanse Windows 7 upgrades for just £30 starts today. But that’s not the only offer that Microsoft has on the table for students…

The Ultimate Steal

The Ultimate Steal offer is back, which lets you buy Office 2007 Ultimate for £39.50. You get both of those offers by visiting http://www.microsoft.com/uk/education/studentoffer/

DreamSpark

If you’re interested in software/web development or design, DreamSpark gives access to a whole range of products free of charge. You can get:

  • Windows Server 2003, Windows Server 2008 and Windows Server 2008 R2
  • Visual Studio 2005 and 2008 Professional editions, and XNA Game Studio 3.1
  • SQL Server 2008 Developer or SQL Server Express
  • Expression Studio 3
  • …and more.

Those offers are all available to all students with a .ac.uk email address, but certain students may be able to get even more software for free via MSDN Academic Alliance. If you are eligible for that, your school or academic department should be able to provide details.

Students interested in coding and other general geekiness should also check out Channel 8.

channel8.msdn.com

Filestore Best Practices #3: Only ever assign group permissions even if the group has only one member.

Assigning the permissions to Filestore resources is easy but managing permissions for an expanding volume of data in an ever evolving department is not. It can however be made easier by only using security groups.

Most people reading this will look after Filestore resources which are accessed by various people within their departments. The data structure may be made up of hundreds or even thousands of folders for which a complex set of permissions are required.

The problem with assigning individual users permissions is that there will come a point eventually where you will not be able remember who a user (let’s call them) n563456 is, why they were assigned permissions and if they should still have access. The situation would be worse still for someone taking over or assisting with management of the resources.

The best way to avoid this is to never assign individual users permissions on a resource but to create a Security group even if only one user will be the only member in it.

This will allow you to do the following:

Give the group a meaningful name.

For example, calling the group HR – Directors Shared Filestore (Read\Write) will help you identify it’s function, level of access and who should be a member at a glance.

TIP: Prefix all of your group names with your departments name e.g. ISS XXXX XXXXX. A group called ‘Research Shared Folder’ will not be as easy to find.

Allow you to add and remove users without having to browse to the resource.

It’s much easier to open the ADUC snap-in and add to or remove from a group than it is to browse to a nested folder and examine the ACLs.

Avoid Ghost s-ids

Ghost sids occur when an account has been deleted but the permission persists on the resource.

Document, audit and manage access from one place.

You can add comments to groups and manage all of your permissions from one central location, perhaps by a regular review of group membership.

Make things easier on team members or your successors.

By using a group based approach new team members and your successors will be able to easily see changes and see how permissions are configured.

SUMMARY: Never assign individual users permissions to a Filestore resource as they will grow too complex. Only ever use groups even if there is only one user on it and always add a description to the group.

Great Windows 7 offer for UK students

From October 1st, students in the UK (with a .ac.uk email address) will be able to get a copy of Windows 7 for just £30!

This will be a limited time offer and you must already have a copy of XP or Vista on your PC. It’s the best pricing that I’ve seen for Windows 7, so if you’re eligible you don’t want to miss out.

Full details will be available from October 1st at http://www.microsoft.com/uk/windows/studentoffer/default.aspx

Connect From Anywhere using the Terminal Services Gateway

Posted by popular demand on behalf of Adele…

The TS Gateway service allows you to connect to your work PC from home or other off-campus locations, even when your work PC is on an internal University network (i.e. 10.x.x.x IP address). Used in conjunction with Wake On Lan. This gives you 24 hour access to your on-campus PC.

To use the service you must ensure that you have the latest Remote Desktop Client installed on the PC from which you are connecting back into work. If you are running Windows Vista or Windows 7, you should already have what you need. If you are running Windows XP or earlier, you may need to visit Microsoft.com and download a later RDP client.

Instructions

Prerequisite: the work PC must be set-up to allow Remote Desktop Connections and you will need to ensure that the ID that you are using is in the Remote Desktop Users group on the PC.

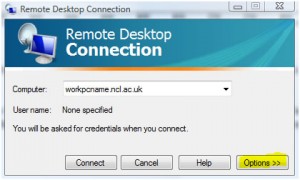
Launch Remote Desktop Client (you’ll find it by browsing to Accessories or just click Start…on Vista or Windows 7 (or Start.. Run if on XP) and type in mstsc and press Enter)

Click on Options as shown below:

Remote Desktop Connection options

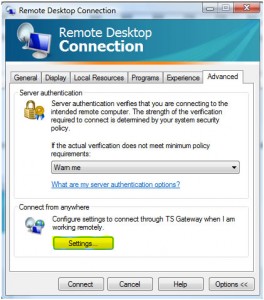
Click on Advanced and then Settings as shown below:

Remote Desktop Connection Settings

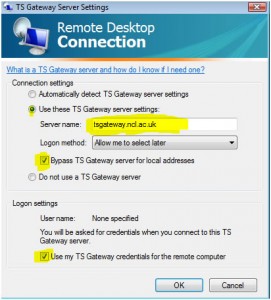
Complete the TS Gateway settings precisely as shown below:

tsgateway settings

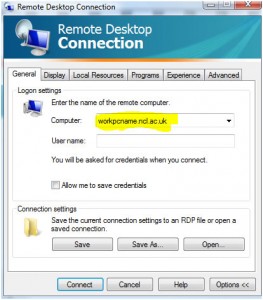
Click OK, and go back to the General tab. Enter the name of your work PC plus .ncl.ac.uk:

Enter the name of your work PC plus ncl.ac.uk


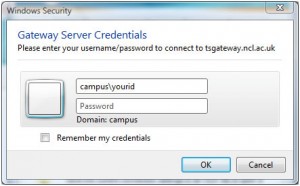
Click Connect. Enter an id that has rights to log on remotely to the PC. For example:

Enter credentials

Click OK. (You can use a local ID, but you’ll need to qualify it by using machinename\ rather than campus\

Setting up a Vista or Windows 7 PC for remote access

Click Start…

Right-click Computer and then select Properties.

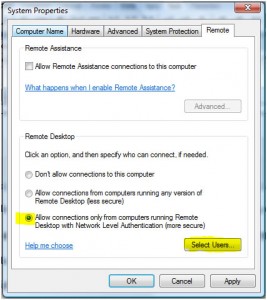
Click on Advanced system settings and, if prompted, supply the credentials of an account that has admin rights to the PC. Click on the Remote tab and Select Users:

Setting up RDC - remote tab

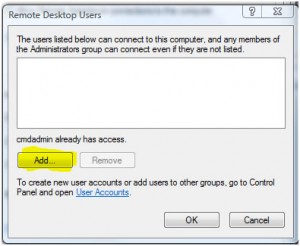
Add the accounts for any user that you want to be able to remotely access the PC:

Add users to RDC permissions

Then click OK… OK. All done.

You should test the settings from another on-campus machine before attempting to connect from off-campus.

The procedure is more or less the same for Windows XP but you will need to be logged on with admin rights before starting.

When using the above service, it is strongly recommended that you ensure your home PC is fully up-to-date with Windows Updates and is running good antivirus/antispyware software. Be sure to adhere to the University’s Computing Rules of Use at all times, and take care to protect sensitive and important data from unauthorised access as you would when working directly on-campus.

A hand-drawn look at Windows 7 and Server 2008 R2

For those who have been struggling to find information about the new features of Windows 7 and Windows Server 2008 R2 (you likely don’t read this blog or mine!), or if you just like to see information presented in a creative way, you should check out the series of cleverly hyperlinked videos put together by my good friends Andrew and James from the TechNet UK IT Professional Technical Evangelist Team.

Since I can’t embed the launchpad video on this blog engine, head over to Andrew’s post to get started.

23rd September: Three fantastic Microsoft enterprise IT presentations

We are very pleased to be able to announce a stellar line up of technical presentations and speakers from Microsoft at the September VBUG Newcastle IT Pro meeting here on the Newcastle University campus…

The Dynamic Desktop Experience – Windows 7, Windows XP Mode, App-V, MDT, MDOP and System Center – Dan Oliver

Windows 7 offers Microsoft’s customers with an opportunity to deliver a platform that releases new capabilities that deliver real business benefit and significantly reduced cost of ownership. The challenge for most companies is that deploying and migrating desktops is time consuming and traditionally offers service continuity risks with Application Compatibility that can prevent progress. This presentation will show capabilities, architectures and strategies that allow companies to move forward cost effectively to the benefits of a modern operating system. Level: 100

Dan Oliver is a Pre Sales Architect within Microsoft UK’s Speciality Technology Unit with some 14 years’ experience of Microsoft-based solutions primarily in the virtualization and systems management fields. Dan has a background that covers a broad spectrum of industry sectors ranging from Financial, Telecoms, Partners, Legal, Professional Services and Healthcare. Dan has also had the opportunity to work as a Chief Technology Officer for the Faculty of Advocates in the Scottish Legal Sector.

Novell and Lotus Notes – Migrating to Microsoft – Conrad Sidey

The business value of implementing Microsoft technologies like Active Directory, Exchange 2007 and SharePoint are clearly understood within Microsoft. For our customers that are still running their organisation on technologies like Novell and Lotus Notes they are starting to gain an understanding of the value of migrating to Microsoft technologies. The purpose behind this presentation is to provide the technical community with an insight into leading a project and architecting a solution to migrate environment that are running both Novell Netware and Lotus Notes. The presentation will discuss envisioning & planning of a Novell and Notes migration project, approaches to undertaking the migration depending upon the business drivers, providing an overview of the approach we are taking in migrating a UK Local City Council while providing coexistence, as well as presenting a number of migration & coexistence recommendations or lessons learnt from the project. Level: 200

Conrad Sidey is a Solution Architect within Microsoft Consulting Services with some 17 years’ experience of Microsoft-based solutions primarily in the infrastructure field. Conrad has a background that covers a broad spectrum of industry sectors ranging from Financial and Insurance, Manufacturing, Aero-Engineering, Defence, UK and European Government Agencies, Power Generators, Retail and Brewing. Conrad has also had the opportunity to work with large scale outsourcing services providers.

Implementing the “Black Box” – Performance Monitoring and Analysis for proactive and reactive support, server baselining and capacity planning – Richard Diver

All current versions of Windows come with a free tool that can prevent server downtime and solve many mysteries – Perfmon!

A little bit of practice with this tool can really help to solve issues with servers that may not even be performance related. Working at the OS level, you can find cause to most performance bottlenecks regardless of server function (Exchange, DC, Web etc).

This is something that has even more focus in future versions of Windows; a brief overview of these benefits will be shown also! Level: 300

Richard Diver is a Premier Field Engineer with 10 years experience implementing and supporting a range of Microsoft technologies, specialising in Active Directory, Server Platform and Virtualisation.

Wrap up Q&A with all presenters at the end.

Time: 18:45 to 21:00

Location: Room 118, Claremont Tower, Newcastle University, Newcastle-upon-Tyne, NE1 7RU

Price: FREE

Please register for your place at the VBUG site so we can make sure we have enough space and refreshments. 🙂