Interesting perspective from Ed Bott.
Why Internet Explorer (and Chrome) will survive and Firefox won’t
Reply

We often get grumbles about how Outlook seems to make a poor fist of finding names in the Global Address List (GAL) when using the Address Book feature of Exchange. Unless you click the Advanced Find link from within the Address Book, the pattern matching for names is from left to right, based on the Display Name of the Active Directory Account. Also note the More Columns option. This allows the search to take place across all Active Directory fields.
Address Book GAL Search:

Advanced Find based on Last Name:

Results based on Advance Find:

To speed up this process you can use the handy keyboard shortcut of CTRL + K. It is a shortcut for the Check Names icon that can be found on the Outlook toolbar. You can type a variety of search terms based on the user’s personal information recorded in their Active Directory Account
For example, you can type: First Name, Last Name, Display Name, Email Address, Department amongst many other fields.

Results:

The name resolution really comes into it’s own when combining search terms. You can type a first name + a department and the system will try to marry those two terms and provide a best guess. In the example below, I asked Outlook to search for “John” and “ISS”. Outlook provided me with results that contain those two terms in any of the available fields.

It is important to note that you still have to verify that the results are correct and not to take for granted that the recipient that you have selected is accurate. As we have so many staff and students, there are quite a few people with the same name. If you use the scroll bar in the results window, you can see which department that the persons returned belong to.
This will hopefully be of help with for people using HP Proliant Servers who want quickly to patch their Firmware and Software to the very latest versions
ProLiant Support Packs (PSP) represent operating system (OS) specific bundles of ProLiant optimized drivers, utilities, and management agents. These bundles of software are tested together to ensure proper installation and functionality.
This means that the The Proliant support packs will not necessarily contain the latest versions, just a baseline tested combination and that the software\firmware in use could still be vulnerable or lack the updated functionality in later versions.
It’s possible (and painful) to install updates via the System Management Homepage but this requires lots of restarts and lots of waiting around. The easiest method is to use HPSUM (HP Smart Update Manager) which ships as part of the ProLiant Support Pack but has the ability to download the very latest Firmware and Patches from HP as part of the update process.
Here is how to do it:
1. Extract the ProLiant Support Pack
2. Locate and run setup.exe. This will start the Windows GUI (there is also a command
line version setupc.exe for Windows Server Core)
3. Select the Check ftp.hp.com option and set ‘Type of updates to use’ to ‘Both’.

4. Select ‘Start Inventory’

5. If asked for permission to download from HP.com select yes.
6. At the next screen select Local Host > Next
7. At the next screen it is important to select the currently installed ProLiant Support Pack and ‘ALLOW NON-BUNDLE PRODUCTS’ and ‘ALLOW NON-BUNDLE VERSIONS’. If these options are not checked components will not be update above the level of the currently installed Support Pack.
8. At the next screen you will see all of the very latest updates available. Select the ones you want and hit install. Restarts are optional but some components swill not update until after the next restart.

All you need is a Windows Live ID.
Free e-book offer from Microsoft Press: Introducing Windows Server 2008 R2
Learn about the features of Windows Server 2008 R2 in the areas of virtualization, management, the web application platform, scalability and reliability, and interoperability with Windows 7. Sign in to download Introducing Windows Server 2008 R2, written by industry experts Charlie Russel and Craig Zacker along with the Windows Server team at Microsoft.
This month, Microsoft announced their Office 2010 Technology Guarantee, which says that if you purchase and activate Office 2007 between now and the end of September, you’ll get a free upgrade to Office 2010 when it is released.
The good news for students is that same guarantee applies to purchasing Office today via The Ultimate Steal offer for only £38.95
![]()
Personally, I’ve been happily using the Office 2010 Beta for a few months, so if you’re looking to install Office on your own computer, you may want to give that a try. Performance and stability wise, it feels like a finished product.
![]()
If you want a bit more information about Office 2010, you may want to check out my previous post for a free “First Look” ebook.
If you’re looking forward to the release of Office 2010 next summer (and let’s face it, who isn’t?!), then you probably already know about the availability of the public beta. If you’ve tried it, then it would be great if you could share your favourite features in the comments for others to share in your experience.
My personal favourite feature (so far – there are some things that I’m looking forward to trying in Outlook in conjunction with Exchange 2010, when we have that running) is the Backstage view in all the applications. This is the bit that you access via the “Office Button” in Office 2007, which is now accessed through a coloured “File” tab next to the ribbon’s default “Home” tab.
What I particularly like about Backstage is that they’ve brought the live-preview that was such a good addition in Office 2007 to the Print dialogue. You no longer have to look at print settings and print preview separately as they sit side by side. When you make a change to the setting, you see it reflected in the preview immediately. It makes formatting your printouts much more straight forward and will benefit pretty much everyone who uses Office.
I’ve been using Office 2010 since early on in the Technical Preview stage, before the Beta, but even so I haven’t come across all the tweaks in these new versions on the applications, so I was pleased to see that Microsoft Press have released a free ebook “First Look: Microsoft Office 2010”. At that price it’s a no-brainer to download it!

If you are testing Windows 7 and are a user of one of the ISS Remote Desktop Services Servers you can import all of the applications available to you directly to you Start Menu by following these instructions:
1. Navigate to Control Panel\All Control Panel Items\RemoteApp and Desktop Connections on the Start Menu.
2. Select ‘Set up a new connection with RemoteApp and Desktop Connections

3. In the connection box URL type https://servername.ncl.ac.uk/RDWeb/feed/webfeed.aspx
4. Acknowledge the messages at the next 2 screens.
5. You will receive confirmation that the connection has been setup.

The applications will now be visible under: Start Menu > Programs > RemoteApp and Desktop Connections
Great articles from TechRadar. ’24 years of Windows package design’ and ‘Boot screens through the ages.’


As I posted previously, the special offer for students to purchanse Windows 7 upgrades for just £30 starts today. But that’s not the only offer that Microsoft has on the table for students…
![]()
The Ultimate Steal offer is back, which lets you buy Office 2007 Ultimate for £39.50. You get both of those offers by visiting http://www.microsoft.com/uk/education/studentoffer/

If you’re interested in software/web development or design, DreamSpark gives access to a whole range of products free of charge. You can get:
Those offers are all available to all students with a .ac.uk email address, but certain students may be able to get even more software for free via MSDN Academic Alliance. If you are eligible for that, your school or academic department should be able to provide details.
Students interested in coding and other general geekiness should also check out Channel 8.

Posted by popular demand on behalf of Adele…
The TS Gateway service allows you to connect to your work PC from home or other off-campus locations, even when your work PC is on an internal University network (i.e. 10.x.x.x IP address). Used in conjunction with Wake On Lan. This gives you 24 hour access to your on-campus PC.
To use the service you must ensure that you have the latest Remote Desktop Client installed on the PC from which you are connecting back into work. If you are running Windows Vista or Windows 7, you should already have what you need. If you are running Windows XP or earlier, you may need to visit Microsoft.com and download a later RDP client.
Instructions
Prerequisite: the work PC must be set-up to allow Remote Desktop Connections and you will need to ensure that the ID that you are using is in the Remote Desktop Users group on the PC.
Launch Remote Desktop Client (you’ll find it by browsing to Accessories or just click Start…on Vista or Windows 7 (or Start.. Run if on XP) and type in mstsc and press Enter)
Click on Options as shown below:

Click on Advanced and then Settings as shown below:
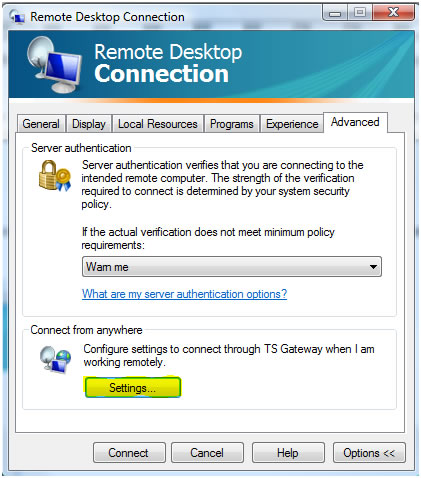
Complete the TS Gateway settings precisely as shown below:

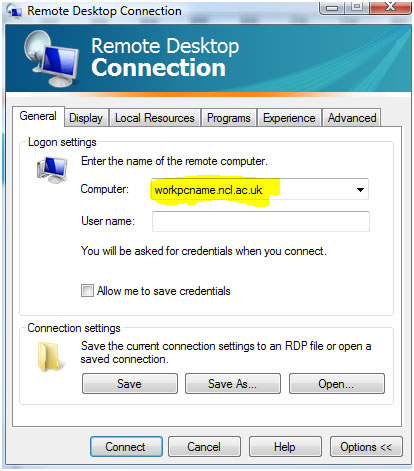
Click OK, and go back to the General tab. Enter the name of your work PC plus .ncl.ac.uk:
Click Connect. Enter an id that has rights to log on remotely to the PC. For example:

Click OK. (You can use a local ID, but you’ll need to qualify it by using machinename\ rather than campus\
Setting up a Vista or Windows 7 PC for remote access
Click Start…
Right-click Computer and then select Properties.
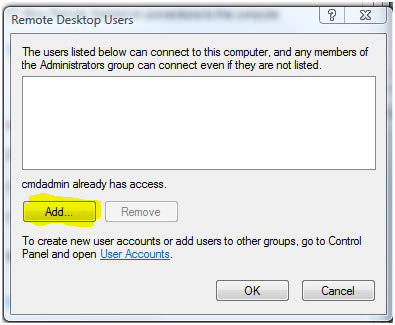
Click on Advanced system settings and, if prompted, supply the credentials of an account that has admin rights to the PC. Click on the Remote tab and Select Users:

Add the accounts for any user that you want to be able to remotely access the PC:
Then click OK… OK. All done.
You should test the settings from another on-campus machine before attempting to connect from off-campus.
The procedure is more or less the same for Windows XP but you will need to be logged on with admin rights before starting.
When using the above service, it is strongly recommended that you ensure your home PC is fully up-to-date with Windows Updates and is running good antivirus/antispyware software. Be sure to adhere to the University’s Computing Rules of Use at all times, and take care to protect sensitive and important data from unauthorised access as you would when working directly on-campus.