Filestore Best Practices #3: Only ever assign group permissions even if the group has only one member.

Assigning the permissions to Filestore resources is easy but managing permissions for an expanding volume of data in an ever evolving department is not. It can however be made easier by only using security groups.

Most people reading this will look after Filestore resources which are accessed by various people within their departments. The data structure may be made up of hundreds or even thousands of folders for which a complex set of permissions are required.

The problem with assigning individual users permissions is that there will come a point eventually where you will not be able remember who a user (let’s call them) n563456 is, why they were assigned permissions and if they should still have access. The situation would be worse still for someone taking over or assisting with management of the resources.

The best way to avoid this is to never assign individual users permissions on a resource but to create a Security group even if only one user will be the only member in it.

This will allow you to do the following:

Give the group a meaningful name.

For example, calling the group HR – Directors Shared Filestore (Read\Write) will help you identify it’s function, level of access and who should be a member at a glance.

TIP: Prefix all of your group names with your departments name e.g. ISS XXXX XXXXX. A group called ‘Research Shared Folder’ will not be as easy to find.

Allow you to add and remove users without having to browse to the resource.

It’s much easier to open the ADUC snap-in and add to or remove from a group than it is to browse to a nested folder and examine the ACLs.

Avoid Ghost s-ids

Ghost sids occur when an account has been deleted but the permission persists on the resource.

Document, audit and manage access from one place.

You can add comments to groups and manage all of your permissions from one central location, perhaps by a regular review of group membership.

Make things easier on team members or your successors.

By using a group based approach new team members and your successors will be able to easily see changes and see how permissions are configured.

SUMMARY: Never assign individual users permissions to a Filestore resource as they will grow too complex. Only ever use groups even if there is only one user on it and always add a description to the group.

Great Windows 7 offer for UK students

From October 1st, students in the UK (with a .ac.uk email address) will be able to get a copy of Windows 7 for just £30!

This will be a limited time offer and you must already have a copy of XP or Vista on your PC. It’s the best pricing that I’ve seen for Windows 7, so if you’re eligible you don’t want to miss out.

Full details will be available from October 1st at http://www.microsoft.com/uk/windows/studentoffer/default.aspx

Connect From Anywhere using the Terminal Services Gateway

Posted by popular demand on behalf of Adele…

The TS Gateway service allows you to connect to your work PC from home or other off-campus locations, even when your work PC is on an internal University network (i.e. 10.x.x.x IP address). Used in conjunction with Wake On Lan. This gives you 24 hour access to your on-campus PC.

To use the service you must ensure that you have the latest Remote Desktop Client installed on the PC from which you are connecting back into work. If you are running Windows Vista or Windows 7, you should already have what you need. If you are running Windows XP or earlier, you may need to visit Microsoft.com and download a later RDP client.

Instructions

Prerequisite: the work PC must be set-up to allow Remote Desktop Connections and you will need to ensure that the ID that you are using is in the Remote Desktop Users group on the PC.

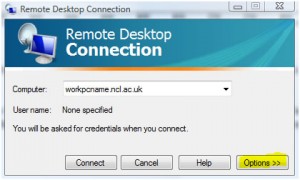
Launch Remote Desktop Client (you’ll find it by browsing to Accessories or just click Start…on Vista or Windows 7 (or Start.. Run if on XP) and type in mstsc and press Enter)

Click on Options as shown below:

Remote Desktop Connection options

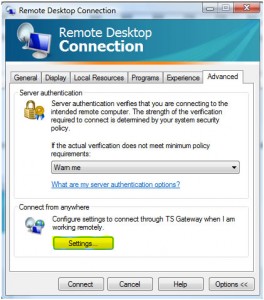
Click on Advanced and then Settings as shown below:

Remote Desktop Connection Settings

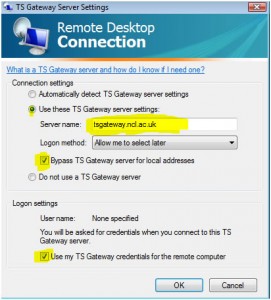
Complete the TS Gateway settings precisely as shown below:

tsgateway settings

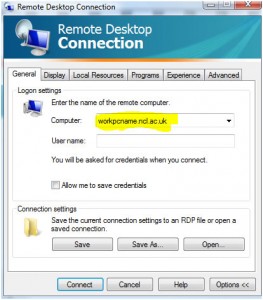
Click OK, and go back to the General tab. Enter the name of your work PC plus .ncl.ac.uk:

Enter the name of your work PC plus ncl.ac.uk


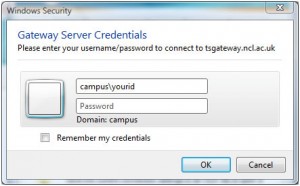
Click Connect. Enter an id that has rights to log on remotely to the PC. For example:

Enter credentials

Click OK. (You can use a local ID, but you’ll need to qualify it by using machinename\ rather than campus\

Setting up a Vista or Windows 7 PC for remote access

Click Start…

Right-click Computer and then select Properties.

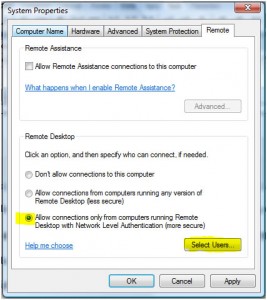
Click on Advanced system settings and, if prompted, supply the credentials of an account that has admin rights to the PC. Click on the Remote tab and Select Users:

Setting up RDC - remote tab

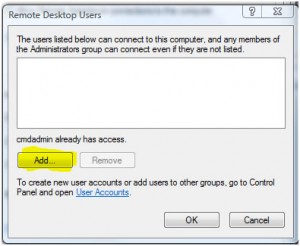
Add the accounts for any user that you want to be able to remotely access the PC:

Add users to RDC permissions

Then click OK… OK. All done.

You should test the settings from another on-campus machine before attempting to connect from off-campus.

The procedure is more or less the same for Windows XP but you will need to be logged on with admin rights before starting.

When using the above service, it is strongly recommended that you ensure your home PC is fully up-to-date with Windows Updates and is running good antivirus/antispyware software. Be sure to adhere to the University’s Computing Rules of Use at all times, and take care to protect sensitive and important data from unauthorised access as you would when working directly on-campus.

A hand-drawn look at Windows 7 and Server 2008 R2

For those who have been struggling to find information about the new features of Windows 7 and Windows Server 2008 R2 (you likely don’t read this blog or mine!), or if you just like to see information presented in a creative way, you should check out the series of cleverly hyperlinked videos put together by my good friends Andrew and James from the TechNet UK IT Professional Technical Evangelist Team.

Since I can’t embed the launchpad video on this blog engine, head over to Andrew’s post to get started.