Extending Visual Studio Team Services via the Marketplace

As useful as Visual Studio Team Services is by itself, and with its API (we sync our LANDesk tickets with the VSTS Kanban board via the REST API – I’ll write a post about that sometime), it can be made a lot better through the use of extensions that have been created by Microsoft and the community and made available through the Marketplace.

There are a whole load of extensions to integrate with other products to help your team collaboration, build, deployment, testing, etc. All you need to do is click the shopping bag icon in the top right of any VSTS screen to go to the Marketplace.

VSTSMarketplace

One extension which I think everyone should add is Code Search, which has been written by Microsoft themselves. This gives you a handy search tool which you can use to find bits of code in your repo which match a variety of criteria. You’ve got a number of powerful search options to make sure you find what you’re looking for, no matter how big your codebase is.

CodeSearch

The other extension that we use all the time is the Microsoft-written integration extension for the Slack messaging app. We’ll probably have another post in the future about Slack – it’s a great tool for teams doing DevOps style work because of all the integration options that it has. By using the VSTS/Slack integration, we all get notifications (in the Slack desktop or mobile apps) of code commits and automated test results, so we don’t need to open the VSTS website to see how builds have gone.

SlackVSTS

We’ll sometimes commit some code and then stick a comment in the Slack channel for the team if we’re perhaps expecting the build to fail for some reason, and we might have a little group celebration of success in the channel when something we were struggling with eventually works.

Useful, huh?

You can have a browse of the VSTS marketplace at https://marketplace.visualstudio.com/VSTS

Setting up a Visual Studio Team Services Git repository

Creating a new repository in VSTS.

1. If you do not already have a VSTS project, you can create a new one from your team home page by clicking the New link under Recent Projects & Teams (if you already have a project, skip to step 3):

1

2. On the Create new team project page, be sure to select Git as the Version Control option. This will automatically create you a Git repository with your new project:

2

3. In the Project home page, you can access your repository by clicking CODE:

3

4. If you wish to create a new repository (because you had an existing project without one, or because you wish to add an additional one to your project), you can click the drop-down at the top left and click New repository:

4

Accessing the repository from your local computer.

First, you’ll need to install the git client; you can download the client from https://git-scm.com/downloads. The default installation options should be fine.

Cloning the repository using Visual Studio

If you’re using Visual Studio, you can clone the repository directly into it from the CODE page:

11

This will open Visual Studio; your repository will be shown in the Team Explorer pane. Click Clone Repository:

5

Then select a location to save your local copy of the repository, and click Clone:

6

Cloning the repository using the command line

If you wish to us a different editor, you can use the git command line tools to clone the repository. First, copy the URL to the repository from the CODE page:

7

Then:

  1. Open a PowerShell window.
  2. Create a directory for the local copy of the repository.
  3. Change directory to that directory.
  4. Type ‘git init’ to initialise a local git repository.
  5. Type ‘git remote add origin <Repository URL>’ to connect to the remote repository.

10

You can now access the repository from any editor and manage it using command line tools (or any tools that the editor provides). If you wish to use Visual Studio Code, simply click File->Open Folder and point it at the folder. If the git pane looks as follows, it’s worked:

9

Next steps

Git is now connected to the remote repository and ready to use. A future blog post will give an overview of how git works, and what the common commands that you need to learn are.

DevOps on Windows events in Newcastle this month

If Sean’s post about the WinOps conference was interesting to you, there are a couple of events coming up in Newcastle which may be up your street. Both of these are free to attend, include some free beverages, and pizza. They are also both being held at Campus North on Carliol Square, so just a short walk from the campus.

On the evening of Wednesday 15th June, NEBytes is hosting Microsoft MVPs Richard Fennell and Rik Hepworth from Black Marble, talking about DevOps with Azure and Visual Studio Team Services, with a focus on environment provisioning and testing, much of which is relevant to on-premises delpoyments too. Registration is at https://www.eventbrite.co.uk/e/real-world-devops-with-azure-and-vsts-tickets-25901907302

The following Wednesday evening, the 22nd, DevOps North East has a session on Microsoft, Open Source and Azure, as well as an interesting sounding “Who Wants to be a (DevOps) Millionaire” game. Registration is open at http://www.meetup.com/DevOpsNorthEast/events/231268432/

WinOps 2016

Last week, Jonathan Noble and I attended the WinOps 2016 conference in London; this was a conference centred around the subject of using DevOps working practices with Windows Servers, which is something that Microsoft are focusing a lot of effort on, and something that ISG have taken a lot of interest in. I’ve been told that videos of the talks will soon be available on http://www.winops.org, and I would strongly recommend them for anyone who works with Windows Servers in any capacity. (Update: videos are now available at https://www.youtube.com/playlist?list=PLh-Ebab4Y6Lh09SnM63euerPW0-pauO7k).

The day started with a keynote speech by Jeffrey Snover, from Microsoft; I’m not sure of his current job title as it keeps changing, but he invented PowerShell and is basically in charge of Windows Server.

The speech covered the evolution of Windows Server from Windows NT, right through to Server 2016, explaining how the product was continuously changed to meet the needs of the time, which flowed nicely into an overview of Server 2016, designed to enable cloud workloads.

A big part of Server 2016 is the concept of ‘Just Enough Operating System’ and the new Nano Server installation option. For those not aware, Nano Server is the next logical step after Server Core; where Server Core removed the Desktop Experience, in order to improve the security, reliability, and speed of your servers, Nano Server strips out absolutely everything unnecessary. It’s not possible to login to a Nano Server in any way – they’re controlled entirely by remote management tools, and PowerShell Remoting. This has enabled Microsoft to shrink the Operating System down to under 500MB. It takes up less space, runs faster, boots in seconds, and requires only a small fraction of the number of patches and reboots that Server with Desktop Experience requires. Jeffrey went as far as to say that Nano Server is “the future of Windows Server.”

Also coming with Server 2016 is support for Docker-compatible Containers. If you’re not familiar with these, it’s worth getting acquainted – one server can run multiple containers, and each will function as if they were their own server, completely isolated from each other, but sharing the underlying operating system and other resources from the host machine. The container itself is a single object, making it very simple to transfer between hosts, or to duplicate and spin up multiple copies of a containerised application.

A couple of other important technologies touched upon were Windows Server Apps (WSA) – a new way of deploying applications based on AppX; Server Support for MSI will become deprecated in favour of WSA, largely because MSI is horrible and unsuitable for server environments – and Just Enough Administration (JEA) – a new PowerShell feature which allows the creation of PowerShell endpoints which users can connect to perform a specified subset of admin tasks, without requiring to be administrators on the target server (even if the tasks would usually require it); this means that you don’t need to hand over the keys to your kingdom in order to let someone perform a few updates or run backups.

The second talk of the day was by Iris Classon, a C# MVP who works for Konstrukt. Iris’s talk was entitled “To The Cloud” and discussed the journey that her company made while moving their services to Azure. Key points of the talk were discussions around the automation of manual processes, such as unit testing, integration testing, and operational validation testing, as well as deployment. She also advocated heavily for using JEA (mentioned above) to prevent system administrators from having access to sensitive data that they didn’t need to see.

The third talk of the day was by Ed Wilson, who works on Microsoft’s new Operations Management Suite (OMS), and is the author of the Hey, Scripting Guy! blog. The talk was primarily an overview of OMS, which is a suite of tools designed to offer Backup, Analytics, Automation, and Security Auditing for hybrid cloud/on-premises environments. OMS is constantly under active development with new features coming online all the time, so it’s definitely worth keeping an eye on. Highlights so far are:

  • OMS Automation (formerly Azure Automation), which has been described as PowerShell as a Service – it offers a repository where PowerShell run books can be stored and run on a schedule.
  • Secure Credential Store – exactly what it sounds like – store credentials securely so that you can use them from the rest of OMS.
  • Windows and Linux machines are supported for monitoring (as well as anything else that can output a text-based log file).

Fun fact mentioned in this talk: PowerShell is now ten years old. Probably time to pick it up if you haven’t yet done so 😉

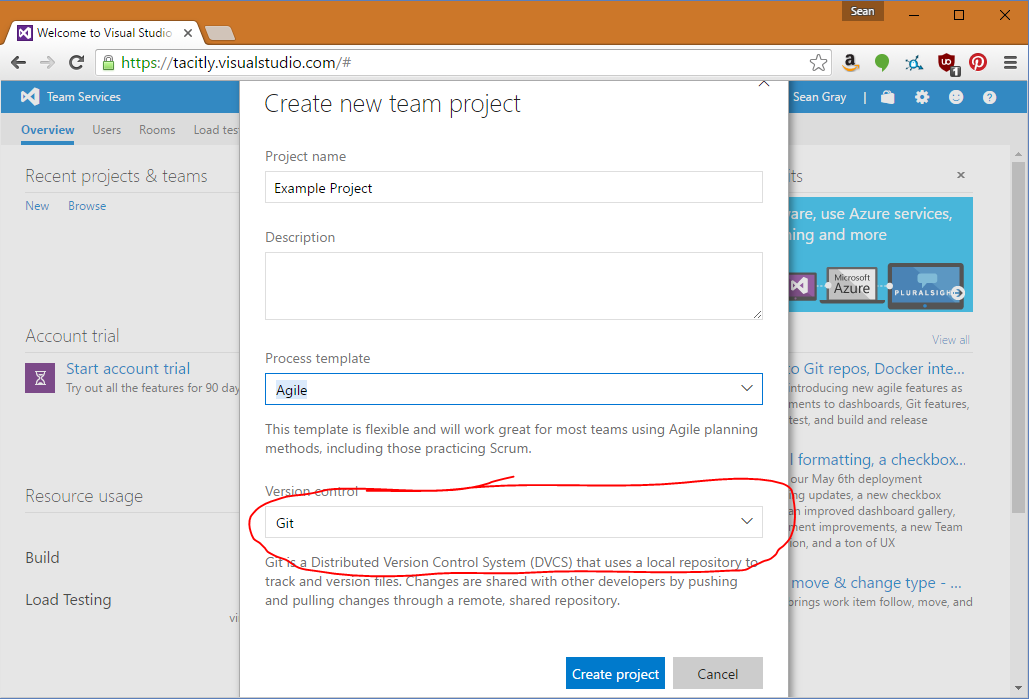
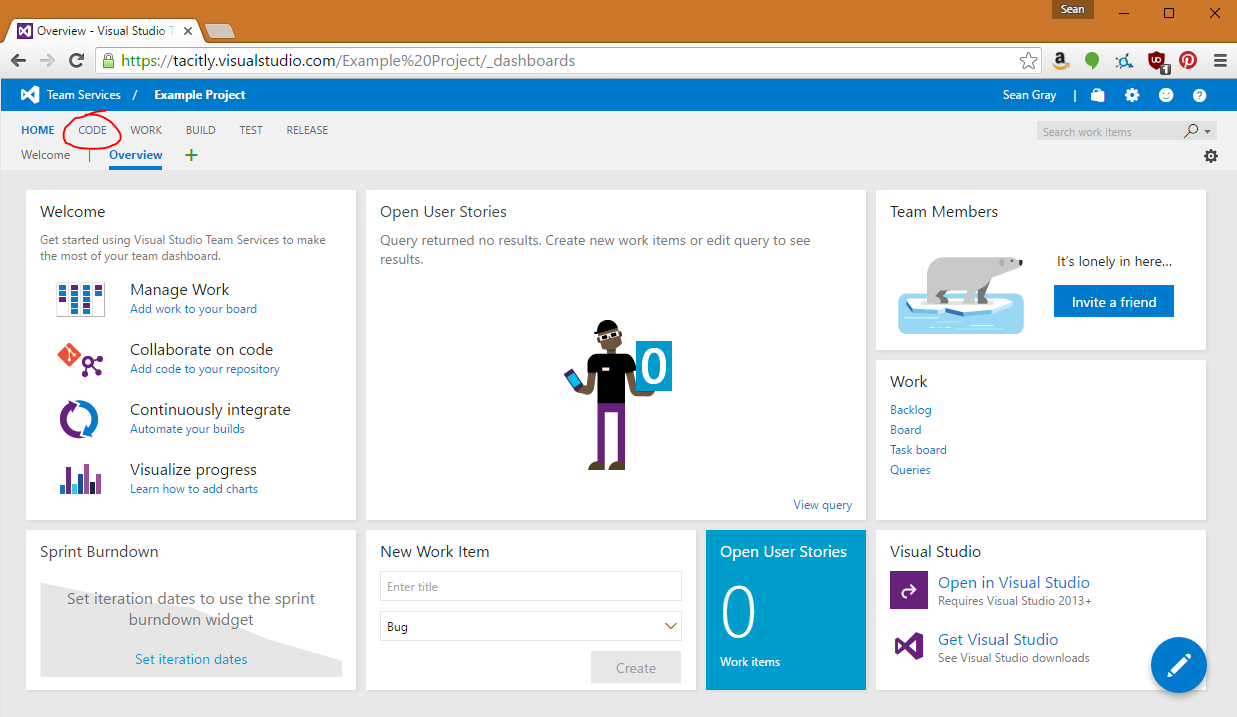
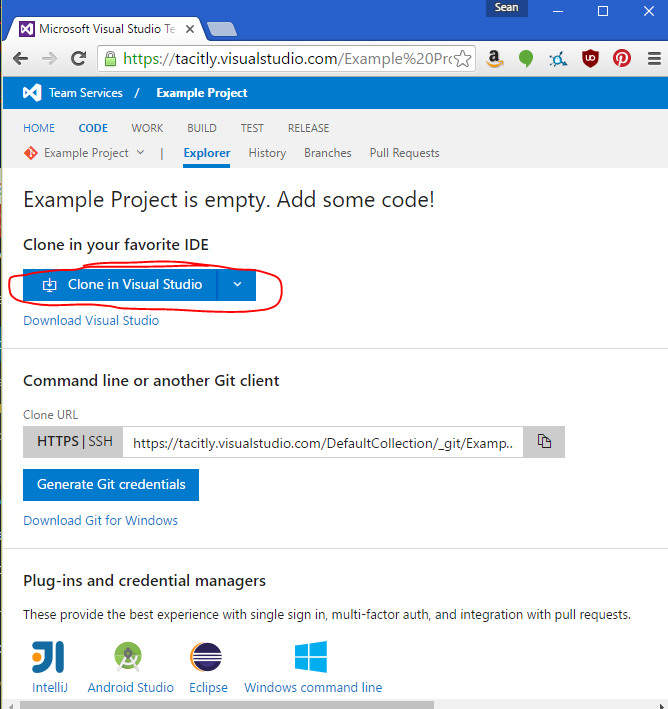
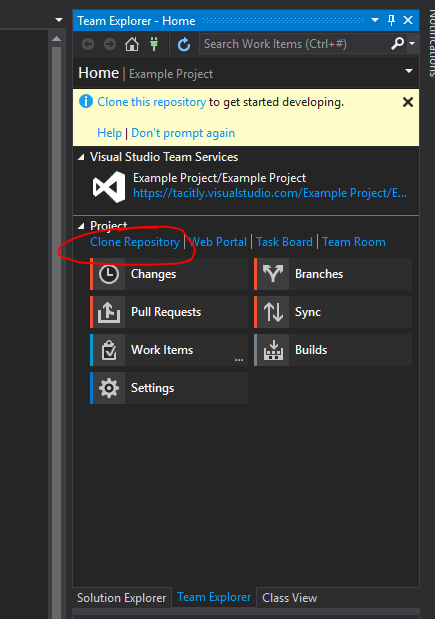
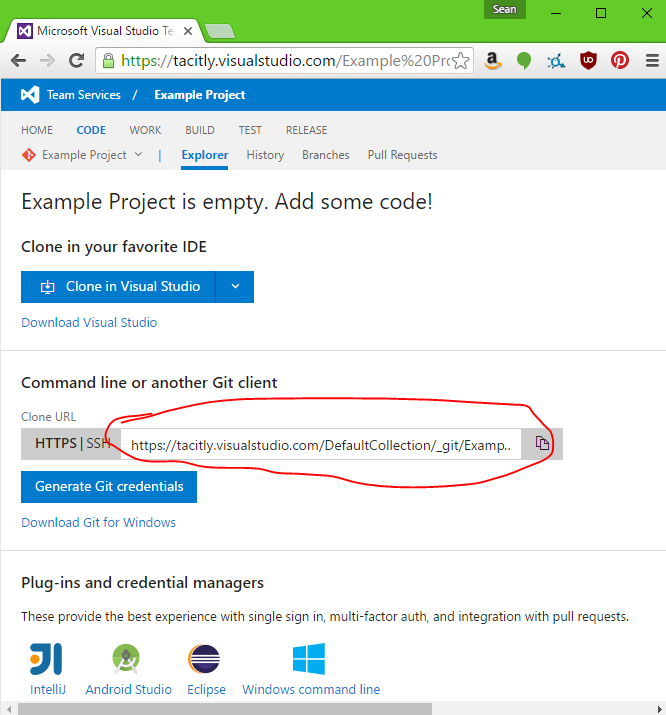
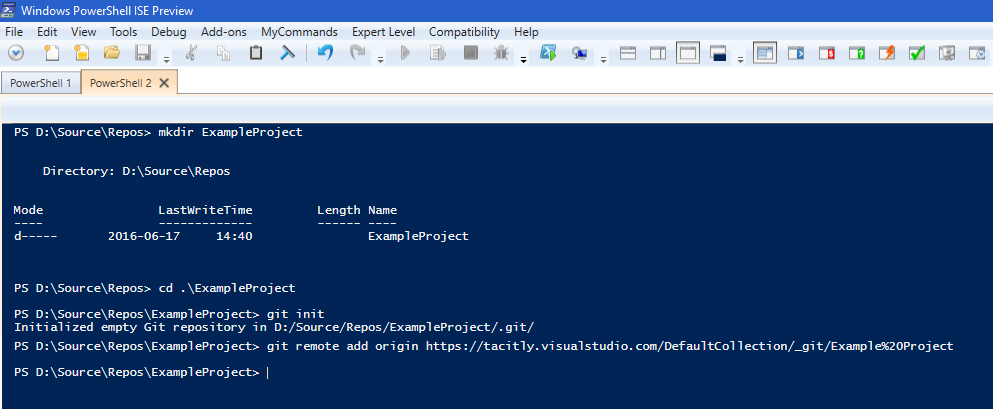
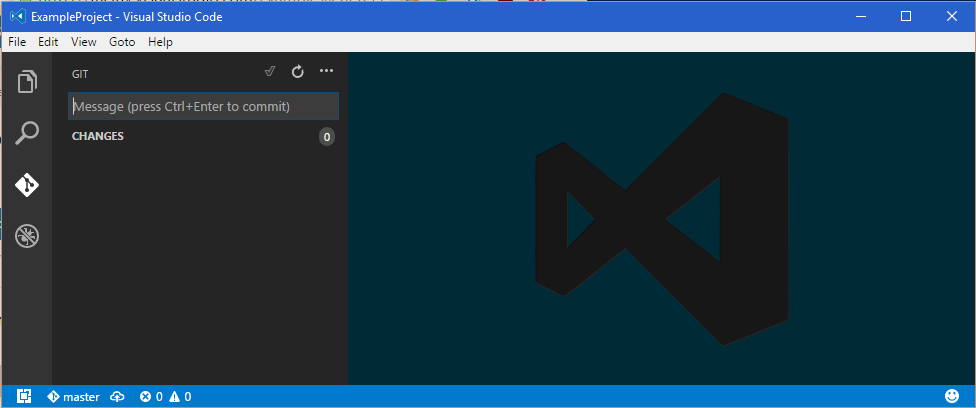
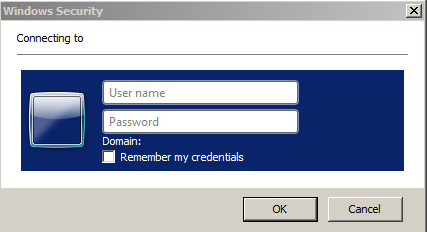
Next up was Michael Greene, who works on Microsoft’s Enterprise Cloud Customer Advisory Team, who gave an excellent talk about using Visual Studio Team Services, PowerShell, and Pester to implement a release pipeline for applications and infrastructure. This was particularly interesting to me, as these are the tools that we’re using in ISG, and I’ve spent the last couple of months trying to do exactly this. Michael was strongly advocating configuring infrastructure as code, which allows the use of proper source control, automated testing, and automated deployment (only if all of the automated tests pass); working in this way has been shown to greatly improve reliability and agility of IT services.

Some excellent further reading on this subject was offered in the form of Microsoft’s whitepaper: The Release Pipeline Model (http://aka.ms/thereleasepipelinemodel) and Steven Murawski’s DevOps Reading List (http://stevenmurawski.com/devops-reading-list/).

Soundbite: If you want to work with Windows Server, the most important technology to learn right now is Pester.

During lunch we had a wander round stalls set up by vendors trying to sell their various DevOps-related products. One that interested me was Squared Up, a configurable dashboard that presents SCOM data (among other things) in a nice, easy to understand manner. I signed up for a free trial, before we discovered that the University already pays for this product. I need to chase this up with our contacts to get myself access to it.

After lunch, the talks split into two streams, so we split up in order to cover more ground. I’ll let Jonathan describe the talks he went to here…

My first afternoon session was with Richard Siddaway, covering Nano Server and Containers. This was really a practical demo following on from Jeffrey’s keynote, stepping through the process of configuring both with the caveat that all of this is pre-release at the moment. It was interesting to note that while Microsoft initially started out by building a PowerShell module to manage containers directly, as a result of feedback they’re re-engineering that to just be a layer on top of Docker, which is the tool that most people use to manage containers today. Another thing that I picked up was that as things stand, there’s no way to patch containers, yet they need to be at the same patch level as the host. The solution is to just blow it away and make a new one, but as was demonstrated, it’s quick and easy to do, so probably the most sensible approach anyway. We need to examine these two technologies carefully over the coming months. Richard mentioned the need to consider version numbering on containers, and which workloads they are suitable for. That’s partly dictated by the workloads that Nano Server will support, which will be limited at launch, but will likely grow reasonably quickly.

Following that, I went to a panel session on technologies, which gave me a shopping list of things to skill up on! The panel agreed that the two most important aspects of the toolchain were Source Control and Build, where the specific tool isn’t important – for Build it just needs to be something that will run scripts, and while it was suggested that any Source Control would be ok, if you didn’t already have something, you should choose Git. On the subject of the most significant tools from the community, Pester and Docker were highlighted. Other things that the panel suggested learning about were JavaScript/Node (although TypeScript is preferable to generic JavaScript), OMS, Linux, and Visual Studio Code. Another couple of interesting points I took from this were that containers don’t remove the problem of configuration management; they just move it, and that Azure Stack would work well for a hybrid model where you would usually host a workload on-premesis, but could burst up to the cloud for particularly busy periods.

…and while he was doing that, I went to a talk by Gael Colas – a Cloud Automation Architect (if anybody is thinking of overhauling our job titles any time soon, I quite like this one) – about configuration management theory.

This was one of my favourite talks of the day – Gael was making the case for short-lived, immutable servers. The general concept is that a server should be built from configuration code or scripts (the exact method is unimportant; what matters is that it’s completely automated), and then never changed at all – no extra configuration, no quick fixes, no patches. When the server needs to be changed (for patches, for example), the source configuration/script should be updated instead, and a new server deployed from that. This method ensures that we always know the exact configuration of a server and we’re always able to rebuild it it identically, every time – this has massive DR and service reliability benefits. This was referred to as Policy Driven Infrastructure. Gael did acknowledge that there are some applications for which this is unsuitable, but they’re rapidly shrinking in number.

The next session I went to was a panel session called DevOps Culture in a Windows World, which mostly turned into people offering advice about how they’ve convinced their organisations to embrace DevOps working practices. You’ll probably see me attempt to use most of the ideas presented over the next few months – this blog post is the start 😉
Two things that I will mention here were the suggestions that it’s important to improve visibility – which I think is something that our department could benefit greatly from – everyone should be able to easily see what everyone else is doing, and should be encouraged to share and help each other (I think we are encouraged to share, but we currently lack the tools to easily do this; I have some ideas about that one but need to work them through) – and the suggestion that we should look at our services like products, and consider their full lifespan when we set them up, instead of thinking of the set up of a service as a project which is completed once the service is up and running, and then left to rot indefinitely.

The last proper talk of the day was given by Peter Mounce of Just Eat, who was discussing how they run their performance testing. Performance is very important to Just Eat, and they work to keep their applications fast by testing their production environment twenty four hours a day. The theory is that running performance tests in QA is meaningless, because it’s impossible to replicate the behaviour of millions of real people using the production application, so they simply pile a load of fake load on their production servers. The fake load increases as real load increases, so that they’re effectively doubling the load on their application all the time – this means that they know that they can take that much load, and they’re able to disable the fake load in case of emergency to handle massive amounts of real load. In general, I’m not sure that the performance testing elements are that applicable to us at this stage, but there was a lovely soundbite which is very applicable to us: Embrace the fact that things are going to break; get better at fixing them quickly.

Finally, everybody came back together for a panel session and discussion, which was interesting, but nothing exceptional to report, then we went for drinks at the expense of Squared Up.

Our Journey to the Cloud (Office 365): Part 2 – Technical Overview

This post outlines the technical steps on the road to implementing our Federated Office 365 with SSO and Exchange Hybrid Deployment. Each of these steps will be expanded upon in subsequent posts.

About Our Environment

Active Directory

Our Active Directory Forest consists of three Domains. An ‘empty’ Forest Root Domain fangorn.ncl.ac.uk (this was best practice when the Forest was created), a resource domain ‘campus.ncl.ac.uk’ which contains all objects used to manage the campus in Newcastle UK. There is also a third domain which is used to manage computer objects at our campus in Malaysia. For the purposes of deploying Office 365 we can ignore this last domain.

Our DNS namespace .ncl.ac.uk runs on a UNIX BIND system and domain controllers for the zones mentioned above have delegated authority for these subdomains. The Forest and all domains are running at Server 2008 R2 Functional level.

Mail

We run a mixture of Exchange 2007 SP2 and Exchange 2010 SP2 and are in the midst of migrating our staff and postgraduate research students to Exchange 2010.  Exchange 2007 remains on SP2 due to an incompatibility with a third-party archiving solution.  All Exchange servers are separated by role (CAS, HUB and MBX) and generally multiple instances for site-based resilience.  The Exchange Client Access infrastructure is fronted by a hardware load balancer.

Office 365 Tenancy Configuration

Configuring the Office 365 tenancy involved running the Office 365 deployment readiness tool and contacting Microsoft in order to have the tenancy located in the appropriate location relative to the number of users (size of the organisation). Another important step at this stage is proof of ‘ownership’.

Active Directory Federation Services Configuration

Federation of the Active Directory means that users can access services in Microsoft Office 365 using the existing Active Directory credentials (user name and password). Just as importantly this means we can use our existing User lifecycle, provision and access configuration tools to manage users using both cloud and on premises services.

The setup of Identity Federation and single sign-on (SSO) for Office 365 requires Active Directory Federation Services (AD FS).

Directory Synchronisation Configuration

The Microsoft Online Services Directory Synchronisation Tool (DirSync) establishes a one way synchronization from the on-premise Active Directory Forest (all domains) to Microsoft Online.

Dirsync is a requirement for running an Exchange Hybrid Deployment and allows global address list (GAL) synchronization from the on premises Microsoft Exchange Server environment to Microsoft Exchange Online.

Exchange Hybrid Deployment Configuration

An Exchange Hybrid Deployment refers to the full-featured deployment of a cross-premises Exchange messaging solution with Office 365 for enterprises and Exchange Online.

The features that an Exchange Hybrid Deployment delivers are:

  • Mail routing between on-premises and cloud-based organisations
  • Mail routing with a shared domain namespace. For example, both on-premises and cloud-based organisations use the University’s standard @newcastle.ac.uk SMTP domain.
  • A unified global address list, also called a “shared address book”
  • Free/busy and calendar sharing between on-premises and cloud-based organisations
  • Centralised control of mail flow. The on-premises organisation can control mail flow for the on-premises and cloud-based organisations.
  • A single Outlook Web App URL for both the on-premises and cloud-based organisations
  • The ability to move existing on-premises mailboxes to the cloud-based organisation
  • Centralised mailbox management using the on-premises Exchange Management Console (EMC)
  • Message tracking, MailTips, and multi-mailbox search between on-premises and cloud-based organisations

Implementation

The team responsible for the implementation of Office 365 is the ISS Infrastructure Systems Group with our very own John Donaldson managing the project. A steering group with student representation provides strategic direction and sign-off.

Our broad testing and implementation strategy are the creation of two test environments followed by production.

POC Environment: A simple proof of concept comprising of a single domain with the minimal infrastructure required for to test the concepts of Federated Office 365 with SSO and Exchange Hybrid Deployment.

Full Test Environment: A fully virtualised environment which mimics (as closely as possible) our production environment. This environment will be maintained in tandem with the production environment and any future changes will be tested here first.

Office 365/ADFS 2.0: Forms AND Integrated Authentication (SSO) based on the user agent string

Background

The ADFS Farm + ADFS Proxy Farm model that we are using for Office 365 requires that the CNAME of the ADFS service has to be the same for both the ADFS proxy server farm and the internal ADFS farm (in our case adfs.ncl.ac.uk). Users ‘inside’ our network need to be directed to the internal farm and external users to the proxy farm.

ADFS supports multiple authentication mechanisms including the ones we are interested in, Windows Integrated Authentication (WIA) and Forms Based Authentication (FBA). It seems however that there is no way to dynamically select which one is used when a request hits the farm based on client properties. Where Office 365 is concerned a farm uses WIA or FBA

The way our network is configured means that we do not have the network model of Internal/DMZ/Internet with the split-brain DNS that the Microsoft documentation seems to expect. Our systems point at a single zone (running on BIND) which is resolves both internal and external requests.  As such, private IP addresses such as that of the internal ADFS Farm can be resolved (but obviously not connected to) from the Internet.

Working with our Network team we were able to get around this by creating a work around in BIND so that anyone on the Internet receives the address of the proxy farm and anyone coming from one of our internal IP ranges receives the address of the ADFS farm.

The problem for us is that only around 70% of our internal clients are domain joined and as such able to take part in SSO using WIA. The other devices may be non-Windows machines, non-domain joined Windows machines and mobile devices. Because they are coming from one of our internal address ranges they are directed to the internal WIA enabled ADFS farm and get a non-user friendly ugly pop-up box requesting authentication.

Authentication Popup

We do not think that this is a good user experience so we sought a solution which would let us provide both authentication methods to internal clients.

Possible solutions

After discussions internally and with Microsoft we were presented with 3 possible ways to deal with this problem.

  1. Our Network team could define every IP range we have and point them at the relevant BIND DNS view. This is obviously an inelegant solution and would not cover all scenarios as many ranges in our environment contain both domain joined and non-domain joined clients. It would however work for wireless guests as they are on specific ranges.
  2.  Microsoft proposed pushing out a HOSTS file to all domain joined clients pointing them at the internal farm. This not a scalable or suitable option in our environment as we have development work going on all over the University and this would essentially remove people’s ability to use the HOSTS file due to it being overwritten by whatever mechanism we would put in place to the job
  3. The third option was suggested by a Microsoft representative on the Office 365 community forums. The ADFS Farm could be configured to read a custom attribute from the browsers User agent string.This value would be parsed server-side and if present the request would be authenticated by WIA. Other requests would be forwarded on to FBA.  This was particularly attractive to us as we already use a custom user agent string value for Shibboleth authentication.

What we lacked was the expertise to implement this solution but thanks to collaboration with our colleagues as well as working with members of the Microsoft TechNet community we were able to implement something that seems to do the job for us. We thought we would share this in the event others are running in to the same problem!

Out of the Box Authentication with ADFS 2.0

The mechanism that is used by default on an ADFS farm or proxy Farm can be toggled in the <localAuthenticationTypes> element of the ADFS web.config

<microsoft.identityServer.web>
 <localAuthenticationTypes>
 <add name="Forms" page="FormsSignIn.aspx" />
 <add name="Integrated" page="auth/integrated/" />
 </localAuthenticationTypes>

For WIA ‘Integrated’ is at the top of the list:

<microsoft.identityServer.web>
 <localAuthenticationTypes>
 <add name="Integrated" page="auth/integrated/" />
 <add name="Forms" page="FormsSignIn.aspx" />
 </localAuthenticationTypes>

Implementing Selective Authentication using the user agent string

Manipulation of the User Agent string on Internet Explorer, Firefox and Chrome

The first thing required is to append the user agent string to browsers. This can be done in Internet explorer using Group Policy

  1. Under User Configuration expand Windows Settings/Internet Explorer Maintenance
  2. Select ‘Connection’
  3. In the right-hand pane, double-click User Agent String.
  4. On the User Agent String tab, select the ‘Customize String To be Appended To User Agent String check box
  5. Type in the string (in our case campus-ncl).

We have this value set in the ‘Default Domain Policy’ though it could be set lower down.

For Firefox and Chrome things have to be done in the application deployment package. Obviously people will have to use a managed version of the product as it’s not exactly a user friendly setup!

In Firefox the prefs.js file requires to extra lines:

user_pref("network.negotiate-auth.trusted-uris", "<ADFS FQDN>");
user_pref("general.useragent.override", ",<actual agent string> <customstring>")

So in our environment:

user_pref("network.negotiate-auth.trusted-uris", "adfs.ncl.ac.uk");
user_pref("general.useragent.override", ",<actual agent string> campus-ncl")

Chrome needs to be run with some extra switches:

--auth-server-whitelist="ADFS FQDN" --user-agent=" <actual agent string> + <customstring>

So in our environment

--auth-server-whitelist="adfs.ncl.ac.uk" --user-agent=" <actual agent string> + campus-ncl"

Disable Extended Protection must be disabled on the ADFS Farm in IIS (for Firefox and Chrome only)

In order to get SSO working with Firefox and Chrome Extended Protection must be disabled on the ADFS Farm in IIS. Lots of information on this feature and the consequences of disabling it can be found with a simple Google search.

ADFS Farm modifications

There are 2 steps required on the ADFS farm.

  1. Enable Forms Based Authentication as the default method.
  2. Modify the FormsSignIn.aspx.cs source code file

To turn on FBA edit the <localAuthenticationTypes> element of the ADFS web.config file and make sure FBA ‘Forms’ is at the top of the list:

<microsoft.identityServer.web>
 <localAuthenticationTypes>
 <add name="Forms" page="FormsSignIn.aspx" />
 <add name="Integrated" page="auth/integrated/" />
 </localAuthenticationTypes>

Next open the FormsSignIn.aspx.cs Source Code File.

The default out of the box, the code looks like this:

using System;

using Microsoft.IdentityServer.Web;
using Microsoft.IdentityServer.Web.UI;

public partial class FormsSignIn : FormsLoginPage
{
 protected void Page_Load( object sender, EventArgs e )
 {
 }
…

We need to add some code to the Page_Load event which will forward the request to integrated authentication if the campus-ncl user agent string is present. In order to do this we had to add System.Web to the namespace list.

using System;
using System.Web;
using Microsoft.IdentityServer.Web;
using Microsoft.IdentityServer.Web.UI;

System.Web supplies the classes that enable browser-server communication which are needed to get the user agent string and the query string generated by Microsoft Online Services.

protected void Page_Load( object sender, EventArgs e )
 {
 //Get the raw query String generated by Office 365
 int pos = Request.RawUrl.IndexOf('?');
 int len = Request.RawUrl.Length;
 string rawq = Request.RawUrl.Substring(pos + 1, len - pos - 1);

 //Convert query string (qs) to a string
 string qs = HttpUtility.ParseQueryString(rawq).ToString();

 //Get the user agent value
 string uagent = Request.UserAgent;

 //Check if the string campus-ncl appears in the User Agent
 //If it is there forward to WIA along with the Query String

 if(uagent.IndexOf("campus-ncl") > -1)
 {
 Response.Redirect("/adfs/ls/auth/integrated/?" + qs, true);
 }
 else
 {
 //Carry on and do Forms Based Authentication
 }
 }

And that’s it! Anyone using a managed browser with the custom string will be forwarded for WIA and get the SSO experience and all others will get FBA.

Things to note

  1. This method is not officially supported by Microsoft and there are potential issues around future ADFS upgrades (there is no guarantee that the same configuration will be in future versions of ADFS). We are also developing the fall back plan of pointing different clients and the different farms in DNS in case it is needed.
  2. There may very well be a better way to do this! If you find one please let us know 🙂

Special mention

Although we knew what we wanted to do we were having trouble getting the query string and putting it in a usable form (I’m not a programmer!) This information was provided by another TechNet forum member


PowerShell On-Ramp

Last week I was up in Edinburgh with Microsoft presenting at their IT Pro Camps. We had multiple mentions how PowerShell can help you with the managment in the three topic areas we were covering: Hyper-V, Private Clouds and Consumerisation (supporting BYOD scenarios). Taking the audiences for those three days as a representative sample, it looks like about half of the Windows-based IT community still hasn’t begun their PowerShell journey.

Now is a great time to get started with PowerShell, especially with its increased prevalence in Windows Server 2012 and some of the great improvements in PowerShell 3.0. For those just getting started, I’m encouraging everyone to get familiar with the following four cmdlets (pronounced “command-lets”) in particular:

Get-Command finds all the commands (including aliases and functions) that are available to you in the current shell.
Get-Member tells you about the objects on the pipeline which the previous cmdlet has output. eg. Get-Process | Get-Member
Get-Help provides help about cmdlets and features of PowerShell (in v1 and 2 this is all in the box; with PowerShell 3.0, you need to Update-Help).
Get-PSDrive tells you about the drives that PowerShell is exposing; not just the file system, but the registry and others.

Given those four cmdlets, you can get a long way by yourself, just through experimenation. Don’t forget to use the -whatif parameter (or -confirm) on any cmdlet that might change something.
eg. Get-Process | Where {$_.name -match “^s”} | Stop-Process -whatif

In PowerShell 3.0, you can benefit a lot from using the Show-Command UI in the PowerShell ISE (Integrated Scripting Environment) to help you with the parameters required to achieve a task. As a beginner to PowerShell, you can also learn a lot by looking at other people’s scripts; the Microsoft Script Explorer for Windows PowerShell is a useful tool to find scripts and other great resources from online repositories.

There’s no better way to learn PowerShell than to write some scripts that solve real problems, and there are a number of pre-canned problems that you can take a shot at in the Windows PowerShell Scripting Games. You’re too late to enter this year’s competition, but you can still try out the challenges, and once you’ve given it a try, you can see the expert solutions from some of the top members of the PowerShell Community.

I suggest that while you’re getting used to PowerShell, you print a couple of quick reference guides (or cheat sheets) and keep them close to hand, or pinned up beside your monitor. You can also download a great free ebook called Mastering PowerShell from PowerShell.com, where you’ll also find a bunch of other great resources (including another free ebook on PowerShell remoting, for when you’ve got to grips with the basics).

If you like to go and buy a book, then the beginner’s book of choice is Don Jones’ Learn Windows PowerShell in a Month of Lunches.

Our Journey to the Cloud (Office 365): Part 1 – Introduction

Newcastle University has made the decision to move some of its Student email services to the cloud using Microsoft’s Office 365 platform.  We have decided to share our journey as we go through it explaining the reasons why along with detailed technical information which we hope may be of use to other institutions.

Introduction

The University’s current undergraduate (UG) and postgraduate taught (PGT) student Email hosting service resides upon a mature ISS hosted Exchange 2007 platform that is four years old. The hosting hardware will reach end of life during 2012. ISS planned to review student Email hosting options as this hardware approached end of life with a view of comparing an internally provisioned replacement service against a Cloud based solution or the “no provision” option.

The University’s current Email hosting provision is split into two services, one for UG/PGT and the other for staff/PGR. The UG/PGT service serves over 30,000 student mailboxes with an overlapping group of graduating students where mailboxes are retained for a period of time post-graduation. The current staff Email hosting platform serves around 10,000 staff and postgraduate research (PGR)   mailboxes. Both staff and student hosting platforms are inter-linked using Microsoft Active Directory which permits a seamless integration of calendaring, address list and message tracking functionality.

The Email hosting platform for UG/PGT resides upon six servers and six directly attached disc arrays (each with 12 mirrored hard discs). The servers are deployed in an active/passive configuration between two data-centres (that is although data is replicated between the two data-centres, only servers in one data-centre provide service to students at any one time). Student access to the service is via Outlook Web Access and personal mobile devices only. UG/PGT students have a quota of 200MB, although they cannot send Email when a 150MB limit is reached.

Choices

We believed there were three alternatives for UG/PGT Email hosting provision: in-house; outsourced to the Cloud; no provision.

In-house Provision

ISS estimate that the non-staff cost of replacing the current UG/PGT hardware platform in 2012 will require a capital investment of £160K with a recurrent element of £5K pa. The electrical usage and carbon impact of in-house provision is estimated to be 68,000 KWh and 36,500 Kg of CO2 pa. In addition to this, staff costs must be taken in to account.

Cloud Provision

Both Microsoft and Google provide their respective services to education establishments free at the point of use Other cloud-based options are available, generally with different services levels, but at a financial cost to the institution.

No Provision

The final alternative is that the University does not provide any Email hosting facilities to UG/PGT students. Given nearly all students arrive at the University with an existing personal Email account (e.g. Yahoo, Gmail, and Hotmail), does the University need to provide another Email account for UG/PGT students to monitor and use? To ease communications between staff and students, the University could provide a forwarding service whereby a @ncl.ac.uk Email address is available for each student that simply forwards to their personal Email account, such forwarding addresses made available in the University’s global address list.

Microsoft vs Google

Microsoft’s current Cloud service in the education arena is branded as “Live@Edu”; Microsoft plan to upgrade and re-brand the offering as “Office 365 for Education” early in 2012. Given the timescales only the “Office 365 for Education” offering will be discussed. It offers (to students):

  • Online version of Microsoft Exchange 2010;
  • 25GB Email quota
  • Office Web Apps (online versions of Microsoft Word, Excel, PowerPoint and OneNote);
  • Instant messaging/video conferencing via Lync Online;
  • Collaborative web sites via SharePoint Online;
  • Linkage with the University’s Active Directory infrastructure to permit calendaring and address list integration between the University’s staff/PGR Email infrastructure and Office 365 for Education;
  • Secure use of University authentication system (students will use their Campus password);
  • Use post-graduation facilitating alumni communications.

Google

The Google Cloud service in the education arena is branded “Google Apps for Education”. It offers:

  • Online version of Gmail;
  • 25GB Email quota and 1GB of storage for Google Docs;
  • Google Docs (online word processor, spread sheet and drawing packages);
  • Instant messaging via Google Talk;
  • Collaborative web sites via Google Sites;
  • Secure use of University authentication system (students will use their Campus password);
  • Use post-graduation facilitating alumni communications.

The Decision

Both Microsoft and Google provide similar functional offerings. The primary differentiators between the offerings are the integration with the University’s infrastructure and, from a student experience perspective, the familiarity of the Online Office applications compared to those currently deployed on student cluster desktops.

Following consultation with student representatives and the University Teaching, Learning and Student Experience Committee, Strategic Information Systems Group agreed to proceed with a project based upon Microsoft Office 365.

NEXT: Our Journey to the Cloud (Office 365): Part 2 – Technical Overview