Shift & Right Click!

Thought I would blog on something that I only learnt last year but has been a great time saver for me.

Holding down ‘Shift’ when right clicking in explorer gives some extra very handy options including ‘Open a Command Window here’ and ‘Copy as Path.’

Also, several files types have other contact sensitive options for instance Office files can ‘Open as read only’.

CAP

Workaround for the: “The network folder specified is currently mapped using a different user name and password” error

Some people make use of the “Connect using different credentials feature” when working with different permissions is required:

It seems that this can sometimes result in the error message “The network folder specified is currently mapped using a different user name and password” error message.” The message can occur even when this is not the case!

Microsoft state that this behaviour is by design and provide a workaround.

“Use the IP address of the remote server when you try to connect to the network share”

This does seem to work but requires that you know the name of the IP of the server you are connecting to. This can easily be found out using the command:

Ping servername

Everything you wanted to know about Microsoft OS Activation

There seems to be some confusion as to how Vista/Windows 7/Server 2008/Server 2008 R2 OS activation works both inside/outside the campus domain and on/off the university network so I’ll try and explain what the options are:

KMS activation

KMS (Key Management Server) activation is designed for machines (doesn’t matter which OS) which are connected to the University network at least once in every 6 months.

If a machine is joined to the campus domain then you don’t need to do anything else, the machine will just activate against the ISS KMS server and you can forget about it.

If the machine is on the University network but not in the campus domain then you can manually point the machine at the ISS KMS server and it will activate (see below)

Once a machine has activated against the ISS KMS server it will periodically re-activate automatically, you’ll only a have a problem with it if it doesn’t talk to the KMS server for over 6 months in which case you should use….

MAK Activation

MAK (Multiple Activation Key) activation should be used for machines which are off the campus network for periods of 6 months or more e.g. a University laptop which is always used off campus. If you need a MAK key then you should email the ISS Helpline and ask for a MAK code stating that you need a MAK code along with the OS that you are using e.g. Windows 7. Once you have the MAK code activate windows by typing activate windows in the search box on the start and follow the on screen prompts and enter the MAK code when asked to do so.

MAK activation requires an internet connection but once it’s done your machine will never need activating again unless you re-install the OS (this is the same type of activation you would use on a computer you bought from PC World etc).

Useful activation commands

All of these commands need to be run from a command prompt running with administrator rights, the easiest way to do this is by typing cmd in the search box on the start menu then right click the cmd icon that it finds and select run as administrator.

1 – Activate a machine on the University network which is NOT in the campus domain

cscript c:\windows\system32\slmgr.vbs -skms locksmith.campus.ncl.ac.uk:1688

cscript c:\windows\system32\slmgr.vbs -ato

2 – Force activation on a machine that is in the campus domain (if you’re impatientJ)

cscript c:\windows\system32\slmgr.vbs -ato

3 – Convert a machine from using MAK to KMS activation and vice versa (you’ll still need to request and use a MAK code if you need one).

N.B. These are generic product keys that are available for all to see at http://technet.microsoft.com/en-us/library/ee355153.aspx

slmgr -upk

slmgr -ipk 33PXH-7Y6KF-2VJC9-XBBR8-HVTHH

slmgr -ato

The above is for Windows 7 Enterprise, replace the product key as appropriate from the table below

Platform
Operating system edition
Product key

Windows 7 and Windows Server 2008 R2

Client
Windows 7 Professional
FJ82H-XT6CR-J8D7P-XQJJ2-GPDD4

Client
Windows 7 Professional N
MRPKT-YTG23-K7D7T-X2JMM-QY7MG

Client
Windows 7 Professional E
W82YF-2Q76Y-63HXB-FGJG9-GF7QX

Client
Windows 7 Enterprise
33PXH-7Y6KF-2VJC9-XBBR8-HVTHH

Client
Windows 7 Enterprise N
YDRBP-3D83W-TY26F-D46B2-XCKRJ

Client
Windows 7 Enterprise E
C29WB-22CC8-VJ326-GHFJW-H9DH4

Server
Windows Server 2008 R2 Web
6TPJF-RBVHG-WBW2R-86QPH-6RTM4

Server
Windows Server 2008 R2 HPC edition
FKJQ8-TMCVP-FRMR7-4WR42-3JCD7

Server
Windows Server 2008 R2 Standard
YC6KT-GKW9T-YTKYR-T4X34-R7VHC

Server
Windows Server 2008 R2 Enterprise
489J6-VHDMP-X63PK-3K798-CPX3Y

Server
Windows Server 2008 R2 Datacenter
74YFP-3QFB3-KQT8W-PMXWJ-7M648

Server
Windows Server 2008 R2 for Itanium-based Systems
GT63C-RJFQ3-4GMB6-BRFB9-CB83V

Windows Vista and Windows Server 2008

Client
Windows Vista Business
YFKBB-PQJJV-G996G-VWGXY-2V3X8

Client
Windows Vista Business N
HMBQG-8H2RH-C77VX-27R82-VMQBT

Client
Windows Vista Enterprise
VKK3X-68KWM-X2YGT-QR4M6-4BWMV

Client
Windows Vista Enterprise N
VTC42-BM838-43QHV-84HX6-XJXKV

Server
Windows Web Server 2008
WYR28-R7TFJ-3X2YQ-YCY4H-M249D

Server
Windows Server 2008 Standard
TM24T-X9RMF-VWXK6-X8JC9-BFGM2

Server
Windows Server 2008 Standard without Hyper-V
W7VD6-7JFBR-RX26B-YKQ3Y-6FFFJ

Server
Windows Server 2008 Enterprise
YQGMW-MPWTJ-34KDK-48M3W-X4Q6V

Server
Windows Server 2008 Enterprise without Hyper-V
39BXF-X8Q23-P2WWT-38T2F-G3FPG

Server
Windows Server 2008 HPC
RCTX3-KWVHP-BR6TB-RB6DM-6X7HP

Server
Windows Server 2008 Datacenter
7M67G-PC374-GR742-YH8V4-TCBY3

Server
Windows Server 2008 Datacenter without Hyper-V
22XQ2-VRXRG-P8D42-K34TD-G3QQC

Server
Windows Server 2008 for Itanium-Based Systems
4DWFP-JF3DJ-B7DTH-78FJB-PDRHK

Security Principals, ACE, ACLs, DACLs, and SACLs

As a follow up to an earlier post I made on Advanced NTFS Permissions I thought I’d post some notes I made recently on Security Principals, ACE, ACLs, DACLs, and SACLs

Security Principals

A security principal is an entity that can be authenticated by the system, such as a user account, a computer account, or a thread or process that runs in the security context of a user or computer account and Security groups of these accounts. The important thing to remember is that each principal is automatically assigned a security identifier (SID)when it is created and that these are unique. This is why a domain computer cannot access domain resources if its account is deleted even when a new account with the same name exists.

Access Control Entry (ACE)

An Access Control Entry (ACE) is an element in an access control list (see below). Each ACE controls or monitors access to an object. We see an ACE when we look in the list of security principals which have access tab on an object.
Access Control Lists (ACL)
Broadly speaking an ACLs are the lists of security principals (users, groups and computers that have access to an object. There are two types of ACL. The DACL and the SACL.

Discretionary access control lists (DACLs).

DACLs identify the users and groups that are assigned or denied access permissions on an object. If a DACL does not explicitly identify a security principal it will be denied access to that object.

System access control lists (SACLs).

SACLs identify the users and groups that you want to audit when they successfully access or fail to access an object. Auditing is used to monitor events related to system or network security. A SACL can be found by selecting the Advanced Security settings on an object button and selecting the Auditing Tab

Security

Filestore Best Practices #3: Only ever assign group permissions even if the group has only one member.

Assigning the permissions to Filestore resources is easy but managing permissions for an expanding volume of data in an ever evolving department is not. It can however be made easier by only using security groups.

Most people reading this will look after Filestore resources which are accessed by various people within their departments. The data structure may be made up of hundreds or even thousands of folders for which a complex set of permissions are required.

The problem with assigning individual users permissions is that there will come a point eventually where you will not be able remember who a user (let’s call them) n563456 is, why they were assigned permissions and if they should still have access. The situation would be worse still for someone taking over or assisting with management of the resources.

The best way to avoid this is to never assign individual users permissions on a resource but to create a Security group even if only one user will be the only member in it.

This will allow you to do the following:

Give the group a meaningful name.

For example, calling the group HR – Directors Shared Filestore (Read\Write) will help you identify it’s function, level of access and who should be a member at a glance.

TIP: Prefix all of your group names with your departments name e.g. ISS XXXX XXXXX. A group called ‘Research Shared Folder’ will not be as easy to find.

Allow you to add and remove users without having to browse to the resource.

It’s much easier to open the ADUC snap-in and add to or remove from a group than it is to browse to a nested folder and examine the ACLs.

Avoid Ghost s-ids

Ghost sids occur when an account has been deleted but the permission persists on the resource.

Document, audit and manage access from one place.

You can add comments to groups and manage all of your permissions from one central location, perhaps by a regular review of group membership.

Make things easier on team members or your successors.

By using a group based approach new team members and your successors will be able to easily see changes and see how permissions are configured.

SUMMARY: Never assign individual users permissions to a Filestore resource as they will grow too complex. Only ever use groups even if there is only one user on it and always add a description to the group.

Connect From Anywhere using the Terminal Services Gateway

Posted by popular demand on behalf of Adele…

The TS Gateway service allows you to connect to your work PC from home or other off-campus locations, even when your work PC is on an internal University network (i.e. 10.x.x.x IP address). Used in conjunction with Wake On Lan. This gives you 24 hour access to your on-campus PC.

To use the service you must ensure that you have the latest Remote Desktop Client installed on the PC from which you are connecting back into work. If you are running Windows Vista or Windows 7, you should already have what you need. If you are running Windows XP or earlier, you may need to visit Microsoft.com and download a later RDP client.

Instructions

Prerequisite: the work PC must be set-up to allow Remote Desktop Connections and you will need to ensure that the ID that you are using is in the Remote Desktop Users group on the PC.

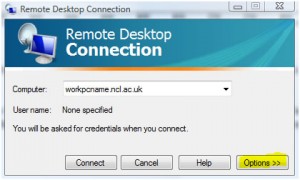
Launch Remote Desktop Client (you’ll find it by browsing to Accessories or just click Start…on Vista or Windows 7 (or Start.. Run if on XP) and type in mstsc and press Enter)

Click on Options as shown below:

Remote Desktop Connection options

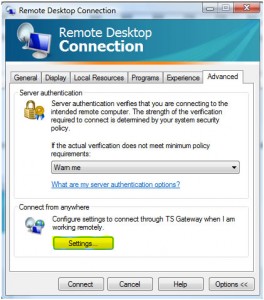
Click on Advanced and then Settings as shown below:

Remote Desktop Connection Settings

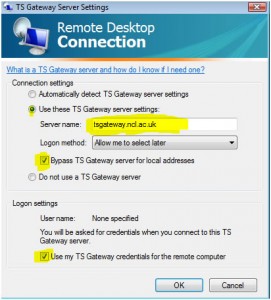
Complete the TS Gateway settings precisely as shown below:

tsgateway settings

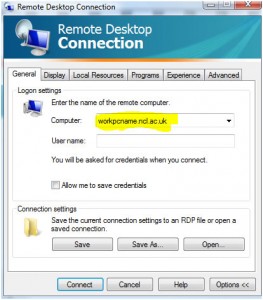
Click OK, and go back to the General tab. Enter the name of your work PC plus .ncl.ac.uk:

Enter the name of your work PC plus ncl.ac.uk


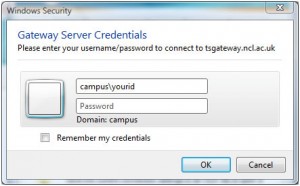
Click Connect. Enter an id that has rights to log on remotely to the PC. For example:

Enter credentials

Click OK. (You can use a local ID, but you’ll need to qualify it by using machinename\ rather than campus\

Setting up a Vista or Windows 7 PC for remote access

Click Start…

Right-click Computer and then select Properties.

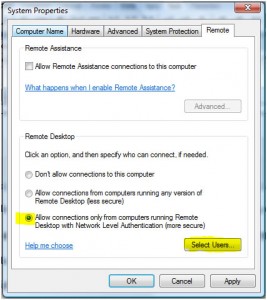
Click on Advanced system settings and, if prompted, supply the credentials of an account that has admin rights to the PC. Click on the Remote tab and Select Users:

Setting up RDC - remote tab

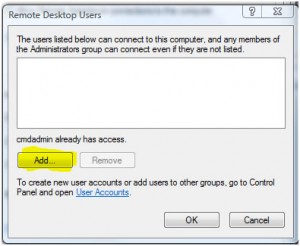
Add the accounts for any user that you want to be able to remotely access the PC:

Add users to RDC permissions

Then click OK… OK. All done.

You should test the settings from another on-campus machine before attempting to connect from off-campus.

The procedure is more or less the same for Windows XP but you will need to be logged on with admin rights before starting.

When using the above service, it is strongly recommended that you ensure your home PC is fully up-to-date with Windows Updates and is running good antivirus/antispyware software. Be sure to adhere to the University’s Computing Rules of Use at all times, and take care to protect sensitive and important data from unauthorised access as you would when working directly on-campus.

TechNet Conference goes virtual (19 June 2009)

From Microsoft:

We’re pleased to announce the launch of the very first TechNet Virtual Conference taking place on 19 June 2009.

You told us that time and budget pressures make attending in person events difficult – so to help both you and the environment we decided to take the TechNet Conference virtual. Now you and your colleagues can join us to get a flavour of some key Microsoft technologies from the comfort of your own desks.

  • Windows 7 – Deployment and Management
  • Windows Server 2008 R2 – 10 things to make life easier for IT Pros
  • An overview of Office Communications Server R2 and voice capabilities
  • The trials and tribulations of SharePoint implementation

We are also really pleased to announce an exclusive Keynote featuring Mark Russinovich, Microsoft Technical Fellow specialising in the Windows platform.

And that’s not the only difference this year. In addition to Microsoft technology news and product overviews from the experts, the TechNet Virtual Conference will also feature a second auditorium focused on IT Management, including:

  • How IT will change over the next 10 years and why you should care – an exclusive session delivered at TechEd EMEA
  • Growing the Business and Managing Costs at Microsoft – An Insider’s View, presented by Asif Jinnah, IT Manager, Microsoft UK

Click here to see the full agenda.

http://technet.microsoft.com/en-gb/dd819085.aspx