Free ebook: Introducing Windows Server 2012

Microsoft Press have released a free ebook called Introducing Windows Server 2012, which does exactly what it says on the tin.

There are three versions available, depending on where you want to read it:

Introducing Windows Server 2012 RTM Edition – PDF ebook
Introducing Windows Server 2012 RTM Edition – ePub format
Introducing Windows Server 2012 RTM Edition – MOBI format

I read the version of this book that was based on the beta and found it very informative. It’s now been updated to the RTM version, so there’s no reason not to grab it now.

Windows Server 2012 Virtual Labs

When it releases later this year, Windows Server 2012 will bring a stack of exciting new features and enhancements, like the fantastic multi-server management features of the new Server Manager, and of course PowerShell v3.0!

If you want to get ahead of the curve on Server 2012, then there’s no better way that digging in and getting your hands dirty, although not everyone has a whole load of spare hardware to setup a test lab, and even if you do, then it’s sometimes difficult to know where to start, especially since pre-release software tends to be lacking some of the documentation that you might want to really explore a feature in depth.

To that end, Microsoft have produced a load of Windows Server “8” Beta Virtual Labs (put together before the Windows Server 2012 name was announced). These are self-contained modules focusing on the following:

  • Active Directory Deployment and Management Enhancements
  • Configuring a Highly Available iSCSI Target
  • Configuring Hyper-V over Highly Available SMB Storage
  • Implementing Storage Pools and Storage Spaces
  • Introduction to Windows PowerShell Fundamentals
  • What’s New in Windows PowerShell 3.0
  • Managing Branch Offices
  • Managing Network Infrastructure
  • Managing Your Network Infrastructure with IP Address Management
  • Managing Windows Server “8” with Server Manager and Windows PowerShell 3.0
  • Online Backup Service
  • Using Dynamic Addess Control to Automatically and Centrally Secure Data

In addition, you might want to check out some of the Resources for IT Professionals that Microsoft have published in relation to the TechEd conference that will start in a month in Orlando.

(Thanks to my friend @Alexandair for both of those links)

The dangers of using the bin to store things you want to keep

When you build IT systems and you put limitations on how they are intended to be used, it goes without saying that people will try to find ways of getting round those limitations. We’ve always been fairly liberal about what users can do with our systems, but there are some times that we have to put limits in place. For example, we don’t have an unlimited amount of disk space, so we have to put quotas on storage capacity for each user’s email and files.

It turns out that some people try to work around these quotas by deleting email messages or files that they want to keep and take advantage of Exchange’s Recover Deleted Items feature and the shadow copies of home folders on file servers (seen as Previous Versions in Windows Explorer). Some people may get away with working like that for some time, simply recovering the content during the retention period and then deleting it again so that it doesn’t impact their quota.

As a way of working that’s about as safe as storing your important paperwork in the bin and hoping that you’re always there to take it out before the cleaner comes along to empty it. From time to time, routine maintenance on the file servers will result in shadow copies being lost – it’s not that we’re being careless with them; that’s just the way it works. If your mailbox has to be moved from one Exchange mailbox store to another, you’ll lose the ability to recover your deleted items. We try to keep these instances to a minimum because those features are useful for quickly recovering when accidents do happen, but sometimes they are necessary in the course of keeping the systems running as reliably as possible.

Throwing things away and then hoping that the bin doesn’t get emptied is not a solution. If there are legitimate reasons why your quota isn’t big enough, then there are better ways to work. We have a system for requesting increases to home folder quotas and a Home Archive Service for infrequently accessed data (and other solutions for even bigger data requirements, such as large sets of research data), and we have an Exchange Archiving System to store larger amounts of old mail. If none of those meet the specific need, then we’re happy to help to find a solution that works.

‘Source Path Too Long’ error when using Shadow Copy Service

When using Shadow Copy Service (also known as “Previous Versions”) to restore or copy a file you may receive an error which states ‘Source Path Too Long’

Error

This is due to a limitation of the Windows File System . In the Windows the maximum length for a path is defined as 260 characters for example “H:\some 256-character path string”. Programs which break this limitation can cause this and other problems on clients and servers.

Workaround

In order to restore files and folders where this error occurs you need to map a Network drive to the location to shorten the path. This changes a long path to a short one allowing the restore to take place.

So a long path like

\\campus\dept\mydeparmtnet\management\management reports\trial system\pre-adoption \Research and development with no reponse\reports\2010

Becomes

X:\2010\

The restore can then be performed as usual.

Security Principals, ACE, ACLs, DACLs, and SACLs

As a follow up to an earlier post I made on Advanced NTFS Permissions I thought I’d post some notes I made recently on Security Principals, ACE, ACLs, DACLs, and SACLs

Security Principals

A security principal is an entity that can be authenticated by the system, such as a user account, a computer account, or a thread or process that runs in the security context of a user or computer account and Security groups of these accounts. The important thing to remember is that each principal is automatically assigned a security identifier (SID)when it is created and that these are unique. This is why a domain computer cannot access domain resources if its account is deleted even when a new account with the same name exists.

Access Control Entry (ACE)

An Access Control Entry (ACE) is an element in an access control list (see below). Each ACE controls or monitors access to an object. We see an ACE when we look in the list of security principals which have access tab on an object.
Access Control Lists (ACL)
Broadly speaking an ACLs are the lists of security principals (users, groups and computers that have access to an object. There are two types of ACL. The DACL and the SACL.

Discretionary access control lists (DACLs).

DACLs identify the users and groups that are assigned or denied access permissions on an object. If a DACL does not explicitly identify a security principal it will be denied access to that object.

System access control lists (SACLs).

SACLs identify the users and groups that you want to audit when they successfully access or fail to access an object. Auditing is used to monitor events related to system or network security. A SACL can be found by selecting the Advanced Security settings on an object button and selecting the Auditing Tab

Security

Must have Powershell snippets

Over the last few months my colleague Jon has been providing me with some very useful Powershell snippets which I thought I’d share. A number of them require the Quest ActiveRoles Management Shell for Active Directory

Display Group memberships for a user.

(Get-QADUser username).MemberOf

Display the members of an Active Directory Group

Get-QADGroupMember "Groupname" | ft name,displayname -a

Bulk remove machine from Windows DNS

The text file contains a list on NetBios machine names.

gc computers.txt | %{dnscmd dnsservername /RecordDelete campus.ncl.ac.uk "$_" A}

Recuse through a Directory Structure and delete all file with a Creation date > 90 days.

The text file contains a list of UNC paths.

GC filecontainingpaths.txt | %{dir $_ -recurse | ?{!$_.psiscontainer -and $_.creationtime -lt ((get-date).adddays(-90))} | del -whatif}

Filestore Best Practices #3: Only ever assign group permissions even if the group has only one member.

Assigning the permissions to Filestore resources is easy but managing permissions for an expanding volume of data in an ever evolving department is not. It can however be made easier by only using security groups.

Most people reading this will look after Filestore resources which are accessed by various people within their departments. The data structure may be made up of hundreds or even thousands of folders for which a complex set of permissions are required.

The problem with assigning individual users permissions is that there will come a point eventually where you will not be able remember who a user (let’s call them) n563456 is, why they were assigned permissions and if they should still have access. The situation would be worse still for someone taking over or assisting with management of the resources.

The best way to avoid this is to never assign individual users permissions on a resource but to create a Security group even if only one user will be the only member in it.

This will allow you to do the following:

Give the group a meaningful name.

For example, calling the group HR – Directors Shared Filestore (Read\Write) will help you identify it’s function, level of access and who should be a member at a glance.

TIP: Prefix all of your group names with your departments name e.g. ISS XXXX XXXXX. A group called ‘Research Shared Folder’ will not be as easy to find.

Allow you to add and remove users without having to browse to the resource.

It’s much easier to open the ADUC snap-in and add to or remove from a group than it is to browse to a nested folder and examine the ACLs.

Avoid Ghost s-ids

Ghost sids occur when an account has been deleted but the permission persists on the resource.

Document, audit and manage access from one place.

You can add comments to groups and manage all of your permissions from one central location, perhaps by a regular review of group membership.

Make things easier on team members or your successors.

By using a group based approach new team members and your successors will be able to easily see changes and see how permissions are configured.

SUMMARY: Never assign individual users permissions to a Filestore resource as they will grow too complex. Only ever use groups even if there is only one user on it and always add a description to the group.

Connect From Anywhere using the Terminal Services Gateway

Posted by popular demand on behalf of Adele…

The TS Gateway service allows you to connect to your work PC from home or other off-campus locations, even when your work PC is on an internal University network (i.e. 10.x.x.x IP address). Used in conjunction with Wake On Lan. This gives you 24 hour access to your on-campus PC.

To use the service you must ensure that you have the latest Remote Desktop Client installed on the PC from which you are connecting back into work. If you are running Windows Vista or Windows 7, you should already have what you need. If you are running Windows XP or earlier, you may need to visit Microsoft.com and download a later RDP client.

Instructions

Prerequisite: the work PC must be set-up to allow Remote Desktop Connections and you will need to ensure that the ID that you are using is in the Remote Desktop Users group on the PC.

Launch Remote Desktop Client (you’ll find it by browsing to Accessories or just click Start…on Vista or Windows 7 (or Start.. Run if on XP) and type in mstsc and press Enter)

Click on Options as shown below:
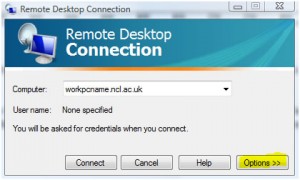
Remote Desktop Connection options

Click on Advanced and then Settings as shown below:
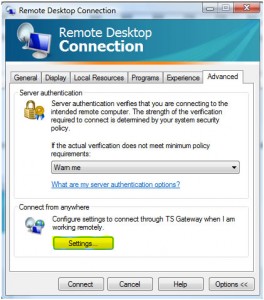
Remote Desktop Connection Settings

Complete the TS Gateway settings precisely as shown below:
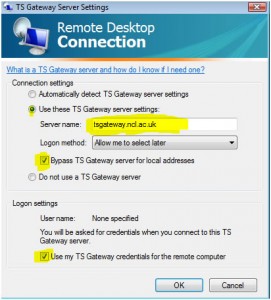
tsgateway settings

Click OK, and go back to the General tab. Enter the name of your work PC plus .ncl.ac.uk:
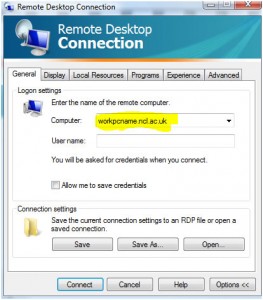
Enter the name of your work PC plus ncl.ac.uk


Click Connect. Enter an id that has rights to log on remotely to the PC. For example:
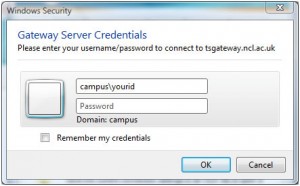
Enter credentials

Click OK. (You can use a local ID, but you’ll need to qualify it by using machinename\ rather than campus\

Setting up a Vista or Windows 7 PC for remote access

Click Start…

Right-click Computer and then select Properties.

Click on Advanced system settings and, if prompted, supply the credentials of an account that has admin rights to the PC. Click on the Remote tab and Select Users:
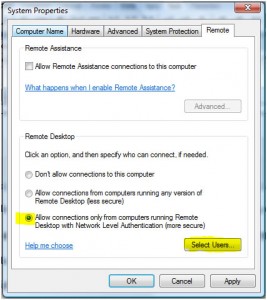
Setting up RDC - remote tab

Add the accounts for any user that you want to be able to remotely access the PC:
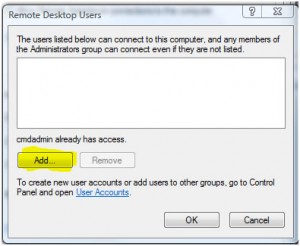
Add users to RDC permissions

Then click OK… OK. All done.

You should test the settings from another on-campus machine before attempting to connect from off-campus.

The procedure is more or less the same for Windows XP but you will need to be logged on with admin rights before starting.

When using the above service, it is strongly recommended that you ensure your home PC is fully up-to-date with Windows Updates and is running good antivirus/antispyware software. Be sure to adhere to the University’s Computing Rules of Use at all times, and take care to protect sensitive and important data from unauthorised access as you would when working directly on-campus.

Advanced NTFS Permissions

Much time can be saved by making use of Advanced NTFS File Permissions. I found the following article at builderau.com.au which gives a good description of Advanced NTFS permissions.

You can also see some other information on basic permissions and some recommendations in my earlier post.

Traverse Folder/Execute File: Users can navigate through folders to reach other files or folders, even if they have no permissions for the traversed files or folders. The Traverse Folder permission takes effect only when the group or user doesn’t have the Bypass Traverse Checking user right in the Group Policy snap-in. (By default, the Everyone group has the Bypass Traverse Checking user right.)

List Folder/Read Data: Users can view a list of a folder’s contents and data files.

Read Attributes: Users can view the attributes of a file or folder, such as read-only and hidden. (NTFS defines these attributes.)

Read Extended Attributes: Users can view the extended attributes of a file or folder. (Defined by programs, extended attributes may vary.)

Create Files/Write Data: The Create Files permission allows users to create files within the folder. (This permission applies to folders only.) The Write Data permission allows users to make changes to the file and overwrite existing content. (This permission applies to files only.)

Create Folders/Append Data: This Create Folders permission allows users to create folders within a folder. (This applies to folders only.) The Append Data permission allows users to make changes to the end of the file, but they can’t change, delete, or overwrite existing data. (This applies to files only.)

Write Attributes: Users can change the attributes of a file or folder, such as read-only or hidden. (NTFS defines these attributes.)

Write Extended Attributes: Users can change the extended attributes of a file or folder.

Delete: Users can delete the file or folder. (If users don’t have the Delete permission on a file or folder, they can still delete it if they have the Delete Subfolders And Files permission on the parent folder.)

Read Permissions: Users have reading permissions of the file or folder, such as Full Control, Read, and Write.

Change Permissions: Users have changing permissions of the file or folder, such as Full Control, Read, and Write.

Take Ownership: Users can take ownership of the file or folder. The owner of a file or folder can always change permissions on it, regardless of any existing permissions that protect the file or folder.