Web proxy changes (reverted)

Unfortunately we’ve had to backout the change to the proxy config. We found that Windows XP clients didn’t handle the change properly and lost access to external web sites.

The good news is that the vast majority of clients worked fine so once we’ve developed a plan for handling the older machines we’ll try again (in the new year).

Free events for IT Pros in Newcastle on 25th November

On Monday 25th November, St James’ Park in Newcastle is the venue for three free events for IT professionals covering a range of Microsoft technologies.

During the day, the MVP Cloud OS Relay and SQL Relay 2012R2 have great line-ups of MVPs and other experts in Windows Server, System Center, Hyper-V, Office 365, Azure, SQL and Business Intelligence.

In the evening, the Windows User Group takes over with an event covering Windows 8.1, deployment, MDOP and Office 2013.

The schedule for the Cloud OS event is at http://www.cloudoscommunity.com/Newcastle and free sign-up is at http://www.eventbrite.co.uk/e/mvp-cloud-os-infrastructure-relay-newcastle-tickets-8456426399

The SQL Relay event has sold out, but if you’re desperately interested in any of the sessions athttp://www.sqlrelay.co.uk/events/2013r2/Newcastle.html you can register for the Cloud OS event and switch tracks throughout the day if there’s capacity in the room.

Sign up for the evening event is at https://www.eventbrite.co.uk/e/windows-and-office-tour-tickets-9107714419

Hopefully I’ll see you there!

Web Proxy Changes

On Monday 16th December 2013 we’ll be changing the content of the proxy auto configuration (PAC) script that web browsers and other applications use to automatically configure use of a web proxy.  The web proxies have been unnecessary for web access since the introduction of NAT at our network border and this change will reduce the number of active clients using them.

The current PAC script provides this configuration (simplified for clarity):

function FindProxyForURL(url, host)
{ 
  return "PROXY 128.240.229.4:8080";
}

This configures web clients to proxy their requests through our load-balanced proxy address at 128.240.229.4. The new PAC config will be:

function FindProxyForURL(url, host)
{
  return "DIRECT";
}

This will configure clients to not use a proxy and just fetch content directly.

We’ve scheduled this change purposely to occur during a quiet time on campus to avoid major inconvenience should any problems arise, however internal testing in ISS over the past few months has shown that this change should be transparent to users.

If you’re aware of any applications or systems that currently have manually set proxy addresses (eg, “wwwcache.ncl.ac.uk”) these can now be removed prior to the eventual full retirement of the web proxies late in 2014.

Exchange ActiveSync Stats Update December 2012

Below are the statistics of the types of unique mobile devices have connected to the on-premises and Office365 Exchange servers for email and calendaring.

There have been 9834 unique mobile devices connected between 01/12/2012 and 17/12/2012.  Well over 9000 unique devices connect on any one day.

Of the 9834 devices, 3707 devices belong to staff and research postgraduate students connecting to the on-premises Exchange servers.  6127 devices belong to undergraduate and taught postgraduate students connecting to the Office365 Exchange servers.

Once again, we have seen a significant increase from previous statistics gathered.

Free ebook: Introducing Windows Server 2012

Microsoft Press have released a free ebook called Introducing Windows Server 2012, which does exactly what it says on the tin.

There are three versions available, depending on where you want to read it:

Introducing Windows Server 2012 RTM Edition – PDF ebook
Introducing Windows Server 2012 RTM Edition – ePub format
Introducing Windows Server 2012 RTM Edition – MOBI format

I read the version of this book that was based on the beta and found it very informative. It’s now been updated to the RTM version, so there’s no reason not to grab it now.

PowerShell 3.0 for Windows 7 and Server 2008

Along with the launch of Windows Server 2012* yesterday, Microsoft released the Windows Management Framework 3.0 for some downlevel clients. In the package you get PowerShell 3.0, and updated versions of WMI and WinRM for Windows 7 SP1, Windows Server 2008 R2 SP1 and Windows Server 2008 SP2. If you were looking for support on XP and Vista you are out of luck.

WMF 3.0 also contains the Server Manager CIM Provider that you’re going to need on your 2008 R2 SP1 and 2008 SP2 servers if you want to manage them with the new Server Manager in Windows Server 2012 or Remote Server Admin Tools for Windows 8 (RSAT for Win8 is yet to reach RTM).

Download WMF 3.0 at http://www.microsoft.com/en-us/download/details.aspx?id=34595

* Make sure you click that link to the online launch event; windows-server-launch.com has a load of learning resources for Microsoft’s amazing new Server release, especially around management and virtualisation.

The Importance of Protecting AD Objects against accidental deletion

I’ve recently had to go through the process of restoring a series of OU objects which is not at all fun even with the AD Recycle Bin feature that came along with Windows Server 2008 R2.

It’s easy to make mistakes though but most can be averted with the ‘Protect Object from Accidental Deletion’ flag. In order to toggle this value in the ADUC console select View > Advanced Features.

Once selected the object tab is available which allows you to toggle the object.

Any OUs in the University Active Directory that have been created using the Server 2008/Vista or later AD tools will have the value set by default. Other objects such as users and computers do not get the value automatically.

If you would like to set the property on all OUs or all Objects in given OU then you can run the following commands using the Quest AD Commandlets with appropriate rights:

For OUs only

get-qadobject -sizelimit 0 -type OrganizationalUnit -SearchRoot "OU=MyOU,OU=Departments,DC=campus,DC=ncl,DC=ac,DC=uk" | Add-QADPermission -Deny -Account Everyone -ApplyTo ThisObjectOnly -Rights DeleteTree,Delete

For Computers Only

get-qadobject -sizelimit 0 -type OrganizationalUnit -SearchRoot "OU=MyOU,OU=Departments,DC=campus,DC=ncl,DC=ac,DC=uk" | Add-QADPermission -Deny -Account Everyone -ApplyTo ThisObjectOnly -Rights DeleteTree,Delete

For Everything

get-qadobject -sizelimit 0 -SearchRoot "OU=MyOU,OU=Departments,DC=campus,DC=ncl,DC=ac,DC=uk" | Add-QADPermission -Deny -Account Everyone -ApplyTo ThisObjectOnly -Rights DeleteTree,Delete

REMEMBER TO TEST YOUR SCRIPT FIRST!

Exchange ActiveSync Statistics Update

Every year we try to produce some statistics of the types and number of mobile devices that are connecting to the Exchange servers for email and calendaring.

There have been 7064 unique mobile devices connected between 01/04/2012 and 15/08/2012.

Of the 7064 devices, 4697 belong to students and 2367 to staff.


Disappearing messages to lists

We had a question last week about some messages sent to a local mailing list not reaching the members of the list. When we looked at the logs on the list server we saw that the messages were being discarded as duplicates/loops. This is an explanation of why this happens and how to avoid it.

Every mail message has identifying label associated with it which should be globally unique. This label is called a message-id (commonly shorted to msgid). The system we use to run our mailing lists (Sympa) relies on this to stop looping messages being sent to a list repeatedly. In the version we use at the moment the list of msgids that have been seen is only cleared out when the server is restarted for maintenance – this happens irregularly (later versions expire entries in the cache after a fixed time). This is a reasonably common technique to protect lists for mail-loops – I remember implementing it in the locally written MLM when I worked at Mailbase.

The system deliberately sidelines the message silently because it thinks this is a possible loop and sending a message to the sender has a fair chance of making things worse.

Unfortunately some mail programs will create messages with identical msgids. I believe that some versions of Outlook do this if you use the “Resend” option on an existing message. The workaround is to not use “Resend” unless you’re resending a message that failed to deliver. Some old versions of the Pine mail program generated duplicates occasionally because they used the current time to create the msgid but missed out one of the components(hours, minutes or seconds – can’t remember which).

We’ve found another instance in which Outlook will send messages with identical msgids and that’s using templates. If you use Outlook templates in non-cached mode (more specifically if you use a template created when in non-cached mode) then messages created from that template will all have the same msgid. See discussion at http://social.technet.microsoft.com/Forums/en-US/exchangesvrtransport/thread/890412c8-f992-4973-b504-f1d069b0266f/

The suggested workaround for this is to change to using Outlook in Cached mode (see http://www.ncl.ac.uk/itservice/email/staff-pgr/outlook/cachedexchangemode/) and then recreate the templates (you need to create new templates because the fault is attached to the template). If for some reason cached mode isn’t suitable all the time (for example if you regularly use different desktop machines) you just need to turn it on when creating the template.


Share an Internet connection and turn a Windows 7 or 8 PC in to a Wireless Hotspot (even on a VPN)!

I recently needed to connect my phone to a wireless network and the only connectivity available was a wired VPN on my notebook. It turns out that in Windows 7 and Windows 8 it is possible to turn a wireless enabled machine into a hotspot that any device can use!

Instructions

1) Run an elevated command prompt (Right Click > Run as administrator) and run the command:

netsh wlan set hostednetwork mode=allow ssid=<networkname> key=<password>

Where  <networkname> is your choice of name for your Hotspot and <password>is a strong secure password.

For example

netsh wlan set hostednetwork mode=allow ssid="James WiFi" key="G0dBl3ssTheIntern3t"

2) This will create a connection called ‘Wireless Network Connection 2’ which is a Microsoft Virtual WiFi miniport adapter. Rename the connection as ‘Wifi Hotspot’

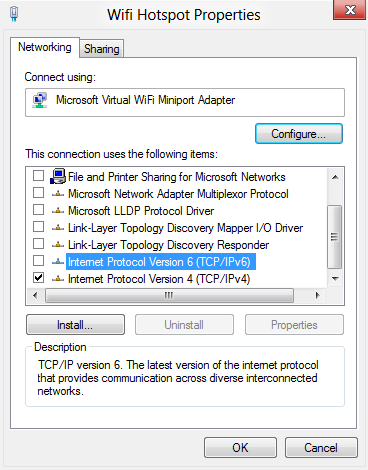
3) Browse to the properties of the adapter and uncheck all of the options apart from Internet Protocol Version 4 (TCP/IPv4)

4) Browse to the properties of the Internet connected adapter or VPN connection and select the sharing tab. Tick the first box as below and select Wifi Hotspot as the Home n.

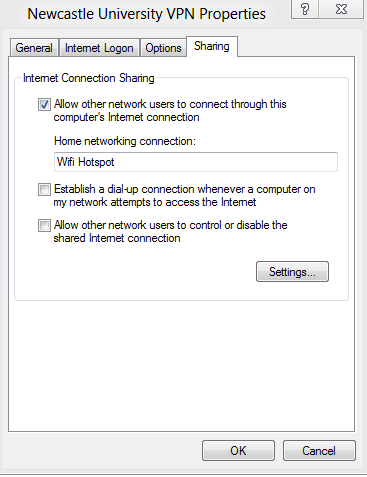
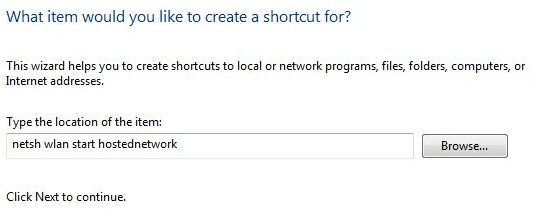
5) Create a shortcut on the Desktop called ‘Start WiFi Hotspot. This will let you switch on the hotspot on without having to type the commands. In the location box type:

netsh wlan start hostednetwork

6) Create another shortcut on the Desktop called ‘Stop WiFi Hotspot. This will let you switch off the hotspot on without having to type the commands. In the location box type:

 netsh wlan stop hostednetwork

7) Note: The shortcuts must be run as an Administrator (Right Click > Run as administrator)

8) And that’s it! You should now be able to connect to your hotspot and use the internet wit other wireless enabled devices such as your Phone, Console or other laptops

To remove the settings run the command below and do change the WiFi Hotspot name or password just run the first command again with the new details.

netsh wlan set hostednetwork mode=disallow ssid=<networkname> key=<password>