It’s possible to add additional fields in any query in NU Service (such as ‘Search All Tickets’), both to the list of result but also to filters used to pare down the results list.
A couple of notes before we get started:
- The way that NU Service works means that not every attribute is available to every process. As an example, only Service Requests will have a ‘Service Item Requested’ attribute, so looking for this attribute in the list when trying to filter an Incident won’t get you very far!
- Any time you add attribute to the results list or filters, you can save the URL of the query as a bookmark in your browser and it will keep all the amendments you’ve made, perfect for quickly returning to a specific view of a query.
Adding fields to the results list
By adding an attribute to the results list, you can quickly get a view of tickets falling into a certain area by attribute.
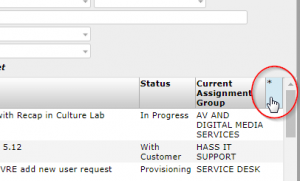
Start by picking a query, then select the asterisk (*) at the end of the column headers:
In the pop up box that appears, look for the attribute you want to add, select it, then click ‘Ok’. This list is a bit unwieldy and it’s not always obvious what the attribute will display, here are a few useful attributes:
- Customer (shows the School that the Raise User is a member of)
- Last Updated By (shows the ID of the last person to update the ticket)
- Ticket Source (shows the origin of the ticket, eg Self-Service, Telephone etc)
- Type of User (shows if the Raise User is a member of staff or a student)
Some of these attributes can be further broken down with the small arrow, but this can be a bit of a rabbit hole when looking for a specific attribute – if in doubt, get in touch with the SMO and we can help.
Adding filters to the filter list
By adding a filter into a query, you can reduce the overall number of results by restricting the entries for certain attributes.
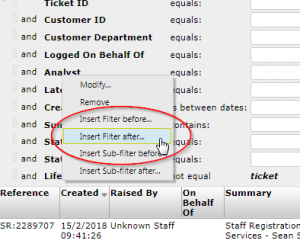
As before, start by picking a query, remembering point 1 of the notes above. Against the filters already in place, right click on one and select ‘Insert Filter after…’:
In the pop up box that appears, look for the attribute you want to add as a filter. As before, this list is a bit unwieldy and it’s not always obvious what the attribute will display, here are a few useful attributes:
- Customer (shows the School that the Raise User is a member of)
- Last Updated By (shows the ID of the last person to update the ticket)
- Ticket Source (shows the origin of the ticket, eg Self-Service, Telephone etc)
- Type of User (shows if the Raise User is a member of staff or a student)
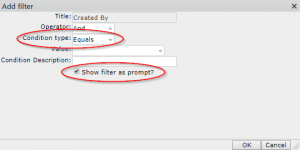
Once you’ve selected the attribute, a different window will appear. From here, I’d suggest first selecting the ‘Show filter as prompt?’ box, which will make the attribute appear in the filter list, and consider changing the ‘Condition type:’ depending on what you’re searching for:
For the ‘Condition type:’, there are a few options available. For many attributes you’re able to pick from (not an exhaustive list):
- Equals (the input must match exactly to display a result)
- Contains (the input can from any part of the result)
- Is Null (will only return where there is a blank result)
- Is One Of (can select multiple separate inputs, and will show where any are a result)
For dates, we can select ranges as well (not an exhaustive list):
- Is Between Dates (results between a specified start and end date)
- Is Within The Previous (results within the previous specified number of minutes/hours/days/weeks/months/years)
- Is Older Than (results from prior to a specified date)
Once you’ve picked your condition and ‘Show filter as prompt?’, click OK and the attribute will be entered onto the filter list to help pare down your results.
Some of this isn’t super-intuitive, if you need any assistance with making queries easier to use or understand then please get in touch.

