You can’t afford not to read this

(Adapted from a post at Kent University : https://blogs.kent.ac.uk/isnews/you-cant-afford-not-to-read-this/ – but it’s so spot on, I thought I’d share it here)

You are probably likely to get at least one fake email this week. And it might be very convincing. You need to know what clues to look for so that you don’t lose work, personal data such as photos, or put University data at risk.

Good fakes look almost identical to genuine emails, and often appear to be from companies you know, such as:

  • Amazon
  • eBay
  • PayPal
  • phone companies like O2 and Vodafone
  • courier companies like DHL, and UPS
  • travel companies
  • student finance
  • local companies. Remember criminals don’t just copy large companies.

o2-phish-image

Clues to look for

  1. If it says you’ve ordered a service that you haven’t – it’s highly likely to be fake. Delete the email, even if it looks convincing. If you want to double-check, use a browser and find their website. From there you can check your online account or contact them.
  2. If there’s an attached file you weren’t expecting – don’t open or even preview it. Attachments are used to unleash a virus. They know you might be curious enough to want to look and see what it is. Do not look – delete it. Absolutely do not ‘enable content’ or ‘enable macros’.
  3. Check the email address it was sent from. Does it look like the expected sender? Is it readable, or unusual, or sent ‘on behalf of’ another email account? Note that even if it looks like the right sender, hackers can ‘hijack’ genuine email accounts – so look for other clues.
  4. Don’t click on links if you have any doubts. The link text you see on the screen might not match the website address it will go to. If you can, hover your mouse over them and the actual website address will appear. Is it a readable, sensible destination for that company?

If you’re not sure if it is fake or not

  • Contact the organisation outside of the email or go to their website independently. From there you can check your online account or contact them.
  • Never ‘Load remote content’ or ‘download pictures’ if you have any doubts at all.
  • If it is definitely fake, mark it as junk and delete it. Don’t reply, click links, view attachments or view images.

If you think you’ve responded to a fake

If you’ve previewed or opened an attachment which you now realise is fake, or clicked a link, or allowed ‘remote content’ or images to be seen in an email that is likely to be fake:

  • turn the power off your device immediately.
  • if you think your bank details have been compromised, contact your bank immediately.
  • contact the Service Desk (it.servicedesk@ncl.ac.uk or call x85999)

A note about your passwords

  • Never give out your CAMPUS password (or any other password). No reputable organisation will ask you to do this. Newcastle University IT staff do not need your password to perform maintenance on your account, and will never ask you to ‘verify your details’.
  • If you think your password has been compromised, contact the Service Desk, and change your password.
  • Don’t use the same password for more than one account. Just don’t do it.
  • Try and use a unique password with a mixture of letters, numbers and punctuation.

We do block most fake messages that are sent to your University email account, as we have ways of identifying them before they reach your Inbox. But some may still get through to you, unfortunately.

We are hiring! System Administrator (Windows)

Since we’ve got such a great team, opportunities to join us don’t come along very often, so you might want to check out this rare chance: C47242A – Systems Administrator (Windows)

You should have experience of recent versions of Windows Server, and systems automation (if you don’t know PowerShell, what have you been doing with yourself?!), and if you’ve got some cloud experience, that’s good too. More than anything, you need to have a desire to continually improve systems and expand your own knowledge. We don’t ever buy in a lot of help here, so you’ve got to be able to learn as you go.

In terms of what you could be working with, there’s a whole range of systems, including (but not restricted to): Active Directory, file store and backup, Office 365, IIS, SQL, Azure, FIM/MIM, VMware, HPC, SharePoint, and more.

Closing date for applications is the 2nd October, so don’t delay.

DevOps North East – Introduction to Infrastructure as Code

This Thursday, the ever-informative DevOps North East (D.O.N.E.) group has a meetup introducing Infrastructure as Code. This is the first in a new series of “back to school” beginner-level talks for people getting into DevOps, so even if you can’t make it this week, it’ll be worth checking out future months’ topics.

The event is being held in the city centre at Campus North, and it’s looking like it’s going to be popular, so I’d recommend registering ASAP at: http://www.meetup.com/DevOpsNorthEast/events/232890542/

Free Technology User Group event in Newcastle

TechUG Newcastle is two weeks today (Thurs 22nd Sept) at the Jurys Inn, Scottswood Road. Some of our team will be there, along with colleagues from the like of Aldi, Draeger, Sanderson Weatherall, Convergys, University of Northumbria, and Newcastle Royal Grammer School.

Speakers include Jason Meers from VMware, Marcus Robinson from Microsoft, Michael Stephenson from Northumbria University, Danny O’Callaghan from VCE, Paul Parkin from Veeam, and others, covering a range of topics including Azure, DevOps, Docker & Containers, Server 2016, HyperCoverged Infrastructure, a VMworld update, vSphere and much more.

You can register for free at http://tug.in/newcastlereg and the event also includes prize giveaways, complimentary teas, coffees and lunch provided, plus networking drinks at the end of the day.

There’s always a lot of good learning and networking to be done at these twice-yearly events, so hopefully we’ll see you there.

Testing before testing

In a previous post entitled Why we use Git, I said this:

When something is checked in to Git, we have VSTS set up to automatically trigger tests on everything. For example, as a bare minimum any PowerShell code needs to pass the PowerShell Script Analyser tests, and we are writing unit tests for specific PowerShell functions using Pester. If any of these fail, we don’t merge the changes into the Master code branch for production use.

Which is really useful, because we don’t want to always have to remember to run PowerShell Script Analyser* against our scripts. When there’s something that you always want to just have happen, it’s best to make it an automatic part of the workflow.

The trouble with this though, is that when you’ve got a number of people checking in their code, someone can push an update into the repo which fails a test, and nobody is going to be able to deploy any of their changes until that failure is fixed, either by the original contributer or someone else. That might be fair enough for something complicated that has dependencies that are only picked up by integration tests, but it’s somewhat annoying when it’s just a PSSA rule telling you that you shouldn’t use an alias, or some other style issue that isn’t really breaking anything.

So the responsible, neighbourly thing to do is to only check in code that you’ve already tested. For PSSA there are a couple of ways we do this. The first is using ISESteroids. This isn’t a free option, so only those of us that spend a lot of time in the PowerShell ISE have a license for this. ISESteroids is probably worthy of another post, but one of its many features will display any PSSA rule violations in the script editor as you’re writing your PowerShell code.

ISESteroidsPSSA

The other method is completely free, using GitHooks. You can use GitHooks to do all sorts of things, but I’ve got one set up to run PSSA prior to commit. This means that any files that Git is monitoring, will have this action taken on them before it commits changes.

To do this, you need to create a folder called “hooks” inside your .git folder. Inside that, I’ve got a file called “pre-commit” (no extension) which contains this:

#!/bin/sh
echo
exec powershell.exe -ExecutionPolicy Bypass -File ‘.\.git\hooks\pre-commit-hook.ps1’
exit

That pre-commit-hook.ps1 file, contains this:

#pre-commit-hook.ps1
Write-Output ‘Starting Script Analyzer’
try {
$results = Invoke-ScriptAnalyzer -Path . -Recurse
$results
}
catch {
Write-Error -Message $_
exit 1
}
if ($results.Count -gt 0) {
Write-Error “Analysis of your code threw   $($results.Count) warnings or errors. Please go back and check your code.”
exit 1
}

Now, if you’re using Visual Studio Code as your editor (as some of us are), you’ll see the output of that script in the Output pane in VSCode like this:

vscodegithooks

This means you can go back and correct them before you push to the team repo and make the continuous integration fail for everyone else, and you don’t even have to remember to do it. 🙂

* You can read more about PowerShell Script Analyser in this post.

Extending Visual Studio Team Services via the Marketplace

As useful as Visual Studio Team Services is by itself, and with its API (we sync our LANDesk tickets with the VSTS Kanban board via the REST API – I’ll write a post about that sometime), it can be made a lot better through the use of extensions that have been created by Microsoft and the community and made available through the Marketplace.

There are a whole load of extensions to integrate with other products to help your team collaboration, build, deployment, testing, etc. All you need to do is click the shopping bag icon in the top right of any VSTS screen to go to the Marketplace.

VSTSMarketplace

One extension which I think everyone should add is Code Search, which has been written by Microsoft themselves. This gives you a handy search tool which you can use to find bits of code in your repo which match a variety of criteria. You’ve got a number of powerful search options to make sure you find what you’re looking for, no matter how big your codebase is.

CodeSearch

The other extension that we use all the time is the Microsoft-written integration extension for the Slack messaging app. We’ll probably have another post in the future about Slack – it’s a great tool for teams doing DevOps style work because of all the integration options that it has. By using the VSTS/Slack integration, we all get notifications (in the Slack desktop or mobile apps) of code commits and automated test results, so we don’t need to open the VSTS website to see how builds have gone.

SlackVSTS

We’ll sometimes commit some code and then stick a comment in the Slack channel for the team if we’re perhaps expecting the build to fail for some reason, and we might have a little group celebration of success in the channel when something we were struggling with eventually works.

Useful, huh?

You can have a browse of the VSTS marketplace at https://marketplace.visualstudio.com/VSTS

PowerShell Script Analyzer

When we check PowerShell scripts in to our Git repository, one of the things that happens automatically is that the Visual Studio Team Services build agent kicks off the PowerShell Script Analyzer to check the code.

This is a module that the PowerShell team at Microsoft have create to help check for best practices in writing PowerShell. Some of the things that it picks up on are just good things to do for readability of scripts, like not using aliases, but others are more obscure, like having $null on the left side of a comparison operator when you want to see if a variable is null – there’s a good reason for that – just trust it. 😉

This means that scripts that don’t comply with the rules don’t get to be automatically deployed into production, which is a good thing, but it also can block someone else’s working code from getting released. That being the case, it might be worth checking your PowerShell before checking it in. Fortunately that’s only going to add seconds on to the process, and it’s quicker than waiting for the results from the build agent.

There are two basic ways to install Script Analyzer. If you install as an Administrator, it’s going to get the best coverage for use on that specific machine, or if you install it for the current user, it’s going to install in your home directory and follow you round to other machines.

Running PowerShell as an Administrator, type:

install-module psscriptanalyzer

Or, running with your normal user account, type:

install-module psscriptanalyzer -scope CurrentUser

PowerShell is going to pop up a warning, saying:

You are installing the modules from an untrusted repository. If you trust this repository, change its Installation Policy value by running the Set-PSRepository cmdlet. Are you sure you want to install the modules from ‘PSGallery’?

We aren’t going to worry about changing the trust, we just need to say ‘Yes’ to this and the module will be installed. (Always be very careful about doing this with any other modules!!)

Now that it’s installed, to check your script once you’ve saved it, you just need to run:

Invoke-ScriptAnalyzer c:\whatever\myscript.ps1

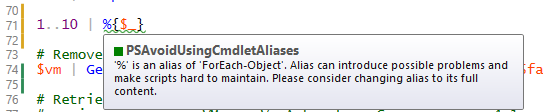
If it’s all good, you’ll see nothing in return (you can always stick a -verbose on the end to see what it’s actually checking as it does it), or you’ll get some feedback about which rules have been broken, which lines they are on, and some guidance on how to get into compliance, like this:

pssa
(
click on the image to see it full size)

If it’s not clear enough from the feedback, a quick web search for the RuleName should give you plenty to go on.

If you want to know more about Script Analyzer and how it works, it’s all open source on the PowerShell Team’s GitHub repository.

Learning to use Git

Using a source control repository is a key aspect of software development, Infrastructure as Code, and DevOps. There are a number of different options for source control, but the one that most of the industry has currently settled on is Git. You can read in our previous posts why we use Git and how we use a Git repository on Visual Studio Team Services.

There are many resources to get you started with using Git, so rather than re-invent the wheel, we thought it best just to provide a few pointers to some of the better ones that we’ve found:

  • Code School has a number of Git courses, including a free introductory one. Code School’s courses are really good because they are mostly interactive. They have free beginner courses for lots of other things that you might want to check out too.
  • Tutorialzine’s Learn Git in 30 Minutes is really well written, covering the key information and then offering links for further reading and a handy cheat-sheet.
  • Branching is one of the most interesting aspects of Git, and a good way to learn all about that is with the interactive tutorial at Learn Git Branching.

You don’t need to go through all of those, but any one of them should be enough to get you going with what we see as a vital skill in the future for sys admins as well as developers.

Setting up a Visual Studio Team Services Git repository

Creating a new repository in VSTS.

1. If you do not already have a VSTS project, you can create a new one from your team home page by clicking the New link under Recent Projects & Teams (if you already have a project, skip to step 3):

1

2. On the Create new team project page, be sure to select Git as the Version Control option. This will automatically create you a Git repository with your new project:

2

3. In the Project home page, you can access your repository by clicking CODE:

3

4. If you wish to create a new repository (because you had an existing project without one, or because you wish to add an additional one to your project), you can click the drop-down at the top left and click New repository:

4

Accessing the repository from your local computer.

First, you’ll need to install the git client; you can download the client from https://git-scm.com/downloads. The default installation options should be fine.

Cloning the repository using Visual Studio

If you’re using Visual Studio, you can clone the repository directly into it from the CODE page:

11

This will open Visual Studio; your repository will be shown in the Team Explorer pane. Click Clone Repository:

5

Then select a location to save your local copy of the repository, and click Clone:

6

Cloning the repository using the command line

If you wish to us a different editor, you can use the git command line tools to clone the repository. First, copy the URL to the repository from the CODE page:

7

Then:

  1. Open a PowerShell window.
  2. Create a directory for the local copy of the repository.
  3. Change directory to that directory.
  4. Type ‘git init’ to initialise a local git repository.
  5. Type ‘git remote add origin <Repository URL>’ to connect to the remote repository.

10

You can now access the repository from any editor and manage it using command line tools (or any tools that the editor provides). If you wish to use Visual Studio Code, simply click File->Open Folder and point it at the folder. If the git pane looks as follows, it’s worked:

9

Next steps

Git is now connected to the remote repository and ready to use. A future blog post will give an overview of how git works, and what the common commands that you need to learn are.