Launch of the Centre for Cybercrime and Computer Security

Tuesday 9th February is the EU’s Safer Internet Day, and the University’s recently formed Centre for Cybercrime and Computer Security is getting involved by hosting a half day event to raise awareness in order to protect young children from dangers on the internet. This will take the form of interactive workshops for parents and children.

This will be followed on Wednesday 10th February by the official launch event of the CCCS with a group of presentations on a range of topics including Counterfeiting, Internet Grooming, Gambling Websites and Security.

Both events will be held at St.James Park.

For more details, head over to http://cccs.ncl.ac.uk

Filestore Best Practices #3: Only ever assign group permissions even if the group has only one member.

Assigning the permissions to Filestore resources is easy but managing permissions for an expanding volume of data in an ever evolving department is not. It can however be made easier by only using security groups.

Most people reading this will look after Filestore resources which are accessed by various people within their departments. The data structure may be made up of hundreds or even thousands of folders for which a complex set of permissions are required.

The problem with assigning individual users permissions is that there will come a point eventually where you will not be able remember who a user (let’s call them) n563456 is, why they were assigned permissions and if they should still have access. The situation would be worse still for someone taking over or assisting with management of the resources.

The best way to avoid this is to never assign individual users permissions on a resource but to create a Security group even if only one user will be the only member in it.

This will allow you to do the following:

Give the group a meaningful name.

For example, calling the group HR – Directors Shared Filestore (Read\Write) will help you identify it’s function, level of access and who should be a member at a glance.

TIP: Prefix all of your group names with your departments name e.g. ISS XXXX XXXXX. A group called ‘Research Shared Folder’ will not be as easy to find.

Allow you to add and remove users without having to browse to the resource.

It’s much easier to open the ADUC snap-in and add to or remove from a group than it is to browse to a nested folder and examine the ACLs.

Avoid Ghost s-ids

Ghost sids occur when an account has been deleted but the permission persists on the resource.

Document, audit and manage access from one place.

You can add comments to groups and manage all of your permissions from one central location, perhaps by a regular review of group membership.

Make things easier on team members or your successors.

By using a group based approach new team members and your successors will be able to easily see changes and see how permissions are configured.

SUMMARY: Never assign individual users permissions to a Filestore resource as they will grow too complex. Only ever use groups even if there is only one user on it and always add a description to the group.

Connect From Anywhere using the Terminal Services Gateway

Posted by popular demand on behalf of Adele…

The TS Gateway service allows you to connect to your work PC from home or other off-campus locations, even when your work PC is on an internal University network (i.e. 10.x.x.x IP address). Used in conjunction with Wake On Lan. This gives you 24 hour access to your on-campus PC.

To use the service you must ensure that you have the latest Remote Desktop Client installed on the PC from which you are connecting back into work. If you are running Windows Vista or Windows 7, you should already have what you need. If you are running Windows XP or earlier, you may need to visit Microsoft.com and download a later RDP client.

Instructions

Prerequisite: the work PC must be set-up to allow Remote Desktop Connections and you will need to ensure that the ID that you are using is in the Remote Desktop Users group on the PC.

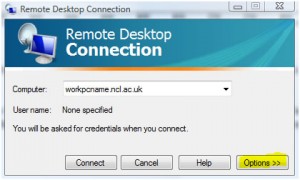
Launch Remote Desktop Client (you’ll find it by browsing to Accessories or just click Start…on Vista or Windows 7 (or Start.. Run if on XP) and type in mstsc and press Enter)

Click on Options as shown below:

Remote Desktop Connection options

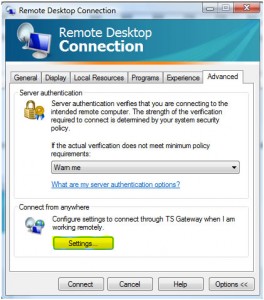
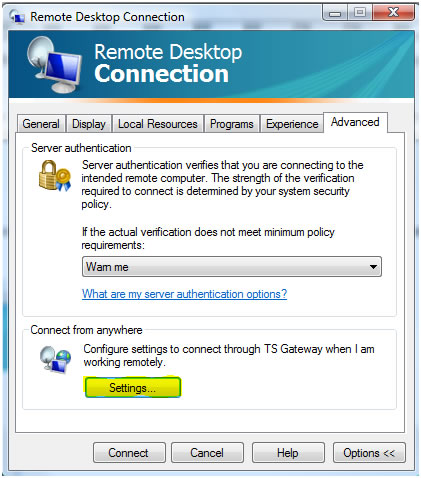
Click on Advanced and then Settings as shown below:

Remote Desktop Connection Settings

Complete the TS Gateway settings precisely as shown below:

tsgateway settings

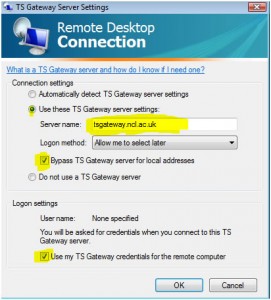
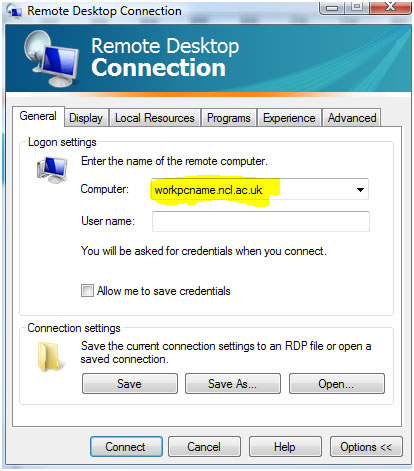
Click OK, and go back to the General tab. Enter the name of your work PC plus .ncl.ac.uk:

Enter the name of your work PC plus ncl.ac.uk


Click Connect. Enter an id that has rights to log on remotely to the PC. For example:

Enter credentials

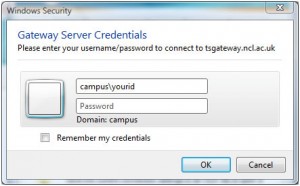
Click OK. (You can use a local ID, but you’ll need to qualify it by using machinename\ rather than campus\

Setting up a Vista or Windows 7 PC for remote access

Click Start…

Right-click Computer and then select Properties.

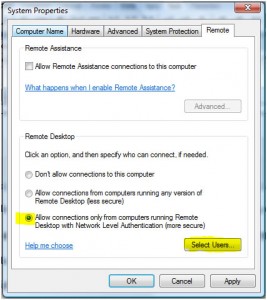
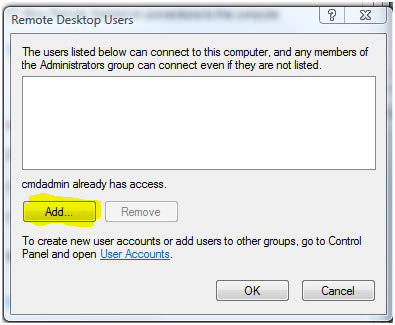
Click on Advanced system settings and, if prompted, supply the credentials of an account that has admin rights to the PC. Click on the Remote tab and Select Users:

Setting up RDC - remote tab

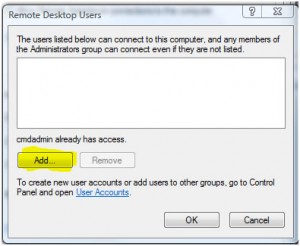
Add the accounts for any user that you want to be able to remotely access the PC:

Add users to RDC permissions

Then click OK… OK. All done.

You should test the settings from another on-campus machine before attempting to connect from off-campus.

The procedure is more or less the same for Windows XP but you will need to be logged on with admin rights before starting.

When using the above service, it is strongly recommended that you ensure your home PC is fully up-to-date with Windows Updates and is running good antivirus/antispyware software. Be sure to adhere to the University’s Computing Rules of Use at all times, and take care to protect sensitive and important data from unauthorised access as you would when working directly on-campus.

Configure Bitlocker in Windows 7 on a TPM enabled machine.

Introduction:

This guide is an update to my earlier post on Bitlocker in Windows Vista.

BitLocker Drive Encryption is an integral security feature in the Windows Vista and Windows 7 operating systems that provides considerable protection for the operating system on your computer and data stored on the operating system volume. BitLocker ensures that data stored on a computer running Windows Vista remains encrypted even if the computer is tampered with when the operating system is not running. This helps protect against “offline attacks,” attacks made by disabling or circumventing the installed operating system, or made by physically removing the hard drive to attack the data separately.

This guide demonstrates how to configure a basic installation of Bitlocker with a TPM Enabled machine and assumes you are performing a clean build on a new machine using a network based WDS build.

Important things to remember before you begin

  • Bitlocker is particularly recommended to users of Laptops within the University.
  • Backups are more important than ever on encrypted disks as recovery will be all but impossible if the disks hardware fails.
  • Changing a systems hardware will cause the TPM to react and have the system lock down. This can easily be fixed by using the Bitlocker recovery key but only if you still have it!

Prerequisites

A Machine with a TPM chip
Windows 7 Installation media (DVD or WDS install)

1. Build the machine as normal. Unlike Windows Vista, Windows 7 automatically creates (and hides) the tiny system parition required for drives encrypted with Bitlocker to boot.

2. Once the machine has finished building restart and enable your TPM in the BIOS if it is not already. There does not seem to be any convention on how the TPM is referred to but with HP machines it is so as the ‘Embedded Security Device’

3. Logon to Windows and navigate to Control Panel\All Control Panel Items\BitLocker Drive Encryption.

Bitlocker

4. Select the drive you want to Encrypt.

Bitlocker

5. Choose a method of saving your recovery key.

6. Check the ‘Run BitLocker system check’ option.

Bitlocker

7. Finally restart the machine. After logon you will see a notification that the drive is being Encrypted.

Bitlocker

Advanced NTFS Permissions

Much time can be saved by making use of Advanced NTFS File Permissions. I found the following article at builderau.com.au which gives a good description of Advanced NTFS permissions.

You can also see some other information on basic permissions and some recommendations in my earlier post.

Traverse Folder/Execute File: Users can navigate through folders to reach other files or folders, even if they have no permissions for the traversed files or folders. The Traverse Folder permission takes effect only when the group or user doesn’t have the Bypass Traverse Checking user right in the Group Policy snap-in. (By default, the Everyone group has the Bypass Traverse Checking user right.)

List Folder/Read Data: Users can view a list of a folder’s contents and data files.

Read Attributes: Users can view the attributes of a file or folder, such as read-only and hidden. (NTFS defines these attributes.)

Read Extended Attributes: Users can view the extended attributes of a file or folder. (Defined by programs, extended attributes may vary.)

Create Files/Write Data: The Create Files permission allows users to create files within the folder. (This permission applies to folders only.) The Write Data permission allows users to make changes to the file and overwrite existing content. (This permission applies to files only.)

Create Folders/Append Data: This Create Folders permission allows users to create folders within a folder. (This applies to folders only.) The Append Data permission allows users to make changes to the end of the file, but they can’t change, delete, or overwrite existing data. (This applies to files only.)

Write Attributes: Users can change the attributes of a file or folder, such as read-only or hidden. (NTFS defines these attributes.)

Write Extended Attributes: Users can change the extended attributes of a file or folder.

Delete: Users can delete the file or folder. (If users don’t have the Delete permission on a file or folder, they can still delete it if they have the Delete Subfolders And Files permission on the parent folder.)

Read Permissions: Users have reading permissions of the file or folder, such as Full Control, Read, and Write.

Change Permissions: Users have changing permissions of the file or folder, such as Full Control, Read, and Write.

Take Ownership: Users can take ownership of the file or folder. The owner of a file or folder can always change permissions on it, regardless of any existing permissions that protect the file or folder.

Filestore Best Practices #1: Don’t give full permissions unless you really need to!

A large proportion of the calls to helpdesk relating to the Shared Filestore Service (Turrets) are around broken permissions with the Share Administrator and often the Server Administrator permissions being removed. This can interfere with day-to-day operations , backup procedures and become a real problem when it becomes necessary to copy data.

Even more worryingly there have have been occurrences when users have removed folders so that the Share Administrator cannot even see that the folder exists!

Looking over some random shares it seems that nearly all of the folders assigned to users are set with ‘Full Control’. This is not necessary for users to have read\write access.

Let’s have a look each type of permissions and what it really means:

Full Control

Change permissions and take ownership, plus perform the actions permitted by all other NTFS file permissions

Modify

Modify and delete the file plus perform the actions permitted by the Write permission and the
Read & Execute permission

Read & Execute

Run applications plus perform the actions permitted by the Read permission

Read

Read the file, and view file attributes, ownership, and permissions

Write

Overwrite the file, change file attributes, and view file ownership and permissions

The problems we have are often around a poor understanding of permissions but usually caused by end-users with ‘Full Control’ who try to set permissions themselves. In 99% percent of cases this is not required and users who need to work with and change files in a folder can accomplish this with ‘Modify’ access.

Modify

SUMMARY: Look at your folders. Do the assigned users need to have rights to change permissions? If not, take them away by changing ‘Full Control’ to ‘Modify’.

TechNet Conference goes virtual (19 June 2009)

From Microsoft:

We’re pleased to announce the launch of the very first TechNet Virtual Conference taking place on 19 June 2009.

You told us that time and budget pressures make attending in person events difficult – so to help both you and the environment we decided to take the TechNet Conference virtual. Now you and your colleagues can join us to get a flavour of some key Microsoft technologies from the comfort of your own desks.

  • Windows 7 – Deployment and Management
  • Windows Server 2008 R2 – 10 things to make life easier for IT Pros
  • An overview of Office Communications Server R2 and voice capabilities
  • The trials and tribulations of SharePoint implementation

We are also really pleased to announce an exclusive Keynote featuring Mark Russinovich, Microsoft Technical Fellow specialising in the Windows platform.

And that’s not the only difference this year. In addition to Microsoft technology news and product overviews from the experts, the TechNet Virtual Conference will also feature a second auditorium focused on IT Management, including:

  • How IT will change over the next 10 years and why you should care – an exclusive session delivered at TechEd EMEA
  • Growing the Business and Managing Costs at Microsoft – An Insider’s View, presented by Asif Jinnah, IT Manager, Microsoft UK

Click here to see the full agenda.

http://technet.microsoft.com/en-gb/dd819085.aspx