Thing 12: Using styles and templates in Word, an introduction

Consistency in document presentation is something that has come up several times recently, alongside using document templates.

One way of ensuring that documents we produce have the same consistent approach is to use styled templates in Word.

What are the advantages of using styles?

By agreeing to use styled templates we can ensure that we are consistent in presentation. When styled documents are converted into PDFs, the software uses the styles as a way to generate indexes, bookmarks etc that have a cascading hierarchy. This makes navigating longer documents easier for the reader, and for screenreaders.

  • You can auto-generate a table of contents.
  • You can move pages and numbered paragraphs around within a document and the page and paragraph numbers change automagically saving you time and frustration.
  • You can move well formatted text easily between Word, PowerPoint, Excel and even websites.
  • If you receive a styled document and want to take content from it into another document, using the paste and match styles function in word makes it match the rest of your document beautifully.

Mastering styles is worth doing as it will save you a lot of time in future.

Your task

There is a good online tutorial from FMS on using styles effectively in Word.

Work through it, and then think about whether or not a styled set of LTDS templates would be useful or not, and why or why not.  Add a comment to this post with your thoughts, and as Mrs Merton might say “Let’s have a heated debate…”

Thing 11: Writing for the web, the LTDS website and blog

With the migration to a revamped website, and the relatively recent advent of the learning and teaching blog with its related host of social media accounts, it’s probably about the right sort of time to have a little reminder of good practice in how to alter your writing style for presenting information on the website, or for putting together a blog post for the learning and teaching blog.

Whilst Katie C and Claire are our blog and social media leads in the team, there is nothing to stop anyone in the team putting up something on the blog, and most of us probably have some area of responsibility on the website. So getting into practice with writing for the web and blogs is something we should all be doing.

This thing is not a technical how to. It’s more about when you know you have something to add to the website or blog, how you identify what goes where, and a reminder of the guidance which has already been put together, which you might like to bookmark for future reference. Go to /TeamSecure/Website/Website_content_update September_2015 – this folder contains a great deal of useful information about the website including guidance on writing for the internet and a writing a blog post.

Website, blog or email?

  • As a general rule of thumb, if what you want to tell people about is fairly time specific, its probably best on the blog.
  • If your content is fairly ‘newsy’ its definitely the blog.
  • If there is some long standing or non time specific content its probably best on the website. But you might want to tell people about it, which might warrant an explanatory blog post pointing to the website.
  • Consider if your message/content relates to a very specific audience. If it might be relevant to more that one group of people, a blog post might be better than writing an email, and then composing a short email pointing to the blog post.
  • Writing blog posts rather than sending out emails endorses our values of transparency too – content is public rather than ring fenced to certain groups.
  • Are you sending out a set of slides from something? Put them in a blog post, and you can point more people to them.

I’ve got nothing interesting to say

All of us have interesting things to say about what we do. Our job is about communicating. And the more we tell people about what we do and how we can work together, the better our colleagues will understand what the service does, and what its value is to the organisation.

Communicating what we do isn’t down to one person who has that word in their job title. It’s down to every single one of us.

Have a go

Think about what you are doing in your job currently. Is there an aspect of it that people should know about? Using the blog you set up on day one of 23 Things and have a go at using the guidance to help you to write an update on one thing you are currently working on.

If you would like some feedback on it, you can talk to Katie, Claire, Graeme, Nuala or Suzanne.

If you hear someone else talking about their work and you think its interesting, you might like to suggest a blog post to them.

Thinking about putting stuff on the blog is a mindset. And it takes a little while to get into thinking about blogs as a primary mode of communication. But don’t be put off – posts can be really short.

Here’s a good example from one of our colleagues in Computing Science who has written briefly about developing the Cyber Security free online course.

There are loads of good examples from this blog, so scroll through and see what kinds of content is being added.

I need more help

Talk to Katie, Claire, Graeme, Nuala or Suzanne.

Thing 10: Attribution matters

cc_by_cake

cc-by cake © Suzanne Hardy, 2005 CC-BY 3.0 Unported© © © ©

You’ll probably all have heard me blether on and on (and on) about copyright in the three years I’ve been with LTDS. It’s a passion of mine. No idea why. I think it might be because I think giving credit when you use someone else’s work is really important. And just plain good manners.

The Copyright, Designs and Patents Act 1988, is the current UK copyright law (the UK Copyright Service has a really good user friendly summary). It gives the creators of literary, dramatic, musical and artistic works the right to control the ways in which their material may be used. And in the UK copyright always exists. If something is recorded, copyright exists automatically. You don’t have to register it anywhere. It just exists. You can register copyright with the UK Copyright Service, but it isn’t a requirement. 

Giving credit – acknowledging whose work you have used, where and how – is known as attribution.

In academic written work attribution is generally given via referencing, citation, quotation or reproduction (especially in the case of a visual piece of work) – and substantial quotation or reproduction would fall under copyright law. There is a really good guide to referencing by the Library. And that’s usually fine as long as you follow referencing guidance. Where you are using a substantial portion of someone else’s work then you should seek permission to use it, unless fair use is covered by licensing. The University has many licenses in place to allow for using copyrighted work in education. There is another excellent libguide on copyright and IPR that is definitely worth bookmarking.

Attribution is just as important with teaching materials, and even with administrative documentation.  It’s just good manners, and since the most recent changes to copyright legislation, a legal requirement.

So how do I attribute the work of others in non academic documentation/resources?

Wherever possible we should adopt the Harvard at Newcastle style of referencing outlined in the library guide. This includes guidance on citing newspapers, web pages, secondary referencing (where you’ve come across a summary or a mention of another author’s work in the source you are reading) and has some interactive examples and FAQs.

When should I give credit?

Always. As Nuala says a good way to win friends and influence people.

By consistently given credit where it’s due, you avoid claims of plagiarism, you demonstrate your understanding of a subject/area of work, illustrate good practice – something we should all strive for in the service – and comply with UK copyright law.

Yes, even with openly licensed materials (such as those licensed under Creative Commons). As we don’t have the concept of ‘copyright free’ in the UK I’d even go so far as to give credit even when using CC0 materials.

How do I give credit to openly licensed materials?

However the copyright owner has specified. There is excellent attribution guidance on the Creative Commons website.

What is fair use?

An oft-asked question is Doesn’t education fall under fair use? My response is always It depends, if in doubt ask for permission. In the case of potential copyright infringement its best to ask up front. See the UK Copyright Service factsheet on Understanding Fair Use.

With the 2014 changes to copyright law, some exceptions were introduced. Exceptions to copyright: education and teaching is a short 16 page document – basically its now a legal requirement to attribute others work in exchange for being able to use it under licensed circumstances, or under fair use.

This is further complicated by the tendency for people to share on the worldwide web. Fair use would probably never apply to anything that appears on a web page. So its important to seek permission in this case.

I’d like to know more

The Top 10 Copyright Myths page from the UK Copyright Service are a good place to start. Or you can use the teachingcopyrightadvice@ncl.ac.uk email.

Thing 9: Images in PowerPoint

Being able to use images in PowerPoint can really enrich any slides you put together, enable better visual storytelling, and make for more compelling and memorable presentations. But adding lots of images and video clips can make your presentation file size grow very large very quickly. There are a few tips and tricks we can use to ensure that we make sending presentations to others and presenting elsewhere as easy as possible. But before we get to that we should consider the visual identity for the team and representing LTDS.

How should my slides look? Is there a LTDS template?

We should be using the recommended University PowerPoint templates in the Conference Toolkit for everything we do, so you might like to bookmark these links. The template generally change year on year, so its worth downloading a new template from these links every now and again to make sure you are using the most up to date version.

What if I don’t use PowerPoint?

Online presentation tools such as Google slides. Prezi or the paid for version of Haiku Deck also have options for using PPT templates, so that we can maintain a consistent visual identity for the service, and for reducing file sizes, which can make your presentation load more quickly.

Practice makes perfect

Download the current Key Facts and Figures template. This is a visually rich template that you can play around with. We are going to add some images and video.

Adding, cropping and resizing images

There is a good Microsoft tutorial on reducing file sizes of pictures. Take a read. You might like to bookmark this too.

After reading it, try the following:

  • Crop the picture on the last slide to focus on the two figures walking towards you, and delete the cropped areas only for this picture.
  • Change the default picture resolution for the whole presentation to 150ppi.

Learning more about using PowerPoint well

Thing 8: Excel – some quick reminders

This week brings a tapas of excel goodies, do feel free to try out one or more of these offerings to suit your appetite.  You’ll need to download the thing8 sample worksheet [ thing8excel ] – but by all means do try this on your own data too.

Setting print areas

thing8-printareas

Be kind to the person you send your lovely data to.  Define the print areas and repeat the row titles if it spans more than one page.

Try this out on the Biscuits Consumed sheet

  • Set the print area to the first 4 columns
  • Use print titles to repeat the first row
  • Use View/Page break preview to check it is good.

Autofilter

Autofilter can help you explore your data. The “Biscuits consumed” sheet holds data from a follow on study catalysed from the biscuit world cup – this time participants chose one biscuit per day and gave it a score.

  • Select the 4 columns making up the table and click “sort and filter” and select “filter”

thing8-sortandfilter

  • Use the drop down menu on the column headings to try a few things out eg:

thing8-filter

  • sort the biscuits A-Z
  • select just the Fruit Club results
  • On the comments heading use “Text Filter” to look for all rows containing “choc”
  • Clear all filters before you go on…

Pivot Tables

We often get information that we need to summarise. Pivot tables can make this really easy.

On our biscuit example we might like to ask “how may times was each biscuit chosen?” and “what was the average score for each biscuit?”.

Here’s what to do:

  • select the first three columns
  • Click on the Insert Menu and select Pivot Table
  • accept the defaults to create a new worksheet

thing8-pivot

  • Drag “biscuit” from the field list to the rows area and drag score to the values area
  • If you like drag, score into the values area a second time, click on it and change the “value field settings” to give average of score.
  • See if it matches the Answer to Biscuits Consumed sheet.

Absolute and Relative Referencing

If I have not yet exhausted your appetite for Excel tapas, here’s one that has its own shortcut key (F4).

By default Excel always uses relative referencing.  If you copy a cell four rows down, any formulas in that cell are updated to point to the corresponding cells four rows down.  You might not always want this, and the good news is that you can override it by using $ in the formula.

To try this out have a look at the sheet labelled MyShares.  (This relates to an alternative reality where you have enough spare cash to have some shares and time to ponder how they will grow in a variety of scenarios).

We need to copy the formula in cell E5 to fill the other areas and work out how our shares may grow.  At the moment the formula is

=D5*E4

A fruit club goes to the first 3 people who can tell me by email where to add two $ signs!

(See this Microsoft article if you need a hint!)


Thing 7: Sending big files

We often have to send large files to folks by email. And I’ll bet you have had either bouncebacks telling you the recipients mailbox is full, or a message saying the email failed to send, or you get a phone call from the recipient saying they haven’t had the attachment, or even the email.

Frustrating, eh?

There are lots of easy ways around this, which mean you can send big files (without clogging up yours or anyone elses mailbox) like graphics heavy PDFs, high resolution images, image heavy PowerPoints or video/audio files really easily.

Can you think of a time when this would have been useful?

Why is this important?

Avoiding sending big files by email is a good thing. Even though many companies are moving towards cloud based email solutions with gigabytes more space per person than ever before, a couple of video files can easily eat up a great deal of space, which is annoying for the person whose inbox is being filled up, and furstrating for you as you may have to try sending the file more than once. And even then the quality may have been compromised.

By using a specific service for sharing big files you can ensure that the version of the file your recipient gets is the same quality as the one you send. Your email will sometimes compress the files without you necessarily being aware of this, which can mean that time (and inbox space!) is wasted as you attempt to ensure the recipient gets what is expected.

If you use a service like Dropoff, you will get a receipt to tell you that your file has been sent successfully, and when it has been picked up.

How can I send big files, then?

  1. You can use the University’s own Dropoff service: dropoff.ncl.ac.uk It works best with your campus login. One logged in you get three options. Usefully, you can also use the service to request big files from other people too!
    Choose Drop-off. You’ll get a screen like this:
    Screen Shot 2016-03-15 at 14.15.10
    Choose Next.
    You’ll get this:
    Screen Shot 2016-03-15 at 14.16.38
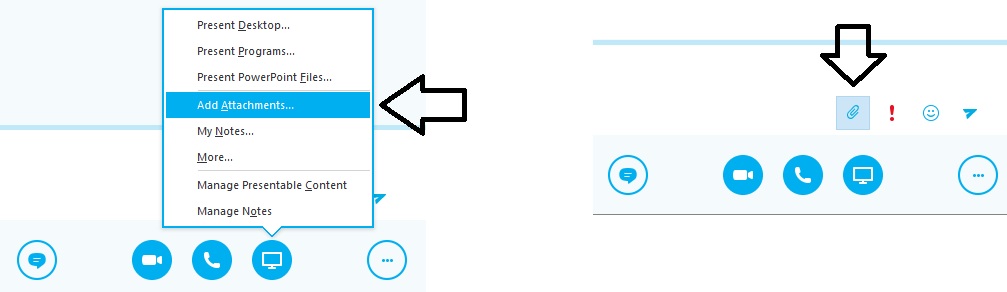
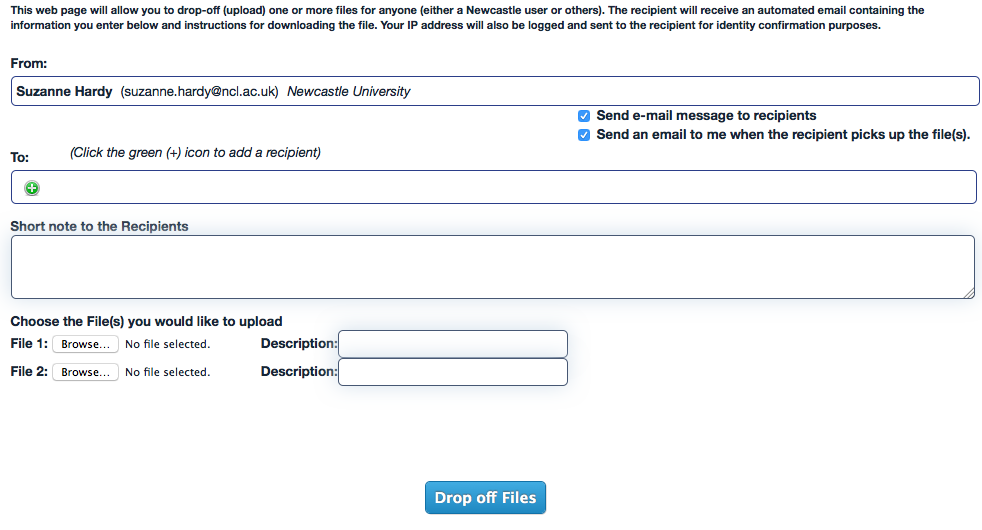
Fill in the form, browsing to the file/s you want to send. Then click Drop off files and you’re away. You’ll get a drop off summary screen and once the file/s have been picked up you will get an email notification telling you who picked them up and when. There is further information on the NUIT website.
  2. You can also use Skype for Business/Lync. This is useful if you are involved in a Skype/Lync call and need to share a file quickly.  You can attach the file to a meeting in a couple of ways.
    sendingFilesWithSkype
  3. There are lots of other options like:
    1. Dropbox – this is popular and very easy to use, though for University business it is recommended to use the Dropoff service.
    2. Use a shared drive/filestore, save the relevant files to it and send a link by email to navigate to it – though the recipient must also have access to the shared space for this work.
    3. Create the files from scratch with collaboration in mind – see Thing 3

Practice sending and picking up big files

Pair up with someone in your office. Try sending a big file to each other using Dropoff or Skype for Business. Was it difficult? How easy is it to pick them up?

Thing 6: Get Outlook to work for you

outlook1

Is email a headache? This thing is a chance to step back from your inbox and think about what you could do to make it work for you.

A quick poll of LTDS colleagues  suggest that the following techniques work:

  • Use folders to hold emails on different topics
  • Colour code items to indicate whether actions are needed
  • Set reminder flags
  • Use rules to delete or move messages that fit particular conditions

Here are three scenarios by way of examples:

  1. You anticipates lots of emails from a particular source that you only need to look at once or twice a day.
    eg:  You have created a form that sends you an email or a Doodle poll and want to keep track of responses, but only want to look at this once every couple of days while it is open.
  2. You want to watch out for certain routine and regular communications and make sure you read them
    eg: You want to make sure you jump on Richard’s weekly update from the Strategy Group
  3. You are part of a small project team of 5 people and want to easily identify communications about this project.
    eg: I work with Angela and Catherine on the Dementia Care free online course, and with Steve, Kovila and Martin on the Cyber Security one. We sometimes use a mailing list and other times communicate with each other individually.

I’ve used these scenarios to illustrate a few things that are possible with rules.  Work through one or two, translating them to your own context. Or, if you like consult with one of the team’s uber-organised colleagues to help you fix something immediately useful to you.

If you are new to rules you may want to have a look at one or two Microsoft training videos.

Scenario 1: Lots of emails from a source that you only need to look at infrequently.

This is crying out for a rule.  One option is to create a folder and move all responses automagically to the folder.

  • Right click on the email message

outlook2

And select Rules

outlook3

  • Then fill in the boxes and click OK.

outlook5

Scenario 2: Watch out for important communications and flag them

Let’s highlight all strategy group updates and flag them.

  • First off find one in your inbox and right click on it.
  • Click advanced options

outlook7

  • Click Next to move on to “What do you want to do with the message?” screen and select “flag message”
  • Click “follow up at this time”

outlook6

  • Select when you want it to go red

outlook8

  • Click through the dialogue boxes to make the change.

Now these will be flagged – you can tick them when read and digested and move them to folders if you want to keep them.

Scenario 3: Colour code items from particular people

Outlook  gives us the possibility of creating custom categories.  You can edit categories in use in Outlook and add new categories, by clicking  the arrow at the bottom of the Categorize button.

outlook9

But, helpfully, you can also do this on the fly in the process of creating a rule.

Here’s what I want to do: assign all emails from the Lynne, Catherine and Angela to a new category “Dementia”.

Create the rule;  in the “Which conditions?” box select the “from”

outlook10

You can add extra people to the list in the rule description box by clicking the underlined value:

outlook11

Then  click next to go onto “What do you want to do with the message?”

outlook12

  • Click category in the bottom part

outlook13

  • Add a new category

outlook14

Now, presto, everything from this project team is signaled on my inbox.

For your blog/comments on this post

Which strategies do you use to manage email?  What have you done/will do as a result of thinking about this thing?

Thing 5: naming conventions (aka “The joy of an ordered sock drawer”)

We all know that giving files sensible names when we save them saves time, just as pairing your socks before they go in the drawer brings a certain joy later.

In this thing we’ll dare to look at our own file naming practice and see what we can learn.

First off let’s be realistic:

If you start a new project or venture chances are you’ll give it a folder and then start saving stuff. But, you don’t always know how many things you will need to save as the venture progresses.  So it’s normal for the filing structure to evolve to a degree.

Quiz

I’m going to invite you to have a go at helping me rename some of my files and sort out some ideas.

We’ll use some examples taken from the project we have just started to develop a Cybersecurity MOOC.

dodgyFileNames-NMD

.. and we’ll do this via a Typeform Quiz – so please click this link below before reading on:

GO to Quiz 

A few pointers

  • Filenames should be meaningful, and if you are collaborating with others they need to be meaningful all round.
  • If dates go in the names then do think about these being “sortable” in some way.
  • “2016-03” will often be better than “March”
  • Avoid spaces (totally) on files on the web – they’ll generate URLS with % signs in.
  • Whilst Windows is not fussed if you call something “stuff.txt” or “Stuff.txt”, it’s a different story on many of our unix webservers so lower case filenames are more web friendly.
  • Having a quick strategy for sending someone a pointer to a file is really useful to have up your sleeve.

Ultimately, in teams filenames and directory structures need to be negotiated, perhaps something for your next team meeting!

For you to thing about

Add a comment to this post or write a note in your own blog to share any top tips.  Please add any resources that you have found helpful.

Some of us, like me, know that we can do better. Following the shame of looking at my own sock drawer I have renamed my files.


Thing 4: Screen Sharing

Have you ever spent far too long explaining something to somebody, whilst trying to work out what they were actually seeing? If you have, then screen sharing may make your life easier.

In this thing we’ll have a look at screen sharing using Skype for Business and Skype. You need to team up with a colleague as it’s kind of difficult to screen share with yourself.

Skype for Business

Office2013 is now fairly standard across campus so we can be relatively sure that everyone has access to Skype for Business (previously Lync).  You don’t need a web-cam or microphone to screen share, you just need to both be signed into Skype for Business.

We’re going to share a screens and permit our buddy to take control of our desktop. There are some step by step instructions below.  (If you’d rather dive in go to this Microsoft Article.)

If your buddy is an different office you may want to call them up on the phone while you do this.

  • Launch one of the applications you commonly talk to people about (EvaSys, Policy pages on the website, Blackboard, maybe even eportfolio)
  • Start Skype for Business, by searching for it in your Start Menu or Finder.
  • Sign in using your Office365 address campusid@newcastle.ac.uk  eg:

  • After Skype for Business loads, start typing in the name of your buddy…. I’ll pick on Graeme

skype1

  • Double click on your buddy’s name to start an instant message conversation.
    It’s polite to offer some suitable salutation at this point, you’ll need to press enter to send the message.

skype2

  • Once you have your buddy’s attention, click on the “Present” icon at the bottom of the Skype for Business window:

skype3

You’ll see we can present a variety of things….for now

  • click “Present Desktop”

Your buddy will receive a notification – they’ll need to click to accept the meeting content.

  • Entertain your buddy by clicking on a few things in your chosen application.

Now the scary bit.

  • On the sharing toolbar at the top of the screen click on “give control”  (NB: sadly Mac using colleagues  won’t have this option)

Your buddy will now be able to move around your desktop clicking things at will. If they become a little cavalier remember that you can use the sharing toolbar to Take back Control. 

  • Now, swap roles, ask your buddy to share her/his screen with you and see how they feel as you rearrange their icons.
  • Try out presenting “programs” – you may be more inclined to let someone take control here!

On a more serious note screen sharing (without taking control) can be a most excellent way of talking somebody through a difficult task.  The explainer and explainee get to see the same thing and confusion is much diminished.

Skype (Free)

A few releases back Skype had an update that brought screen sharing into the standard product.  If you haven’t tried this it’s worth giving it a go, check out the instructions

For your blog

Drop a line or two about how you got on with this, where you think this may be useful, and perhaps any notes on other screen sharing apps you may have used.


Thing 3: Collaborative Tools

Sending documents backwards and forwards for review is lets face it …. “so last century“.

This weeks thing offers a chance to experiment with documents that can be edited at the same time, with the bonus that there is always ONE (and one only) up to date live version.

onenote

OneNote

  • Open the document from the email we’ll send out on Tuesday (if we forget you can edit it through your browser with this link http://bit.ly/OneNoteThingy)
  • Follow the instructions to edit the notebook
  • Add in your review(s)
  • Add a thought or two to the summary

GoogleDocs

Now, I admit not everyone is a OneNote fan, so if you get to a point where you want to abandon ship then have a go at copying or writing your reviews in this GoogleDoc which is roughly equivalent.

The Good News

No blogging requirements this week.  It’s a collaborative exercise so we’ll use our Summaries collected in OneNote and GoogleDocs to come up with a team statement.  Any volunteers?