Check Your Spelling and Grammar as You Type

Content evaluation tools, like Siteimprove, help you to fix problems like misspellings on your live website. But what about catching the mistakes before they’re made public?

For the past month or so I’ve been testing a browser-based spelling and grammar checker that highlights any issues as you type. It’s called Grammarly. You might have seen one of their ads as you’ve waited for a video to play on YouTube?

Add the browser extension to Chrome and you’re ready to go.

The extension works in most browser-based text editors, from webmail to social media and of course, T4. As you type you’ll see errors highlighted in red. When you hover over them an explanation of why they’ve been picked up is given along with suggested corrections. Just like the spellchecker in Word, you can review the identified errors and choose to accept or ignore them.

Screenshot of Grammarly spelling correction in T4

You can choose to sign up for a free account (although it’s not necessary) to get access to additional features:

  • choose British English rules for spelling, punctuation, and grammar
  • add words to your personal dictionary
  • write directly in Grammarly or upload documents for checking

It’s not perfect, and I’d advise you to read the explanations and use your judgment as to whether you accept them or not. It’s also not a substitute for proofreading your content before it’s published, but it’s a pretty good tool to help you take a step towards minimising spelling mistakes and grammatical errors.

Share this post:
Share

Use Siteimprove to Find Which Sites You’re Linking To

We’re asking our editors to make sure that all links in web content link to the correct destination page. This will reduce the number of broken links in our websites

You can check what links are on your website and where they are linking to with Siteimprove’s Inventory module. You can also use the section link in T4 to link to web pages within the content management system.

Section links in T4

In T4 using a section link reduces the number of broken links on your website. If the page being linked to moves within a site structure the link is maintained. If the page being linked to is deleted the link will be removed from content.

Over 50% of our websites are now in the content management system, so you can link to most central and school websites with a section link.

Find out which sites your website links to

Before you can update your website links you need to find out what links are in your web pages.

You can use Siteimprove’s Inventory module to see a list of all links used in your website. The inventory also helps you find the page where a particular link is used.

The inventory also shows you links that use a redirect and the correct destination for that link.

To help you work through your website and update your links you can also export a list of links as a spreadsheet.

How to use Siteimprove’s Inventory module

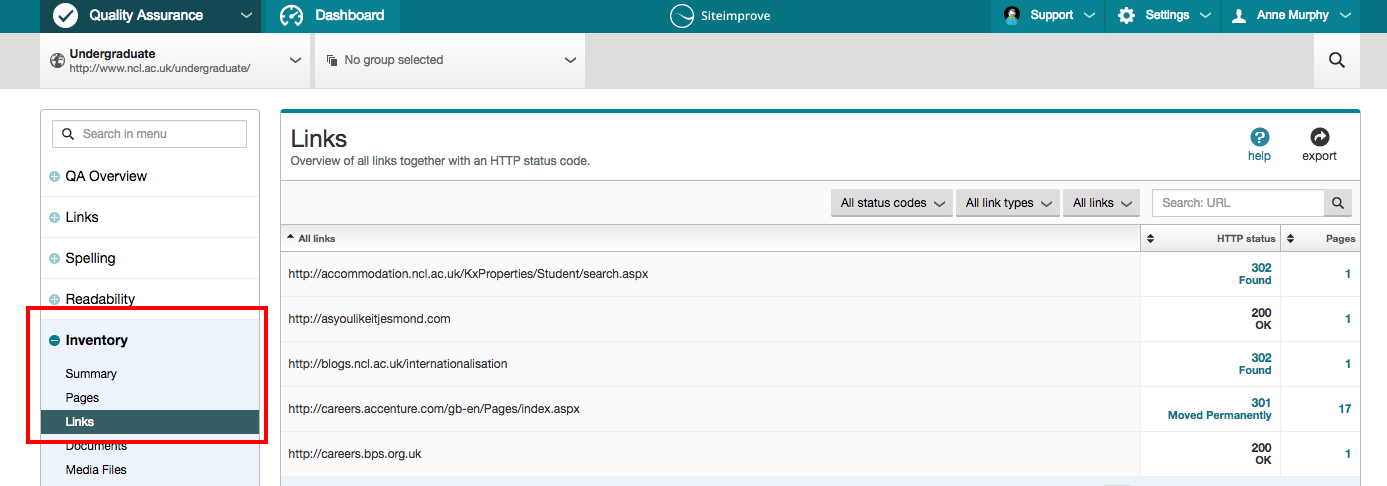
You’ll find a link to the Inventory in the left-hand panel of your Siteimprove report.

Click to expand the menu and select ‘Links’ to see the list of links used in your website content:

Siteimprove Menu panel and inventory tab

Siteimprove Inventory Tab

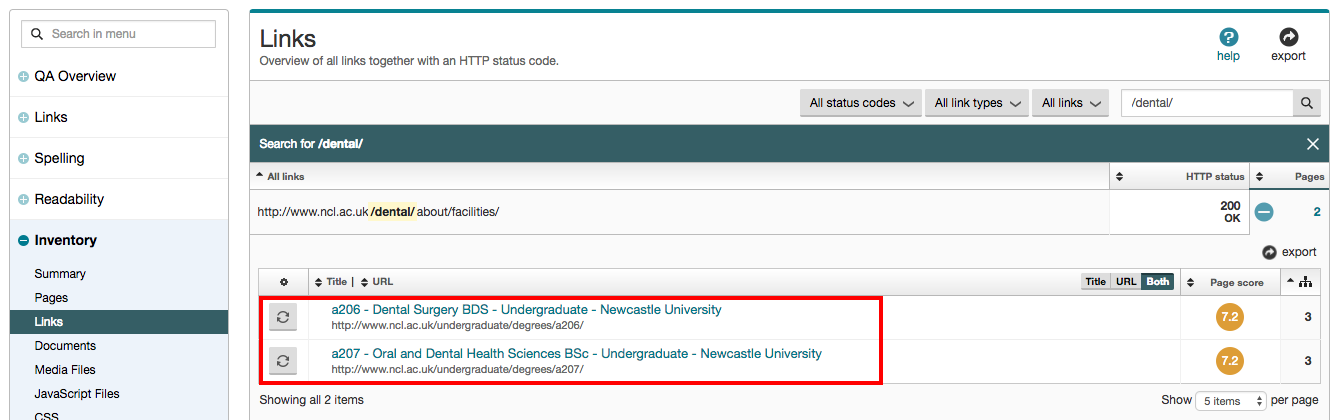
Then search for the link or part of the link you want to review, eg http://www.ncl.ac.uk/dental/:

Siteimprove - search for a link

Hovering the cursor over the ‘Pages’ column and clicking ‘+’ opens a sub-list showing the location of all pages where the link is used:

link-locations

In this example the link http://www.ncl.ac.uk/dental/about/facilities/ can be found in two pages. Using the inventory makes it easy to identify the sections in T4 which contain the link.

Having found the link in T4 you can re-link the content to the destination page using a ‘Section link’.

Find and replace redirected links

When a website moves into the content management system, its address may change. Pages can move within the site structure or be removed from the site.

To avoid creating broken links across our websites we may use a redirect. This takes you from the old page address to a new location within a site structure. But when a redirect expires the links in content will break.

Use the inventory to identify which links use a redirect and update the links so that they point to the correct destination page.

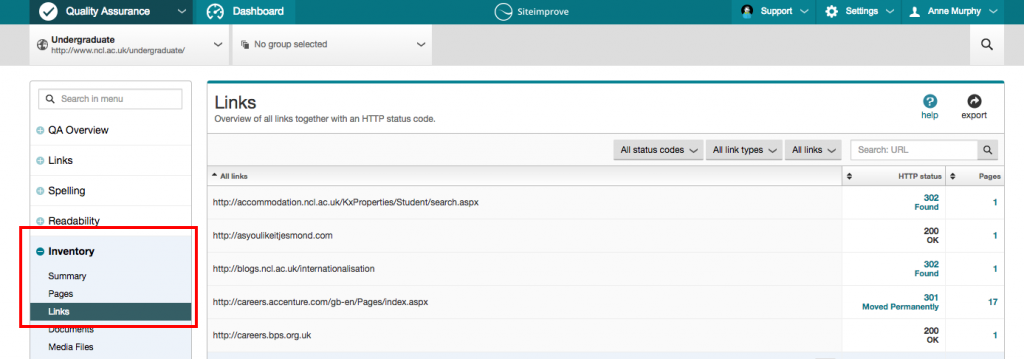
A link which redirects is marked in the Links overview list as 301 Moved Permanently. 

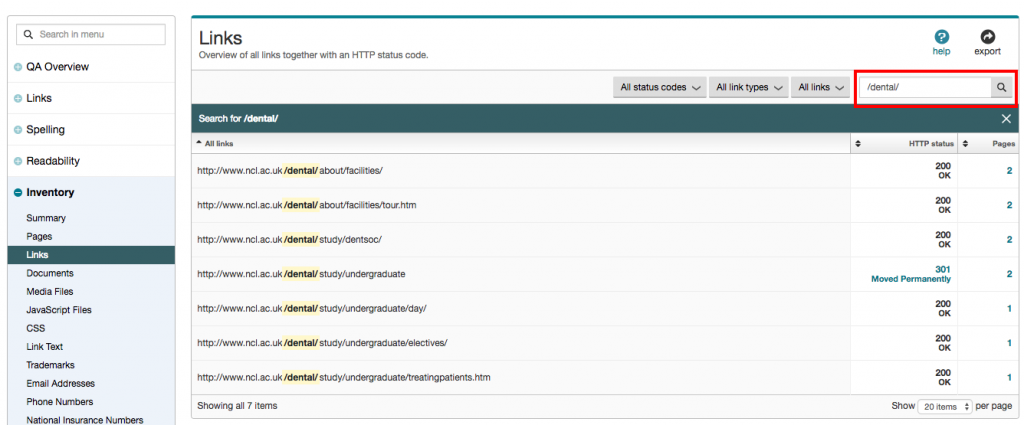
Clicking to the right of a link shows you where the link appears in content. Clicking to the left of the link displays the redirect destination page:

Redirect links destination address

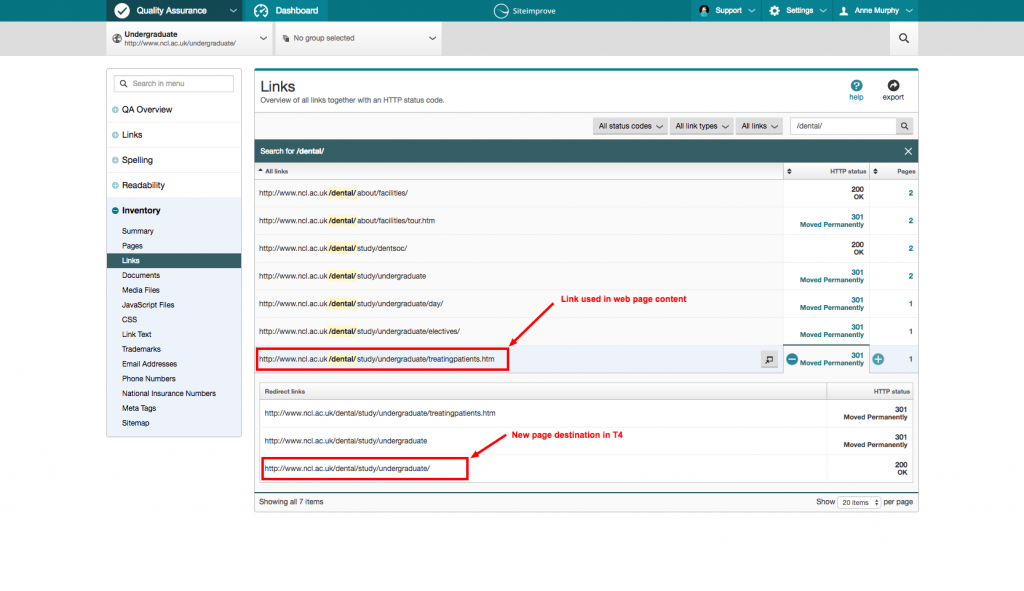
In this example, the link in the content is http://www.ncl.ac.uk/dental/study/undergraduate/treatingpatients.htm but the new destination is http://www.ncl.ac.uk/dental/study/undergraduate/.

As the new destination page is located in T4 you can use this information to help you find the link in the content management system. You can then change it to a ‘Section link’.

Keeping on top of broken links

Broken links on your site cause frustration for the user, and can damage your reputation. It’s important therefore that you keep on top of fixing existing broken links, and pre-empt any future broken links that might occur when redirects expire.

Using Siteimprove to do this makes the task much easier. We’ll also help you out by sending lists of sites to our editors, after each batch is moved into T4.

Access to Siteimprove

Request access to Siteimprove (University Login required).

Share this post:
Share

Usability heads in the right direction

We’ve built something new. It’s a widget for giving your web users easy access to clear directions for the location of your school/faculty/service.

It’s the efficient way for our lovely web editors to help potential visitors to the University.

It eliminates the need for paragraphs of vague/potentially incorrect routes to take:

  • roads
  • rail services
  • walking routes
  • cycling routes

Our new T4 content type is ideal for your website’s Find Us or Contact Us page.

How it works

If you’re seeking to add this content type, you’ll need to choose 14. Google directions.

We advise you add this to the bottom of your page, as it sits to the left under preceding content. Use it further up and people might miss something you’ve written that is important.

There are two boxes to fill out once you’ve selected this content type. The first is title, which should be filled out with:

DIRECTIONS: insert name of your school/service/faculty here

The second box relates to where you actually want to send your website users.

Because much of the university campus has the same postcode, you need to enter the building name and postcode.

An example for the Institute of Cellular Medicine, would be:

William Leech Building NE2 4HH

Then just update and approve your content and wait for it to publish.

What your users get

Your website users will see a search facility on the page with a Find Us button. All they need to do is add their address or postcode into the box and click on the button.

They will instantly arrive on a Google Maps page that will plot the routes to your location:

  • road
  • rail
  • walking
  • cycling
  • flight (if they’re far enough away)

Because it’s all done through Google, the information is constantly updated to remain as accurate as it can be.

It’s also a visual representation that takes you through the journey and works with GPS, instead of paragraphs that vaguely get your users here.

An example is on our demo site. Have a go applying it to yours.

Share this post:
Share

How We’re Improving Our Google Analytics Configuration

Over the past few weeks we have been reviewing the set-up of our Google Analytics tracking.

We had to update the tracking code embedded on all pages of the website. While we were doing this it seemed sensible to look at the whole set-up to make sure we are getting the most reliable data. We’ve been working with the digital agency, iProspect, on this project.

Account structure

The biggest change you’ll notice when you log in to analytics is the structure of our account. Everything has been consolidated into two properties:

  • internal.ncl.ac.uk
  • www.ncl.ac.uk – cross site tracking

The majority of our editors will be interested in data from external sites, so I’ll focus on what can be found in the www.ncl.ac.uk property. Within this property you will see a number of views. These allow you to access data for specific sub-domains, eg research.ncl.ac.uk, or applications, eg Hobsons.

There are also two views that allow you to look at data across all of the services, and see movement between them. They are:

  • 1. MAIN // incl. Microsites, Research, Conferences & Webstore – this gives access to filtered and de-duplicated data and should be used to report on activity from July 2016 onwards
  • 9. RAW – this gives access to unfiltered data and should be used only to report on activity before July 2016

Access to analytics

As part of this review we’re also looking at who has access to our account. This will include revoking access for anyone signed up with a personal email address. If you still need access to analytics we’ll ask you to re-register with a Google Account connected to your Newcastle email address.

Service development

Over the summer we’ll be taking some time to develop the analytics service we offer. This will give us time to collate 2-3 months of data in the new configuration.

We’ll be looking at access, reporting and analysis, as well as how we feed any recommendations back into content and template development.

Related posts

Share this post:
Share

How Compression Can Increase User Satisfaction

Linking to documents that provide more information is vital for responsive design websites.

Let’s face it – no-one wants to read all your content for a specific topic on a single web page, or an endless number of web pages, on a mobile screen.

Having a 70-page research report or the terms and conditions of applying for a job as a downloadable PDF is sensible.

But what happens if that document is 15MB in size? First of all, you won’t get it in the university’s new content management system – it has an 8MB limit.

Even then, someone downloading 8MB on a 3G phone is going to be waiting a while to see it. They’ll also be eating into their data allowance at an alarming rate if they have a few of these to download.

Smaller is better

Making the file size of your documents smaller is key to improving your users’ experiences.

Compression can reduce the time documents need to load and cut the cost for those using mobile data.

Not everyone has access to Adobe Acrobat and its PDF resizing capabilities due to the cost. But there are free tools online to solve this issue; one of the best I’ve found is Smallpdf.

You can drag and drop your document from your computer onto its Compress PDF screen and it’ll do the rest. Then simply download the result for your website.

I’ve seen it take documents of 17MB and reduce them to 600KB, a much more palatable size for users. And there’s no loss of quality.

Even if you think your document is small enough not to bother with this, do it anyway. Every little helps with page loading speed and aiding user experience.

Smallpdf also provides many other PDF manipulation services that could prove helpful to you.

Make it easier for your users to access your documents and there’s every chance they will.

Share this post:
Share