Breaking Bad When It Comes to Links

Broken links are the bane of user experience.

There’s nothing worse than finding a 404 error page. And people who tart 404s up with quaint local dialect or jokes to apologise should just stop.

If you remove a page or change a url and leave the old link lingering elsewhere, you’re breaking trust.

You’re damaging the confidence people have that your website is up-to-date. You’re frustrating them with the promise of information you’ve snatched away.

Search engines won’t like you either. You are breaking their trust in sending people to your website.

Identifying broken links

You might say it’s unavoidable to have broken links. It’s not, it just requires care. If you’re killing a page, document or changing a url remember where you’ve placed links and change or remove them. This could be on your website, social media or even in print.

If you can’t remember where website links were, use these services to find them:

Make search engines work for you

What happens if search engines have indexed the page/document you removed?

They make it difficult enough to get up the search rankings without causing this kind of headache.

If you can’t redirect people elsewhere, it’s time to make Google and co work for you.

Do a search for the page/document you’ve just deleted and if you find it in their listings – report it.

Google (if you have an account) will remove dead links from search listings on request. Make them work for you.

Further reading

A Link is a Promise, Kara Pernice, NNg

Share this post:
Share

Using Siteimprove to Find Content and Assets on your Website

You may already be using Siteimprove Quality Assurance reports to help fix broken links and misspelling on your website, or find content inconsistencies. If so, then I hope you’ve found it a useful tool to help keep content up to date.

The Inventory module is another function of Siteimprove that we think you’ll find useful when reviewing website content and assets.

You might want to locate a document or telephone number on your website or need help with decluttering your website to prepare for Go Mobile. The inventory module can help with this.

How to use the Inventory module

Siteimprove’s Inventory module provides an overview of all content on your site including:

  • pages
  • links and link text
  • documents
  • media files
  • scripts
  • personal information eg email addresses and telephone numbers

You’ll find a link to the Inventory in the left-hand panel of your Siteimprove report. The summary page lists the number of assets on your site:

Screenshot of Siteimprove inventory

To get at the details you can click into the categories on the left.

In this example, clicking the documents’ section gives an overview of:

  • documents types (PDF, Excel, Powerpoint)
  • Internal (documents within your website)
  • External (links to documents on other websites)

Screenshot of Siteimprove Documents overview

From this table you can click through and view all documents (useful if you’re decluttering your site) or focus on a particular document type:

Siteimprove Inventory module - PDF list

Here you can see a list of all PDF files linked to from the website broken down by:

  • url of each document
  • file size
  • link status – eg broken
  • pages that link to the document
  • last time modified

You can filter the list to view just external or internal PDFs by clicking on the ‘all categories’ field. You can also sort documents within each column.

For example, you can sort the ‘last time modified’ column to find out when a document was last uploaded to your site. This is useful to help you decide if an asset should be updated or removed.

You can also see where a document is linked from on your site and from here click through to view the document link in the page. If a document is not linked up this usually means it can be deleted as it’s not in use.

As you can see from the example below, the Marine handbook is linked to from three pages on the website:

Siteimprove Inventory module - PDF referer links

Using the Inventory module to review content

Documents

As shown by the examples above, you can use the inventory tool to locate and check documents on your site.

Keep emails and phone numbers up-to-date

Out-of-date contact information will affect the credibility of your content. Use the inventory module to review email addresses and telephone numbers and check the format against our editorial style (University Login required).

image files

You can also use the inventory tool to check where an image is on your site, and when it was last updated. Updating the images on your site helps with search engine optimisation (SEO), giving the search fresh content to crawl.

Regularly review and update content

It’s important to regularly review and update your content as inaccurate content can damage the credibility of your site.

Next time you review your website content, try out the Inventory module in Siteimprove.

View the Siteimprove Inventory video tutorial to get started.

Access to Siteimprove

Request access to Siteimprove (University Login required) to get started on your website content clean up.

Share this post:
Share

Top 5 Tips: Content Calendars

It’s essential to continually plan your content to ensure it’s up to date and answering your users’ questions. Content calendars (or editorial calendars as they’re sometimes referred to) can help with this.

You can use a content calendar to map out content that will be needed at different points in the year and the deadlines for publishing content.

Read on to find out our top 5 tips for content calendars:

1. Map out key events or activities throughout the year

The best starting point when creating a content calendar is to map out key events and activities throughout the year. This could include recruitment campaigns, events and funding opportunities. You’ll then be able to identify tasks you’ll need to complete associated with each activity. This will include when you’ll need to produce or update content and source new assets.

Adding activities that take place on an annual basis will also help to identify when the busiest times for content production will be.

To help map out these activities, use our calendar template (PDF: 28.9KB, University login required).

2. Be selective with the information you include in your calendar

There’s a variety of details you could add to your calendar. Some details you might record include:

  • what content is needed (depending on the activities you need to support)
  • where on your site your new content will appear
  • the people responsible for writing and editing content
  • deadlines for writing, editing and publishing content
  • other teams that may need to be involved – will you need to contact the Corporate Web Development team (CWD) to create a new page on your site?

However, remember that the more information you include the more complex your calendar will become.

Focus your calendar on the top priorities, and consider eliminating the bottom priorities to make your calendar easy to use and maintain

Kristina Halvorson and Melissa Rach, Brain Traffic

It’s therefore important to be selective with the information you include so that your calendar is easy to understand.

3. Choose a calendar tool that works for your team

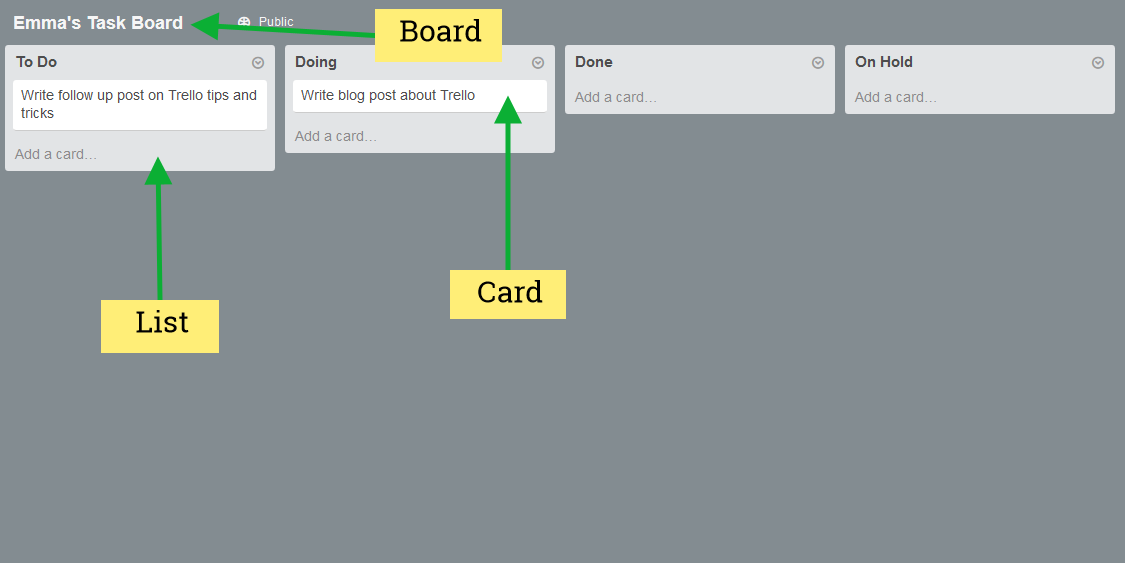
There are a variety of tools you can use to make your content calendar –  software like Outlook or Excel, or online tools like Trello. Deciding on the best tool to use depends on the amount and complexity of the information you want to record in your calendar.

For example, the CWD team first used Excel for our editorial calendar for this blog as it allowed us to record and filter a number of things. These included post categories, tags and whether a post would include an image or be a feature post. It also allowed us to easily assign authors and editors to posts. Although excel worked well, we now use Trello for our content calendar as it includes additional features, such as email notifications when tasks are due.

Learn more about Trello by reading Emma C’s post on Online Task Management with Trello.

Whatever tool you use for your content calendar ensure it works for you and all of your team.

4. Plan in plenty of time to produce content

Make sure you plan enough time to produce and update your content, or gather new assets.

Remember you may need to wait on other colleagues to provide information or request support from other teams, such as CWD or the Press Office.

Although it’s important to plan as much as possible, there will always be last minute content requests.

An editorial calendar should be a flexible, ever-changing live document – one that’s updated according to the comings and goings of your business

Chris McMahon, Sticky Content

Chris McMahon recommends scheduling in time to deal with unplanned content.

5. Share your calendar

Richard Prowse from the Digital team at the University of Bath recommends sharing your calendar:

this will demonstrate to those not involved in the editorial process that you have a considered and measurable plan for content.”

Richard Prowse, University of Bath

Sharing your calendar with customers is also useful when negotiating deadlines. The calendar will make them aware that if they are late in providing information it could delay when content is published.

The content calendar illustrates the other work you have scheduled in, and might also help to minimise those last minute content requests.

References and further reading

Kristina Halvorson and Melissa Rach, Content Strategy for the Web, Brain Traffic, 2012

Chris McMahon, Create an effective editorial calendar, Sticky Content, 24 October 2014

Chris McMahon, Fill your editorial calendar in 5 steps, Sticky Content, 31 October 2014

Richard Prowse, How to create an editorial calendar, Bath University, 6 July 2014

Share this post:
Share

Online Task Management with Trello

If you’ve been to one of our Go Mobile training sessions you’ll have already been introduced to Trello. For the rest of you, today’s your lucky day. I’m going to give you an overview of this productivity tool and tell you about some of the ways we’re using it in the web team.

What is Trello?

Trello is quite simply an online task management tool. It’s flexible and can be used in many different contexts – just look at Trello’s inspirations board for evidence of this.

The basics

There are three essential things to get your head around before you start using Trello:

  1. Boards – every project you create in Trello is represented by a board
  2. Lists – you organise your project and its various stages using lists
  3. Cards – create a card for each task in your project. You can move cards around your lists as work progresses

To learn how to use Trello, check out their getting started guide.

Trello basics; boards, lists and cards

How we use Trello in the web team

In the web team we use Trello for collaborative task management. Here are a couple of examples of the variety of things we use it for.

The editorial calendar

We have a board set up as an editorial calendar for this blog. The lists map to stages in the production of a blog post. They are:

  • post ideas
  • planning
  • writing
  • ready for editing
  • scheduled

Each card has two people assigned to it; one writer and one editor. We use card comments to identify who is in which role. We archive cards when the post goes live.

The calendar power-up allows us to get a visual overview of what’s coming up on the blog.

Workload planning

We have one board used by the whole team for planning tasks that we identify as business as usual. As project requests come in they’re added to a list of tasks to assign.

In our weekly team meeting we review the board, and assign cards to individuals. We have one list per month so we can see what work needs to be done when.

We use checklists, comments and attachments to collaborate on tasks in Trello. This helps to cut down email and allows input from technical and editorial team members.

Conclusions

Trello helps us to keep an overview of everything the team is working on and to increase transparency. It’s easier to see the progress on a project when work is in a shared environment rather than trapped in individual inboxes.

If you’ve been inspired by this post, join Trello to kick-start your collaborative task management.

Share your experiences

Are you already using Trello? Let us know in the comments and share your tips and tricks.

Share this post:
Share

Find Content Inconsistencies Quickly and Easily using Siteimprove Policy

Use of consistent language and terminology helps to raise the reputation of your website.

We have content standards and style guides in place for the University.

But, with over 100 websites and many editors, communicating and maintaining standards is a challenge.

We use Siteimprove, a quality assurance software, to help us find and fix broken links and misspellings on our websites.

Use Siteimprove Policy to remove unwanted content

Siteimprove also has a Policy function that we’re using to inform our editors about:

  • terms we don’t want on the website – such as ‘click here’
  • content changes – eg name of an Academic Unit or Service, or highlighting content that has changed its address
  • reinforcing a standard term – eg Newcastle University not University of Newcastle upon Tyne

Siteimprove does the hard work of finding and listing the content that needs fixing. This makes it easy for editors to follow our content standards.

If you’re a University web editor already using Siteimprove you can start using the Policy tab today.

How it works

You can find the Policy tab in the Services drop down menu:

Siteimprove - how to find the Policy  function

Here you’ll find a list of policies created by the web team, and the number of violations on your website:

Policies list in Siteimprove Web Governance Software

Clicking on a policy description reveals:

  •  a policy summary
  • advice on what the editor needs to do
  • list of all pages where a violation occurs

Siteimprove policy summary and location of violations

You know where the errors are, now let’s get those violations down to zero!

Create your own policies

You can create local website policies for terms that are specific to your content. View the Siteimprove Policy video tutorial to get started.

Access to Siteimprove

Request access to Siteimprove (University Login required) to get started on your website content clean up.

Share this post:
Share