A Quick Guide to… Headings

Pssst….Unlike some of my team, I don’t have perfect recollection of the character length a heading should be. So I’ll put it ‘out there’….. I have to look this stuff up just as much as anyone!

To help you/me keep track of this stuff, let me introduce a new series of short posts about our writing standards.

So fasten those seat belts – fingers on the print button, this is a quick guide to:

Headings

Included in the standards for headings are page titles and sub-headings, so I’ll cover each one here.

Page Titles

Page titles, are the first thing visitors to your site see and tell them what each page is about. They can also be seen out of context, eg in a search results page.

Your page titles need to be clear and meaningful so a user knows whether the information they want is on your page. They should:

  • be short so they are easier to read – less than 50 characters (including spaces)
  • use title case eg Student Life not Student life
  • begin with keywords to support scan reading
  • be simple and clear; jargon is difficult to understand and makes pages hard to find

Sub-headings

Sub-headings help to break up content on your page. They make text easier to scan read and help your users pick out relevant information easily. They should:

  • be short and meaningfulless than 30 characters (including spaces)
  • use sentence case eg Student life in Newcastle
  • begin with keywords to support scan reading

Next time we’ll be covering lists.

Share this post:
Share

Editing Other People’s Content

So you’ve attended our Writing for the Web training and you know all about the inverted pyramid and writing concise, scannable web content. Now you’re faced with a request to add some new content to the website…

It’s a wall of text – full of long sentences, a lot of jargon and it’s about a topic that you don’t have any subject knowledge of. A feeling of dread washes over you, questions start racing through your mind. How will I prioritise the information? How can I shorten sentences when I don’t really understand them? What are the important points that I need to emphasise with bold or a bulleted list?

In our recent Writing Web Content training there were a few questions about how to edit other people’s content – particularly how to prioritise and edit complex content.

In Corporate Web Development (CWD) we face this challenge on a daily basis. In this post I’m going to share my top five tips for editing other people’s content.

1. Find out the purpose of the content

For any webpage you create you need to know why you’re creating the page and how it fits into your site purpose.

You need to be able to answer the following questions:

  • who am I creating this page for? (your users)
  • what do the users want to find out? (their questions/tasks)
  • what does the organisation want the user to do after reading your content? (business goals)

Without these answers you’ll struggle to edit the content so it’s important to speak to the subject-expert or the person who provided the content.

Discuss with content author

Set up a meeting with, or speak to, the author of the content so that you can find out the purpose of the content.

initial face-to-face or verbal briefings need to give content creators an understanding of where their work will sit in terms of the wider project and give them the chance to ask initial questions

Jackie Kingsley, Sticky Content

Armed with the knowledge of who the users are, their tasks, and what the author wants to achieve, you’ll have the confidence to start prioritising and reconfiguring the content for the web – and deleting any unnecessary words!

It’s also important to get the agreed content purpose in writing and send to all involved. This acts as a written record so that you have something to refer to when editing and it makes it clear and transparent for everyone involved.

2. Agree deadlines

It’s important to agree on specific deadlines.

It’s impossible to keep your content production slick and manageable without well-enforced deadlines

Rhiannon Jones, Sticky Content

There might be deadlines for:

  • completing a first pass edit and sending content back to the author
  • the author and stakeholders to send amends
  • the author and stakeholders to sign off content
  • content to go live on the site

Again getting deadlines in writing (even if it’s just an email) gives you a written record to refer back to. Then, if additional content is needed or if the author misses the deadline for sign-off, the record shows there will be an impact on content going live.

3. Take ownership of the content

When editing other people’s content all the rules of writing for the web still apply. Often as editors we can feel nervous about changing someone else’s words but it’s important not to fall back into the role of a content-putter-upper.

You’re the one publishing the content so it’s important that you take ownership of it. Remember you will probably know more about writing for the web than the author so it’s up to you to edit the information so that it’ll work across devices.

Proofreading

If possible, get someone else to check the content after editing and before sending back to the author.

In an ideal world no one will proof copy they have created. That’s because it’s extremely difficult to see your own mistakes

Jackie Kingsley, Sticky Content

Again, if you’ve got the purpose of the content from the author in writing you can use this at the proofing stage.

Content can also be checked against the written brief during the QA process

Jackie Kingsley, Sticky Content

4. Ask the author to check for accuracy only

When you send the content back to the author for sign off, ask them to check for accuracy only. It’s important that the facts are correct, which may have been misinterpreted through the nature of editing. However, you don’t want lots of opinions about style, tone or format as the content has already been edited for the web.

I often find it helpful to compile a document of any content gaps or questions that I’ve come across while editing the content. You can also use this document to explain any editing choices you’ve made and why the edited content works better for different devices. Again, a written record makes everything clear and transparent.

5. Schedule time to review content

Often content is edited and polished before it’s published but then after it goes lives it’s left to languish on the site. Links become broken and content becomes out of date – resulting in frustrated users and the credibility of the site being questioned.

So whatever the content you’re editing, however small it might be, make sure you schedule in time to review it. Speak to the author about whether it is still relevant to their business goals and their users’ tasks.

Share your tips

And that’s my whistle stop tour of editing other people’s content.

Let us know in the comments if you’ve got a challenging editing situation, or share your tips for editing other people’s content.

Further reading and references

Related posts

Share this post:
Share

Nicely Said – a Book Review

In the introduction, Erin Kissane calls Nicely Said: Writing for the Web with Style and Purpose (by Nicole Fenton and Katie Kiefer Lee) ‘a writing guide that grounds its wealth of practical advice in empathy for readers and their needs’.

If you read our blog regularly you’ll know this focus on the user resonates with us.

It’s the perfect introduction for anyone new to writing for the web. It also offers valuable tips and advice for experienced web editors looking to develop their writing.

Let’s get in to some of the advice for writing for the web with style and purpose.

Do your research

In our training we’ve been hammering home the need to plan your content. In a chapter on ‘getting your bearings’ this book offers some key points you should consider when preparing to write:

  • understand the material
  • define your goals and mission
  • identify your audience and address their needs
  • decide how you want to talk to your audience

Writing guidelines

To achieve a good level of writing the authors recommend you regularly practice this set of guidelines:

  • be clear
  • be concise
  • be honest
  • be considerate
  • write how you speak

We provide a similar list of top 5 tips for writing for the web to our editors. If you get these right you’ve got a good foundation to build on to develop your writing style.

Writing style

Something I found incredibly useful about this book was the clear definition of voice and tone – and the difference between them.

Voice is your personality; it influences how people perceive you and doesn’t change much.

Your tone changes depending on the situation; it’s directed by the audience you’re writing for.

Voice + tone = writing style.

The power of words

I want to round of this review with a quote from the book. In a single sentence it conveys a clear message about the power of your words and the importance of good writing:

“Your words can guide readers, bolster their decisions, and encourage them to take action.”

Read more

I’d encourage you to read this book to get more detail on the topics I’ve introduced, and so much more. I’ve definitely picked up some valuable advice that will improve my writing.

You can find out more about the book and its authors on the Nicely Said website. There’s also a good list of free resources, including articles and essays, for you to read around the subject.

Share this post:
Share

How to Improve the Readability of Your Webpages

Readability for websites isn’t just about people understanding the words, although of course that’s a massive part of it.

After all, if you can’t understand what the words are trying to tell you, you’ll just leave the site without the answers to your questions.

We’ve proven it time and time again – the readability of complex information can be improved by using clear, easy to understand English. It’s just making sure more people can understand it.

What I’d like to focus on for this post is some tips about the other elements that can affect readability; prioritisation of content, page layout, the use of design, and ease of navigation.

Prioritisation of content

What is it that people really need to know about on your page? If you identify it, you can prioritise the content to improve readability. Content should always be created and designed with the user’s needs in mind.

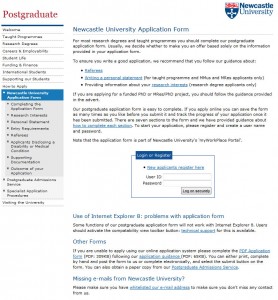
For example, here’s a screen shot of the old version of the postgraduate ‘How to Apply’ section. It had low readability; complex information, use of jargon and too many words! Your eye is also drawn to the box in the middle of the page, which was a little distracting.

example of a hard to read page

Old version of the application page (select to view expanded image)

We reviewed the section, identifying the purpose of the content (get people to apply) and  got to work editing.

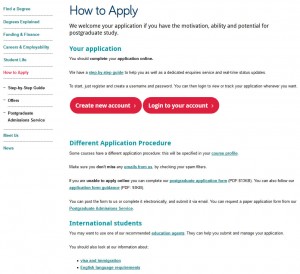
We use page titles to help accurately introduce the content for people. A change of title from ‘Newcastle University Application Form’ to a very clear ‘How To Apply’ certainly helped…

Also, editing reduced the content from 12 to just four pages.

example of an edited page

New edited version of the application section (select to view expanded image)

Another way we have improved readability is to use introductions on pages. This ensures people can quickly read a descriptive summary of the page. Take a look at Linda’s post about how to write great introductions.

Page layout

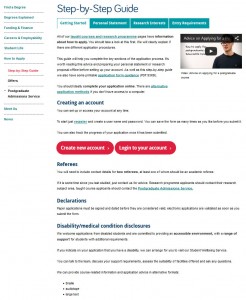
We reviewed the page layout or format, quickly deciding a step-by-step guide would be most effective at helping people though the application process. We even added a relevant video to support our primary messages.

content page with tabs

Pages of content were re-worked into a simple step-by-step guide using tabbed content (select to view expanded image)

Use of design

We’ve blogged before about how design can help people navigate around your site, but it can also help draw attention to key content/things you want people to do.  And no…I’m NOT talking about flashing animation here, but more subtle design devices.

I’ll explain – we often use expandable boxes on pages to hold content for specific audiences. It’s so that content can be seen – but doesn’t have to be opened unless it is relevant to you.

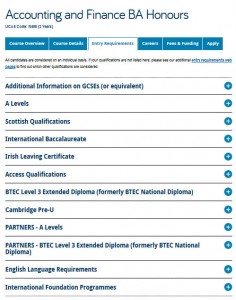
We use expandable content on the Undergraduate website for a long list of entry requirements, see the screen shot below. Don’t panic at all the options! Relax and simply choose the content relevant to you…

Image of expandable boxes on the undergraduate website

Using expandable boxes in content to help readability (select to view expanded image)

Test, test and test again

We’ve tested the content on the new postgraduate application pages using Clarity Grader (a website content analysis report) and the results are really positive:

Readability has increased from 48 to 55 (we aim for 60).

Long sentences (harder to read) were at a whopping 19.69% before we re-developed the page and have decreased to 7.97% (we aim for 5%).

This is all the more impressive when you consider the content is mostly complex and detailed information on application procedures.

Final tip

One of the key things to remember – is that you can always go back to pages and improve readability. It might be a slight tweak to a sentence, or a layout change – the main thing is that you can always improve it.

We ran some extensive testing on the postgraduate content. After all, a lot of what we did, not just to the content, but to the layout and design, then formed the master plan for Go Mobile – so it needed to be right. Did we do it?

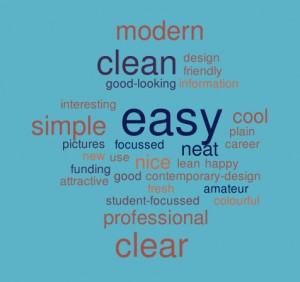
Oh yes. You can read about the excellent results in an earlier post of mine. A particular favourite is the below word cloud created from user feedback about first impressions of the postgraduate website. The most popular words that users used to describe the site included: easy, simple and clear.

Word cloud showing first impressions of the PG website

Go on, take the challenge – have a go! Choose one of your pages and see how you’d improve readability. I’d love to hear what you get up to!

Related posts

Share this post:
Share

Improving Introductions

You might have read our post on Making New Year’s Resolutions for our Websites: mine was improving introductions to content. I’m going to expand on what this means in this post.

We’re often reworking existing content rather than writing from scratch. And because of this it’s easy to get lazy and not bother to rework the introduction. The concern is that because it looks a little bit different, that’s enough.

Image showing the difference between a page title, introduction and body text.

Our introduction is styled to look different to body text.

The introduction style is a new feature of our responsive design. It follows the title of a page and is a larger font size to help highlight it. It also comes with its own content standards, it should:

  • summarise the point of the page
  • be no more than 50 characters
  • be descriptive

Working out if your introduction is any good

I’m inspired by Ida Aalen’s approach to this on the Gather Content blog about Testing the Usability of Text (particularly your introduction).

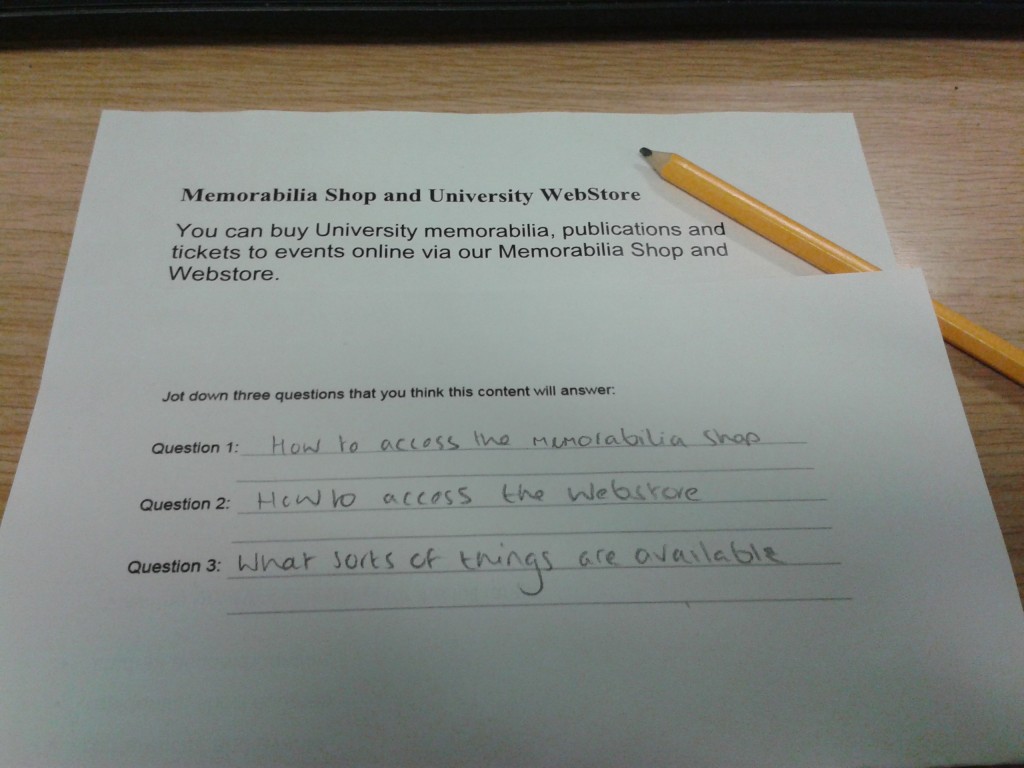
She suggests putting a copy of your content into word and printing it out. You then fold the paper so only the title and introduction are visible.

Image of page introduction with content hidden - three questions that I think the hidden content might answer have been added.

Will this content answer the questions I’ve asked?

Next step, ask yourself (or your site users) to read the title and introduction. You should then jot down three questions that you think the content will answer.

Once done, you can review the page content and see whether it does what you expect. If it doesn’t, you can rewrite the page content or improve your introduction.

In this case, I’m pleased to say that the page answers the questions I thought of – view our content on the Memorabilia Shop.

Have a go

Do your introductions work for you? Why not try this out on your colleagues or site users to objectively assess your content? Let us know how you get on in the comments.

Related blog posts

Share this post:
Share