Tag Archives: food

The Science of Baking: Cake

For the next instalment in Science of Baking series, just in time for the Bake-Off
Final, Charlie Wilkinson has looked into the science of making the perfect cake.

Cake is a wonderful thing, there’s nothing quite like the first slice of homemade cake to cheer you up. We use it to celebrate birthdays for a reason! There is science in baking a cake, even if you don’t realise it.

cake

The basic ingredients for cake include the use of flour, eggs, sugar and butter. The flour and eggs are strengthening ingredients for building structure in the cake while the sugar and butter are structure weakening. A good cake feels light in texture, this lightness is due to air bubbles formed throughout the batter which creates a structure of thin layers of cake separated by those air bubbles.

Baking a cake starts with creaming your fat and sugar, this action incorporates all that air which is required to form the light texture of cake. At this point eggs are added to the mixture, beaten egg essentially protects the air bubbles in the cake from collapsing during the baking process. Flour is then gently added into the mixture, gently to protect those precious air bubbles. The addition of flour is essential for the structure of the cake, forming gluten to add structure. This is a delicate process, however – too much gluten creates a heavy consistency like bread. This is why the type of flour used is important, with cake flours with lower protein content and heavy strong bread flours with higher.

As the cake bakes air expands as water vapour and carbon dioxide is released, the egg cooks and coagulates forming a permanent risen form of the cake. Browning reactions take place on the cake surface which enhance the flavour of the cake, creating a final form of browned, risen, light, airy, delicious cake.

The Science of Baking: Bread

With the Great British Bake-Off gracing our TV screens once more, we’ve decided to dig a little deeper into the science behind baking. What makes bread rise? What makes cake light and fluffy? Why do we love all things sugary and baked so much? All of these questions and more will be scientifically answered in our newest series of blog posts. Neuroscience student and Social Media Intern, Charlie Wilkinson is starting us off with the science of bread…giphy-2.gifIf you’ve watched the bake off then you’ve definitely experienced the beauty of watching 12 British bakers pounding dough into the bench like it’s an olympic sport. But what’s actually going on here besides taking your BBC/Channel 4-related-aggressions out on some innocent bread.

Bread is the product of key basic ingredients including flour, yeast, water and salt. The process of making bread involves mixing these ingredients together until the flour converts into a stiff paste, this initial mixing allows for the development of gluten as the dough becomes stretchy and elastic. The type of flour again is important with breads using strong white bread flour due to the high protein content for a strong dough.

Following GBBO bread week to the next stage of rising, as the bread is covered and left to prove. This fermentation process allows gluten proteins to stick together forming networks, and the yeast cells grow. Yeast cells break down sugars using enzymes into water and carbon dioxide. The carbon dioxide gas is retained in the dough allowing for the dough to expand and double in size. Some breads require two bouts of kneading and proving to form the perfect bread.

During the actual baking process the heat of the oven penetrates the dough leading to rapid formation of air bubbles as fermentation increased. The heat increases the activity of the yeast to form more air until a point at which the heat kills the yeast cells and air formation stops. High temperatures also cause gluten strands to transform into sex-rigid strands which give bread its crumb-like structure. Sugars blend together and brown to form the colour of the bread crust during ‘browning reactions’.

So the next time you’re watching bake off with your friends and family you can delight and entertain with your extensive knowledge of breads.

#TryThisTuesday: Rock Candy

This weeks Try This Tuesday takes a while, but you end up with a tasty treat!

You will need:

  • A wooden skewer or chopstick
  • Peg
  • 1 cup of water
  • 2-3 cups of sugar
  • A narrow glass or jar

pic

Clip the wooden skewer into the peg so that it hangs down inside the glass and is a couple of centimetres off the bottom.

Put the water into a pan and bring it to the boil. Pour about a quarter of a cup of the sugar into the boiling water and stir until it dissolves.

Keep adding more and more sugar, each time stirring it until it dissolves, until no more will dissolve. This might take quite a while!

When no more sugar will dissolve remove it from the heat and leave it to cool for about 20 minutes.

Pour the sugar solution into the glass or jar almost to the top. Then put your skewer back into the glass so it hangs down and doesn’t touch the sides.1st

Leave your glass in somewhere it won’t be disturbed. The sugar crystals will grow over 3-7 days. Once these have grown you can eat them!finished-product

The Science

By mixing the sugar and water together when they were really hot, you have created a super saturated solution. This means that the water contains much more sugar than in could in normal circumstances. As the water cools back down the sugar leaves the solution (mixture) and becomes sugar crystals again, forming on the skewer.

Supersaturated solutions are used in real life. In a sealed fizzy drink the drink is saturated (full) with carbon dioxide, as the carbon dioxide is put in using pressure. When you open the drink, the pressure of the carbon dioxide is decreased, which causes your drink to be supersaturated as there is much more carbon dioxide dissolved than there would be at normal pressure. The excess carbon dioxide is given off as bubbles.

#TryThisTuesday: Curly Fries!

Today we are looking at the science behind curly potato fries. First, let’s talk about how we make them.

  1. Carefully chop up a potato into straight thick chips.
  2. Boil around 250ml of water and stir salt into this water until no more salt will dissolve.
  3. Fill a bowl with tap water and place half of your chips into this bowl.
  4. When the salty water has cooled pour it into another bowl and add the rest of your chips to this.p1020750
  5. Leave both bowls of chips out overnight.
  6. The next day you should have one bowl of chips that are still hard and straight and the other bowl (with salty water in) will be full of chips that are more flexible, that you can shape into curls.

p1020755

The Science

The addition of salt to the water allows you to make curly fries due to osmosis. Osmosis is the movement of water from an area that has few molecules in the water to an area that has more molecules in it to try to even things out and create a balance.

waterin

Plants like our potato here are made up of millions of cells that have a cell membrane around its edge which allows some things in and not others. Water can easily flow through this but the salt we dissolved in it can’t. Cells are filled with lots of little molecules so water usually flows into the cells and fills them to dilute the liquid. But when we have lots of salt in the water, there are more particles in the water outside of the potato cells than inside so the water leaves the cells.

waterout

bendy
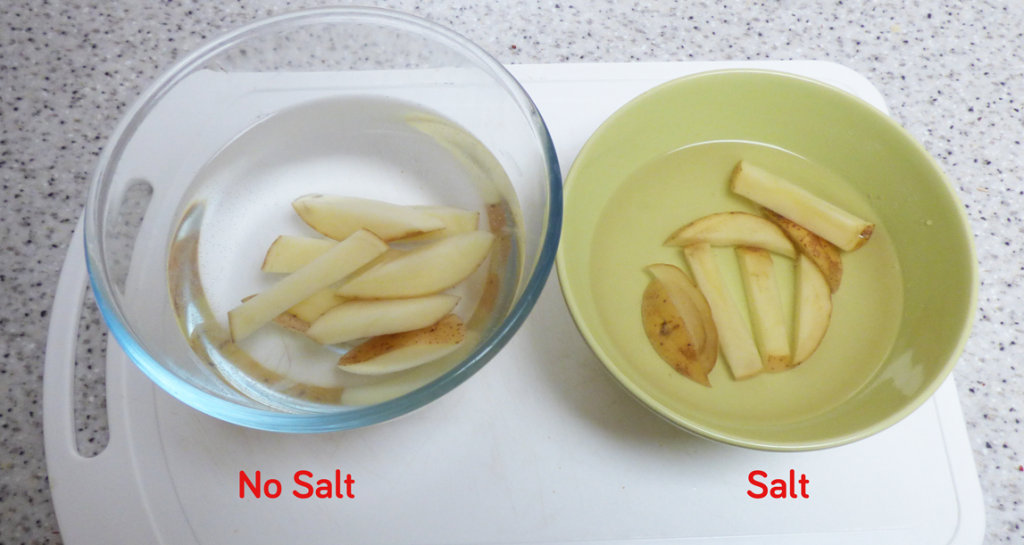
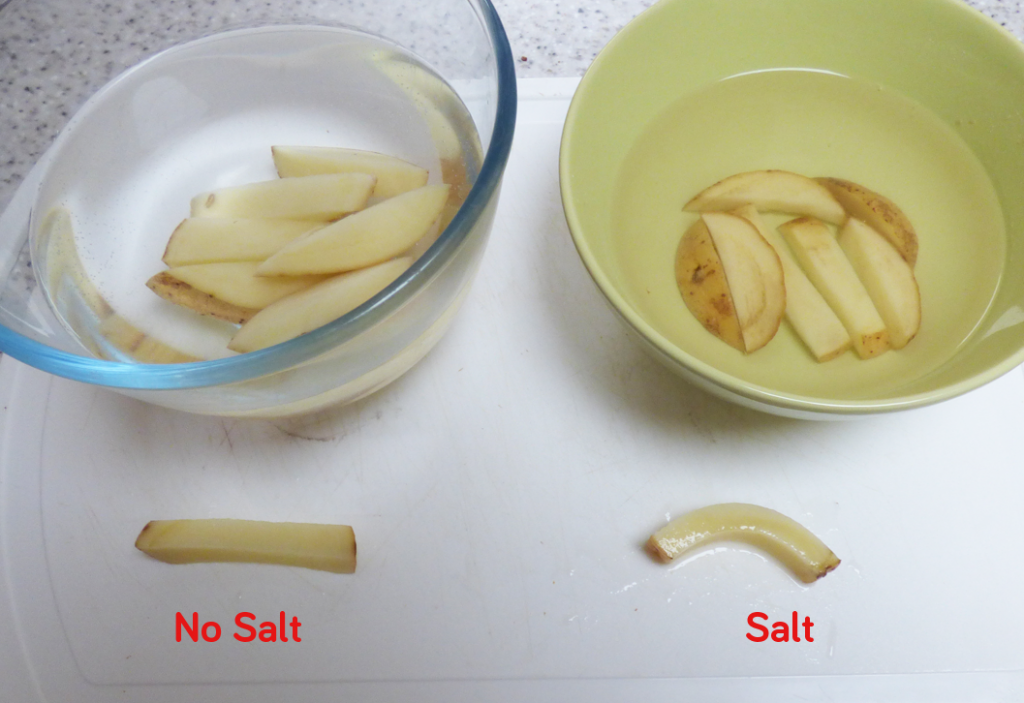
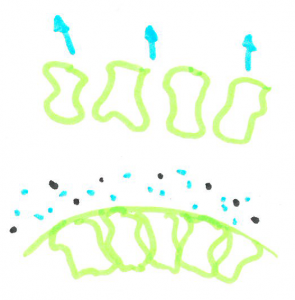
When cells are filled with water they are quite rigid and packed closely together making a fairly sturdy chip. When the cells are dehydrated, they are smaller leaving space between cells, allowing the chip to bend without snapping.

Osmosis is used in all plants – not just when you cut them up and put them in a bowl of water! Plants use osmosis in their roots to allow water to move from the soil into their roots.


#TryThisTuesday: Homemade Ice cream!

This week we’re making ice cream but instead of using an ice cream machine, we’re going to make it using science!

You will need:

  • Two Ziploc bags – one small, one large
  • 100ml double cream
  • 50ml milk
  • 40g sugar
  • Vanilla extract
  • Ice
  • Salt

p1020737-2

  1. Measure out the milk, cream and sugar and place them into the smaller Ziploc bag.
  2. Add a dash of vanilla extract  then zip up the bag.
  3. Fill the larger bag 2/3 full with ice.
  4. Pour a generous amount of salt onto the ice.p1020738-3
  5. Making sure the small bag is tightly zipped up, place it inside the bigger bag with the salt and ice.
  6. Gently shake the bag for 5-10 minutes, be careful not to rip the bag!
  7. Leave the ice cream to sit inside the ice and salt bag for another 10 minutes
  8. Open up your bag and enjoy!

p1020740-2
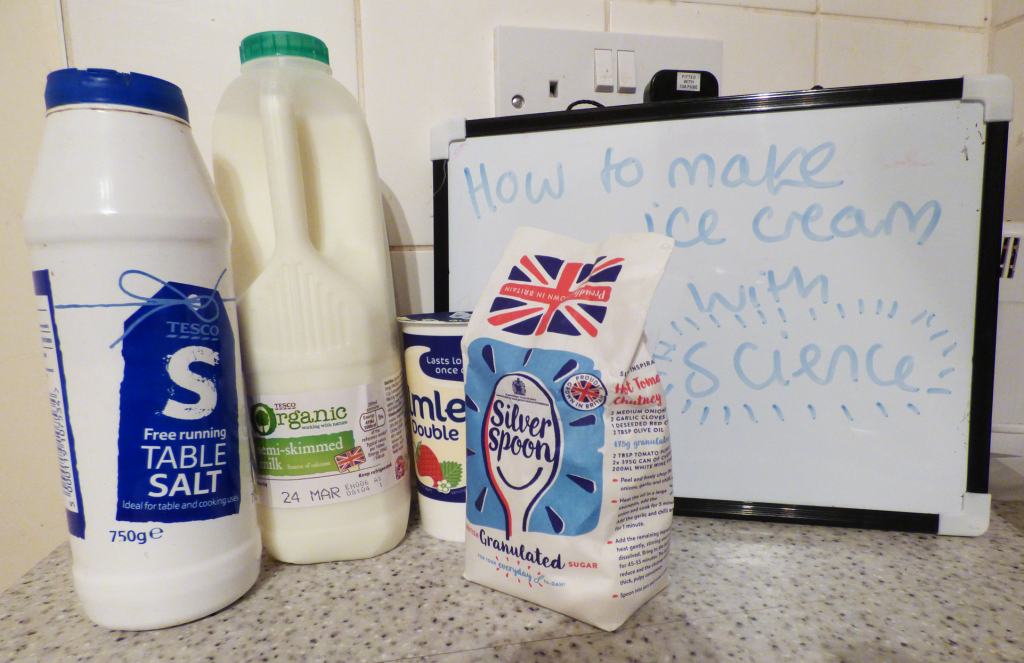
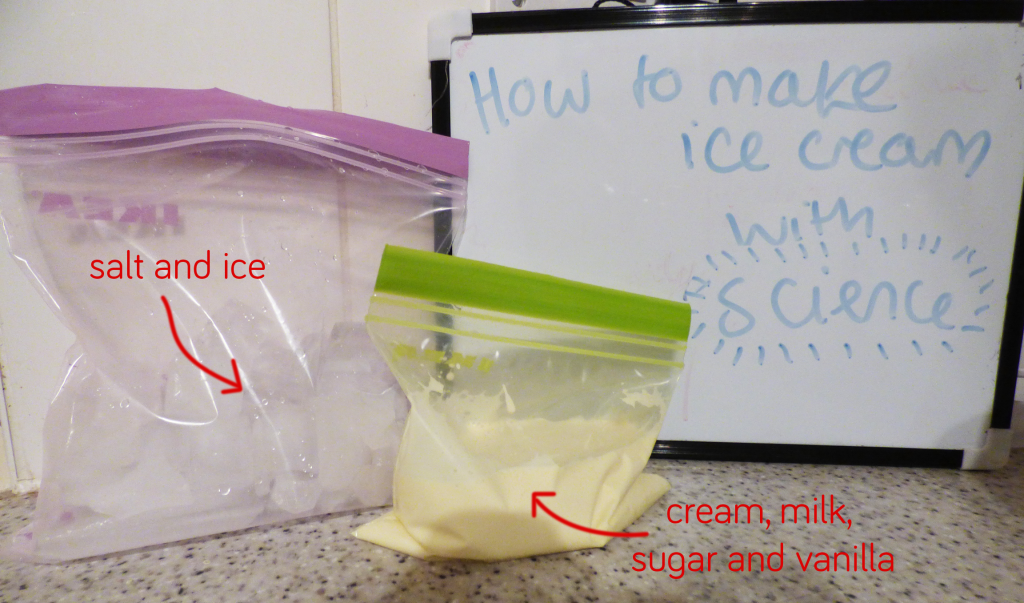
Try making different flavours of ice cream by swapping the vanilla extract for strawberry or mint extract or even cocoa powder for chocolate ice cream. You could also try adding chocolate chips.


How does this work?

Water, as I’m sure you know, freezes to make ice at 0oC. But your freezer at home is around -18oC, so how are we making the ice cold enough to freeze your creamy mixture? The secret is in the salt.

Ice is in a constant state of melting and refreezing and melting and refreezing. When we add salt, the salt particles block the path of the melted ice, stopping it from freezing back on to the rest of the ice but ice can still melt. Therefore more ice is melting that freezing.

Now you may be thinking that surely if the ice is melting that means it is getting warmer? It’s actually the opposite. For ice to melt it needs to break the bonds that are formed between the H2O molecules. This breaking requires energy which it gets in the form of heat. When a molecule melts away a bond is broken, taking heat away from the surrounding, causing the temperature to drop.

This is also the reason that salt is put on icy roads – it stops water forming ice.

#TryThisTuesday: Guess The Flavour

For this Try This Tuesday all you will need is some starburst or chewy fruit sweets.img_4490

Close your eyes and pick a starburst at random without looking. Unwrap it with your eyes closed.

Hold your nose and eat the starburst, make sure you keep holding your nose the whole time.

Can you guess the flavour without looking at the colour of the sweet or the wrapper? You might get some of them wrong!

If you let go of your nose halfway through chewing, you might suddenly be able to taste the flavour.

The Science

Smell and taste are really closely linked, so it is really hard to guess the flavour of the starburst when you hold your nose. About 90% of what we taste is due to smell. Both senses use similar receptors and rely on the same molecules to send messages to the brain about what you can taste and smell. Flavour is actually a mix of taste, smell, texture and other cues like temperature.

It is also important to close your eyes when you eat the starburst, as you can make unconscious links between colour and flavour. Our brain is really good at picking up associations such as a purple coloured sweet is likely to taste of blackcurrant. When the colour makes us expect something to taste a certain way, we taste what we expect unless it’s really different.

This colour association affects some people worse than others,  the pathways to the brain can get crossed over causing synaethesia. This might mean that when they see yellow – they taste lemon.

#TryThisTuesday: Honeycomb

honeycomb

Honeycomb or Cinder Toffee not only makes a great Bonfire Night snack, it’s also a fun and quick science experiment! Here’s our simple recipe for the honeycomb reaction:
1. Grease a baking tray with butter and set aside.
2. Mix 100g sugar with 2.5 tablespoons of golden syrup in a pan. Mix the two well before you heat the pan.


3. Gently heat the pan, try not to stir the mixture at this point just let it gently begin to melt.
4. Once you can see the sugar start to melt you can push the sugar around to ensure in melts evenly and doesn’t burn.
5. When all the sugar has melted turn up the heat so the sugar begins to boil and forms an amber coloured caramel
6. Turn off the heat and add one teaspoon of bicarbonate of soda, beat the mixture quickly as it begins to bubble up to incorporated all the bicarb then tip onto the greased baking tray.


7. Leave to set for 30-60 minutes then enjoy!

The Science

The heat causes the bicarbonate of soda (NaHCO3) to break down and release the gas, carbon dioxide (CO2). The gas gets trapped within the sugar, this results in the bubbles in your honeycomb.

honeycomb

#TryThisTuesday: Make your own Sherbet

sherbet

This week we’re taking on the science of sweets! Here is a super easy way to make your own sherbet powder at home.

All you will need is:

  • 7 teaspoons of sugar (either caster sugar or icing sugar)
  • 1 teaspoon of bicarbonate of soda
  • 3 teaspoons of citric acid in powder form

Mix your ingredients in a bowl and then take a small amount on a teaspoon and have a taste. It should fizz in your mouth.

Where does the fizz come from?

When you place the mixture on your tongue it reacts with the water in your mouth and produces carbon dioxide, this causes the fizzy feeling.

sherbet-equation

The reaction occurs because  acids, like the citric acid used here, release charged hydrogen particles when added to water. These particles will attack an alkaline (the opposite of an acid) such as bicarbonate of soda. The reaction produces more stable molecules – water and carbon dioxide.

If you pour water onto your mixture you should be able to see the reaction that’s happening in your mouth. You can actually feel the carbon dioxide gas being released if you hold your hand close to the surface.