As part of the conference, Susan Lennie and Eleanor Gordon presented this video detailing the student response to the introduction.
The written summary of the development of the intervention can be accessed below.

Find out the pros and cons of 360 degree meeting room cameras in practical sessions.
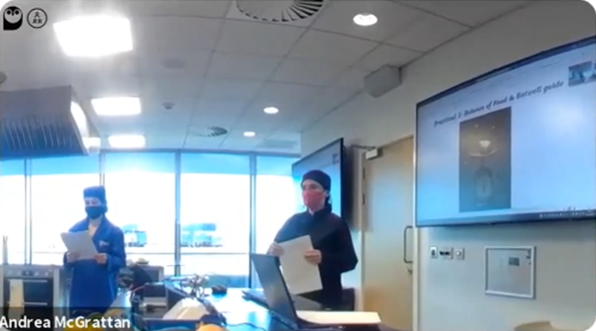
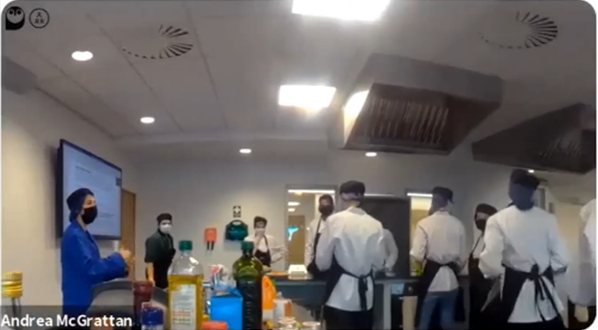
This practical session was based around students creating a meal to align with the recommendations of the EatWell guide, using ingredients provided in the food handling lab. The session involved a short introduction, followed by time for the activity, and feedback. At the last moment there was a request to record the practical session, and therefore a 360° camera was used as a quick solution – an ideal opportunity to test the camera’s capabilities.
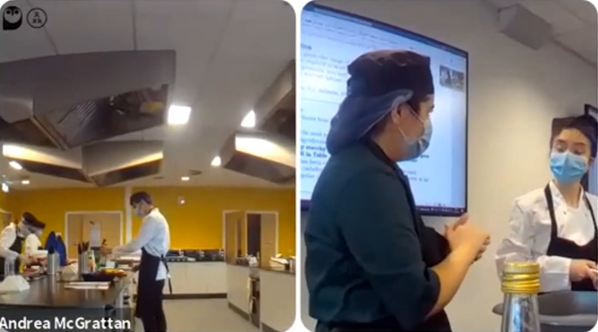
These rooms are not set up for ReCap, so having this portable method of recording allowed for the session to be captured. The camera was connected to Zoom so that a remote student could watch the session or review the recording. As it happened, no one watched the stream live, so there was no interaction with a remote participant. As shown from the screenshots below, the camera could cover the whole room without needing to be moved. It can also zoom in and out to focus on where the action was taking place.
The camera was quick and simple to set up, and lecturers used lapel mics to capture sound when they were addressing the class. The camera was placed on the demonstrators’ bench at the front of the room, where it could see the kitchen spaces as well as the session leads, and the whiteboard.
All present were made aware of the device. It was relatively unobtrusive and didn’t get in the way of the session – most people just forgot about it. This is a bonus as it means the lecturers don’t have to consider what to capture at various points during the session. They could also walk around the room naturally rather than being stuck at the fixed point of presenting from a particular spot at the front as the camera would follow them.
As a quick solution, it was easy to set up, and the predetermined settings allowed for much of the session to be captured. It provided a record of the practical session, though due to the level of automation in where the camera chose to focus, some detail and some sound was lost. For example, on some occasions, the camera would choose to focus based on an incidental sound in the room, like a pot being scraped. This kind of auto-selection would work better in a situation such as a seminar where everyone sits around one table with less background noise and more obvious turn-taking when speaking.
The camera also captured incidental discussions – as it was placed at the front where students were collecting ingredients, it captured discussions between students about what they were choosing to include in their meal.
It was also able to capture two areas simultaneously and display them side by side, allowing for an overview of the room as well as capturing individual discussions.
There are a range of applications for this type of device in a practical setting. For example, for a remote student, the device could be placed in a group of students so that some collaboration would be possible. This would allow them to be more involved in the practical aspect of the session, though of course it would not be a complete substitution for in-person attendance.
Though the session recordings are relatively long, once uploaded to Panopto, bookmarks could be added to allow students to quickly navigate to various parts of the session, for example the input and feedback.
Roisin Devaney, Susan Lennie and Andrea McGrattan, Nutrition and Dietetics, School of Biomedical, Nutritional and Sports Sciences
Art of the Possible Lightning Talk including a brief overview of this work at 24:22.
This post is about the use of Menti – a pretty polling tool that can show responses in real time on screen. Lindsey Ferrie used this to gather student feedback during an in-person event. Link to guides included.
In Biomedical, Nutritional and Sport Sciences this year there is a focus on improving assessment and feedback. Including student voice in this development work is key. As well as the normal routes for student voice, such as staff-student committees and module evaluation forms, there were certain questions that staff had in mind which could reveal a lot about how students were feeling about this aspect of their course.
The formal module evaluation forms don’t always capture a large sample from the student body, and as with any survey, generating a high response rate is very difficult, and can sometimes end up only revealing the most polarised responses. Informal live response tools were a potential way to gather large amounts of more representative data, as well as demonstrating that feedback is wanted, heard, and acted upon within a shorter cycle. It is also much more convenient to capture a response immediately when students are in the room.
Having seen Menti in use during the FMS TEL Conference, the decision was taken to try it out in a much bigger setting – the inductions for all programmes in the School. Overall, this includes around 1500 students.
A useful aspect of Menti in this situation was the capacity to provide a wide range of question types, as well as the ability to see answers as they are coming in. Naturally, this has some disadvantages too – students’ responses may be coloured by what they see on screen if this is displayed. Possibly due to its anonymous nature, students provided some genuinely challenging feedback which proved very useful.
When in use, Menti allowed for the sessions to be more interactive as sharing live responses is quite immersive. It also allowed for the presenters to directly react and respond to things as they came in and broke the ice between students and staff. This can be useful for quick questions about content as well as student voice activities, for example polling the level of understanding of a concept at the start and end of a teaching session.
In terms of providing evidence to share with other colleagues, or at committees, Menti retains the responses for you to review, and can generate lists of entered comments. It isn’t designed as a statistical analysis tool, so comments don’t come in a convenient format for analysis. Graphs can be screenshotted for simple sharing if needed. It is of course possible to read through the comments and type up an overview of common themes yourself if needed.
The instant feedback received highlighted that some students weren’t entirely satisfied with the feedback they were receiving on their lab reports. Based on the responses, the School was able to put on a dedicated feedback session to further explore this, and to find out what could be improved, and have already been able to implement some changes.
You can create a free account on Mentimeter.com. This free account has limits on how many individual questions you can make, but you can always make multiple presentations and switch to them when sharing your screen. The university does not have any subscription to this service. As such, do not ask students to input any personal or sensitive information as this won’t be covered by our data policies.
When presenting, simply ask the audience to visit the site and enter the provided code that you show on the screen. When you’re ready, you can display the results to your audience. See the FMS TEL Community for a full walkthrough.
Lindsey Ferrie, Senior Lecturer, School of Biomedical, Nutritional and Sport Sciences
This post is about using audio recordings of patient consultations in teaching. Commentary was added to the recordings by the lecturer to create a richer resource.
This case study concerns Dietetics and Nutrition module NUT2006, Measurement and Assessment of Dietary Intake and Nutritional Status. As part of this module, dietary interview consultations are recorded so that the students can listen to these as examples. The FMS TEL Podcasting Webinar provided initial inspiration for what could be done with the recordings to enhance them. With a little more support, a new audio resource has been developed which adds audio commentary to the recorded consultations, highlighting various features.
The work of Dietitians and Nutritionists involves gathering information from individuals and populations on their recent or typical food intake. This enables them to analyse nutrient intake and understand dietary behaviours so that they can make suitable recommendations. Taking a diet history, or a 24-hour dietary recall, involves a structured interview with questions exploring habitual food intake, timing of meals, cooking methods and quantities. The effectiveness of the interviewers’ questioning technique impacts upon the quantity of information gathered and the quality of the nutritional analysis that can be undertaken. Students are working towards proficiency in these skills. Listening to recordings of these interviews exposes students to examples which will support in improving their skills when they perform these tasks for themselves. They can also practice analyzing the data provided from the audio recordings.
The recordings themselves are a very rich resource, which could be used in a variety of ways to help students improve their practice. The following task was developed, which required teaching staff to add audio commentary to the interviews.
Students first watched a short lecture on best practice for conducting interviews. They then listened to a recorded interview, by an anonymous peer, and made notes critiquing the effectiveness of the questioning techniques and determining if the quality of information obtained was sufficient to undertake nutritional analysis. Next, they listened to the same interview with professional commentary provided by staff, highlighting what could be improved and were asked:
This task was designed to allow students to develop their skills in conducting the interviews, and to reflect on practice and identify areas for development. The use of peer recordings meant that there would be a range of areas to comment on, making the task itself much more active than simply listening to a professional. Students were also offered more interview recordings to practice this task further.
A recording was chosen that demonstrated a range of teaching points. Having listened to the recording and made brief notes, cuts were then made in the original recording at natural stopping points, for example, after the participant and interviewer had discussed breakfast. It was important to allow the original recording room to breathe by not interjecting too often – this makes for fewer edits too.
You can record audio with a range of devices – Windows laptops can run Audacity, and Macs come with GarageBand. It is also possible to record audio clips on a smartphone and import them. When doing any recording, make sure to do a quick test first to ensure there is no unwanted background noise – just record a few seconds and listen back. GarageBand was used in this case, but the Audacity user interface is very similar.
The first 20-minute recording took around two hours to produce, but this time included learning how to use the software. The screenshot below shows how the editing process looks in GarageBand. The top half shows the three tracks that were mixed to create the final output. By cutting and arranging the various sections, it is possible to quickly add commentary and even intro music to the basic original recording.
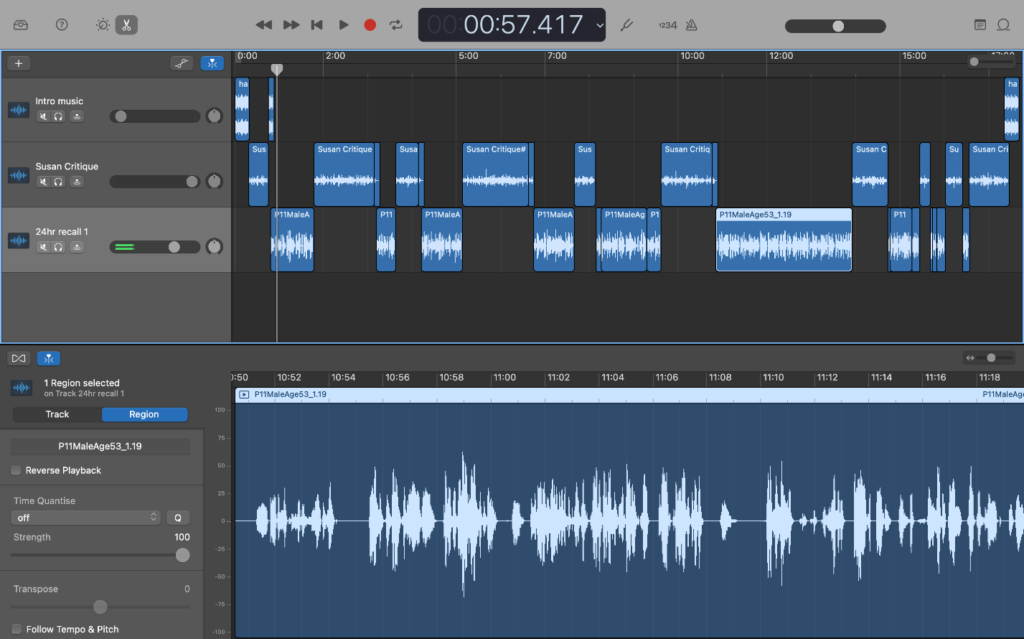
The project file, which contains all of the information in the top half of the screenshot such as individual tracks and cuts, can be saved for later use. This is helpful if you want the flexibility to change the content, or re-use elements. The single stream of audio can be exported separately as an audio file and embedded into Canvas or the MLE with accompanying text and other resources to build the desired task.
It is natural to worry about quality when producing an audio or audiovisual resource for the first time as the content should convey a level of professionalism matching its purpose. As long as content is clear and understandable, it will serve for teaching. Making a clean recording can be done relatively simply by avoiding background noise and speaking at a measured pace and volume. You can add a touch more professionalism to your recordings by adding a little music to the intro and using some basic transitions like fading between different tracks if needed, but there is no need to go out and buy specialist equipment. The content of the recordings was linked very closely to the students’ tasks and mirrored how they may receive feedback in future by showing what practitioners look for in their interviews. This clear purpose alongside the care taken in producing the audio ensures that this resource is valuable to listeners.
While at first it seemed like a big undertaking, a quick YouTube search for instructions on using the software, and then having a go with the audio recordings has opened up a new avenue of teaching methodology – it was a lot easier to do than it first appeared, and in total took around 2 hours. The software has a lot of capabilities, but only the basics are really needed to produce a high-quality, rich teaching resource. Commentated practitioner interactions allow teaching staff to draw students’ attention to key moments while remaining in the flow of the interaction, signposting how students can reflect on practice and develop their own interviewing skills.
Susan Lennie, Senior Lecturer, Biomedical, Nutritional and Sports Sciences

Having a new assessment system (Inspera) offers the opportunity to redesign assessments, and there are many examples of authentic assessment already running throughout FMS.
Authentic assessment covers a wide range of assessment techniques, including setting tasks that students may be asked to undertake in their future careers. It also covers the setting of other purposeful tasks – assessments that have value beyond simply testing knowledge, such as reflective tasks.
During the FMS TEL conference, a session was run that covered several examples of authentic assessment. Examples came from the School of Dentistry, presented by Ruth Valentine and Chris Penlington, the School of Psychology’s Psychology of Religion module led by Patrick Rosenkranz, and the School of Biomedical Sciences, presented by Lindsey Ferrie. The resources can be accessed via the links below.
Check out our previous posts on Inspera for more information, or read more on the LTDS website and Inspera’s corporate homepage.
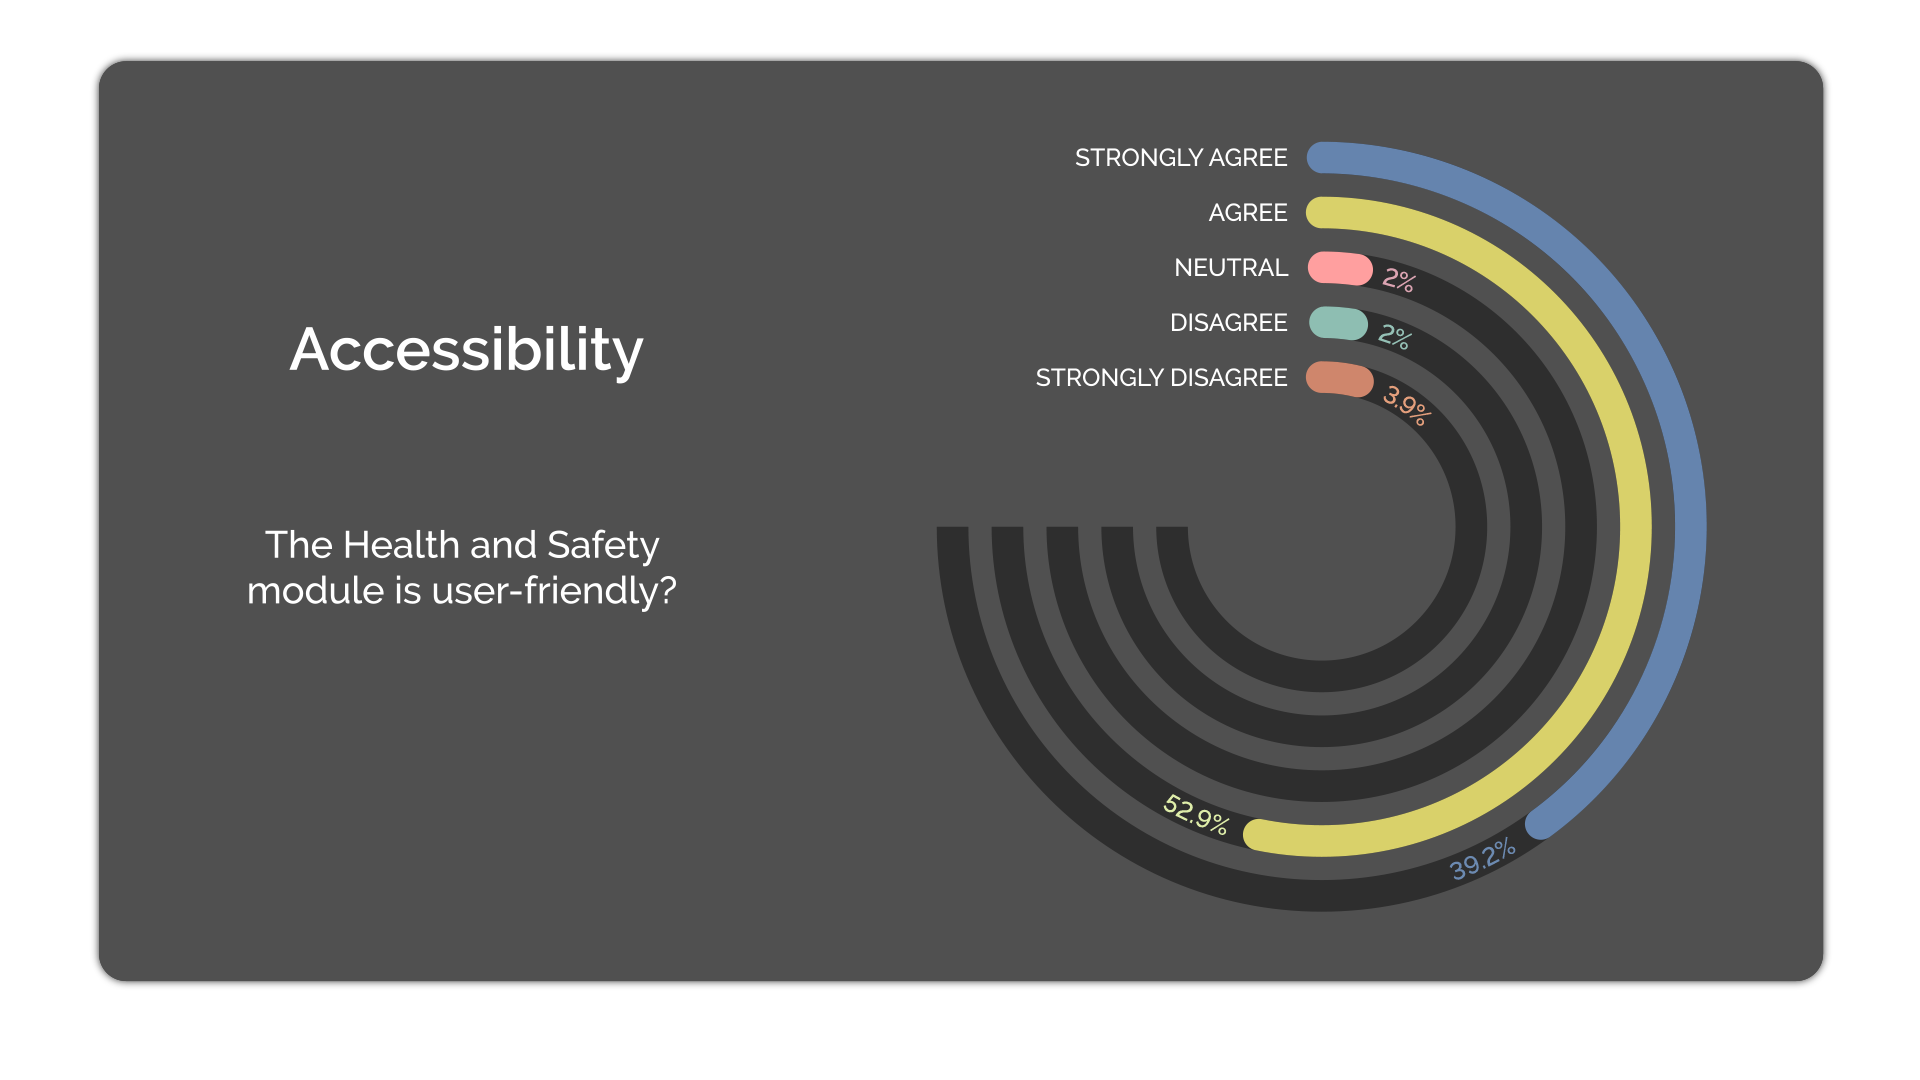
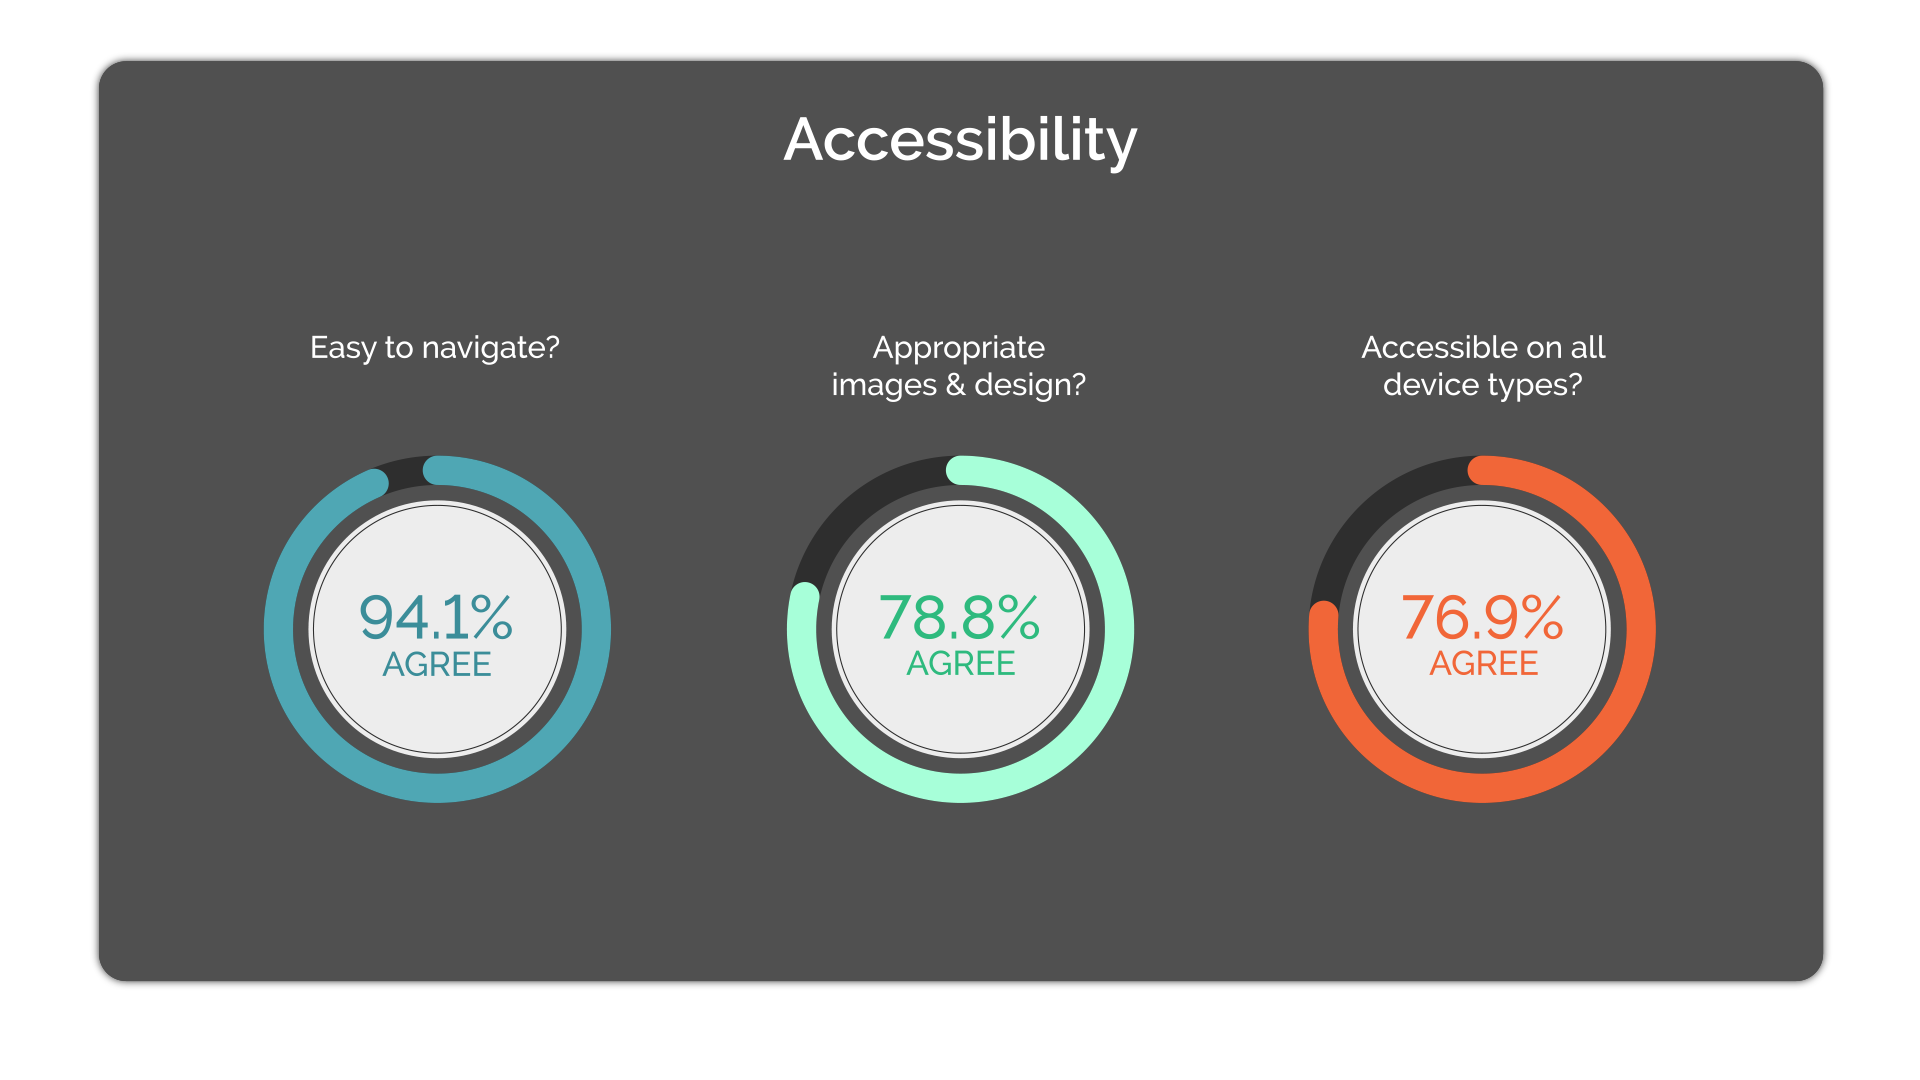
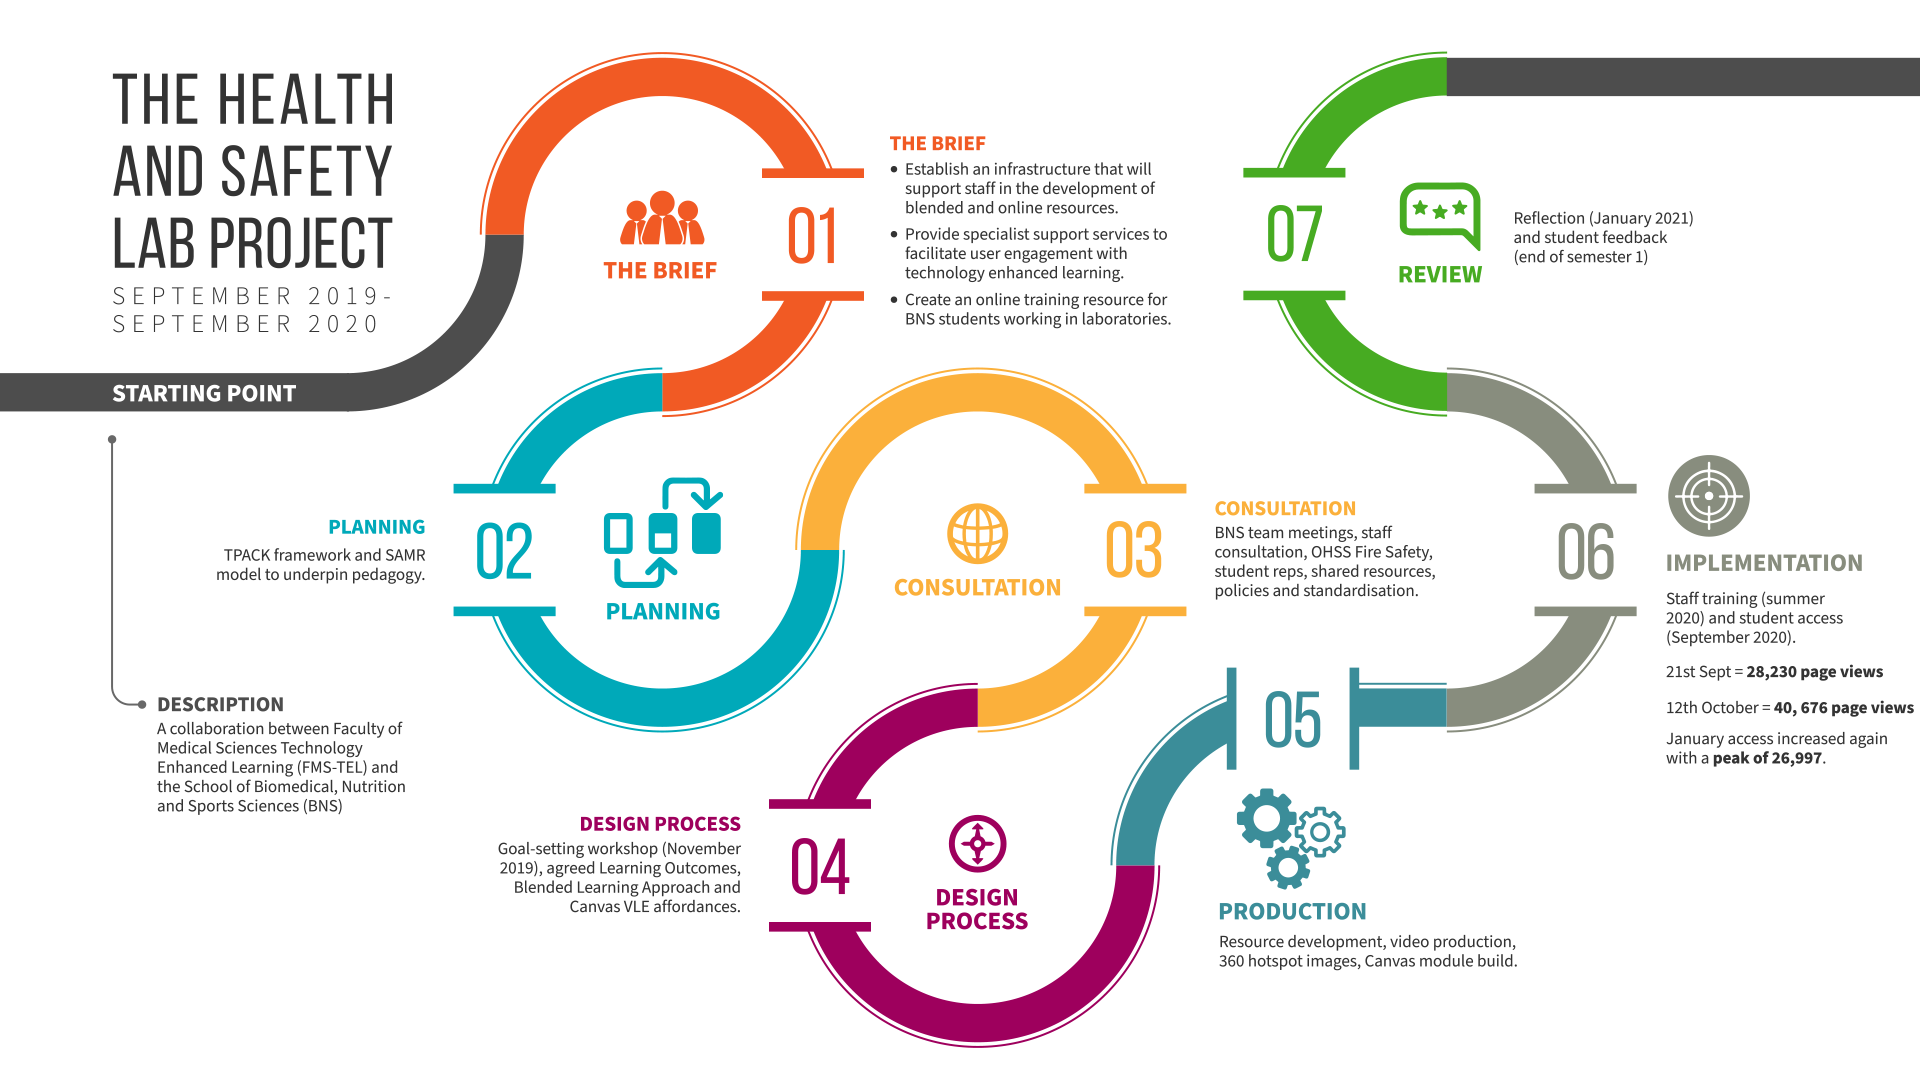
In September 2020, the School of Biomedical, Nutritional and Sport Sciences launched their new Laboratory Health and Safety Module. This online package was designed to give Stage 1 students an induction into key areas of laboratory health and safety, but also as a revision resource for Stages 2 and 3. Future content development will look at additional resources specific to the later stages of study.
Development of this module required a complete redesign of laboratory health and safety resources, moving from paper-based module handbooks to interactive, online blended materials. We had to establish an infrastructure to support both staff and students with this change. We also used key design principles and frameworks to facilitate user engagement with interactive resources.
A collaborative team was formed between the Faculty of Medical Sciences Technology Enhanced Learning team (FMS-TEL) and the school of Biomedical, Nutrition and Sport Sciences (BNS) to amalgamate technological, pedagogical and content knowledge.
Our Goals
Student engagement: Academic staff were finding it difficult to monitor student engagement with the paper-based module handbook and laboratory code of conduct and wanted to have a more standardised approach to ensure that all students are aware of and complying with health and safety requirements in the laboratory.
Blended Learning: We did not want to simply replicate the paper materials into a digital format, so a lot of time was spent thinking about blended learning pedagogy.
New and interactive Resources: Access to the new VLE, Canvas, provided us with a more sophisticated platform to produce an interactive module with new approaches to learning.
Staff Autonomy: We did not want to rely on external tools and specialist software otherwise upkeep and editing would be a challenge once staff handover was completed.
The Project Roadmap below summarises key milestones from the project:
Achievements
Clear Signposting and Navigation
The intention is that students can dip in and out of sections in whichever order they prefer. However, the laboratory safety section was divided into three ordered segments:
Multi-disciplinary
Some resources cover all three strands of Biomedicine, Sport and Nutrition so we decided to host one course for all. Subject specific materials are clearly labelled. We attempted to introduce lock and release and mastery pathways so that students would only access their own subject areas, however some students are multi-disciplinary so this did not work. Also, there was too much of a time delay with the Canvas mastery pathways function that we felt this was not appealing to students.
Humanising/Personalisation
We felt it important that students could connect with key staff members and that video welcomes would achieve this.
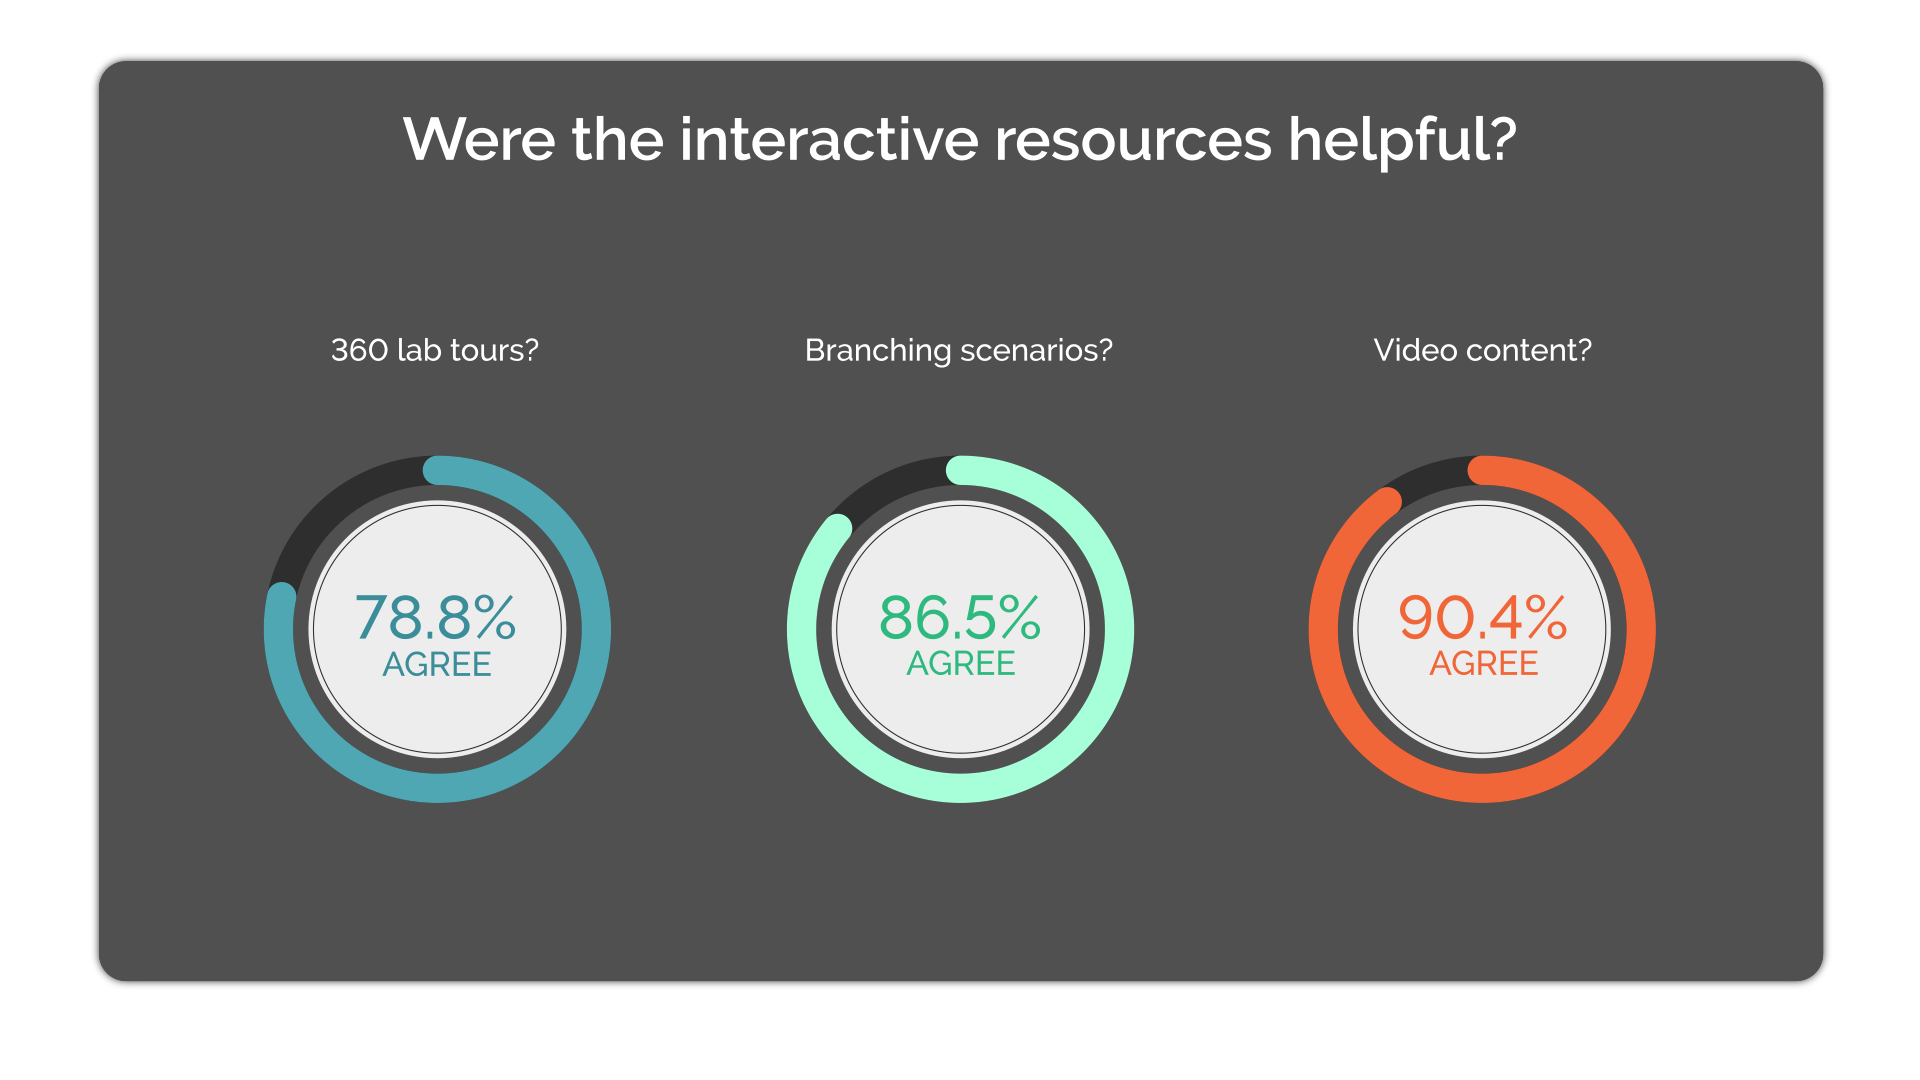
Interactive Resources
It was always planned that we would use 360⁰ images to allow students the opportunity to become familiar with the laboratory environment before attending in person. This is to help alleviate some of the anxiety that our students experience when first entering a large laboratory space.
Innovative assessments
Canvas enabled us the opportunity to embed and host new online interactive assessments.
(i) 360⁰ hotspots hazard identification
We wanted to create a hazard identification exercise in a safe environment. 360⁰ images allowed us to create an interactive digital version of the laboratory with a number of hazards included. This would not have been safe or possible to do in a physical laboratory space.
The 360⁰ materials were hosted externally on theasys.io There are many tools which allow you to add hotspots to 360⁰ images but the problem is that they are never hidden. However, with the ability to upload custom hotspots in theasys we were able to create and upload a transparent image to use as an invisible hotspot.
(ii) Branching Scenarios
Branching scenarios allow students to make decisions in a safe online environment, helping them to understand the consequences of their choices.
Self-management of learning
We added features to encourage students to monitor their own progress:
For future developments, we are considering how we may be able to generate course completion certificates or Digital Badges.
The new course went live in September 2020 for the start of the academic year with 1176 students enrolled. Canvas analytics indicates good interaction at appropriate times.