Case Study – Unconscious Bias in Healthcare

This case study concerns a range of activities created for MCR8032 Clinical Research Delivery in Practice. The module leader, Fraser Birrell, put me in touch with his colleague, Associate Lecturer Ann Johnson, to assist in the development of a piece of learning about Unconscious Bias in Healthcare.

Ann Johnson has been a Patient and Public Involvement (PPI) Advocate, Lay tutor, and facilitator for twenty-five years, researching and creating a Patient Involvement Framework for Leicester University Medical School. She has conducted extensive community outreach in London, Leicester, and Florida USA with the goal of bridging communications between patients and practitioners. She is continuing her work as an Associate Lecturer and PPI Advocate at the School of Medicine.

As part of this module, it was important to ensure that a patient-centred approach to healthcare was highlighted. As such, Ann’s experience in the field allowed her to challenge students to look at healthcare – and clinical trials in particular – from the patients’ points of view.

One particular topic inspired Ann to focus on the topic of unconscious bias in more detail. In cases of hypertension, GPs had been trained to prescribe different drugs and treatment plans to people based on ethnicity, even though there is no evidence to support this course of action (Gopal, D.P. et al., 2022). This is an example of taught bias – but at the same time, GPs were making assumptions about patients’ ethnicities which could also be erroneous. Naturally, this is an area of concern for patients.

Equality, Diversity and Inclusion and Bias

The difference between EDI concerns and bias is important to clarify at this stage. While EDI principles are focused on actively working to improve outcomes, unconscious bias is present in all of us as a survival instinct and extends beyond those ‘protected characteristics’ formalised in EDI policies. Unconscious bias allows us to make quick decisions based on assumptions – for example choosing to cross the road to avoid encountering someone walking along with an unleashed Pitbull Terrier.

As a clinician, it is especially important to recognise one’s own potential for unconscious bias as it can affect decision-making, resulting in poorer outcomes for some patients. When this bias extends to choosing who to include in clinical trials, it is easy to see how misconceptions or omissions could be compounded.


Discussion

You have been asked to become involved with the recruitment for the trial of Nosuchximab, a targeted therapy for Paediatric Lymphoma. The research target group is children aged between 02 and 14. There is a significant disparity in survival rates of the South Asian population and white European population. You have been asked to recruit children from the target age range. However, the NHS Foundation Trust site for the Nosuchximab trial is located within in a region where this population is under-represented – however, it is present (although in minimal number).

  • How might Unconscious Bias impact the outcomes of this trial?
  • Is it important to strategically recruit this cohort?
  • How might you put in place a strategy for recruiting those particular subjects?
  • What attempts should be made to minimalize barriers to their inclusion?

The above activity challenges students to consider a range of complex factors and is designed to explore the recruitment process for clinical trials, which can be affected by unconscious bias. As such, we designed a range of scaffolding activities to lead up to students exploring this topic in a more confident and informed manner.

The learning was divided into three stages, supported by Canvas’ tools.

  1. An introduction to unconscious bias with a test-your-knowledge quiz. This built understanding of the basics, and used the quiz to instil confidence into the students that they had understood the basics. The introduction was also written in such a way to highlight that this was a supportive environment.
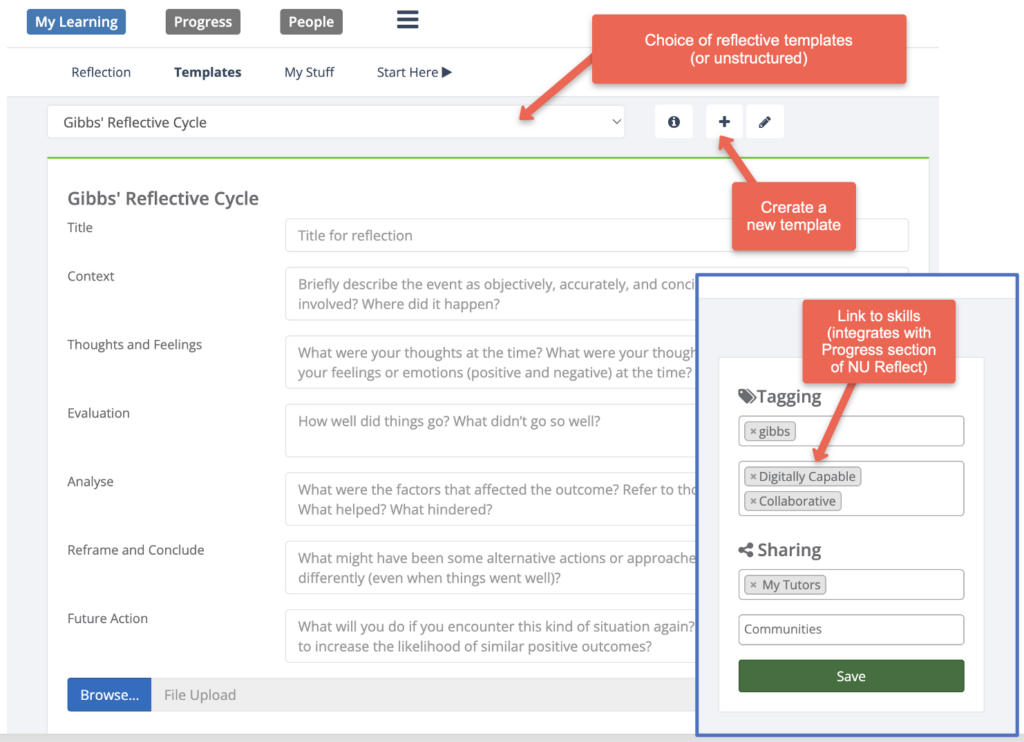
  2. An opportunity to explore the effect of unconscious bias through a key reading, and a test that students could try to identify their own potential biases, followed by reflection in one of a few ways.
  3. Attempt the activity in discussion with others. A webinar is also available for students to join and discuss the activity with Ann and the other students, as well as to explore the topic further if needed.

We understood that the topic of unconscious bias could be challenging for students to confront, as it is intensely personal and potentially triggering. To allow students to explore this area in a supportive way, we suggested a range of activities, from private reflection to group discussion, about the topic in general, to allow students to examine this in an environment where they felt comfortable. We felt that this was especially important as this meant students would not feel they may be judged or blamed for sharing their experiences and feelings about bias, and this would make the entire topic much more approachable, and the learning more effective.

Next Steps

The activities will soon be live for students to try out the materials and share feedback. Anything highlighted by the student feedback will be discussed, and appropriate changes made to the activities if necessary. These materials will then run as part of the module next year. Further distribution of this content can also be done via Canvas Commons, should other module leaders wish to incorporate them into their teaching.

References

Gopal, D.P., Okoli, G.N. & Rao, M. Re-thinking the inclusion of race in British hypertension guidance. J Hum Hypertens 36, 333–335 (2022). https://doi.org/10.1038/s41371-021-00601-9

Using overlays to make engaging videos

This post, kindly provided by Module Leader David Thewlis, discusses the use of OpenShot Video Editor to add overlays into videos for teaching.

Check out the resources section at the bottom of this post for step-by-step guides.

Example taken from MEE8079, Assessment in Medical Education, 2023

Why I use overlays?

I started my approach to online lecturing by recording in PowerPoint. Then I moved to recording in ReCap/Panopto. Neither were quite right for me, I felt limited in my delivery compared to in-person teaching. I found using props difficult when you only take up a small portion of a screen and emphasis on what really matters can be lost when you can’t feel the energy of the room.

I realised my biggest issue with my lectures was that I was relegated to a tiny corner and the slides had become central.

You want the slides to be condiments to what you’re saying, not be the main event.

Patrick Winston, How to Speak

Bell Hooks writes about academics hiding behind the pedestal lose engagement with the class. Unfortunately, online lectures can create a similar barrier between us and our students. Overlays is the approach I decided on to help reduce this barrier in my teaching.

I hope I am not the only person who spends hours watching videos on YouTube for inspiration. The videos I found most interesting (even if they were long) were simple speaker focused talks, which showed media when it was helpful. Replicating this type of content was my aim.

What can you use overlays for?

Overlays replace slides by allowing the speaker to have greater control over where and when to place media. You can incorporate pictures, videos, audio, and titles into a single talk with reasonably little skill (I have managed – you can too!). You can choose to direct focus in the frame. Wes Anderson has made a film director’s career out of this skill, perhaps we can learn from it.

Types of overlays:

  • Picture – these can act very much like slides. Placing them in a corner of the screen, or covering the whole screen can offer different experiences.
  • Titles – these are text which appears in picture. They can be used as a title, but I like to use them to correct a mistake I’ve made in wording I also use them to throw forward to an idea or call back something discussed earlier in the lecture or course.
  • Video – adding another video within your video can serve as a much better example than just simple explanation. I have done this a few times with examples of good teaching models recorded by my colleagues. I have also seen some effective uses of people having brief conversations with themselves using picture in picture overlays.
  • Audio– if you have a flair for the dramatic backing music might help at some point in your talk. Audio Commentaries can also create a richer resource, see our case study.
  • Emojis – They’re there. Why not?

How I set up overlays

You will require some basic video editing software – I like OpenShot Video Editor. It’s free and reasonably simple. Simplicity is the theme of my advice.

1.    Create/choose your media

Create a recording of your lecture using whatever recording device you have available. Errors or issues with the recording can be fixed in the editing process if needed. In this example on YouTube an instructor made a mistake with wording. Rather than re-record the entire video, which is otherwise good value, they corrected with an overlay title.

Making your images can be equally as easy. Saving pictures to an appropriate folder is one approach. I like to insert my pictures into a PowerPoint presentation to give myself the opportunity to get the structure clear in my head. I then save each slide as a picture. 

2.    Organise your content

Keep it simple and experiment with different formats. Layouts, text sizes, fonts, and colours all can have an impact on what you are communicating. Ensure that your titles are legible, and contrast appropriately with your background. I like the background to be the video of me generally, but I’ve seen solid examples of it being a slide or set of slides.

3.    Put the video together

I recommend you take your time editing your first few videos.

Regardless of the software you decide to use I recommend you save your project often! Losing an almost completed video is very frustrating.

You can clip your videos to remove errors. Insert other videos in the middle of your talk. Explore effects if you are delivering a narrative.

The export time can be quite long (mine usually run around 40 minutes for a 10-15 minute video). This is an opportunity to make a coffee, have a stretch, and look away from a screen.

Conclusion

Although it may need more initial time investment it is worth it. Using overlays can add a personal touch to any asynchronous video content.


Resources

References

  • Winston, Patrick (2018) How to Speak. MIT OpenCourseWare
  • Hooks, Bell (1994) Teaching to transgress : education as the practice of freedom. New York: Routledge.

Technology Showcase – UTME Study Day 2023

The FMS TEL team participate in an annual study day on the Utilising Technology in Medical Education (UTME) module offered by the School of Medical Education.

The module aims to raise students’ awareness of how technology enhanced learning is currently used in health care education and gives students the opportunity to explore technologies and investigate theoretical underpinnings. Based on these aims we put together a 3 part presentation.

Part 1 – Tools for Student Interaction

PowerPoint Slide: FMS TEL Interactive Content, Instant/Quick Wins

Emily introduced a number of TEL tools including; Menti, vevox and padlet. Each tool was discussed; outlining its uses, pros and cons. Current examples of content designs, interactive activities and animations used throughout the faculty were shared.

Part 2 – Collaborating and Facilitating Group Work

PowerPoint Slide: FMS TEL Collaborating with Microsoft

Simon demonstrated how to use Microsoft 365 to co-author and co-edit documents, presentations and spreadsheets. Students were shown various features including; reviewing mode, version history and how to use Sharepoint to monitor breakout room activities.

Part 3 – Teaching Tools

PowerPoint Slide: FMS TEL Teaching Tools

Eleanor shared her experience of teaching with Zoom/Teams and tips on how to humanise online sessions. She discussed common barriers, such as awkwardness or long silences and strategies or tools to use as solutions.

Technology Showcase – UTME Study Day

This weeks post shares a session FMS TEL were asked to participate in a study day on the Utilising Technology in Medical Education (UTME) module offered by the School of Medical Education.

The FMS TEL team were asked to participate in a study day on the Utilising Technology in Medical Education (UTME) module offered by the School of Medical Education.

The module aims to raise students’ awareness of how technology enhanced learning is currently used in health care education and gives students the opportunity to explore technologies and investigate theoretical underpinnings. Based on these aims we put together a 3 part presentation.

Part 1 – Tools for Student Interaction

PowerPoint Slide: FMS TEL Interactive Content, Instant/Quick Wins

Emily introduced a number of TEL tools including; Menti, vevox and padlet. Each tool was discussed; outlining its uses, pros and cons. Current examples of content designs, interactive activities and animations used throughout the faculty were shared.

Part 2 – Collaborating and Facilitating Group Work

PowerPoint Slide: FMS TEL Collaborating with Microsoft

Michelle demonstrated how to use Microsoft 365 to co-author and co-edit documents, presentations and spreadsheets. Students were shown various features including; reviewing mode, version history and how to use Sharepoint to monitor breakout room activities.

Part 3 – Teaching Tools

PowerPoint Slide: FMS TEL Teaching Tools

Eleanor shared her experience of teaching with Zoom/Teams and tips on how to humanise online sessions. She discussed common barriers, such as awkwardness or long silences and strategies or tools to use as solutions.

Embrace the silence: the use of timers in synchronous teaching

Learn how to use timers in your PowerPoint presentations to aid questions and answers for students and yourself.

As teachers or trainers we can often feel the pressure to fill the silence when presenting. How long should you wait for an answer? Or a better question might be, how long do you think you wait?

Research suggests that at least 3 seconds can provide positive outcomes for both teachers/trainers and students (Rowe, 1972).

Each task may require different lengths of silence, you will want to think about the time the students will need to:

  • process the question
  • think of the answer
  • formulate a response
  • (if teaching virtually) unmute or type their response

The concern is to provide the period of time that will most effectively assist nearly every student to complete the cognitive tasks needed in the particular situation.

Stahl, 1994

You may find yourself counting the 10 or 15 seconds in your head, but still the silence can feel unbearable.

PowerPoint Animations to the rescue

Using a consistent slide design with an animation will not only relieve the pressure on you to keep track of the time but also provide cues that students will become familiar with as your teaching progresses.

Below are examples and instructions for 4 different types of animations you can create in PowerPoint, ranging from super easy to slightly complex. At the bottom of this post you will find a template document of all the examples shown plus a few more complicated designs which you can download and use in your own presentations.

Example 1: Stopwatch

Example stopwatch PowerPoint animation
  1. Insert a circle and style as required (holding shift will help you draw a perfect circle)
  2. Add a “Wheel” animation to the circle and adjust to your chosen duration (max of 59 second)
  3. Add the stopwatch icon (Insert > Icons > search for “Stopwatch”)

Example 2: Progress Bar

Example progress bar PowerPoint animation
  1. Insert a rectangle, remove the outline and choose a fill colour
  2. Add a “Wipe” animation to the rectangle, using the effect options drop down change the direction to “From left” or “From right”. Adjust to your chosen duration (max of 59 seconds)
  3. Insert a second rectangle on top of the first, remove the fill colour and style the outline as desired.

Example 3: Count Down

Example count down PowerPoint animation
  1. Create a text box for each number required, style as required
  2. Add the “Disappear” animation to all text boxes
  3. Set the first number to start “on click” with a 1 second delay
  4. Set all other numbers to start “after previous” with a 1 second delay
  5. Stack each text box on top of each other in the correct order, you may want to use the arrange menu or the selection pane to assist with this
  6. (optional) Add a text box at the back stating times up

Example 4: Scrolling counter

Example scrolling counter PowerPoint animation
  1. Insert a rectangle, with no fill and an outline of your choice
  2. Insert a text box and type in the required numbers, with a new number on each line
  3. Add the “Lines” animation to the text box, move your text box so your first number aligns with the green arrow and your final number aligns with the red arrow (further guidance). Adjust to your chosen duration (max of 59 seconds)
  4. Insert more rectangles above and below the first rectangle you created to hide the numbers as they scroll in and out

Resources

References

Rowe, M., 1986. Wait Time: Slowing Down May Be A Way of Speeding Up!. Journal of Teacher Education, 37(1), pp.43-50

Stahl, Robert J. & ERIC Clearinghouse for Social Studies/Social Science Education.  1994,  Using “Think-Time” and “Wait-Time” Skillfully in the Classroom [microform] / Robert J. Stahl  Distributed by ERIC Clearinghouse [Washington, D.C.]  <https://eric.ed.gov/?id=ED370885>

Scaffolding Reflection

This article outlines the rationale for scaffolding reflection and describes the developments, which will be available across the University by September 2022.

Structured reflective templates are currently being piloted in NU Reflect. This article outlines the rationale for scaffolding reflection and describes the developments, which will be available across the University by September 2022.

Scaffolding

A picture containing scaffolding, roof. Royalty free image from Pixabay

Scaffolding provides a great metaphor in Education. In the construction industry, scaffolding provides temporary support and helps shape the developing building. Scaffolding was first used as an educational concept, by Wood, Bruner, and Ross (1976) to describe the support given by an expert in one-to-one tutorials – something akin to a semi-structured interview.

Scaffolding is also a useful metaphor in reflective practice. A series of questions or prompts can provide the learner with a structure to reflect on. There are many structured frameworks which can be used to scaffold reflection. Perhaps the best known are Gibb’s reflective cycle (Fig 1). This involves 6 stages, each with questions to encourage the learner to go beyond purely descriptive accounts, to incorporate reflective self-evaluation and also make plans to improve future performance.

Overview of Gibb’s Reflective Cycle

Over time, it is hoped that the use of such frameworks will progressively increase learners’ reflective capabilities. This may be enhanced by sharing, discussion and guidance from educators, particularly in the early stages of developing reflective skills. However, like the use of scaffolding in construction – eventually that structure and support may no longer be needed, after developing as an independent reflective practitioner.

Structure can be a double-edged sword though. Too much structure can reduce engagement (everything else being equal) and long ‘forms’ may be potentially intimidating or off-putting to some. Motivation is key. Aside from the obvious use of summative assessment (itself bringing challenges to ‘authentic’ reflection) – learners need to perceive value and purpose to developing reflective practice. Is reflective practice seen to be valued by the course – is it embedded in the module/programme and referred to by teachers and in course documentation?

In some contexts, particularly many vocational subjects, reflective practice is explicitly required by professional bodies, with clearly defined process which have reflective elements, such as annual appraisals and CPD. In other contexts, without this driver, there are challenges to avoid reflection remaining an ‘abstract’ concept, particularly if there are limited ‘practical’ activities to reflect on. Obviously, clarity of purpose is important. Reflective frameworks can be used (or adapted) for a range of purposes, such as reflecting on an assessment, perhaps before and after feedback, with actions to prepare for the next assignment.

Sharing and discussion of reflection is another dimension – in some contexts, reflection may be purely private, in other contexts sharing with a mentor may be mandatory. Where shared, fostering a ‘safe’ environment for sharing and discussing reflections is particularly important for younger students, whist many (but not all) mature students are more comfortable with this.

Reflective Templates in NU Reflect

NU Reflect https://reflect.ncl.ac.uk is developed and maintained by FMS-TEL, has pedagogic support from LTDS, with academic lead (Patrick Rosenkranz / Katie Wray) and governance via DEC. NU Reflect was launched in September 2021 following a strategic review of ePortfolio. The redesign and rebranding was intended to help promote its core purpose of supporting reflective practice and transferable skills after may years of prioritising developments to support Personal Tutoring. As part of the strategic review, a recurring theme in the staff consultation was the desire for a prospective system to support reflective frameworks. Gibbs reflective cycle was the most widely used framework, used in contexts across all 3 Faculties – though often with minor adaptions for specific courses.

As such reflective templates were developed in NU Reflect and are being piloted in Semester 2 this year, with a view to being made available University-wide for 2022/3. The pilots have three ‘global’ templates available:

  • Gibbs’ Reflective Cycle
  • Driscoll Model of Reflection
  • Four Fs of Active Reviewing

Also, staff can create new templates to meet their particular module or programme requirements.

Pilot of structured templates in NU Reflect

Structured templates are nothing new, and were common in paper-based portfolios. However, there are some key advantages to integrating them in NU Reflect. For example, the reflections can be linked to skill(s) or competency(s) (either the Graduate Framework or programme-level frameworks), which integrates them in the ‘My Skills’ section of the Website . Reflections can also be tagged with course-specified or personal categories. The tools support longitudinal use throughout the student journey, rather than been restricted to an episodic learning event or being compartmentalised in a particular module. As such a learner can accumulate reflections and achievements against skills/categories over time. They also provide choice in sharing (or not).

The pilots are ongoing, but feel free to get in touch if you want to try them out.

References

Wood, D., Bruner, J. S., & Ross, G. (1976). The role of tutoring in problem solving. Child Psychology & Psychiatry & Allied Disciplines, 17(2), 89–100. https://doi.org/10.1111/j.1469-7610.1976.tb00381.x

Gibbs G (1988). Learning by Doing: A guide to teaching and learning methods. Further Education Unit. Oxford Polytechnic: Oxford.

360° Hidden Hotspots for Formative Assessment

A combination of 360° interactive images and interactive hotspot formative assessment tasks have been used to greatly enhance the Health and Safety lab training materials delivered in the School of Biomedical, Nutritional and Sport Sciences.

Within the school, there is a range of labs used in practical sessions. In previous years, preparatory Health and Safety Materials have been distributed on paper, or via PDF, however, one of the challenges of this mode of delivery is that some students do not necessarily engage with this material, resulting in some students not being well-prepared to work in these potentially hazardous environments.

These resources have now been moved to Canvas, and are available as general basic lab health and safety training in their own module. This module is targeted at Stage 1 Undergraduate students, though Stage 2 and 3 also have full access to the module for revision purposes. The module includes training on

  • Basic Health and Safety
  • Fire safety
  • General chemical, biological and physical hazards
  • General lab safety
  • Codes of practice

As well as module resources, there are also 360 lab tours that students can use to familiarise themselves with the lab environments, clicking through the images to ‘walk’ around the lab they might be using in the future.

A low-quality version to illustrate what students see when navigating the lab in 360.

The course concludes with quizzes and some ‘hidden hotspot’ tasks that students can use to test their own knowledge in hazard identification tasks. Interactive images like the one above have extra information inserted, which means that when students click on certain areas, information is displayed.

The interactive hotspots are created using the tool Theasys – 360 VR Online Virtual Tour Creator. One of the main advantages of using this tool is that the hotspot areas are hidden, meaning students have to explore the images in greater depth to discover the hazards. While there is a cursor change when a student hovers over the right spots, this is still much more hidden than in other tools, which highlight the hotspots with circles or other icons.

After the students have finished exploring the image, they can reveal all of the hotspots to find any they may have missed, allowing them to test their own knowledge. This could be enhanced even further by setting a Canvas quiz in the module or asking students to write a summary of the hazards found.

In addition to assessing students formatively, these 3D images and hotspot tasks provide a chance for students who may be anxious about the lab environment to explore these areas virtually first. This helps to minimise the risk of students being overwhelmed by the new space. Pairing the input with the virtual tours and, crucially, the chance to check knowledge builds confidence for all students, helping them feel well-prepared and knowledgeable about the lab environments before they even cross the threshold.

Resources

Previous blog post on 360 images

Theasys

H5P is here!!

Adding engaging and interactive content to your online course materials just got easier with H5P.  

This new online tool allows you to create custom learning resources such as branching scenarios, accordions, interactive images and videos, 360 degree virtual tours, simple formative quizzes, and so much more.   

Try it out:

Below is an example of a simple drag and drop exercise.

Webinar – Getting the Most out of Discussion Boards

This webinar ran twice on 17th June 2021, and we were happy to see colleagues from across the faculty and NUMed in attendance.

The webinar covered:

  • Have a range of discussion board task ideas to incorporate into your teaching 
  • Understand techniques to encourage student engagement 
  • Be able to set up different types of group discussion tasks 

Colleagues can find the resources from the webinar – including the recording and links to further reading – on the FMS TEL Community in Canvas. If you have trouble accessing the community, enrol here first.

View all FMS TEL Webinars

Zoom and MBBS at NUMed with Fiona Clarke

This case study concerns the MBBS programme at NUMed, and the different ways interactive tools and humanising teaching techniques on Zoom has helped facilitate learning during lockdowns. Zoom tools have been used in many different ways, and tools and tips from colleagues, internet searches, and the FMS TEL Humanising the Online Experience webinar have helped enhance these sessions.

From Beginner to Teacher

The prospect of teaching online can be quite daunting, especially if you don’t already have a lot of interest in or experience with the technology. Initially Paul Hubbard offered a help session for Zoom, which was a great help and provided inspiration on how to use the different tools in teaching. With practice, a lot of skills were developed and put into practice with students. After hearing about how Zoom is used in these MBBS sessions, colleagues now come to ask for advice based on the techniques and tools that have been used, and it’s great to be able to provide that for them now.

Humanising the Online Experience in Practice

Turn off Self-View

Some students are very shy, and a range of techniques can help them build their confidence. One among these is turning off self-view in Zoom, which only takes a couple of clicks. This is useful when teaching as well, as your own image can get a little distracting. At first you might worry that you are fidgeting without being aware, but it soon becomes easy to remember that you are still on camera. Students who had initially struggled with presentations or speaking in front of others did become more confident after these interventions, and after getting more comfortable with the Zoom environment.

Encouragement to Switch on Cameras

One thing that has worked very well is giving a lot of deliberate positive feedback to students about switching on their cameras. At the start of sessions students are greeted warmly and the benefits of having the camera on are shared. More importantly, efforts are made to share how lovely it is to see their faces when they do turn the camera on. Even saying something like ‘it’s so nice to see you’ or ‘I’ve missed seeing you all’ as cameras come on encourages others. Since making this deliberate extra effort, a lot more students turn on their cameras during sessions, which helps lift the atmosphere.

Teaching Ethics

Teaching concepts like ethics can be tricky, as they don’t lend themselves to a practical format. To help bring the subject material to life, the ethics segment of the Medicine, Acute Care and Surgery course was previously presented in a very interactive format in person. Students used flipcharts to collate information, moved around the room, worked in groups, did card sorting activities… initially this seemed difficult to replicate online, but it was possible to adapt the sessions using Zoom tools like polling, breakout rooms for group work, and interactive whiteboards.

Approximating In-Hospital Experience

One thing that has been a challenge for the programme is the lack of access to hospitals due to the pandemic, especially for The Hospital-Based Practice course. This is normally case-based, interacting with real patients. The decision was made to create staged patient interactions. These sessions work a bit like branching scenarios in that what the student chooses to do guides the rest of the interaction. A ‘patient’ acts from a script on the Zoom call, and the lecturer can coach the student through the interaction and offer feedback. If the student chooses to, for example, listen to a patient’s breathing, the lecturer provides a sound file of what the student hears when they do so. While this can’t perfectly replicate what it’s like on a ward (patients don’t follow a script!), students still get the chance to practice skills like decision-making and explaining diagnoses.

Advice

The best advice is to try things out and experiment in a Zoom meeting on your own, or with colleagues. Even if you have used a tool before, if it has been a while, just start up an empty Zoom meeting and refresh your memory before it’s time to go live. Google has also been invaluable – it’s possible to fix common issues or refresh your memory by finding software instructions online. Finally, don’t be afraid to try out new tools with students. The interactivity tools such as polls and whiteboards can help bridge the gap and make sessions more engaging.

“Don’t be afraid, just try it out! It’s so worth it, it makes such a difference.”

Fiona Clarke

Resources

Contact

Dr Fiona Clarke, Associate Professor and Senior Lecturer in Medicine, NUMed

Fiona.clarke1@nhs.net