Find out what the move to the cloud means for you – it’s all good news!
(Article reproduced from LTDS Newsletter)
In July 2023, the University will upgrade the ReCap service to the latest version of Panopto (the software that provides ReCap) and transition the service to being cloud hosted.
To achieve this there will be a period of downtime for ReCap during week commencing 24 July 2023. NUIT and Panopto are finalising the exact dates and duration of this downtime and further details will be communicated to colleagues when available.
All current functionality for the service will be maintained and existing content migrated to the cloud hosted service in line with the University’s retention policy (6 years for teaching room recordings and indefinitely for other content e.g. ‘My Folder’ content, conference recordings).
The benefits of upgrading include:
Improved copying within Canvas – making sharing links to recordings from previous years easier and quicker for colleagues, with automatic updating of links reducing the number of students encountering error messages.
Improved live streaming functionality – facilitated by the capacity provided by cloud hosting.
Captioning improvements – including an update to automatic speech-to-text that has improved ASR captions quality, and additional functionality within caption editing including ‘find and replace’ and confidence highlighting.
Distributed recording – allowing presenters in different locations to join the same recording.
Better integrations with other centrally supported software – including Zoom, Teams and H5P. A programme of communication will take place in the coming months to make colleagues aware of the downtime. During the 2023/24 academic year, we will also provide support in using the upgraded and new functionality.
Please send any questions about the upgrade, or any other aspects of the ReCap service, to ltds@ncl.ac.uk.
If you need to produce captions and a transcript, complete the caption editing first and then use the corrected caption file as your starting point for your transcript. Creating a transcript with the method below will not give you a file that can be used for captions.
When creating a transcript, you will need to decide a few things before you start.
Are timings important, and if so, what level of accuracy do you need? Does every utterance need a time, or would it suffice to signal timing points at the start of each slide, for example?
Is it important to know who is speaking? Training videos may not need this.
The first step is to download your caption file and copy and paste the text into Word. Then, transform your lines of text into a table using ‘convert text to table‘ and setting the number of columns to 4.
Copy your table from Word and paste it into Excel. Once this is done, you can use Excel to trim down your times and make them more human-friendly, using the MID function in a new column. Copy the formula down the whole row to quickly tidy all of the timestamps. This example trims the hours from the start time, and gets rid of the milliseconds and the end time completely.
The formula above (typed into B1) will look in A1 for the source text, and starting with the 4th character, output 5 consecutive characters into the cell, and then stop. You can change the numbers if you need a different segment or more characters, for example, if you want the hours included.
Pasting the resultant data back into Word means you can then use Word’s formatting tools to shape your transcript, adding columns as needed to denote speakers or other important information, and removing columns that contain redundant data.
Cutting and pasting the individual cells containing speakers’ words into a single cell will help improve the look of the document. Paste without formatting to combine the cells into one. Spare rows can then be deleted. Using Find and Replace to get rid of line breaks (search for ^p) and replacing them with spaces further tidies this up. You can then delete the redundant rows.
If you like, you can then remove the borders from your table. You could also set a bottom cell margin to automatically space out each row.
It is important to check your resulting transcript’s accessibility. As this method uses a table, make sure that a screen reader can read it in the correct order. You can do this by clicking into the first cell of your table and then pressing the tab key to move between cells – this is the order most screen readers will relay the text, so check it makes sense.
You can also choose to add a header row to your table to give each column a title. After adding this, highlight the row, click ‘table properties‘ and in ‘row‘ select ‘repeat as header row’. Ally in Canvas will not give a 100% score without this.
Once your transcript is formatted correctly, you can correct your text and fix mistakes in the usual way if you have not already done so for captions. The previous post on Faster Captioning has some tips and tricks to speed this up.
This post details some easy tips and tricks to speed up your caption editing process using Notepad and Word.
This post assumes users are using Panopto (ReCap), therefore Panopto guidance is linked for uploading and downloading caption files. Guidance for other products such as Streams, Vimeo and YouTube can be found on their own sites.
In FMS TEL many team members regularly work with captioning videos – whether these are our own instructional videos or webinars, or student learning materials. Recently a few of us in the team have been talking about how we caption videos – specifically, what processes we use. There are some of us in the team who use the inline caption editor in Panopto, and use speed controls to manage the flow of speech so they can correct as they go. Others prefer to download the caption files and work with them in a separate program.
Both methods have their pros and cons. Working within the online editor is often best for short videos, or those with very few corrections to be made. Sometimes, though, it is easier to manage longer or more error-prone caption files in their own window. This gives more space to see what you’re doing – as long as you can avoid messing up the file structure. You can also use proofing tools in Word to speed things along or cut out repeated mistakes.
The rest of this post details some tips you can try to speed up your own process if not using the online editor.
You may find that for the bulk of the editing you don’t even need to be listening to the video – the errors can sometimes be evident just from text.
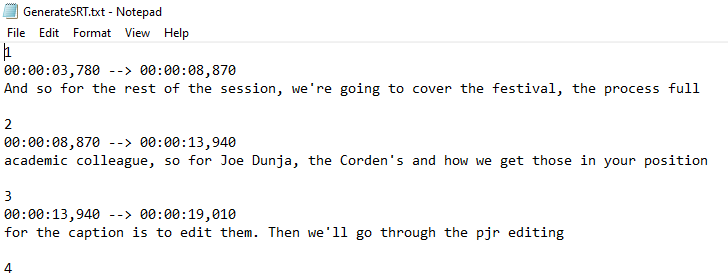
To work with captions outside of Panopto, you’ll first need to download the caption file. If there is no file to download, you’ll need to request automatic captions first. The caption file can be opened in Notepad. From there, you can edit each line of text separately. You must not change the file structure – so do not edit any of the other lines in the file, even the empty ones.
The file repeats in structure every 4 lines. The first is the sequence number of the caption, the second is the timestamp displayed in hours, minutes, seconds and milliseconds, the third is the spoken text and the fourth is an empty line.
If you want to take advantage of some more proofing tools, try copy and pasting your entire file into Word. This will allow you to use tools such as Spelling and Grammar check to remove duplicate words or transcribed stuttering sounds, and can also draw your attention to other oddities. The Spelling and Grammar tool automatically moves you through your document, saving time scrolling and searching. As well as checking spelling, this can also help trim unnecessary words from the text, making it faster to read.
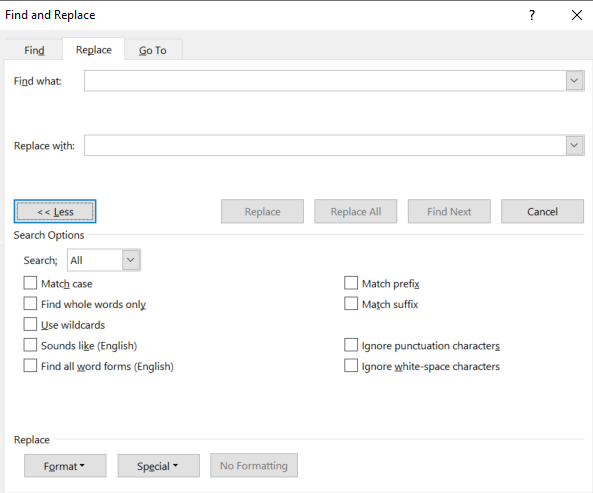
Find and Replace is useful, and can help…
If a name has been consistently misspelled – for example Jo/Joe.
If the speaker has a filler word that can be removed (I say “kind of” as filler so always search for and remove it from the captions!).
To replace key numbers or years that have been spelled out with their numerical representations (e.g. ninety-nine percent -> 99%).
Filtering out inappropriate language if it has been misheard by the auto software – if you see it once you can search the whole document quickly.
Filtering out colloquial spellings (gonna -> going to).
A good tip to ensure you only find whole words is to search them with spaces before and after the word itself. You can also use the ‘more’ option dialog and check the ‘whole words only’ box.
These extra options can help speed things up.
If you have been deleting a lot of items and adding spaces in their place, you might also want to do a find and replace for two spaces together and replace with one space. Run this a few times until there are no results. Similarly, you could look for comma-space-comma if you have removed a lot of filler.
These steps won’t fix everything, but can cut out some of the bulk and help speed up your process. After using these tools, read through the captions carefully again to fix any leftover errors.
Resulting from a few queries from FMS staff, we have added some information to the FMS TEL Community detailing how to add audio to a video using ReCap.
Staff had recorded footage of processes or experiments in laboratories which they wished to add a narration over afterwards. There was existing audio or noise on the video which they did not want to include. Rather than go through the process of removing the unwanted audio, ReCap/Panopto ignores the audio if the video is uploaded as a Secondary file. Audio can only be uploaded as a Primary file.
You may want to record your audio narration first using your mobile phone or software such as Audacity on a computer with a microphone. A common format would be mp3. Then upload your audio narration as your primary file and your video as a secondary file. Any audio in your video file is ignored and the new audio you recorded will be played instead.