During the recent Teaching and Learning Conference, prompted by Michelle Miller’s poster on Adobe Acrobat, we were asked if it was possible to add audio to a pdf document. Here’s how to do it:
Add Audio in Adobe Acrobat Reader
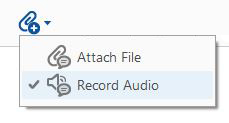
Click on Comments
Click on the attachments icon
Select Record Audio
Click the cursor where you want the audio to appear. A Sounder Recorder prompt will appear.
You now have two options:
record directly into acrobat
browse for an existing file
Record audio comments directly into Acrobat
Click the Record button and speak into your microphone. Click the Stop button when you have finished.
Click OK to add the recorded audio
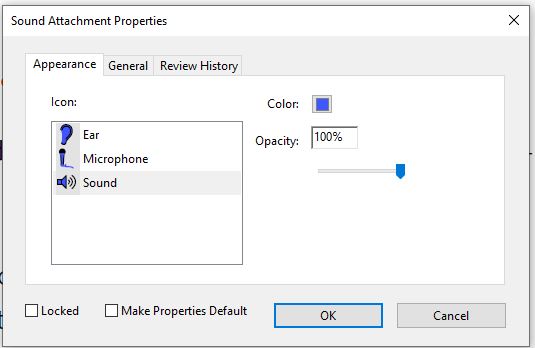
Select your preferred icon and colour, then click OK
Embed an existing audio file
Click the Browse button
Navigate to your existing audio file
Click Open
Click OK to add the audio file
Select your preferred icon and colour, then click OK
Note: this only supports uncompressed WAVand AIFF files.
This post is about using audio recordings of patient consultations in teaching. Commentary was added to the recordings by the lecturer to create a richer resource.
Introduction
This case study concerns Dietetics and Nutrition module NUT2006, Measurement and Assessment of Dietary Intake and Nutritional Status. As part of this module, dietary interview consultations are recorded so that the students can listen to these as examples. The FMS TEL Podcasting Webinar provided initial inspiration for what could be done with the recordings to enhance them. With a little more support, a new audio resource has been developed which adds audio commentary to the recorded consultations, highlighting various features.
Consultations and Recordings
The work of Dietitians and Nutritionists involves gathering information from individuals and populations on their recent or typical food intake. This enables them to analyse nutrient intake and understand dietary behaviours so that they can make suitable recommendations. Taking a diet history, or a 24-hour dietary recall, involves a structured interview with questions exploring habitual food intake, timing of meals, cooking methods and quantities. The effectiveness of the interviewers’ questioning technique impacts upon the quantity of information gathered and the quality of the nutritional analysis that can be undertaken. Students are working towards proficiency in these skills. Listening to recordings of these interviews exposes students to examples which will support in improving their skills when they perform these tasks for themselves. They can also practice analyzing the data provided from the audio recordings.
The recordings themselves are a very rich resource, which could be used in a variety of ways to help students improve their practice. The following task was developed, which required teaching staff to add audio commentary to the interviews.
The Task
Students first watched a short lecture on best practice for conducting interviews. They then listened to a recorded interview, by an anonymous peer, and made notes critiquing the effectiveness of the questioning techniques and determining if the quality of information obtained was sufficient to undertake nutritional analysis. Next, they listened to the same interview with professional commentary provided by staff, highlighting what could be improved and were asked:
Did you spot the same things?
Reflect on the comments and try to think about how you might use this knowledge to improve your own skills in gathering dietary information from service users.
This task was designed to allow students to develop their skills in conducting the interviews, and to reflect on practice and identify areas for development. The use of peer recordings meant that there would be a range of areas to comment on, making the task itself much more active than simply listening to a professional. Students were also offered more interview recordings to practice this task further.
Adding Commentary with GarageBand
A recording was chosen that demonstrated a range of teaching points. Having listened to the recording and made brief notes, cuts were then made in the original recording at natural stopping points, for example, after the participant and interviewer had discussed breakfast. It was important to allow the original recording room to breathe by not interjecting too often – this makes for fewer edits too.
You can record audio with a range of devices – Windows laptops can run Audacity, and Macs come with GarageBand. It is also possible to record audio clips on a smartphone and import them. When doing any recording, make sure to do a quick test first to ensure there is no unwanted background noise – just record a few seconds and listen back. GarageBand was used in this case, but the Audacity user interface is very similar.
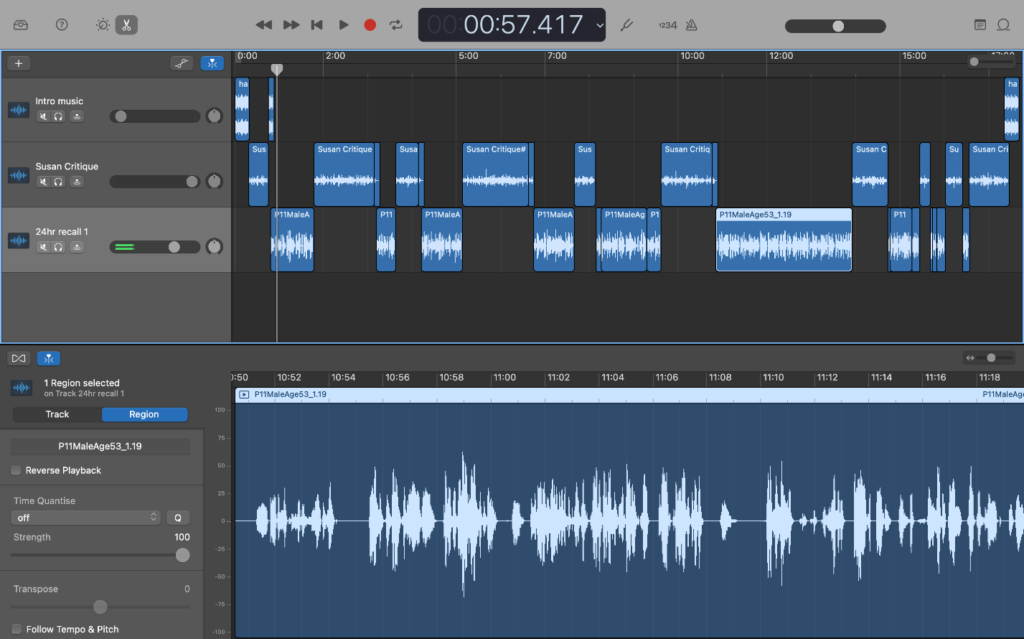
The first 20-minute recording took around two hours to produce, but this time included learning how to use the software. The screenshot below shows how the editing process looks in GarageBand. The top half shows the three tracks that were mixed to create the final output. By cutting and arranging the various sections, it is possible to quickly add commentary and even intro music to the basic original recording.
The project file, which contains all of the information in the top half of the screenshot such as individual tracks and cuts, can be saved for later use. This is helpful if you want the flexibility to change the content, or re-use elements. The single stream of audio can be exported separately as an audio file and embedded into Canvas or the MLE with accompanying text and other resources to build the desired task.
Style and Substance
It is natural to worry about quality when producing an audio or audiovisual resource for the first time as the content should convey a level of professionalism matching its purpose. As long as content is clear and understandable, it will serve for teaching. Making a clean recording can be done relatively simply by avoiding background noise and speaking at a measured pace and volume. You can add a touch more professionalism to your recordings by adding a little music to the intro and using some basic transitions like fading between different tracks if needed, but there is no need to go out and buy specialist equipment. The content of the recordings was linked very closely to the students’ tasks and mirrored how they may receive feedback in future by showing what practitioners look for in their interviews. This clear purpose alongside the care taken in producing the audio ensures that this resource is valuable to listeners.
Conclusion
While at first it seemed like a big undertaking, a quick YouTube search for instructions on using the software, and then having a go with the audio recordings has opened up a new avenue of teaching methodology – it was a lot easier to do than it first appeared, and in total took around 2 hours. The software has a lot of capabilities, but only the basics are really needed to produce a high-quality, rich teaching resource. Commentated practitioner interactions allow teaching staff to draw students’ attention to key moments while remaining in the flow of the interaction, signposting how students can reflect on practice and develop their own interviewing skills.
As part of the research for our Podcasting webinar, I recently spoke to Iain Wheeldon in the School of Arts and Cultures about his experience running his podcast Cultural Peeps.
Our webinar recording and accompanying resources can be found on the FMS TEL Canvas community. These will be useful for anyone considering incorporating audio-only material in their teaching and assessment, as well as anyone interested in listening to or creating podcasts.
Resulting from a few queries from FMS staff, we have added some information to the FMS TEL Community detailing how to add audio to a video using ReCap.
Staff had recorded footage of processes or experiments in laboratories which they wished to add a narration over afterwards. There was existing audio or noise on the video which they did not want to include. Rather than go through the process of removing the unwanted audio, ReCap/Panopto ignores the audio if the video is uploaded as a Secondary file. Audio can only be uploaded as a Primary file.
You may want to record your audio narration first using your mobile phone or software such as Audacity on a computer with a microphone. A common format would be mp3. Then upload your audio narration as your primary file and your video as a secondary file. Any audio in your video file is ignored and the new audio you recorded will be played instead.
We have had a few enquiries via FMS Enquiries about getting tasks done without specialist equipment we would normally have on hand in our offices.
We have recently added some information to the FMS Community on how to use mobile devices to produce learning materials. A kind of Do It Yourself guide for producing materials from home or on location.