Some group tasks are easier to complete using Word/Excel/PowerPoint. The easiest way I have found to share the files with students is to create a folder in SharePoint and provide a link to the folder in Canvas.
Task while the module is running
At the end of the academic year, I find its best practice to upload the completed documents and remove the link to SharePoint.
Task after module is complete
Benefits
Files are not lost, should a member of staff leave the University
The SharePoint files can be rolled back to a previous version and reused
The link in the original task can be used year after year
Files can no longer be edited by past students
Negatives
Can be time consuming if you have a lot of group activity files to upload
The FMS TEL Team work with schools across the faculty to maintain and improve our E-Learning offerings. At the moment, this is around 40 modules.
Join us in this blog post for a behind the scenes peek in our last minute checks before publishing the new courses for September 2023.
What have we already done?
During the summer we imported last years content, updated the timetables, and refreshed any padlets or wiki pages. We review the student feedback received from the previous year, and see if there are any quick wins we can do, or any larger problems which are being mentioned multiple times or have been mentioned over multiple years. Suggestions are made to our Module Leaders and agreed improvements are actioned. These will usually consist of activity revamps, updating outdated information, and excessive reading materials replaced with graphics or videos.
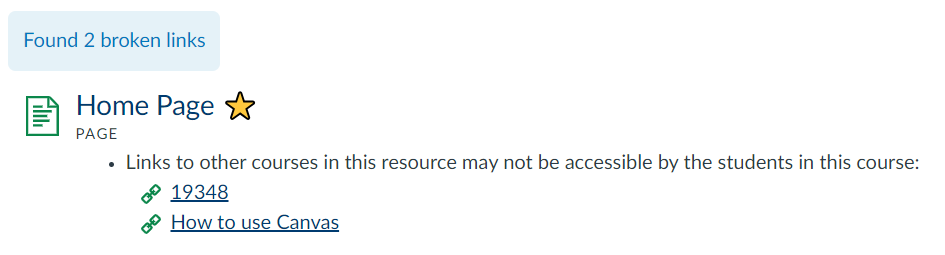
What: The Link Validator will find any broken links within your content. It will display a list of the page/discussion/assignment where the broken link is located and what the broken content is, as well as how it is broken.
Where: Settings > Validate links in content > Start link validation
How: We review every broken link. Sometimes an external website may have changed their website layout so a new path is required. Other times a resource might not longer be available and an alternative source will need to be found. We go through the list, fixing what we can and send a list of any unfixable links to our Module Leaders to review.
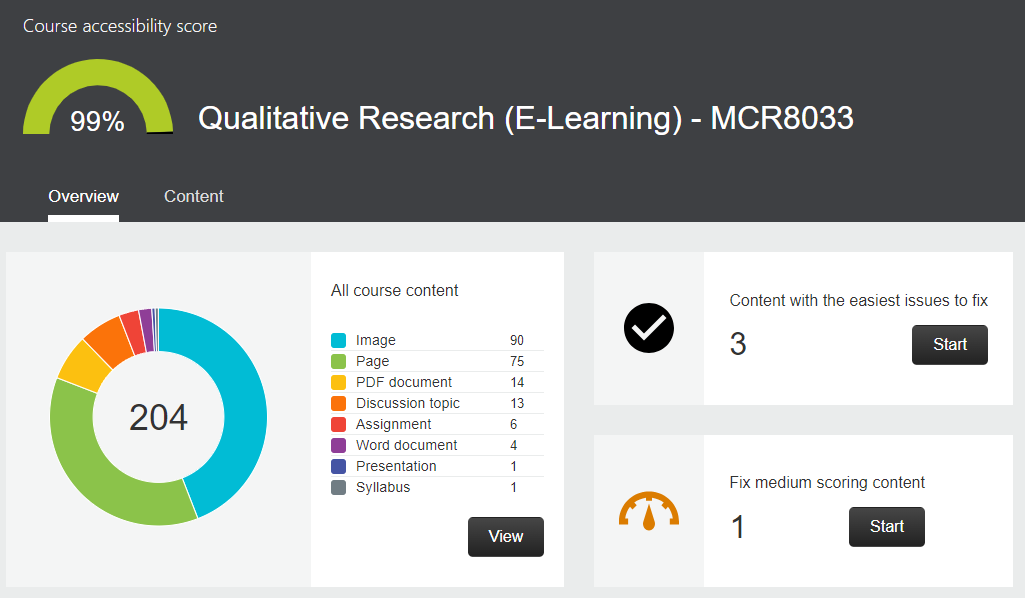
What: Canvas has an integrated Accessibility Report using Ally that will check all content; including documents, images and HTML content. The University has no baseline score, however it is highly recommended that your course is as accessible as possible. For E-learning courses in FMS we aim for a score of at least 95%.
How: The majority of improvements are easy to make and Ally takes you through the process step by step. Most of the time it will be tagging PDF documents, adding alt text to images or editing images that are over exposed (usually screenshots). We start with the red items and move onto the amber items. It is usually a case of following the on screen instructions. We have a walkthrough document available on the FMS Community as well as a few other posts on Accessibility.
Learn more on the LTDS Digital Technologies website: Ally for Canvas
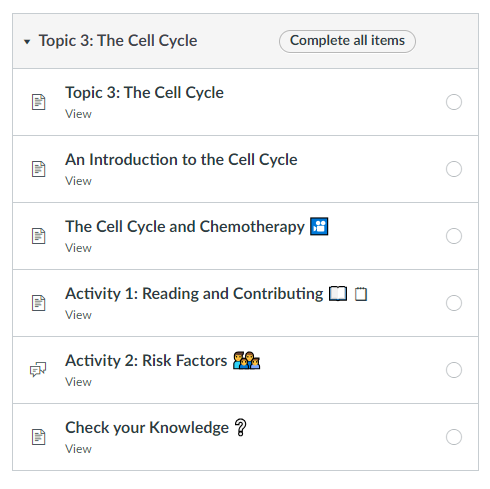
Create Groups and Journals
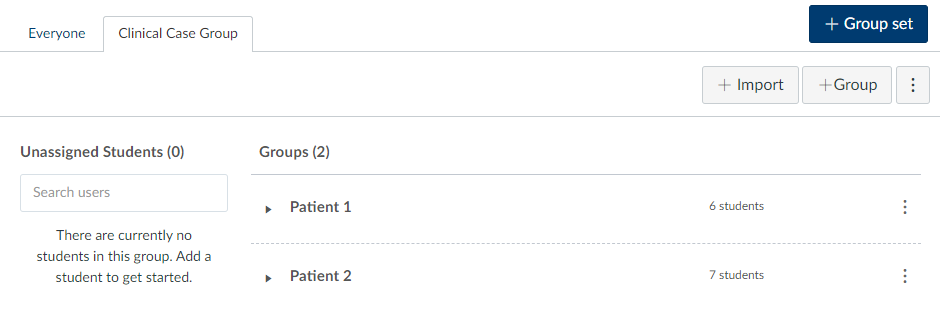
Example of groups in Canvas
What: On larger modules we tend to put students into groups for certain tasks. We find this helps with engagement, there is nothing worse than joining a task late and finding it already completed. Group tasks are also a great way to distribute workload and encourage teamwork. Some tasks also require privacy or independent thinking, for those tasks journals are a great addition.
Where: Canvas > People > +Group Set
How: Using the groups function in Canvas you can create custom groups, automatically assign groups or create journals by creating a group set with a size of 1. We will start assigning groups once students are added to canvas in the first week in September and then do daily checks for new arrivals every couple of days for the first few weeks of term. I also add a little message to the main board on my group activities asking students to get in touch if they haven’t been assigned to a group/journal yet.
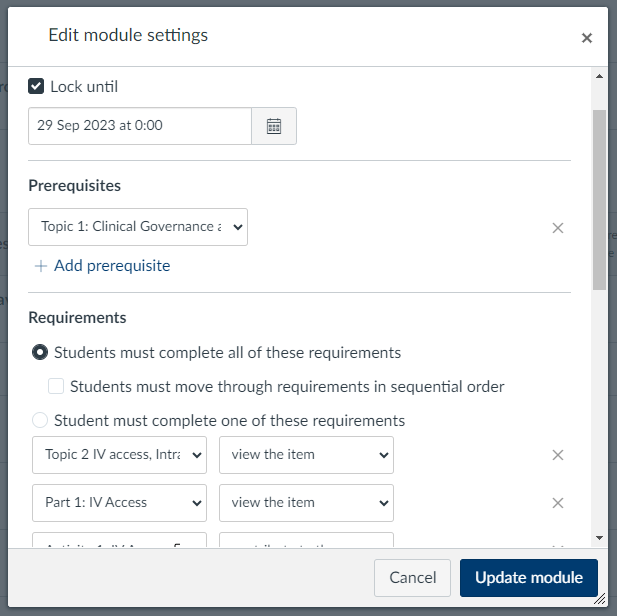
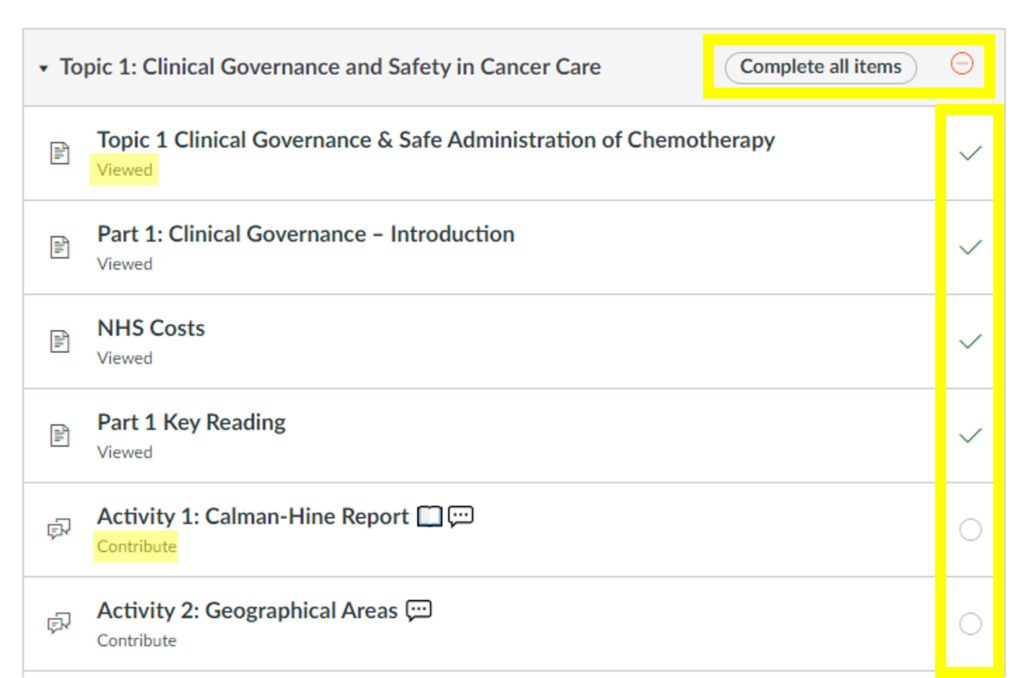
What: There are various ways to organise the flow of your courses. Adding requirements to your content creates a little tick box next to each item, so students can easily pick up where they left off. Using requirements also allows us to add prerequisites, which control when students can move on. They may have to contribute to a discussion board, or pass a test before moving on. We can also control the date and time certain content is made available.
Where: Modules > 3 dot menu > Edit
How: Most modules will have a lock until date, so content is released gradually. All modules include requirements on every page but they will vary from module to module. Some will just be “view” for everything so students can see where they are up to, other modules require students to complete certain tasks to get their tick. A few modules will use the prerequisite option to stop student continuing until they have completed certain tasks.
During the recent Teaching and Learning Conference, prompted by Michelle Miller’s poster on Adobe Acrobat, we were asked if it was possible to add audio to a pdf document. Here’s how to do it:
Add Audio in Adobe Acrobat Reader
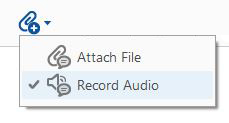
Click on Comments
Click on the attachments icon
Select Record Audio
Click the cursor where you want the audio to appear. A Sounder Recorder prompt will appear.
You now have two options:
record directly into acrobat
browse for an existing file
Record audio comments directly into Acrobat
Click the Record button and speak into your microphone. Click the Stop button when you have finished.
Click OK to add the recorded audio
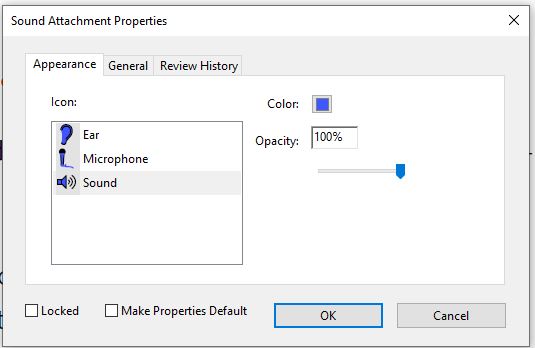
Select your preferred icon and colour, then click OK
Embed an existing audio file
Click the Browse button
Navigate to your existing audio file
Click Open
Click OK to add the audio file
Select your preferred icon and colour, then click OK
Note: this only supports uncompressed WAVand AIFF files.
We have a few different Virtual Learning Environments in FMS. You may be familiar with Canvas or the Medical Learning Environment (MLE), but you may not be familiar with Ngage.
Ngage was used in tandem with Blackboard, but since the move to Canvas in 2020 the system has slowly been phased out and will be decommissioned in the next academic year.
A feature used quite extensively in Ngage were the activity elements. These elements were styled blocks which highlighted an actions was required.
Q&A block in Ngage
We did not want to lose these call to action blocks when we moved to Canvas so we recreated the most popular elements using the HTML editor in Canvas. We built on the original idea by using different colours and styles to represent different tasks or actions. By using the same styled blocks across all courses and modules students can navigate the content with ease, and at a quick glace know what is expected of them. They also help to make the content more visually appealing.
Reading Activity block with pale green background and uppercase title
Optional reading block with grey background, dotted border and lowercase title
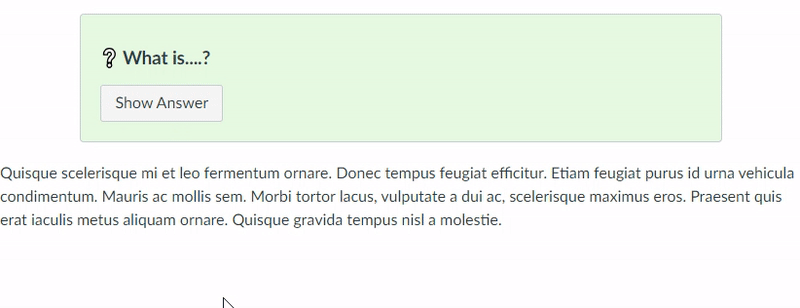
Q&A block with pale green background, solid grey border and interactive button
To add even more colour and visual interest we agreed on an emoji for each task and added them to the blocks as well.
Emoji
Activity
?
Discussion Board
?
Reading Activity
?
Watch a Video
?
Listen to a Podcast
?
Research Activity
❔
Q&A or Quiz
?
Journal Activity
????
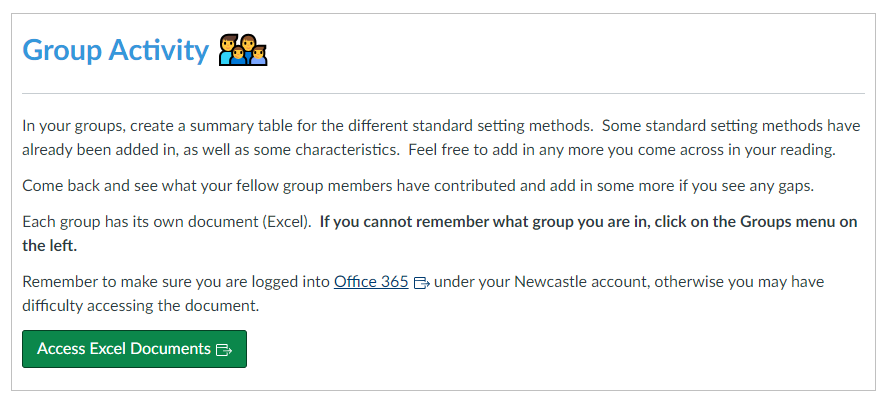
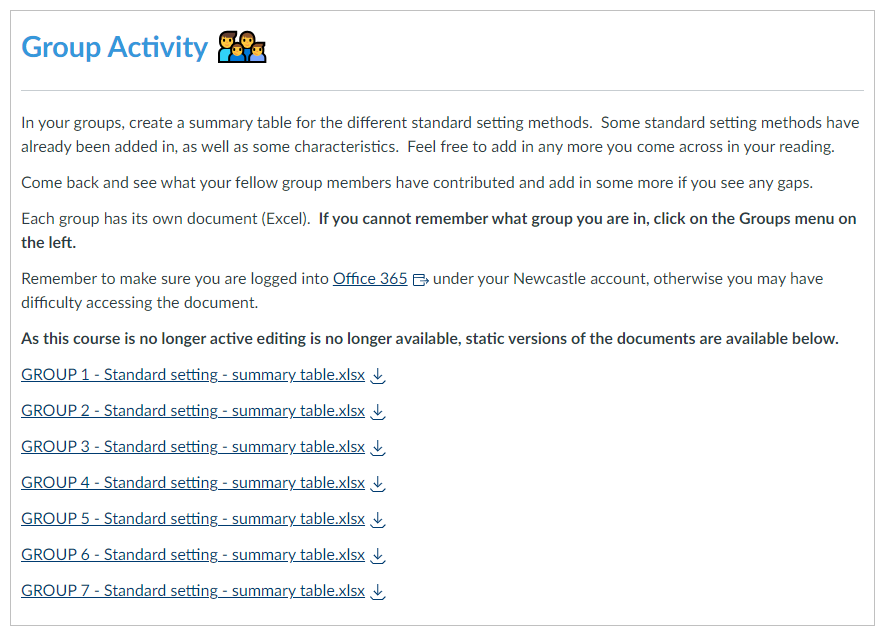
Group Activity
?
Blog Activity
?
Padlet Activity
?
Timetabled Event
Our chosen Emojis
We decided to use emojis instead of icons as emojis can be placed in page titles as well. Adding emojis to page titles gives students a broad idea of what is to be expected that week.
Example of using Emojis in page titles
Having the emojis in the titles also allows Instructional Designers and Module Leaders to view the distribution of tasks throughout a course, and quickly know which pages may need updated for the following year. Padlets, for example, need to be remade each year and a quick scroll through the modules area is all that is required to locate all the pages that contain padlets.
Want to make your own blocks?
You may first want to speak with your School or Programme team to come up with a shared theme or design. The blocks work best when used over multiple modules.
Easily add emojis by right clicking in chrome and opening the Emoji window
Recently the FMS TEL Team have been wondering how to keep tabs on events we’re not attending, without confusing the meeting organiser (or yourself!) by accepting them to keep them in your calendar. As Outlook takes a ‘decline’ response as an instruction to delete the event, this can be tricky.
For example, you may be part of a team running a series of demos or teaching, but you have split the delivery between you. It’s useful to know when the events are on, but you don’t need to go to them. Alternatively, you can use this to keep track of meetings happening when you are out of the office, in case you need to check on results, or in case your own plans change and you decide to attend.
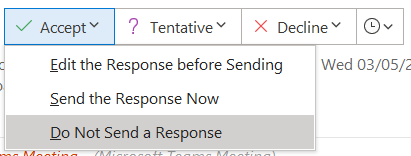
We thought there must be a better way to decline a meeting but keep it in your calendar. We searched online and found these instructions.
In your calendar, decline the meeting request as you normally would. Then, you can go into your ‘deleted items’ folder in the mail tab and open up the meeting request again. Next, select ‘accept’ or ‘tentative’ at the dropdown arrow, choosing not to send a reply to the meeting organiser.
Doing this puts the meeting back in your calendar, but you still show as ‘declined’ in the meeting organiser’s tracking. I tend to choose ‘tentative’ so that the meetings look visually different to my other events.
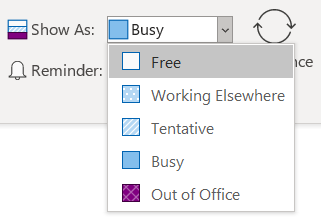
Keeping your calendar full of tentative meetings may make you look more unavailable than you are. You can adjust the settings of the events to say you’re free. That way if anyone needs you, they can see that you’re available. Open up the meeting, and select Show As: Free.
This tip should help you manage complex calendars or use cases. To give your calendaring another boost, consider filtering your invitations and responses into a favourited folder using a rule.
This will let you keep on top of your availability, replies to your invitations and any changes without hunting through your inbox. Instructions on filtering with rules can be found here. You can set a rule to filter based on a ‘type’ of email, which includes calendar updates. We also have a post about email management you may find useful.
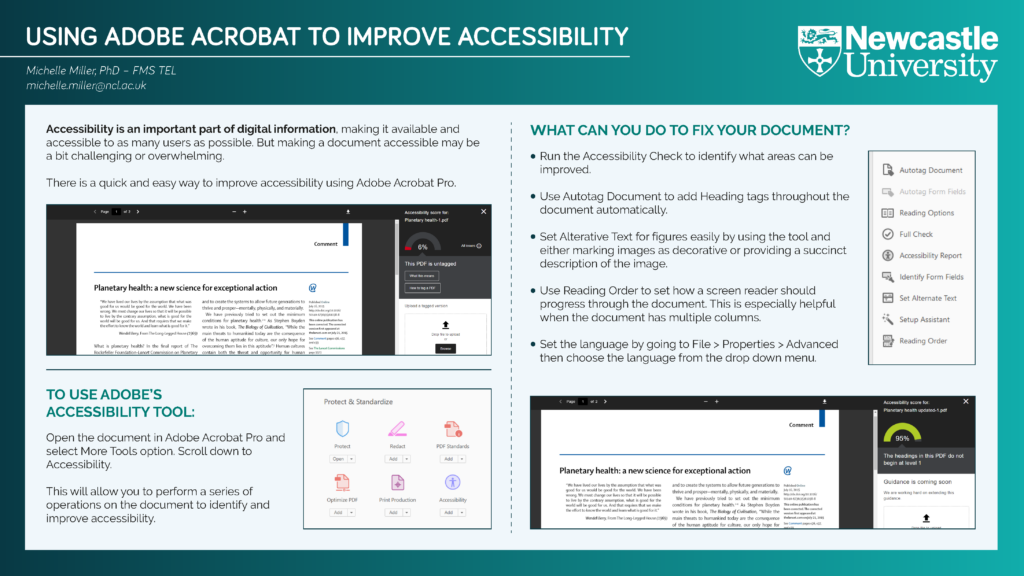
Michelle Miller shared her work in digital skills and accessibility at the Learning and Teaching Conference in March this year. This poster shows how you can improve your PDFs’ accessibility using Adobe Acrobat Pro, including common issues flagged by Ally, the accessibility checker in Canvas. All colleagues have access to this software.
The FMS TEL team were recently discussing the amount of teams and chats we end up belonging to after working at the University for a while. As a team we decided to attempt a spring clean of our teams areas.
The digital intensity of our workday is increasing, and we need to be thoughtful about how we help manage it
I spent 5 minutes reviewing the chats I was a part of. Below are a few things I considered:
Is this conversation still on going?
Do I talk to this person/group regularly?
If I answered no to both questions then the chat can be removed from my list. There are a few ways to do this:
Hide – This is my preferred option, the chat is removed from my list but the conversation history is easily restored by searching for the conversation and clicking “Show hidden chat history”. The other members of the chat are unaware that I have hidden the conversation and if the conversation starts again the thread will reappear in my list and I will be notified.
Delete – This is a more permanent option but does have its uses. Perhaps you are in a group chat and your contribution is complete, however the conversation is still ongoing. By deleting the chat you leave the conversation and are no longer able to see any future posts. Other members of the chat will be made aware that you have left and can re-invite you if you are needed again.
I now review my chats on a more regular basis, my aim is to remove the scroll bar to ensure the colleagues I chat with on a regular basis are easily accessible without having to scroll through the clutter.
Next I looked at the “Teams” I was a member of. Some teams had been started with all the best intentions but had never gotten any traction or the teams were used during a project which is now complete, so I decided to leave those teams. Other teams which were active but were not currently offering value I decided to “hide”. This way they do not clutter up my teams window or send me notifications but I can still pop in an read any updates if I need to.
? OneDrive
After decluttering my teams (which didnt take as long as I thought it would) I felt invigorated to do more decluttering so I moved onto my OneDrive.
I have to admit I am guilty of saving and keeping everything, so my OneDrive was very full and quite messy. I knew this was going to be a big task so I set myself a timer for 10 minutes and I would do as much as I could and call it a win.
I started at the top level and decided any loose files needed to be sorted into folders. I then went through the folders I had for teaching materials and anything I knew I had uploaded to Canvas I deleted.
This task is still on going, anytime a meeting finishes early or I am waiting for a meeting to start I use that time to review a few more folders.
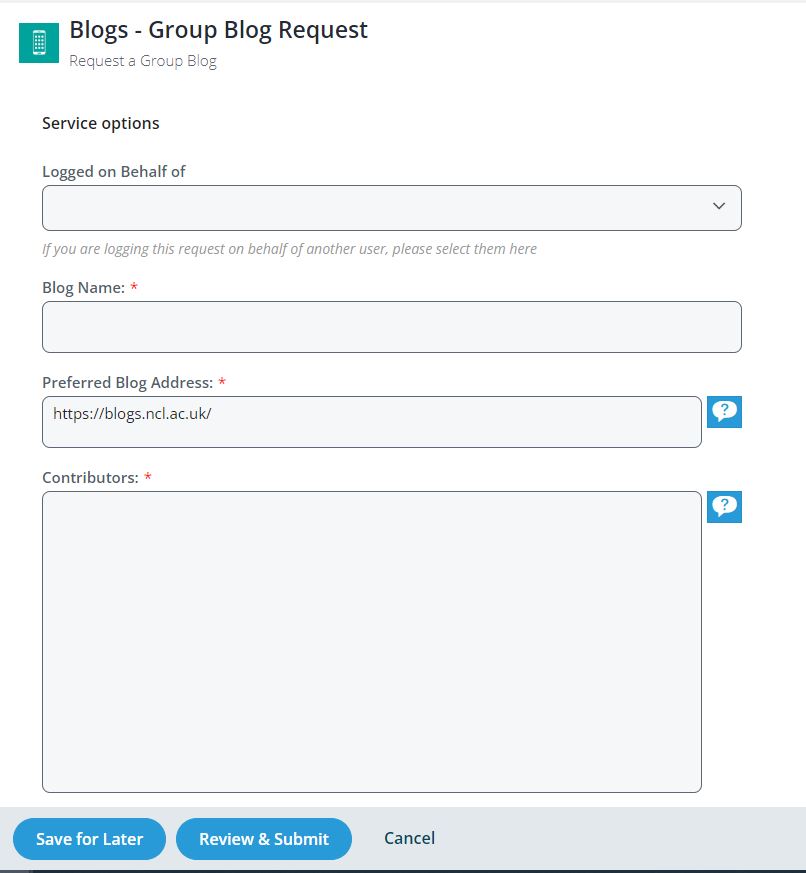
So, you like our FMS TEL blog and you’d like to have something similar. How do you do it?
Go to blogs.ncl.ac.uk. You will see the following page with a choice to create a personal blog or a team blog. FMS TEL use the Team Blog as everyone in our team contributes to it.
Click on the button for your choice of blog. You will then be asked to sign in.
Team Blog
For a Team Blog, if you are not already logged in, you will have to login using your University email (username@newcastle.ac.uk) and password. You will then be presented with a form to request your Team Blog.
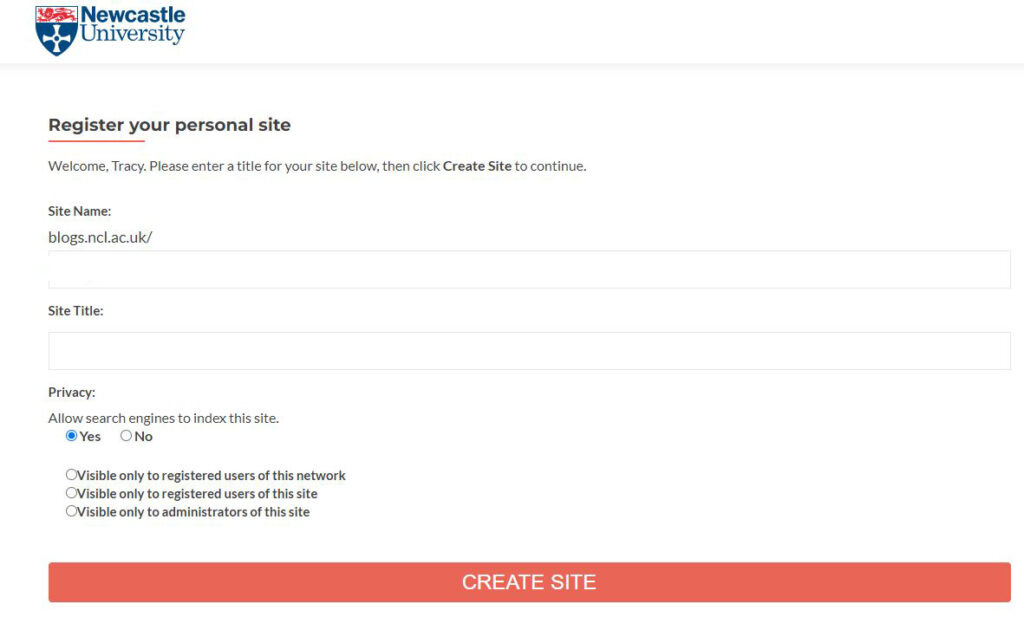
For a Personal Blog, if you are not already logged in, you will just enter your username and password . You will then be presented with a form to register your personal blog site.
Rules and Policies
Please make sure you read the university Rules and Policies regarding publishing content on university servers and applications.
This quick guide gives you tips on how to boost the power of your Outlook searches.
The FMS TEL team was recently discussing the options for searching for emails in Outlook. Most of us are familiar with the search tool and can use the basic function. But there are ways to supercharge your searches in Outlook.
Advanced Search
The first option is to use the Advance Search feature. To use this feature simply click on the Search bar then click on the open menu carrot on the right side of the Search bar.
Use the Advanced search options to specify criteria for your search. This interface is easy to use and understand. Search for emails based on sender, dates, subjects, attachments, and more.
Search Operators
You can also conduct specific searches using Outlooks search language operators. Here is a list of some of the search operators you can use to quickly search for specific results.
Search for
Findings
Pat
Anything containing the string pat including Pat, pattern, sympathy
Pat Smith
Anything containg the string pat or the string smith, including as part of a larger word
Pat AND Smith
Anything containg both strings pat and smith, including as part of a larger word
Pat NOT Smith
Anything containing the string pat but not the string smith, including as part of a larger word
Pat OR Smith
The same as searching Pat Smith
“Pat”
Anything containing the string pat alone, not including as part of a larger word
from:”pat smith”
Anything sent from Pat smith
from:”pat smith” about:”status report”
Anything sent from Pat smith that includes the phrase status report in the subject line
Hasattachment:yes
Anything with an attahcment
attachments:document.docx
Anything containing an attachment called document.docx
subject:”status report”
Anything with the subject including the phrase status report
received:15/2/2022
Anything received on 15 February 2022
from:pat (received:15/2/2022 or received:16/3/2022)
Anyting received from a sender with string pat on 15 February 2022 or 16 March 2022
We hope these search tips will prove useful to you in your future Outlook email searches.