As part of the Education for Life Strategy, Student Launchpad sets out an ambitious vision to enhance how students are supported throughout their academic journey. A key part of this work is the development of a new digital system designed to transform academic advising.
This project focuses on creating a single, consistent, and accessible advising record for every student. By bringing together interactions, goals, and referrals in one place, the system aims to support more connected, transparent, and equitable advising experiences across the student lifecycle. The system is being developed and delivered by the FMS Technology Enhanced Learning (TEL) team, in close collaboration with academic and professional services colleagues.
Moving beyond fragmented systems
In many institutions, advising information is spread across multiple platforms, making it difficult to build a complete picture of a student’s experience. This project addresses that challenge by providing a structured space where advising interactions can be recorded and shared appropriately.
The result is a more holistic view of each student’s progress, enabling better conversations, more informed support, and improved continuity over time.
What we’re delivering first
The initial release, a Minimum Viable Product (MVP) launching in September 2026, focuses on the core foundations needed to support effective advising:
A persistent advising record across academic years
Role-based access for staff and students
Simple logging of advising interactions and actions
Referral workflows to specialist services with status tracking
A student-facing view to support reflection and engagement
This approach prioritises usability and consistency, ensuring the system is easy to adopt while delivering immediate value.
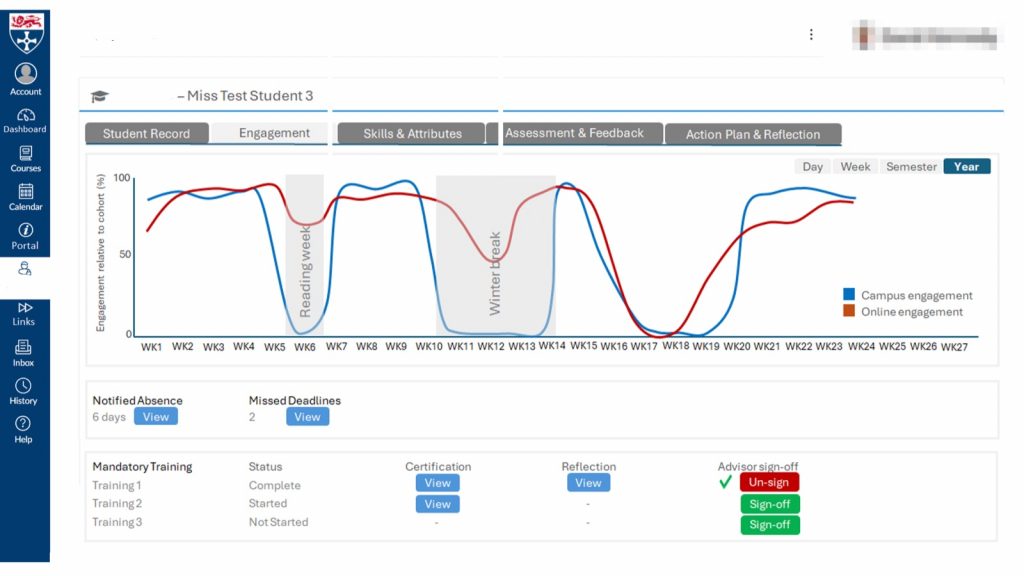
Designing for real use
A central principle of the project is simplicity. Interfaces are being designed to reduce administrative burden and support intuitive use, while still maintaining robust permissions, audit trails, and data security.
Early design work is exploring how students and advisers can clearly visualise progress, interactions, and support pathways – helping to make advising more meaningful and visible.
Figure 1: Prototype interface showing student advising record and interactions
Looking ahead
This work represents a shift from transactional advising towards a more connected and data-informed approach. By making advising visible and trackable, the project supports more proactive and personalised support for students.
As the system develops, it will also enable better evaluation of advising activity and impact — helping Newcastle University continuously improve how it supports student success
Figure 1: Prototype interface showing student advising record and interactions
We’ll continue to share updates as the project progresses towards its initial launch in 2026.
Navigating through the extensive volume of reading material in certain modules can be a daunting task for students, often leaving them overwhelmed by the sheer magnitude of information. Recognising this challenge, the module leaders of ONC8017 took a pioneering approach to ease the burden on students. In a bold move towards innovation, they harnessed the power of artificial intelligence (AI) and embraced the collaborative spirit of group work to revolutionise the learning experience.
Image used in Discussion Board task
The Task
Article Allocation:
The first step involved compiling a comprehensive list of articles relevant to the module’s curriculum. Each article was carefully selected to contribute significantly to the students’ understanding of the subject matter. Subsequently, the articles were allocated to individual students, ensuring that each student had a unique piece of content to delve into. Students were asked to read and summarise their assigned article.
Student Autonomy:
To cater to diverse learning preferences, students were given the autonomy to choose their preferred approach in engaging with the assigned article. They could opt to read and summarise the content independently, a traditional method fostering individual comprehension and analysis. Alternatively, students had the option to choose an AI tool for summarisation, exploring the cutting-edge capabilities of technology to streamline the information extraction process.
Students who opted to use an AI tool were tasked with critiquing the summaries generated. This not only encouraged a deeper engagement with the material but also honed their analytical skills as they assessed the accuracy, coherence, and relevance of the AI-generated summaries.
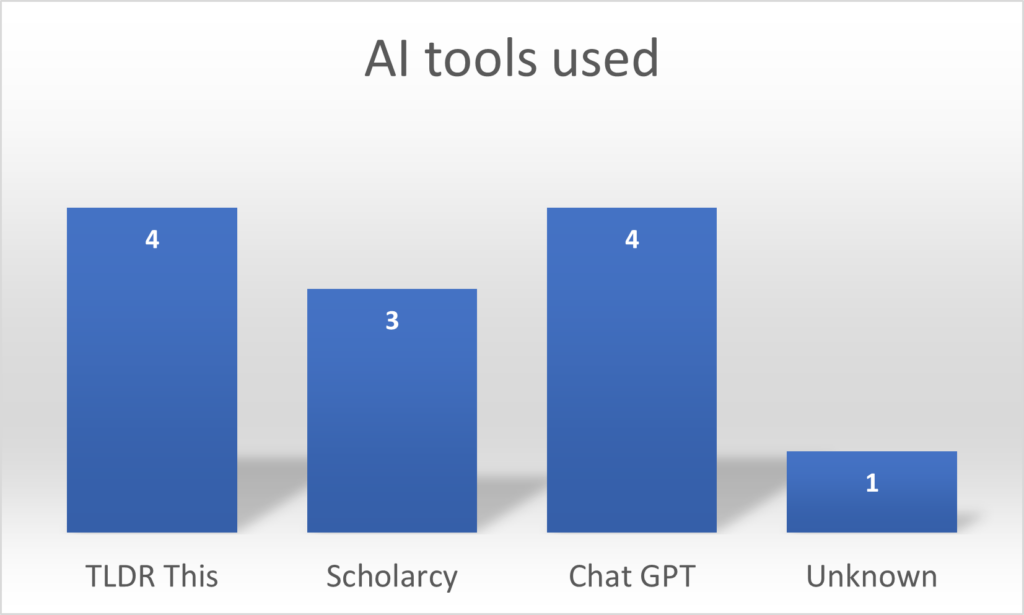
Following consultations with the Newcastle University Library, we recommended the AI tools Scholarcy and TLDR This. However, students were able to choose any tool that best suited their preferences. The library, also provided valuable insights, including a copyright statement and links to AI Guidance, as well as the Uses and Limitations of AI.
If your allocated article is behind a sign in wall we kindly request that you do not upload or share this licensed material with third party AI tools
Copyright statement
Group Collaboration:
The students were asked to share their summaries to a discussion board and to look through the summaries posted by others. They could then identify which literature was most relevant to them and read the articles in depth themselves.
Recognising the significance of collaborative learning, the module leaders fostered a sense of community among students. Group discussions and collaborative sessions were encouraged, providing a platform for students to share insights, discuss varying perspectives, and collectively enhance their understanding of the subject matter. This collaborative element not only enriched the learning experience but also mirrored the collaborative environments students are likely to encounter in their future careers.
The Student Experience
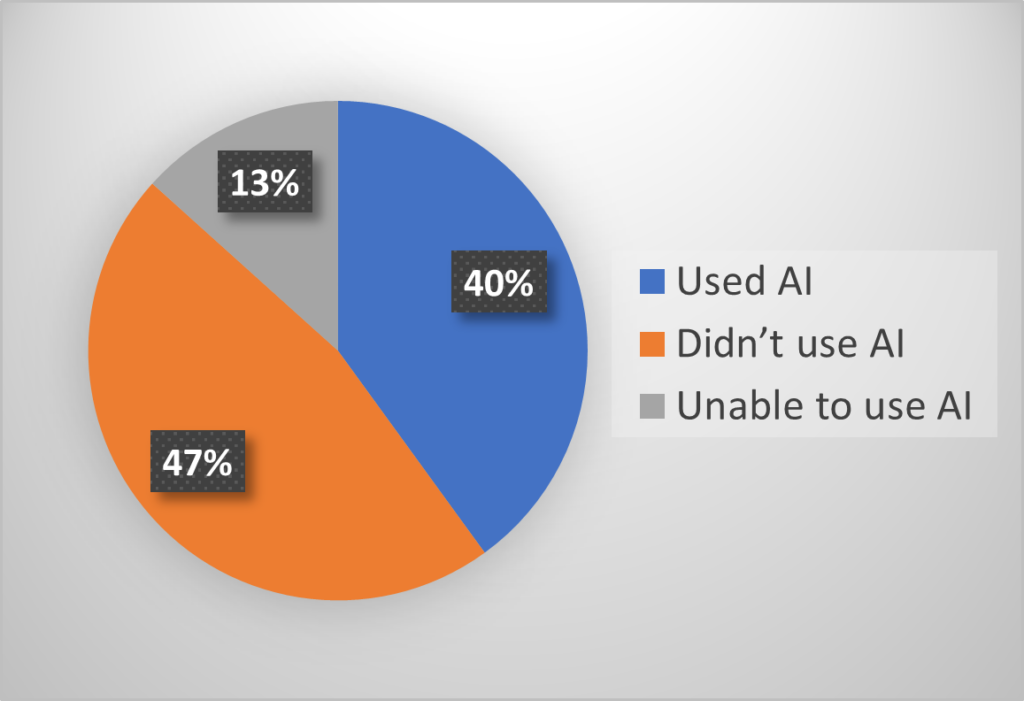
53% of students opted for AI-assisted summarisation, showcasing a keen interest in exploring the capabilities of technology for academic purposes. This choice not only demonstrated a desire for efficiency but also provided students with valuable hands-on experience in harnessing AI tools for practical applications.
However, the practical application of AI tools had its challenges. 25% of students who chose AI encountered difficulties, with the tools unable to produce a summary at all.
In their candid feedback, students highlighted both positive and negative aspects of their experiences. While some were impressed by the efficiency of AI tools, all students expressed concerns about gaps and missing details in the generated summaries. Specific instances of errors, omissions, and disjointed reading experiences were noted, revealing the practical limitations of relying solely on AI for complex tasks. The majority of students who opted for AI, eventually opted to manually summarise the articles anyway, indicating a less-than-ideal outcome from the AI tools.
The AI tool also provided a second longer summary. This summarised most sections of the paper individually, which was presented like a smaller version of the paper. There was still important information missing, which was clear from the disjointed reading experience. Even so, I was still quite impressed with how well the AI tool had summarised the vast amount of information in the original paper into something relatively usable.
Student experience of Scolarcy
No inaccuracies were noted. Good summary of the epidemiology, although it seems that the AI summary has basically just been derived from the abstract of the article. A number of gaps were identified.
Student experience of TLDR This
The article has been summarised into ten key points, but these are not detailed. For example. only one of the statistics provided in the article have been included in the AI summary.
Student experience of Chat GPT
Final Thoughts
These nuanced results underscore the importance of balancing technological innovation with practical considerations. While the incorporation of AI offered students valuable exposure to emerging technologies, the ultimate outcome indicated that, as of now, AI tools might not be the ultimate solution we were hoping for.
Despite the unexpected challenges encountered in the use of AI, this experiment has provided invaluable insights. Recognising the evolving nature of technology, we remain committed to maintaining the task, observing how AI technology progresses year after year and see if, as the technology advances, the dialogue from students changes.
This post was written with the assistance of AI tool, Chat GPT.
In a world where the demands on medical professionals reach an all-time high, the need for effective communication has never been more crucial. Imagine a scenario where physicians must deliver devastating news to a patient—news that could alter the course of a life, news that might even imply the end of life. I have often wondered how people can deal with that as part of their job. I found out through my first project as a Learning Technologies Developer at the University with the redevelopment of an web service that helps facilitate roleplaynorth (RPN).
RPN provides a crucial role in preparing our MBBS students to deal with those types of scenarios. Through tailored and realistic scenarios they help in the theory of good communication, transitioning customers to be ready to apply these findings in practice.
In the first of a series of 3 posts about the redevelopment of RPN, we’ll look at the following aspects of the project; specifications, system features, and future plans. In this post I will walk you through the specification process.
Specifications: Building the Foundations
Firstly, we looked into what the existing system currently does. Amongst mainly other features it allowed RPN staff to add events and update role players using spreadsheets to manage who was on what event and the role they would play on the event. This information would then be added to the event on system. RPN also had available a separate AccessDB that provided queries required for payroll reports.
Action Function Requirement Document (AFR)
I used a document our team has worked with previously that lists the tasks/actions, function, data requirements to get RPN to think about the whole process and break it down into steps. This document was used to get feedback on how RPN expect the actions to work and gave the opportunity to add tasks if required.
Here’s an example on what that looks like:
ACTION/TASK
FUNCTION
DATA REQUIREMENTS
NOTES/ FEEDBACK
a) events
Create, Update, Delete Events
Start date, End date, description of event
b) event TAG
Assign Event Tag to event. This can be used to filter the events
Event Tag – Name/Title
c) Add/Remove Role Player – Event
On the events page add a role player to the event
Role Player, Event
Does this need to be automatic or do you want to add them as pending first until they have confirmed participation?
d) Scenario
Create, Update, Delete Scenario
Scenario – title, description
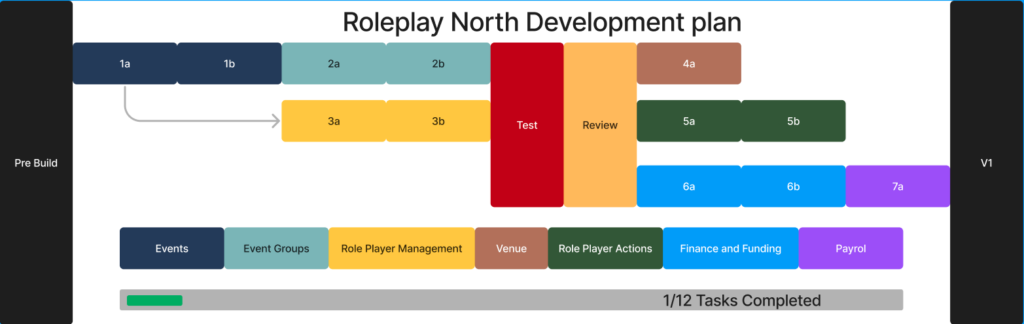
After feedback from RPN, we then converted this document into a more functional focused document. Breaking down actions into tasks allowed us to plan what needed to be developed first, including what actions could be worked on independently or by another members of the team. Here’s what we ended up with.
Role Play North Development Gannt Chart
From this gantt chart you can see that the Events block (1a, 1b) and the Events Group block (2a, 2b) need to be completed before the Venues block (4a) is worked on. You can also see that once 1a is completed someone else can start work on Role Player Management (3a,3b). We also gave time for testing and reviewing what the new system does, giving RPN staff the chance to influence the build and find bugs. We had multiple testing stages one after the Event Groups and Role Player Management blocks were completed, and another back in April after all listed tasks were completed.
The first iteration included all the fundamental features and actions of the website including, user authentication, role based access, basic management of events and customers and communication tools. Nothing too complicated, but essential to the functioning of the website and a good starting point for any future project.
The above image and the AFR document does not show how long each section took – as due to unknown variables like feedback, change in requirements and staff commitments effected the timeframes. However, with a continuous review process we added weight or complexity to these tasks.
You can also see that 1a, 1b is part of the events block by looking at the legend below the branches and you can see what tasks were completed. We also added a cross next to an item once complete to keep us updated on where we were in the build without digging through the code.
We then created wireframes showing how the new system could work. With the AFR, Gantt Chart and the Wireframes we were able to clearly outline what we intended to build for RPN. In my next post I will go through the features.
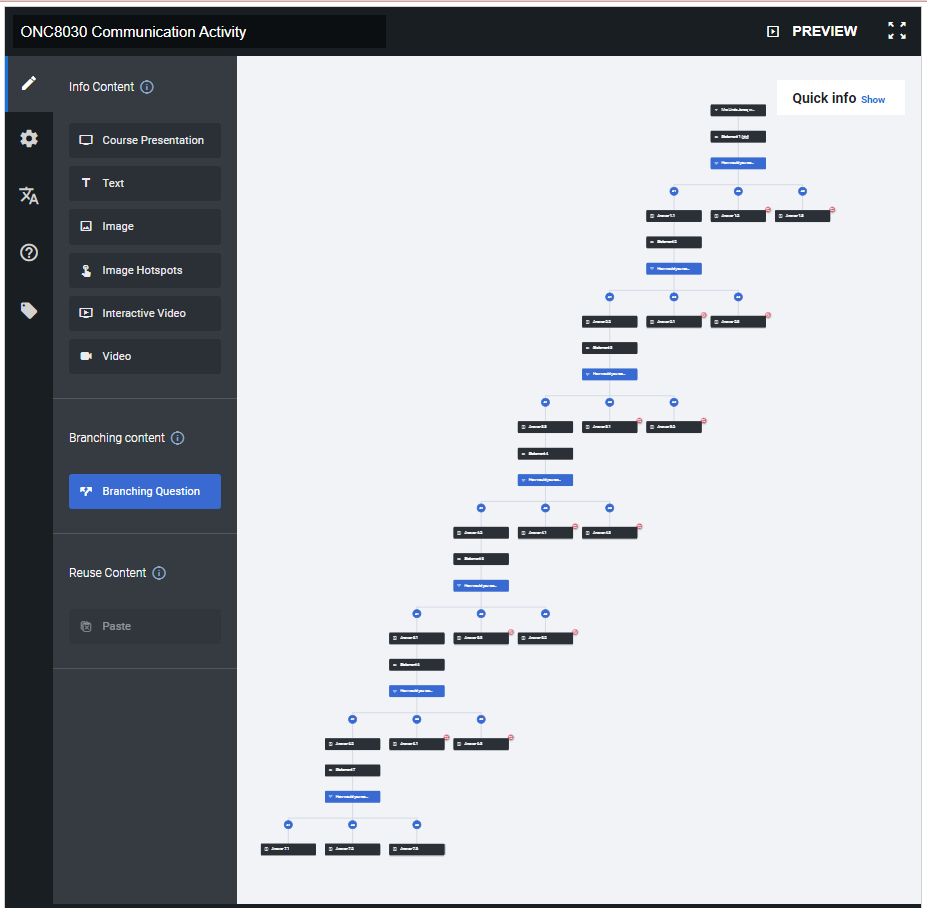
Inspired by an H5P talk at the NU Learning and Teaching conference, Kay McAlinden, module leader for ONC8030 Psychosocial Issues in Advanced Disease, approached the FMS TEL team about creating a branching activity.
We jumped at the opportunity to be involved and offered our services to film and edit the videos, and also build the activity in H5P and Canvas.
Bringing to idea to life
Kay took the lead in crafting the scripts and coordinating an actor. Pip Davies, roleplaynorth Co-Ordinator, kindly offered to play our patient and Kay would take the role as the Health Care Professional.
Emily Smith and Tracy Connell from the FMS TEL Team volunteered to be our videographers and canvased the campus to find a suitable room to be our ‘doctors office’. Once the scripts were finalised and the room was staged, filming commenced. Using two cameras and a team of two videographers we were able to film both the patient and the health care professional scenes at the same time. This aided in the flow of the conversation for the actors and filming was able to be completed within a couple of hours, with brief interruptions for the inevitable giggles and occasional bloopers.
Editor View of H5P Activity
Next, we moved onto the task of editing the footage, which was completed in Adobe Premiere Pro, and building the task in H5P. We had filmed two options for the patients thoughts so a few different variations were created. After choosing a variation, making any further adjustments and proofreading of the captions, the activity was finalised.
All in all, the process took around a week of work.
The Final Layout
The activity is situated within a discussion board on Canvas, providing students with the opportunity to complete the task and subsequently engage in discussions with their peers. This setup also enables us to gather valuable feedback regarding the students’ perceptions of the task.
Canvas Discussion Board
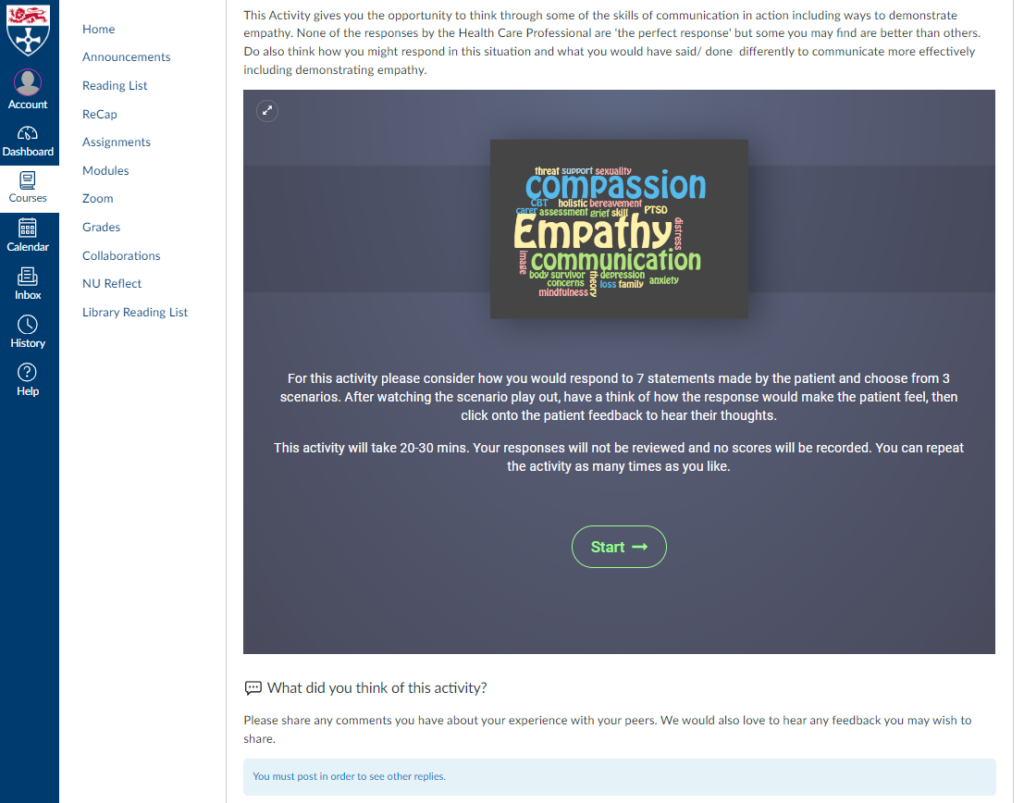
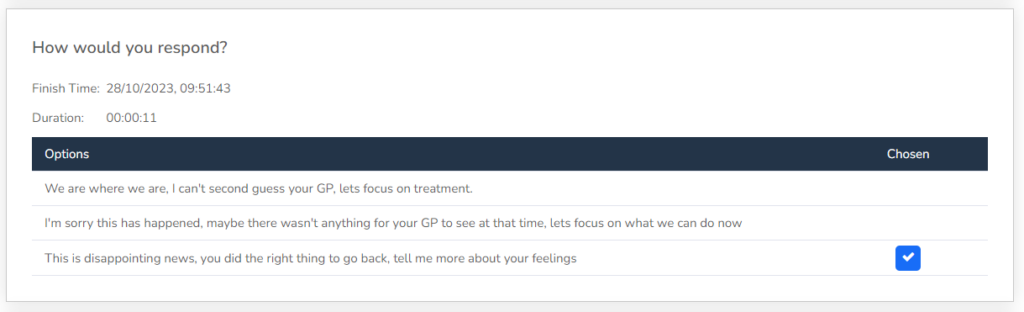
After the introduction and instruction slides the first statement is introduced. Students are then prompted to pick from 3 responses. The corresponding response video is played, and students get a opportunity to reflect on the response and consider the patients perspective. Finally, we get to hear the patient’s thoughts. There are 7 statements for the students to work through, guiding students through a sequential conversation with the patient, fostering a sense of engagement and interaction.
Student Responses
While the activity is not actively monitored we are able to track which students have completed the task, view their selected options, and read their written responses. These insights will prove valuable when we conduct future reviews of the activity.
Results page – Branching Route
Results page – Free text comments
Student feedback
We have been inundated with wonderful feedback from all the students. Below are some of our favourite quotes:
“This was a really valuable reflection for me. I could think back to how I had previously handled discussions like this. Had I perhaps been too quick to try and offer solutions and fix things. “
“This was quite an interesting exercise. It is quite easy to tip into problem solving and fixing, however what this highlights is that stepping back, allowing space for difficult emotions to be expressed”
“This was really interesting, I liked that there was not necessarily a wrong answer but makes you think about how you are wording answers to patients and the sequence to presenting the information to the patient.”
“I thought that was an interesting activity. It highlighted the importance of actively listening to what your patient is telling you and not just them with more information…. It was interesting sometimes the one i picked wasnt said in the way I would have said and therefore the response from the patient wasn’t what I would have expected.”
“I thought this was a really effective activity; it made me really think about how I would respond in these situations and how to put myself in Linda’s shoes to try and understand her feelings. I found that my responses developed through the activity and could see how by offering more space and time for Linda to talk it allowed her to open up and feel understood. At the start I definitely could see myself trying to find solutions to her problems but it became apparent that answers weren’t what Linda was seeking, she just wanted reassurance and to be understood. This will be useful to take into practice.”
“As a healthcare professional, this activity has opened my eyes to the fact that more often then not, we have been taught to focus on the physical issues and to prioritise first the physical health, and then the psychosocial aspects of the person’s life. During this activity, I realised how therapeutic empathy can be in itself.“
Final Thoughts
The creation of this branching activity, led by Kay McAlinden and supported by RolePlay North and the FMS TEL team, has been a successful collaboration. Scriptwriting, filming, and editing, came together to create an engaging and interactive learning experience for the students.
The use of technology, including Premiere Pro and H5P, was essential for executing the activity seamlessly and collecting valuable data for future improvements.
The overwhelmingly positive feedback from students underscores the effectiveness of this activity in enhancing their learning experience. It’s a fantastic example of how technology and teamwork can result in innovative and impactful activities that students truly enjoy and appreciate.
Your Next Step: Resource and Support
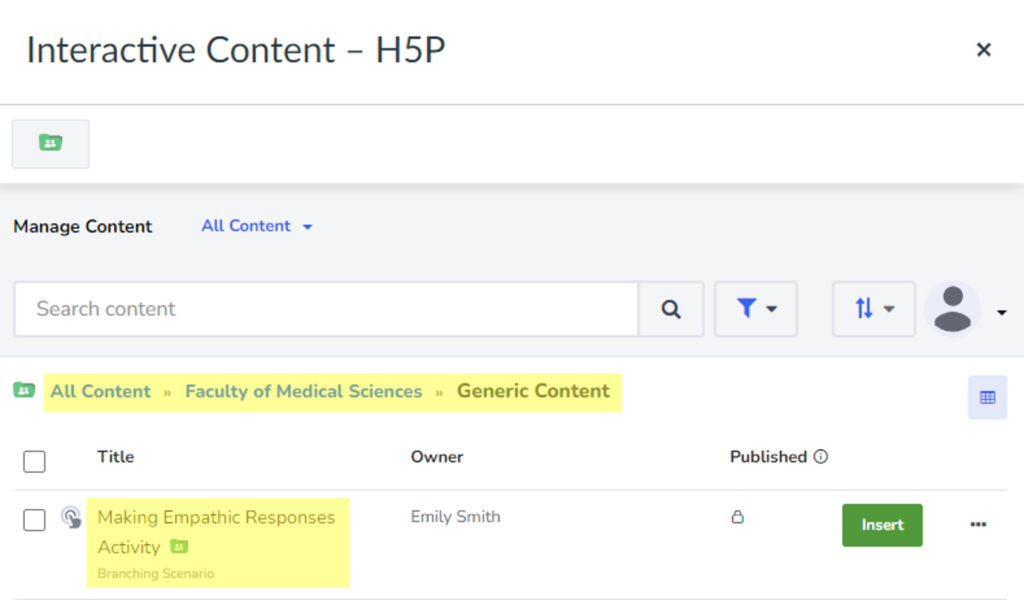
This activity has kindly been shared with all staff at Newcastle University and is available in the Faculty of Medical Sciences > Generic Content folder within H5P.
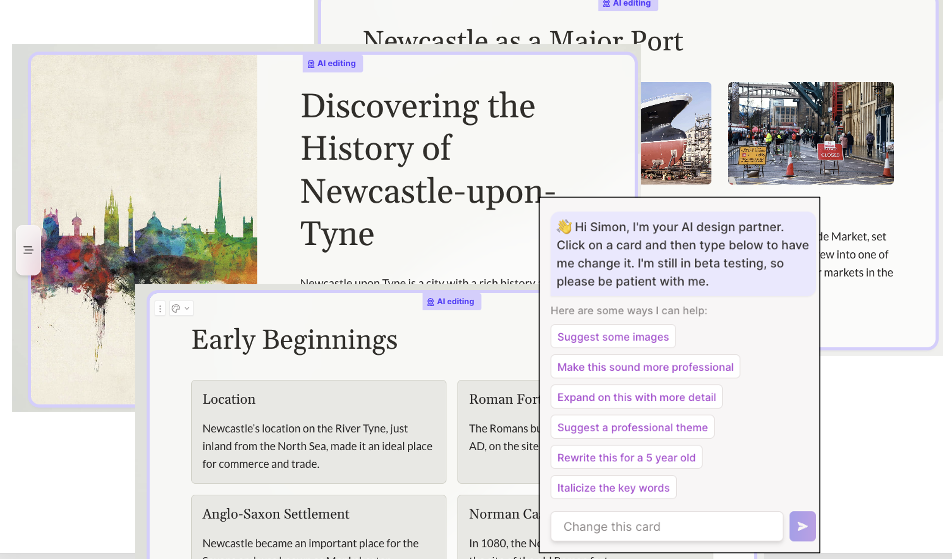
Gamma.app is an A.I-based tool which generates presentations, documents, and webpages. It’s focus on presentations makes it of potential interest to those involved in teaching and learning. https://gamma.app
Quick Look:
In ‘guided mode’, I gave a title ‘history of Newcastle upon Tyne’, and Gamma provided a choice of templates and then generated a suggested presentation structure within a few seconds. It then generated a deck of 8 slides in about 1 minute. The slide deck included relevant images and could be exported as Powerpoint or PDF. Additionally, Gamma allows for the import of custom text, which it adapts and converts into a slide deck or document. The ‘AI editor’ provides options, such as “Suggest a professional theme”, “Give more detail”, “Give me a more exciting way to say this” etc.
Cost:
Gamma currently (October 2023) has a three tier model:
Free limited use – you get a one-off 400 ‘AI Credits’ (credits used each time you generate a document), exported slides and documents are branded
‘Plus’ – £78/year, 400 ‘AI Credits’ per month
‘Pro’ – £147/year, unlimted credits and extra features
Thoughts:
Gamma is a powerful tool which can quickly generate slide decks and documents which are ‘usable’ with little modification. With all the focus on the tools of the ‘big players’, such as Microsoft/Chat-GPT and Google, it is refreshing to see a tool from a seemingly independent company (though, like many other A.I. apps, it may well be using the back-end services of Chat-GPT ).
Of course, to use A.I. generated materials, it is important to have grounded subject knowledge and critically review and adapt outputs, to avoid mistakes. It is also important to carefully word the prompts which you provide to the A.I.; for example, a presentation generated for me by Gamma, about “Newcastle University”, included accurate information about the 19th century pre-cursors of the University of Newcastle upon Tyne, but then mentioned a merger with UCL in 2002, and included a photo of Newcastle University in Australia.
There are obvious plagiarism and academic integrity issues to consider. In common with most other A.I. apps, there is no acknowledgement of the source materials used in training of the A.I. As such it may be part-based on copyrighted materials and licenced content such as Wikipedia, which has an Attribution-Share-Alike licence. Likewise, the source of images aren’t acknowledged – though the ‘A.I. Editor’ does give the option of ‘all images’ (even if licencing unknown), ‘Free to use’ (which seem ‘loose’, by including sources which don’t generally display image licence information, such as Facebook and Twitter) and ‘Free to use commercially’ – and you can click through to the source of the image. The pricing model for Gamma is similar to that of other A.I. tools, all of which lead the universal problem of inequality of access, giving advantage to students from more well-off backgrounds. But these tools are widely available now, and this is the new reality that H.E. needs to adapt to.
Have you ever heard students complain about a particular topic? Module Leaders for our Chemotherapy Nurse Training module often come across such complaints for their Cell Cycle topic. As the issue was becoming a perennial problem, we decided to thoroughly review the topic that was causing frustration among our students. This blog post shares our project and the transformative impact it had on our students’ perception and understanding of the once-hated topic.
Revamping the Content
We started with the learning objectives for the topic. Using Blooms Verb Wheel as a guide we changed the wording so the objectives would be measurable, and therefore the students could better understand what was expected of them. We removed words such as “understand” and replaced them with “describe”.
Next we reviewed the flow of the topic. We started with a text heavy page with stock images covering; cell basics, cancer, chemotherapy, and ending with the phases of the cell cycle. This page was edited, removing over 100 words, and rearranged so we covered; normal cells and their cycles, then moved onto cancer and chemotherapy. The stock images were converted into animated infographics that were tailor made for the content being discussed.
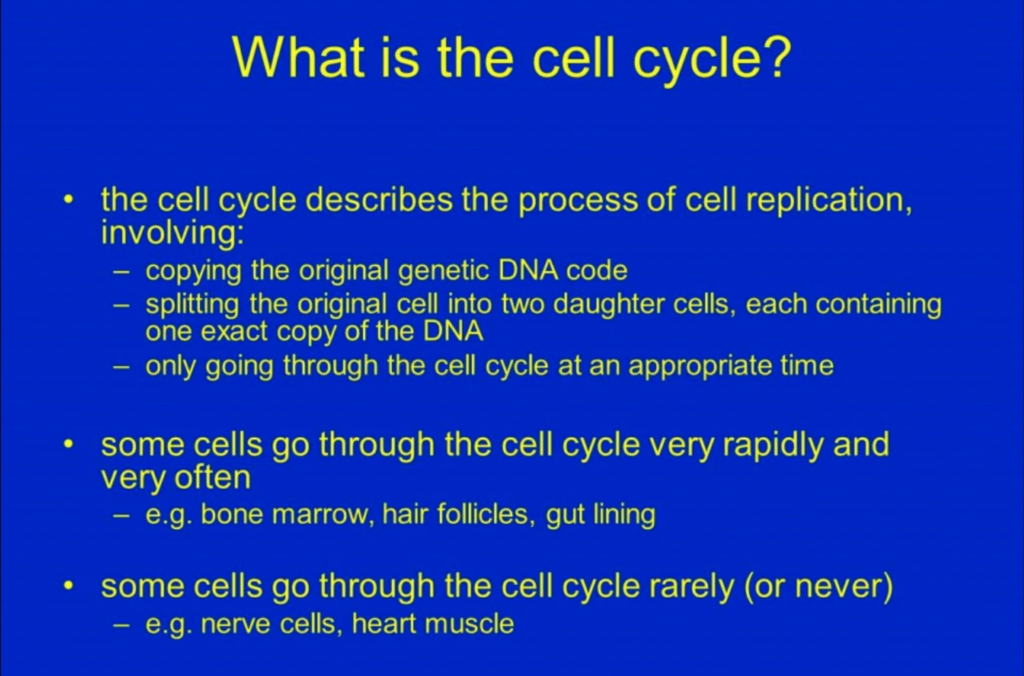
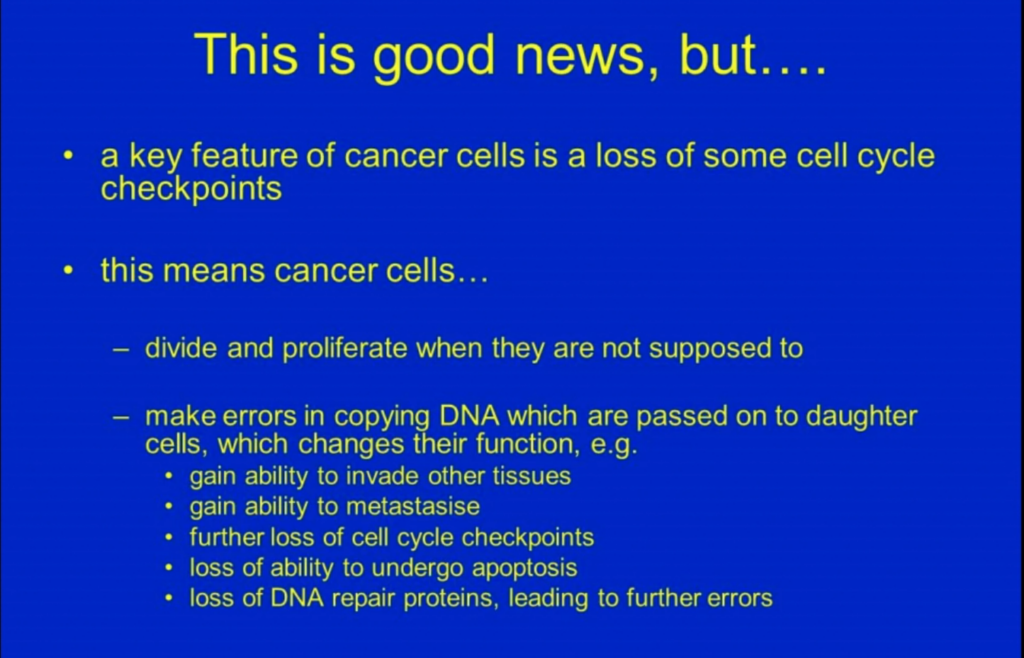
The biggest change was with the asynchronous lecture. The audio was good quality and the messages were still relevant, however the lecture slides were text heavy and had an outdated look.
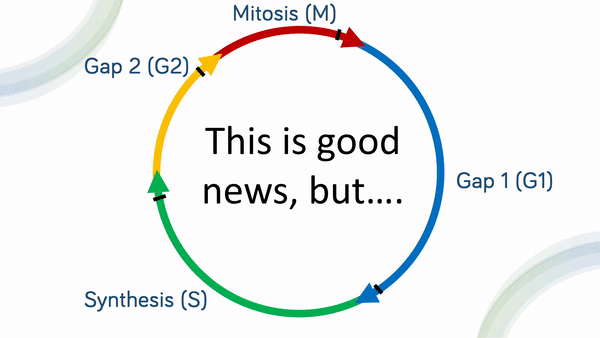
Original slide: What is the cell cycle
Original slide: This is good news, but…
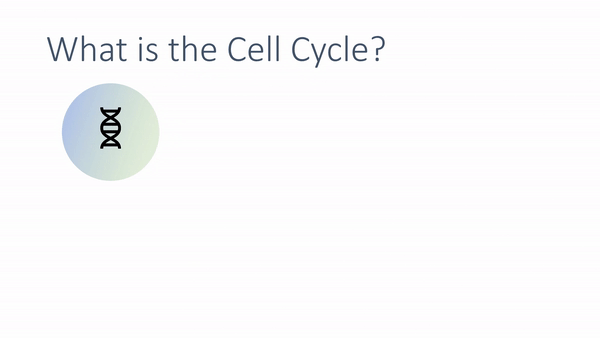
The slides were given a facelift and where possible, animations were used to replace the text. We hoped the animations would assist the students in visualising the processes being described by the voiceover.
Updated slide: what is the cell cycle
Updated slide: This is good news, but…
Next the students had two tasks to complete. One was to answer some basic questions, and the other was to put their knowledge into action within a group activity. We spruced up the tasks visually, but didn’t make any other changes to them.
We chose to add a “check your knowledge” type quiz, using H5P, at the end of the topic. The questions directly linked to the learning outcomes and we hoped would help the students confidence with the topic.
Student feedback (before):
Found the cell cycle topic very difficult to understand.
I am dreading the cell cycle topic
Student feedback (after):
The topic I have enjoyed most was topic 3 (The cell cycle)
I have particularly enjoyed topics 3 – going further in depth into the cell cycle and pharmacology of the drugs we use has been really useful
I quite enjoyed the cell cycle section…I enjoy the lightbulb moments I’ve had understanding how everything links together.
Final Thoughts
The module team is thrilled with the amazing transformation we witnessed. Our goal was to address the complaints and make things better for the students. But we ended up surpassing our own expectations. The topic that used to be dreaded by the students has now become one of their favourites. The positive feedback from the students has made us proud and motivated us to continue on our journey for improvement. It’s really amazing to see such a big change in how they feel about the subject, with only a few tweaks in how the content was delivered.
This case study concerns a range of activities created for MCR8032 Clinical Research Delivery in Practice. The module leader, Fraser Birrell, put me in touch with his colleague, Associate Lecturer Ann Johnson, to assist in the development of a piece of learning about Unconscious Bias in Healthcare.
Ann Johnson has been a Patient and Public Involvement (PPI) Advocate, Lay tutor, and facilitator for twenty-five years, researching and creating a Patient Involvement Framework for Leicester University Medical School. She has conducted extensive community outreach in London, Leicester, and Florida USA with the goal of bridging communications between patients and practitioners. She is continuing her work as an Associate Lecturer and PPI Advocate at the School of Medicine.
As part of this module, it was important to ensure that a patient-centred approach to healthcare was highlighted. As such, Ann’s experience in the field allowed her to challenge students to look at healthcare – and clinical trials in particular – from the patients’ points of view.
One particular topic inspired Ann to focus on the topic of unconscious bias in more detail. In cases of hypertension, GPs had been trained to prescribe different drugs and treatment plans to people based on ethnicity, even though there is no evidence to support this course of action (Gopal, D.P. et al., 2022). This is an example of taught bias – but at the same time, GPs were making assumptions about patients’ ethnicities which could also be erroneous. Naturally, this is an area of concern for patients.
Equality, Diversity and Inclusion and Bias
The difference between EDI concerns and bias is important to clarify at this stage. While EDI principles are focused on actively working to improve outcomes, unconscious bias is present in all of us as a survival instinct and extends beyond those ‘protected characteristics’ formalised in EDI policies. Unconscious bias allows us to make quick decisions based on assumptions – for example choosing to cross the road to avoid encountering someone walking along with an unleashed Pitbull Terrier.
As a clinician, it is especially important to recognise one’s own potential for unconscious bias as it can affect decision-making, resulting in poorer outcomes for some patients. When this bias extends to choosing who to include in clinical trials, it is easy to see how misconceptions or omissions could be compounded.
Discussion
You have been asked to become involved with the recruitment for the trial of Nosuchximab, a targeted therapy for Paediatric Lymphoma. The research target group is children aged between 02 and 14. There is a significant disparity in survival rates of the South Asian population and white European population. You have been asked to recruit children from the target age range. However, the NHS Foundation Trust site for the Nosuchximab trial is located within in a region where this population is under-represented – however, it is present (although in minimal number).
How might Unconscious Bias impact the outcomes of this trial?
Is it important to strategically recruit this cohort?
How might you put in place a strategy for recruiting those particular subjects?
What attempts should be made to minimalize barriers to their inclusion?
The above activity challenges students to consider a range of complex factors and is designed to explore the recruitment process for clinical trials, which can be affected by unconscious bias. As such, we designed a range of scaffolding activities to lead up to students exploring this topic in a more confident and informed manner.
The learning was divided into three stages, supported by Canvas’ tools.
An introduction to unconscious bias with a test-your-knowledge quiz. This built understanding of the basics, and used the quiz to instil confidence into the students that they had understood the basics. The introduction was also written in such a way to highlight that this was a supportive environment.
An opportunity to explore the effect of unconscious bias through a key reading, and a test that students could try to identify their own potential biases, followed by reflection in one of a few ways.
Attempt the activity in discussion with others. A webinar is also available for students to join and discuss the activity with Ann and the other students, as well as to explore the topic further if needed.
We understood that the topic of unconscious bias could be challenging for students to confront, as it is intensely personal and potentially triggering. To allow students to explore this area in a supportive way, we suggested a range of activities, from private reflection to group discussion, about the topic in general, to allow students to examine this in an environment where they felt comfortable. We felt that this was especially important as this meant students would not feel they may be judged or blamed for sharing their experiences and feelings about bias, and this would make the entire topic much more approachable, and the learning more effective.
Next Steps
The activities will soon be live for students to try out the materials and share feedback. Anything highlighted by the student feedback will be discussed, and appropriate changes made to the activities if necessary. These materials will then run as part of the module next year. Further distribution of this content can also be done via Canvas Commons, should other module leaders wish to incorporate them into their teaching.
References
Gopal, D.P., Okoli, G.N. & Rao, M. Re-thinking the inclusion of race in British hypertension guidance. J Hum Hypertens 36, 333–335 (2022). https://doi.org/10.1038/s41371-021-00601-9
How do oral presentations work for 100% online modules?
Presentations helps students put across an idea while expressing their personalities, which is hard to do in an essay.
Introduction
Oral presentations are a popular choice of assessment in the Faculty of Medical Sciences, especially in our e-Learning modules. Students are asked to submit a pre-recorded presentation to Canvas and the markers watch the presentations at a time and place that suits them.
Diarmuid Coughlan, module leader for ONC8028 Practical Health Economics for Cancer, has kindly agreed to walk us through how the Virtual Oral Presentation element works on his module.
The Assessment
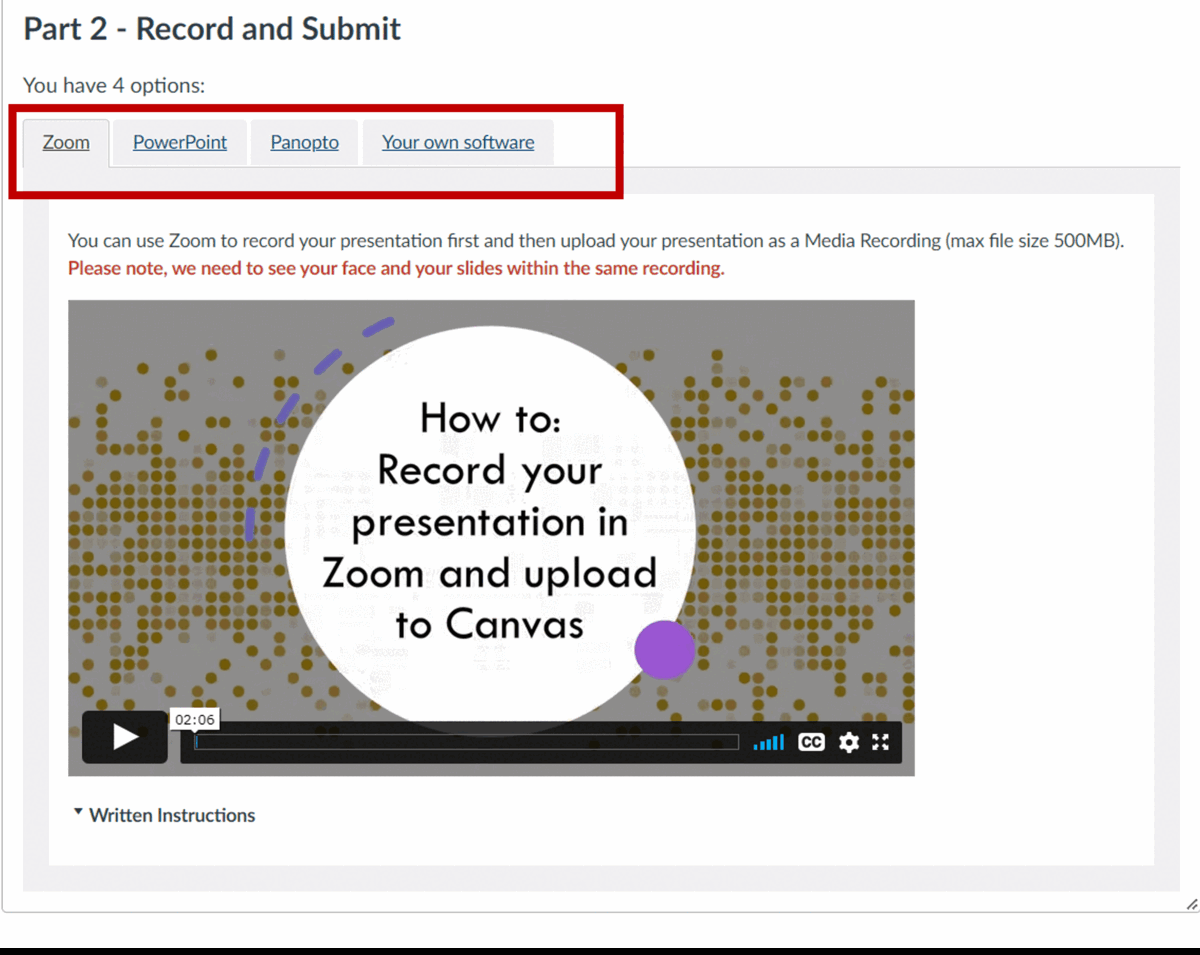
This year we had 14 students on the module. We asked the students to create a 15 minute presentation using either Zoom, Panopto (Recap) or PowerPoint.
We informed the students right at the start of the module that an oral presentation was part of the assessment and 4 weeks into the module we provided a formative assessment. The formative assessment allowed students to familiarise themselves with their chosen software, gain experience talking to a camera and also get some limited feedback on their presentation skills.
The submissions are double marked by 2 markers. Marking is completed separately by each marker outside of Canvas, then markers meet to discuss which marks/comments would be entered into Canvas and made visible to each student.
The Set Up
We provided 2 submission points in Canvas:
Recording Submission Point:
This area was used for the marking. It was set up as Media Recording for MP4 uploads (max of 500 mb) with a Text Entry option for Panopto users (no size limit).
We allowed students to choose which technology they were most comfortable with and provided video and written instructions for Panopto and Zoom. PowerPoint instructions were added later as an option with links to guidance provided by Microsoft.
View of instructions in Canvas
We also provided some instructions so students could crop their recordings to comply with the 15 minute time limit.
You are limited by time so remember to edit your recording so it is no longer than 15 minutes. Instructions: Windows | Mac | Panopto
Slide Submission Point:
This area had a 0 point value. It was set up as a File upload area for students to submit their slides as .ppt or .pdf, this allowed us to get a turnitin plagiarism score for each presentation as well as a reference copy of the slides, should anything be unclear in the video recordings.
How did it go?
There was a lot of fear from students initially. We encouraged students to give it a go, informing them that we were not trying to trick them. We provided clear guidance on what we expected and provided a rubric with a breakdown of points, clearly showing only a small percentage of the grade would be based on their presentation style and delivery. The content of the presentation was the most important part!
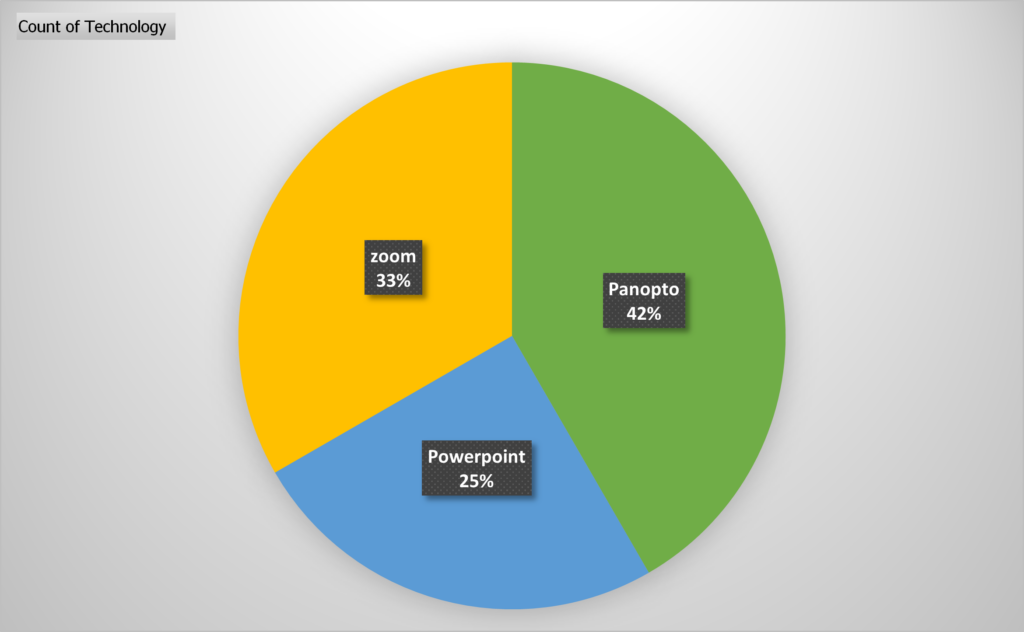
The use of technology was varied:
As markers we also had to overcome our fears of technology.
PowerPoint is easier once you know how to access recordings (you have to download the file, then click start slideshow).
Sometimes the Panopto recordings were hard to find, especially if students had experience of using the technology in Blackboard and did not follow the Canvas instructions correctly.
What are your next steps?
We only provided grades with a short feedback comment last year, we plan to provide more extensive feedback going forward
We will add more video content into the module as examples of how to create engaging slides and showcase our presentation styles – hopefully leading by example
We would also like to provide examples of a good presentation vs a bad presentation
Personal Tutoring is the process of assigning the availability of university staff for student tutoring. It is not actually the process of assigning individual students to individual staff. Staff in the faculty are assigned to programme groupings/pots (not individual programmes), these groupings have a lead administrator that can then work out by looking at the expected student intake whether they need more staff resource, or can free it up for others.
The faculty admin team have undertaken this process for many years using excel spreadsheets and email communications to pass the information back and forward. This kinds of activity is both time consuming and prone to errors caused by duplicate copies of data and missed communications.
This is the perfect example of a process that can be done better using a web application, the kind of work the Technologies Developers in FMS TEL undertake all the time.
No time to plan properly
Sometimes a project comes to the unit that needs to be completed in a short time frame. Ideally the amount of time spent on a new website would be evenly spread between specifications, design, implementation, testing and support/improving., it may even go through many loops of these processes.
When a project does not have the luxury of time, then all these steps need to be compressed and decisions made on which steps need to be prioritised . In the case of personal tutoring the design phase and specifications where collaborated from the old Excel spreadsheets and turned into a simple tabular wireframe display. These spreadsheets where also identified as the origin of the data the site would be based off and import scripts planned accordingly. No complex interface features where offered, just a clean display of the data, with filters and stats to help the tutoring assignments. As for the implementation of the site, we decided to host the new site on top of another, saving time on hosting framework and infrastructure. We chose a site that had similar tools (FMS Projects, which has a statistics section) and tools we could utilise. We also based the core of the new site off knowledge and experience the team was used to (API’s and data tables, spreadsheet importing / exporting). Finally the testing and support side was compressed, keeping the interface simple, reducing the need for support and documentation. The limited number of users the site may have, also helps support as we can offer short term direct guidance.
With all these measures, we managed to reduce a development process that could take 6 months down to 3.
The Results
The Personal Tutoring site is due to go live in July 2022. We managed to write and get a functional version of the site done in roughly 2 months. This left 1 month planning the release, testing and show casing the site to the customers and making improvements from their feedback. Overall we are pleased with the structure and quality of the site. The code design is based on solid principles and should offer a degree of flexibility when Personal Tutoring gets used and the inevitable suggested improvements come through.
If you are interested in this topic and wish to learn more, please contact:
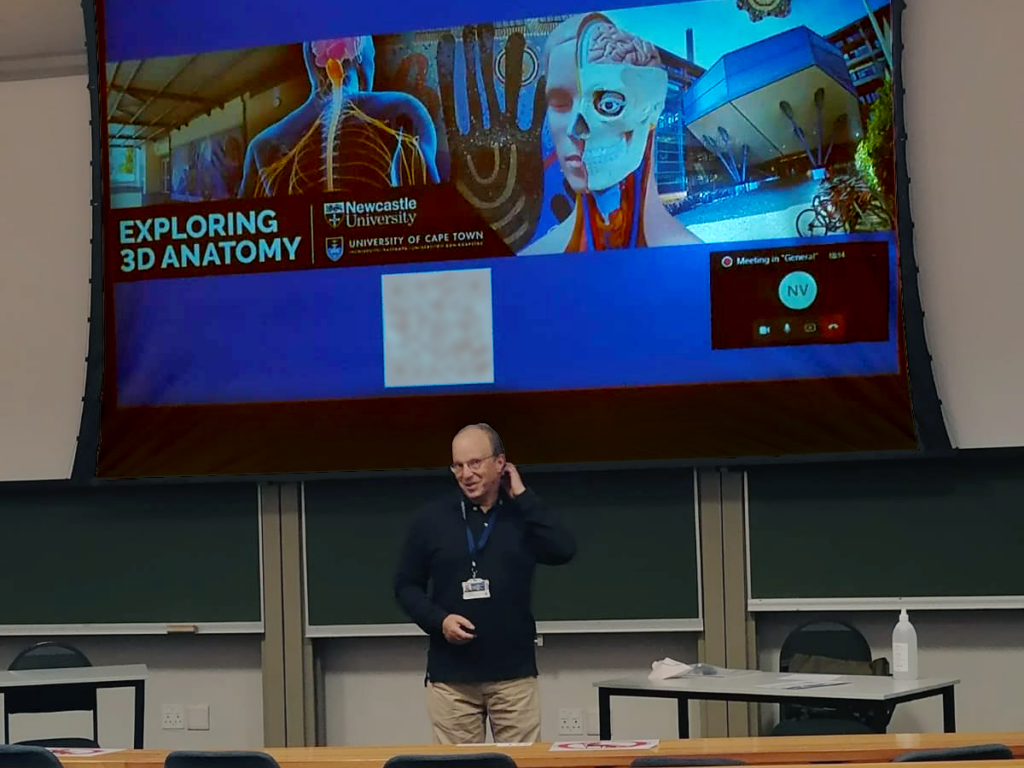
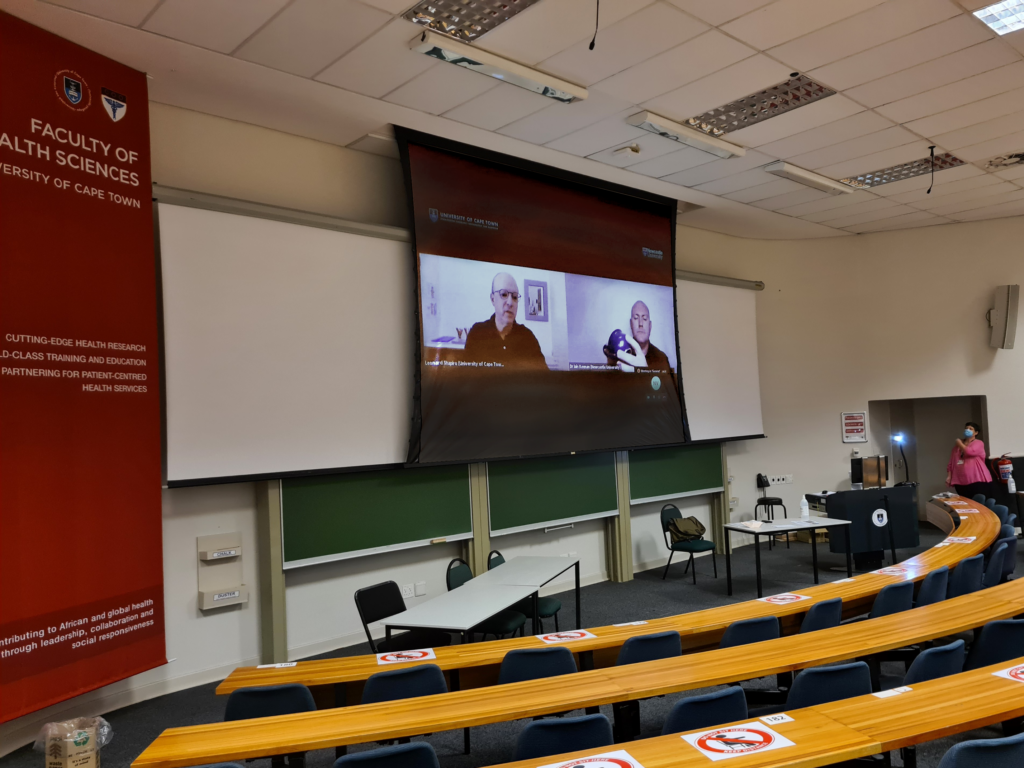
This week students from the University of Cape Town have joined the pilot of the Exploring 3D Anatomy course.
The second pilot of the Exploring 3D Anatomy course is now live, with students participating at the University of Cape Town in South Africa.
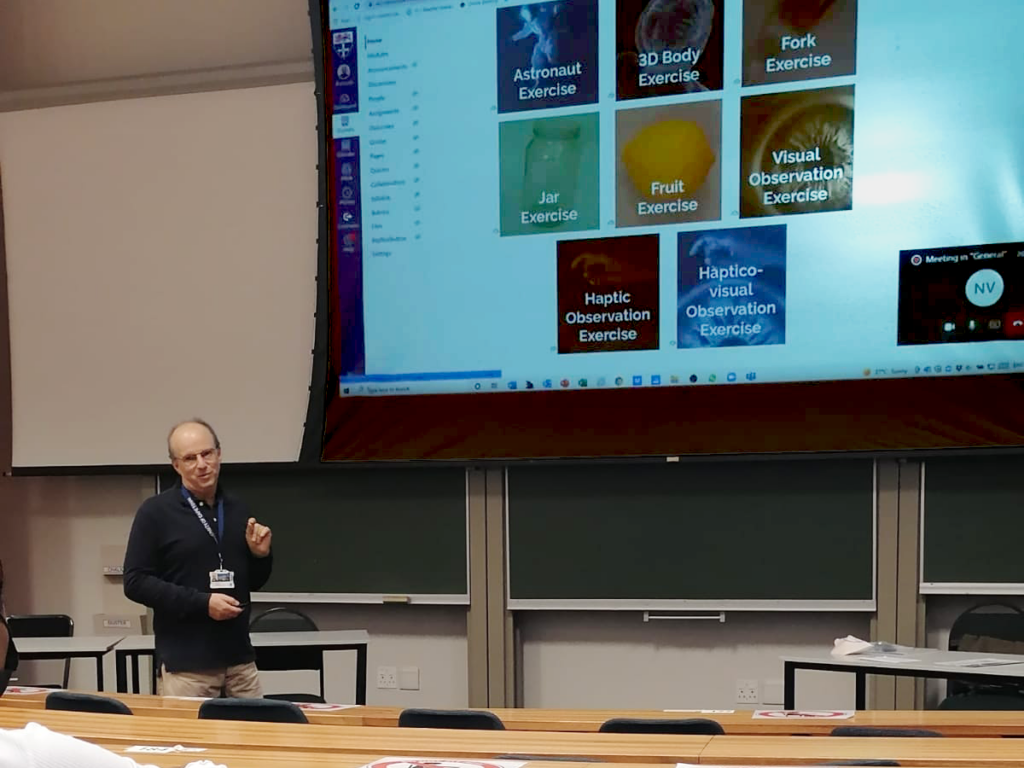
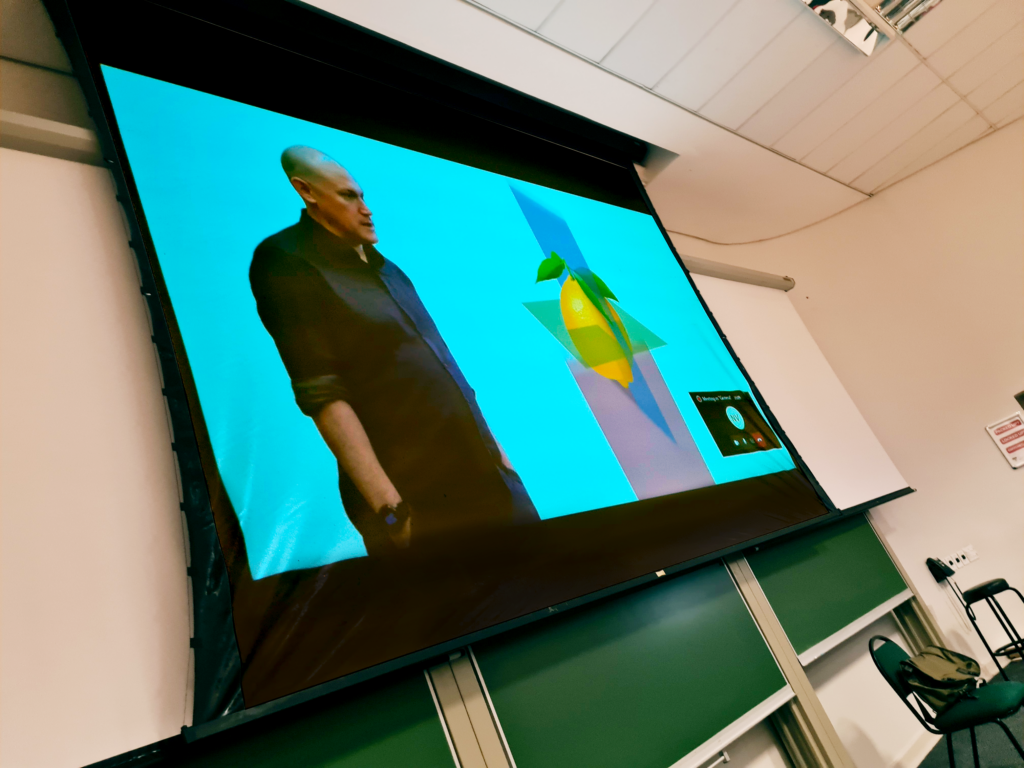
Leonard Shapiro presented an introduction to the course on 18th March to a class of second-year medical students – many of whom joined the class remotely via Teams.
Leonard presents the courseAn example of one of the course exercises is sharedLeonard presents the course exercisesDr Iain Keenan in the course trailer
The course trailer was also shown, and students were invited to sign up using a QR code posted on the slide show as well as on posters in the lecture theatre. Senior lecturer in Anatomy, Dr Geney Gunston, also posted the sign-up link for the students on VULA, the university messaging system.
Many students have signed up, and we look forward to working with them over the next few weeks as they Explore 3D Anatomy from home.
After this pilot and a further development phase, we hope to make the course more widely available to many more students.
Images provided by UCT medical student Mulaudzi God-mother Matodzi-muswa and Leonard Shapiro.