The Learning and Teaching Conference in March gave Gemma and I the chance to present a video about our current ERDP research project.
Our research focuses on engagement with online learning materials within the Faculty of Medical Sciences and NUMed. The full video can be viewed on the conference playlist.
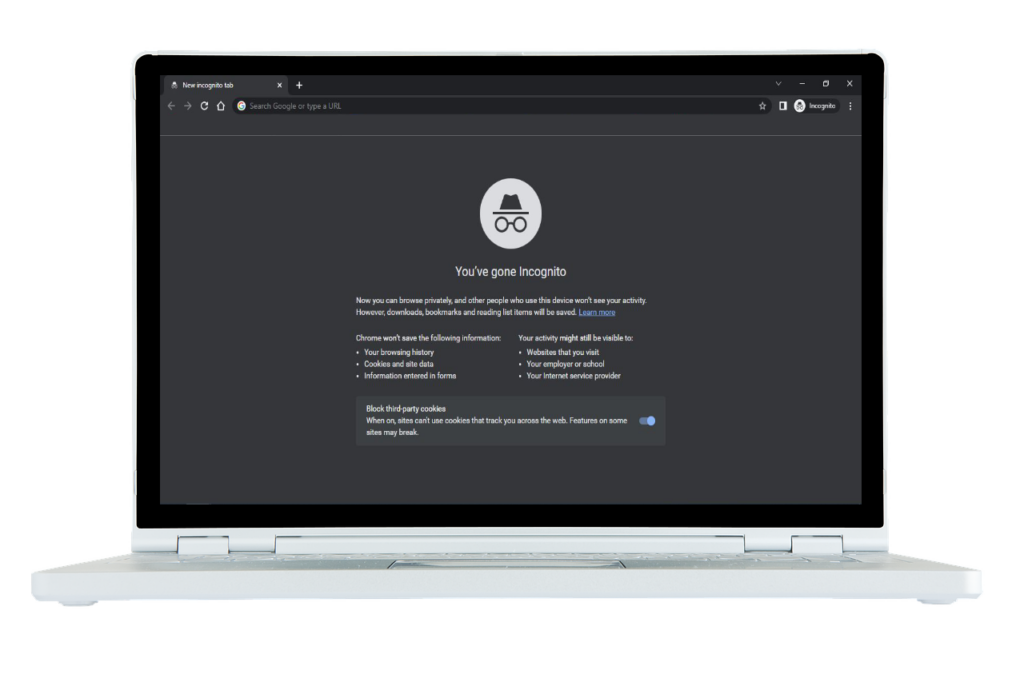
You’d like to quickly open an incognito browser window in Google Chrome. Usually you would click on the three dots on the top right and click New incognito window.
The Solution
Google Chrome, Microsoft Edge
Windows: CTRL + Shift + N
Mac: Command+Shift+N
Firefox
Windows: Ctrl-Shift-P
Mac: Command-Shift-P
Safari
Mac: Command+Shift+N
The Result
A new incognito window opens instantly. You can browse the web without Chrome recording every page and activity in its history.
This post, kindly provided by Module Leader David Thewlis, discusses the use of OpenShot Video Editor to add overlays into videos for teaching.
Check out the resources section at the bottom of this post for step-by-step guides.
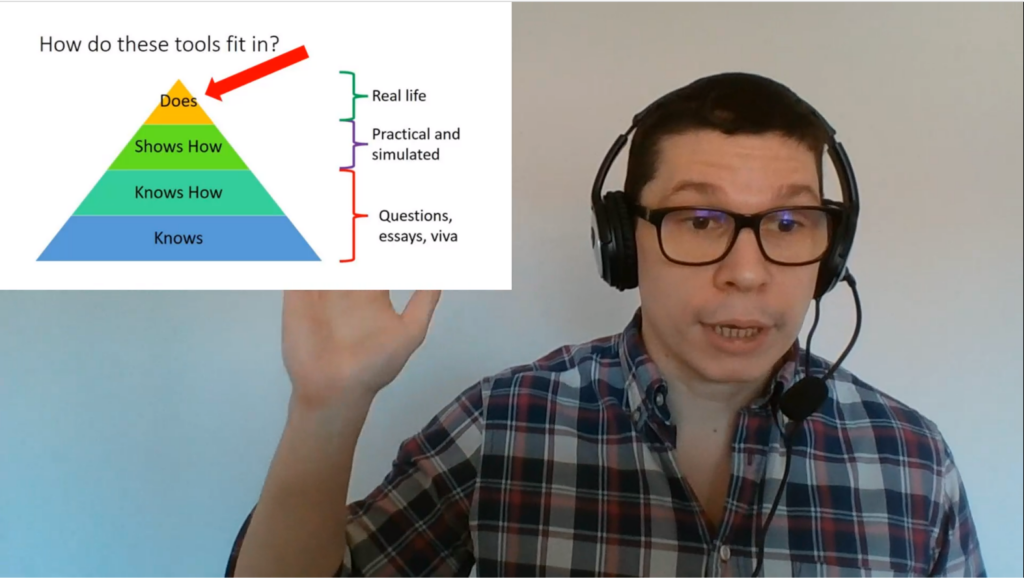
Example taken from MEE8079, Assessment in Medical Education, 2023
Why I use overlays?
I started my approach to online lecturing by recording in PowerPoint. Then I moved to recording in ReCap/Panopto. Neither were quite right for me, I felt limited in my delivery compared to in-person teaching. I found using props difficult when you only take up a small portion of a screen and emphasis on what really matters can be lost when you can’t feel the energy of the room.
I realised my biggest issue with my lectures was that I was relegated to a tiny corner and the slides had become central.
You want the slides to be condiments to what you’re saying, not be the main event.
Bell Hooks writes about academics hiding behind the pedestal lose engagement with the class. Unfortunately, online lectures can create a similar barrier between us and our students. Overlays is the approach I decided on to help reduce this barrier in my teaching.
I hope I am not the only person who spends hours watching videos on YouTube for inspiration. The videos I found most interesting (even if they were long) were simple speaker focused talks, which showed media when it was helpful. Replicating this type of content was my aim.
What can you use overlays for?
Overlays replace slides by allowing the speaker to have greater control over where and when to place media. You can incorporate pictures, videos, audio, and titles into a single talk with reasonably little skill (I have managed – you can too!). You can choose to direct focus in the frame. Wes Anderson has made a film director’s career out of this skill, perhaps we can learn from it.
Types of overlays:
Picture – these can act very much like slides. Placing them in a corner of the screen, or covering the whole screen can offer different experiences.
Titles – these are text which appears in picture. They can be used as a title, but I like to use them to correct a mistake I’ve made in wording I also use them to throw forward to an idea or call back something discussed earlier in the lecture or course.
Video – adding another video within your video can serve as a much better example than just simple explanation. I have done this a few times with examples of good teaching models recorded by my colleagues. I have also seen some effective uses of people having brief conversations with themselves using picture in picture overlays.
Audio– if you have a flair for the dramatic backing music might help at some point in your talk. Audio Commentaries can also create a richer resource, see our case study.
Emojis – They’re there. Why not?
How I set up overlays
You will require some basic video editing software – I like OpenShot Video Editor. It’s free and reasonably simple. Simplicity is the theme of my advice.
1. Create/choose your media
Create a recording of your lecture using whatever recording device you have available. Errors or issues with the recording can be fixed in the editing process if needed. In this example on YouTube an instructor made a mistake with wording. Rather than re-record the entire video, which is otherwise good value, they corrected with an overlay title.
Making your images can be equally as easy. Saving pictures to an appropriate folder is one approach. I like to insert my pictures into a PowerPoint presentation to give myself the opportunity to get the structure clear in my head. I then save each slide as a picture.
2. Organise your content
Keep it simple and experiment with different formats. Layouts, text sizes, fonts, and colours all can have an impact on what you are communicating. Ensure that your titles are legible, and contrast appropriately with your background. I like the background to be the video of me generally, but I’ve seen solid examples of it being a slide or set of slides.
3. Put the video together
I recommend you take your time editing your first few videos.
Regardless of the software you decide to use I recommend you save your project often! Losing an almost completed video is very frustrating.
You can clip your videos to remove errors. Insert other videos in the middle of your talk. Explore effects if you are delivering a narrative.
The export time can be quite long (mine usually run around 40 minutes for a 10-15 minute video). This is an opportunity to make a coffee, have a stretch, and look away from a screen.
Conclusion
Although it may need more initial time investment it is worth it. Using overlays can add a personal touch to any asynchronous video content.
The MBBS programme collects a lot of assessment information that needs to be displayed in a way that is useful for the students, so that they can improve their grades through focusing on the right areas. They called upon the web skills of the FMS TEL team to design and implement a web application that could take assessment results, process them, and show them to the students in a visual and interactive way.
Using templates
The first step towards this was agreeing a template that the results could be stored in. The types of assessments the MBBS programme uses are varied and quite detailed in their scope. They required a means to take all of this variation and detail and create something useable. The assessment team started by using complex Excel documents to collect and store all the assessments results. Each assessment type (WriSkE, MOSLER, SBA, OSCE…) needed a unique Excel template to store all the student scores and a way to map the assessment structure to the curriculum outcomes.
Example WriSkE template
Processing the Spreadsheets
Once we had agreed on the template structure, we could then focus on how we would process them for use in a web application. We planned for the heavy concurrent use the web application would undergo when all the students logged in and tried to access their grades at the same time. The best solution for this was to minimise the use of complex database structures and instead store the results in pre-processed files, one for each student per assessment. The format we chose for this was JSON and this allowed us to rely on the speed of the server to provide the data.
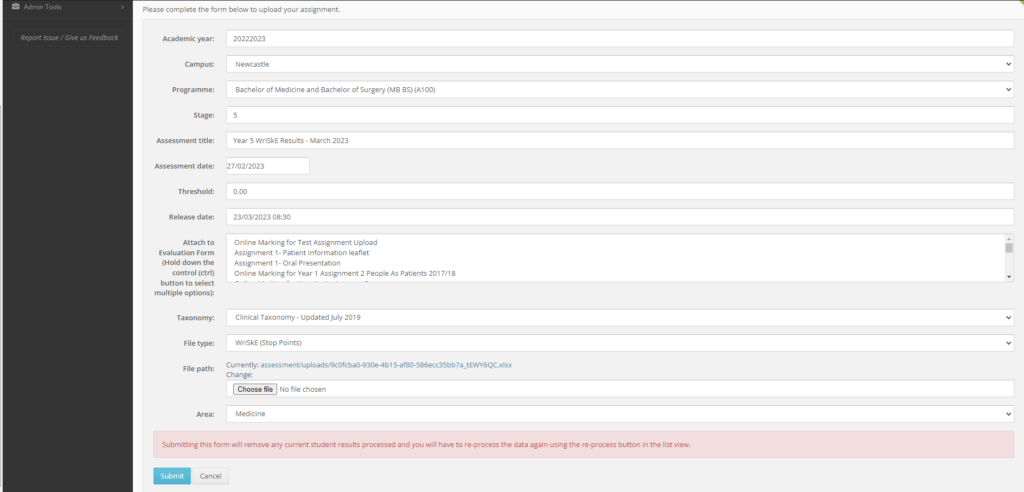
Custom processing scripts were written for each assessment type to create these files. This would mean an administrator from the assessment team could log in to the site, go to the admin tools, choose an assessment type, set up a few settings including a release date, attach the assessment to an uploaded taxonomy (this attached the exam structure to learning outcomes), attach Excel file and process. The site would then go through the spreadsheet and create each assessment file ready for the students.
Admin Upload Form
Display the Results
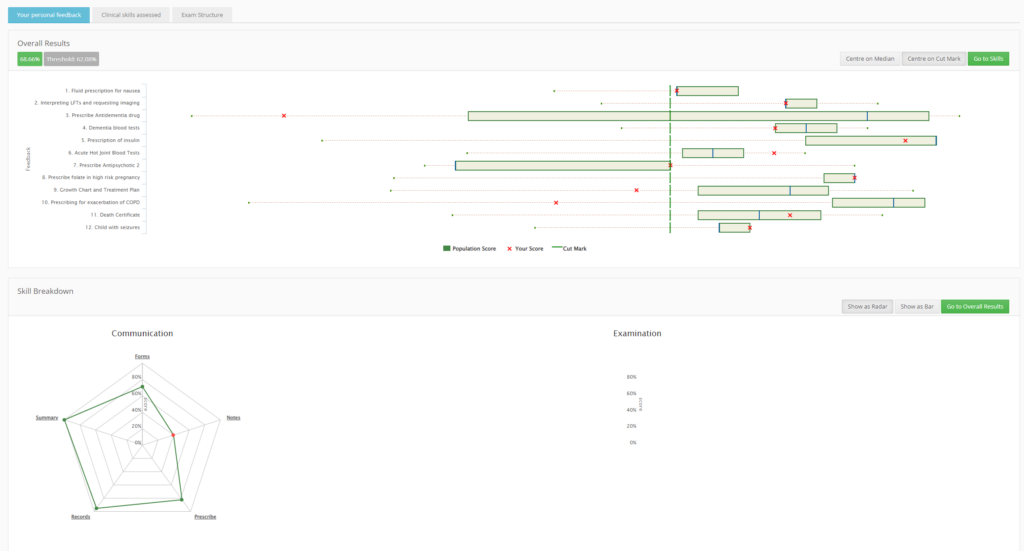
The final step was to decide how to display this detailed assessment information to the student. We chose to use an online chart library called highcharts. This allowed us to utilise a whole suite of charts and graphs to display the raw results in an interactive way.
One of the core charts we used was quartile (boxplot) graphs, which allowed us to plot the students scores against the cohorts. This means that students can see how they are performing in the context of their cohorts, which many of them appreciate. We also heavily use bar charts you can drill down into, and spiderweb charts that could show the same information in a visually different way. Letting the students modify and change the display to their preferences was also key.
Finally, we added tabs to show the exam structure and an area to which support documents could be added, such as assessor comments.
WriSkE results of a student
Each time a student clicked on an assessment, the site would load their file and convert into a visually rich interface of charts, graphs and links to drill down into the data.
System Success and Expansion
The FMS Feedback system has been successfully used by the MBBS programme since 2014. It is held in high regard by the administrative team who appreciate its flexibility and ease of use. For students, the detailed data displayed allows them to have a very granular understanding about their levels of mastery of individual skills and topic areas, and to spot patterns in their performance. This means they can focus their studies on areas identified for improvement, with a view to increasing their overall competency.
It has since been expanded to cover a few assessments from dental programmes that had a similar structure and process to the original MBBS assessments, such as SBA and OSPE’s.
If you would like to learn more about the FMS Feedback system, please contact the FMS TEL Team.