Revolutionising Learning: AI and Group Work Unveil a New Approach to Reading Activities

Navigating through the extensive volume of reading material in certain modules can be a daunting task for students, often leaving them overwhelmed by the sheer magnitude of information. Recognising this challenge, the module leaders of ONC8017 took a pioneering approach to ease the burden on students. In a bold move towards innovation, they harnessed the power of artificial intelligence (AI) and embraced the collaborative spirit of group work to revolutionise the learning experience.

tablet showing research paper and a robot saying i can help with that
Image used in Discussion Board task

The Task

Article Allocation:

The first step involved compiling a comprehensive list of articles relevant to the module’s curriculum. Each article was carefully selected to contribute significantly to the students’ understanding of the subject matter. Subsequently, the articles were allocated to individual students, ensuring that each student had a unique piece of content to delve into. Students were asked to read and summarise their assigned article.

Student Autonomy:

To cater to diverse learning preferences, students were given the autonomy to choose their preferred approach in engaging with the assigned article. They could opt to read and summarise the content independently, a traditional method fostering individual comprehension and analysis. Alternatively, students had the option to choose an AI tool for summarisation, exploring the cutting-edge capabilities of technology to streamline the information extraction process.

Students who opted to use an AI tool were tasked with critiquing the summaries generated. This not only encouraged a deeper engagement with the material but also honed their analytical skills as they assessed the accuracy, coherence, and relevance of the AI-generated summaries.

Following consultations with the Newcastle University Library, we recommended the AI tools Scholarcy and TLDR This. However, students were able to choose any tool that best suited their preferences. The library, also provided valuable insights, including a copyright statement and links to AI Guidance, as well as the Uses and Limitations of AI.

If your allocated article is behind a sign in wall we kindly request that you do not upload or share this licensed material with third party AI tools

Copyright statement

Group Collaboration:

The students were asked to share their summaries to a discussion board and to look through the summaries posted by others. They could then identify which literature was most relevant to them and read the articles in depth themselves.

Recognising the significance of collaborative learning, the module leaders fostered a sense of community among students. Group discussions and collaborative sessions were encouraged, providing a platform for students to share insights, discuss varying perspectives, and collectively enhance their understanding of the subject matter. This collaborative element not only enriched the learning experience but also mirrored the collaborative environments students are likely to encounter in their future careers.

The Student Experience
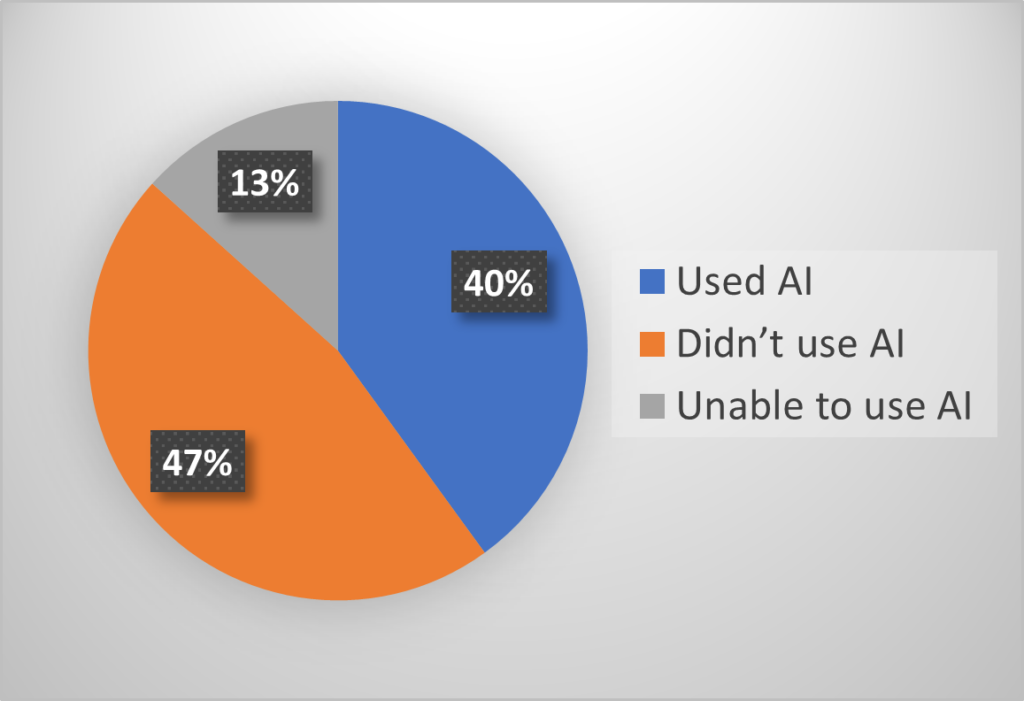
40% used, 47% didnt use, 13% unable to use AI

53% of students opted for AI-assisted summarisation, showcasing a keen interest in exploring the capabilities of technology for academic purposes. This choice not only demonstrated a desire for efficiency but also provided students with valuable hands-on experience in harnessing AI tools for practical applications.

However, the practical application of AI tools had its challenges. 25% of students who chose AI encountered difficulties, with the tools unable to produce a summary at all.
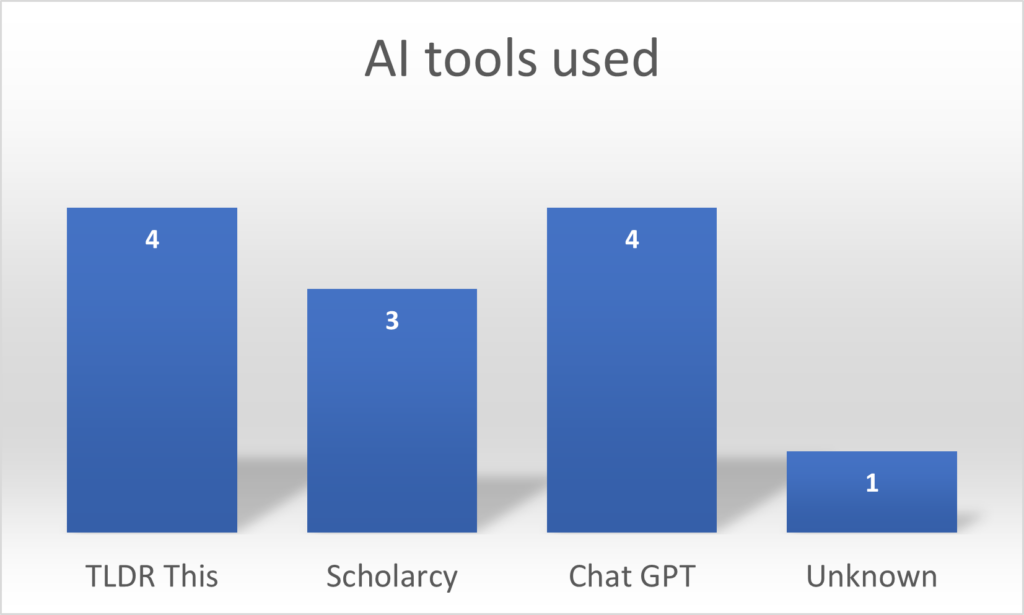
tldr this 4 scholarcy 3 chat gpt 4 unknown 1

In their candid feedback, students highlighted both positive and negative aspects of their experiences. While some were impressed by the efficiency of AI tools, all students expressed concerns about gaps and missing details in the generated summaries. Specific instances of errors, omissions, and disjointed reading experiences were noted, revealing the practical limitations of relying solely on AI for complex tasks. The majority of students who opted for AI, eventually opted to manually summarise the articles anyway, indicating a less-than-ideal outcome from the AI tools.

The AI tool also provided a second longer summary. This summarised most sections of the paper individually, which was presented like a smaller version of the paper. There was still important information missing, which was clear from the disjointed reading experience. Even so, I was still quite impressed with how well the AI tool had summarised the vast amount of information in the original paper into something relatively usable. 

Student experience of Scolarcy

No inaccuracies were noted. Good summary of the epidemiology, although it seems that the AI summary has basically just been derived from the abstract of the article. A number of gaps were identified. 

Student experience of TLDR This

The article has been summarised into ten key points, but these are not detailed. For example. only one of the statistics provided in the article have been included in the AI summary.

Student experience of Chat GPT

Final Thoughts

These nuanced results underscore the importance of balancing technological innovation with practical considerations. While the incorporation of AI offered students valuable exposure to emerging technologies, the ultimate outcome indicated that, as of now, AI tools might not be the ultimate solution we were hoping for.

Despite the unexpected challenges encountered in the use of AI, this experiment has provided invaluable insights. Recognising the evolving nature of technology, we remain committed to maintaining the task, observing how AI technology progresses year after year and see if, as the technology advances, the dialogue from students changes.


This post was written with the assistance of AI tool, Chat GPT.

Case Study: ONC8030 Branching Activity

The Idea

Inspired by an H5P talk at the NU Learning and Teaching conference, Kay McAlinden, module leader for ONC8030 Psychosocial Issues in Advanced Disease, approached the FMS TEL team about creating a branching activity.

We jumped at the opportunity to be involved and offered our services to film and edit the videos, and also build the activity in H5P and Canvas.

Bringing to idea to life

Kay took the lead in crafting the scripts and coordinating an actor. Pip Davies, roleplaynorth Co-Ordinator, kindly offered to play our patient and Kay would take the role as the Health Care Professional.

Emily Smith and Tracy Connell from the FMS TEL Team volunteered to be our videographers and canvased the campus to find a suitable room to be our ‘doctors office’. Once the scripts were finalised and the room was staged, filming commenced. Using two cameras and a team of two videographers we were able to film both the patient and the health care professional scenes at the same time. This aided in the flow of the conversation for the actors and filming was able to be completed within a couple of hours, with brief interruptions for the inevitable giggles and occasional bloopers.

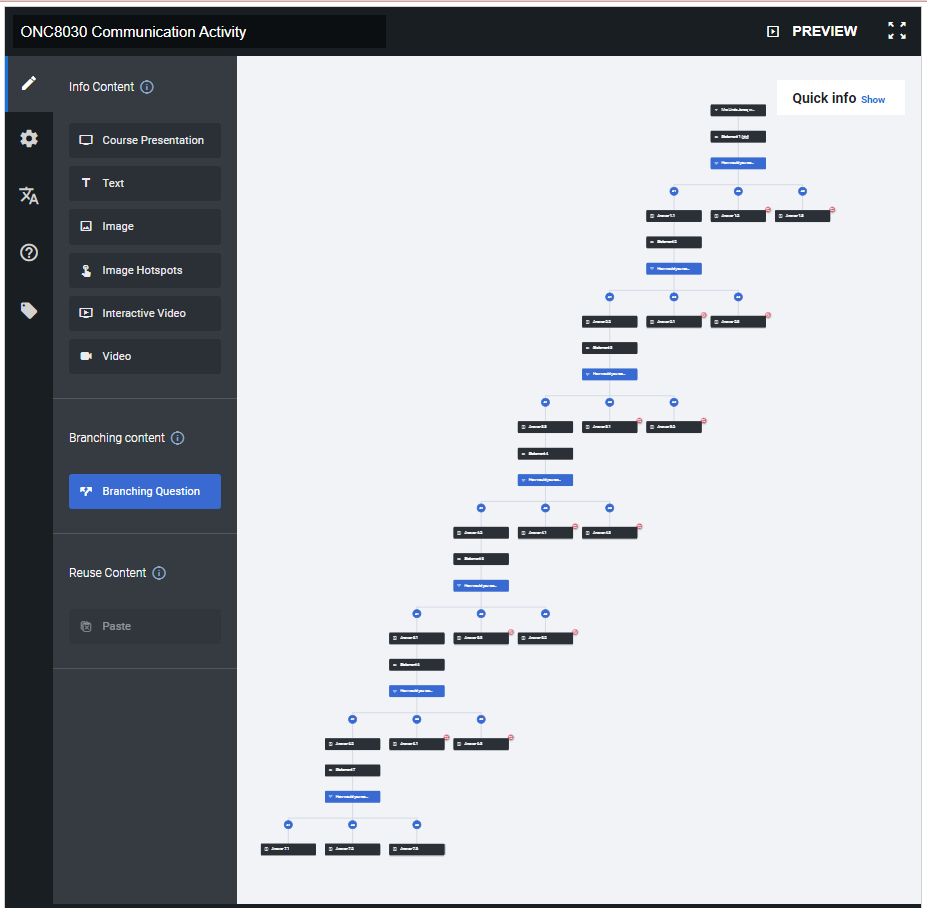
showing branching activity in H5P editor mode
Editor View of H5P Activity

Next, we moved onto the task of editing the footage, which was completed in Adobe Premiere Pro, and building the task in H5P. We had filmed two options for the patients thoughts so a few different variations were created. After choosing a variation, making any further adjustments and proofreading of the captions, the activity was finalised.

All in all, the process took around a week of work.

The Final Layout

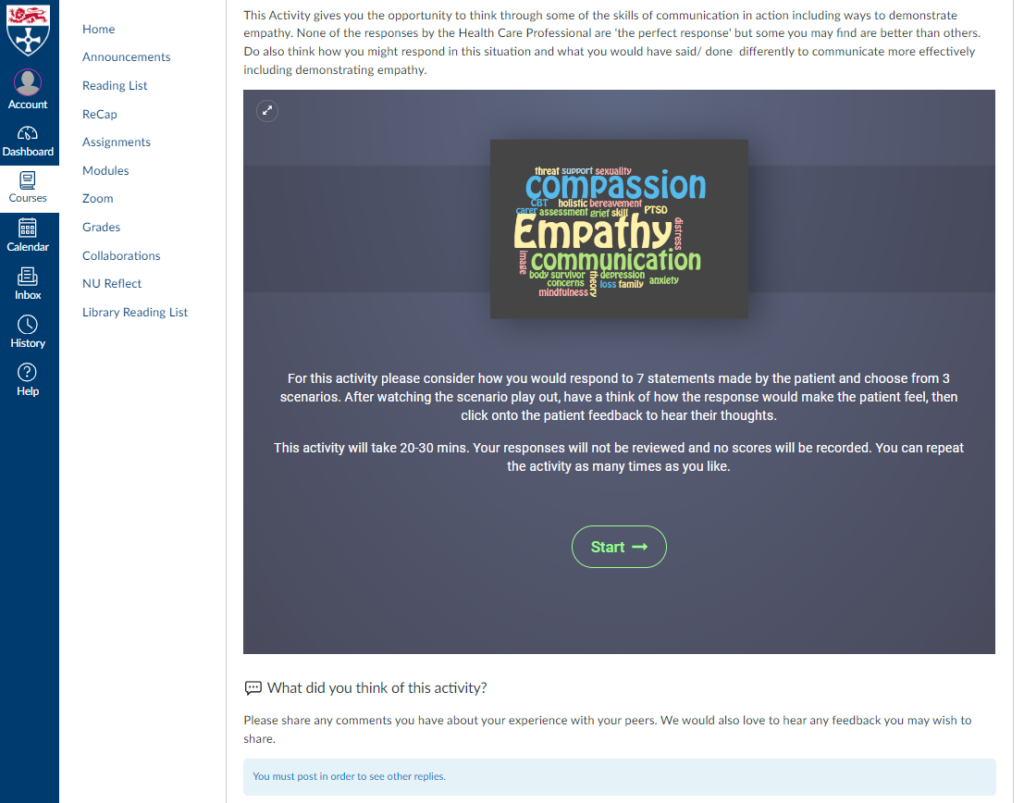
The activity is situated within a discussion board on Canvas, providing students with the opportunity to complete the task and subsequently engage in discussions with their peers. This setup also enables us to gather valuable feedback regarding the students’ perceptions of the task.

Canvas discussion board with embedded H5P activity
Canvas Discussion Board

After the introduction and instruction slides the first statement is introduced. Students are then prompted to pick from 3 responses. The corresponding response video is played, and students get a opportunity to reflect on the response and consider the patients perspective. Finally, we get to hear the patient’s thoughts. There are 7 statements for the students to work through, guiding students through a sequential conversation with the patient, fostering a sense of engagement and interaction.

Student Responses

While the activity is not actively monitored we are able to track which students have completed the task, view their selected options, and read their written responses. These insights will prove valuable when we conduct future reviews of the activity.

H5P results page showing student chose option 3
Results page – Branching Route
results view of H5P showing free text comments
Results page – Free text comments

Student feedback

We have been inundated with wonderful feedback from all the students. Below are some of our favourite quotes:

“This was a really valuable reflection for me. I could think back to how I had previously handled discussions like this. Had I perhaps been too quick to try and offer solutions and fix things. “

This was quite an interesting exercise. It is quite easy to tip into problem solving and fixing, however what this highlights is that stepping back, allowing space for difficult emotions to be expressed”

“This was really interesting, I liked that there was not necessarily a wrong answer but makes you think about how you are wording answers to patients and the sequence to presenting the information to the patient.”

“I thought that was an interesting activity. It highlighted the importance of actively listening to what your patient is telling you and not just them with more information…. It was interesting sometimes the one i picked wasnt said in the way I would have said and therefore the response from the patient wasn’t what I would have expected.”

“I thought this was a really effective activity; it made me really think about how I would respond in these situations and how to put myself in Linda’s shoes to try and understand her feelings. I found that my responses developed through the activity and could see how by offering more space and time for Linda to talk it allowed her to open up and feel understood. At the start I definitely could see myself trying to find solutions to her problems but it became apparent that answers weren’t what Linda was seeking, she just wanted reassurance and to be understood. This will be useful to take into practice.”

“As a healthcare professional, this activity has opened my eyes to the fact that more often then not, we have been taught to focus on the physical issues and to prioritise first the physical health, and then the psychosocial aspects of the person’s life. During this activity, I realised how therapeutic empathy can be in itself.

Final Thoughts

The creation of this branching activity, led by Kay McAlinden and supported by RolePlay North and the FMS TEL team, has been a successful collaboration. Scriptwriting, filming, and editing, came together to create an engaging and interactive learning experience for the students.

The use of technology, including Premiere Pro and H5P, was essential for executing the activity seamlessly and collecting valuable data for future improvements.

The overwhelmingly positive feedback from students underscores the effectiveness of this activity in enhancing their learning experience. It’s a fantastic example of how technology and teamwork can result in innovative and impactful activities that students truly enjoy and appreciate.


Your Next Step: Resource and Support

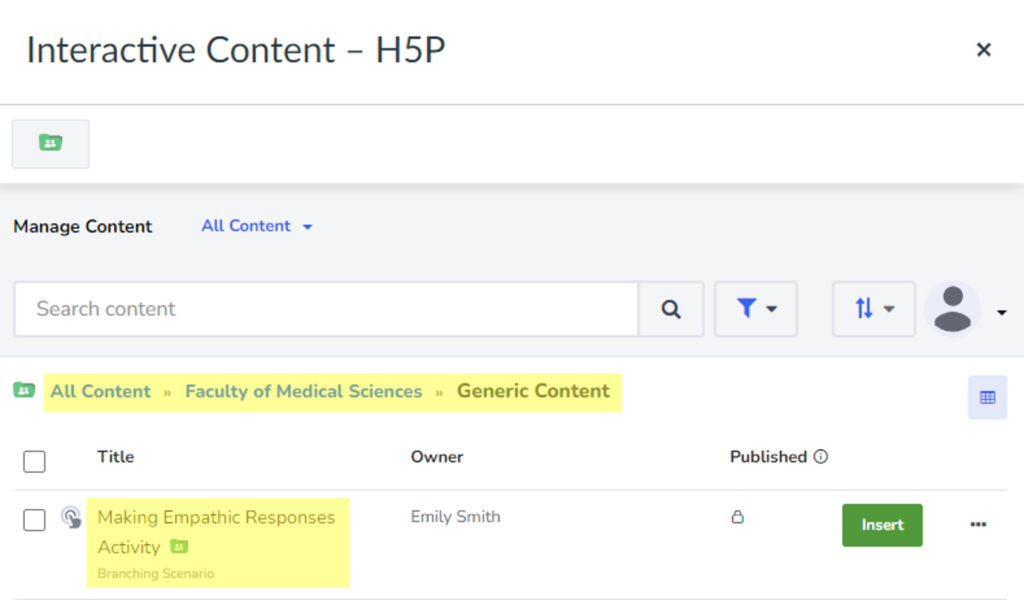
This activity has kindly been shared with all staff at Newcastle University and is available in the Faculty of Medical Sciences > Generic Content folder within H5P.

all content, FMS, generic content, making empathic responses
Folder View in Canvas H5P app.

Taking Ctrl: Device Mode

The Problem

When you’re putting together course materials, it’s important to think about how it’ll look to your students. Laptops and monitors come in all shapes and sizes, so what looks good on your screen might not on someone else’s.

It is also becoming increasingly common for students to access content on their mobile phones and tablets. How can you efficiently ensure that everything appears visually pleasing and functional across these diverse devices?

The Solution

Windows: F12
Mac: Cmd + Opt + I

This opens the developer tools, which includes a ‘device mode’ where you can see how your content will look and function on different devices. The below example is using Chrome on a windows machine:

Example showing responsive and iphone views

Learn more: Chrome Documentation


Enjoy this post? Check out the others in our Taking Ctrl series.

Collaborative Documents in Canvas

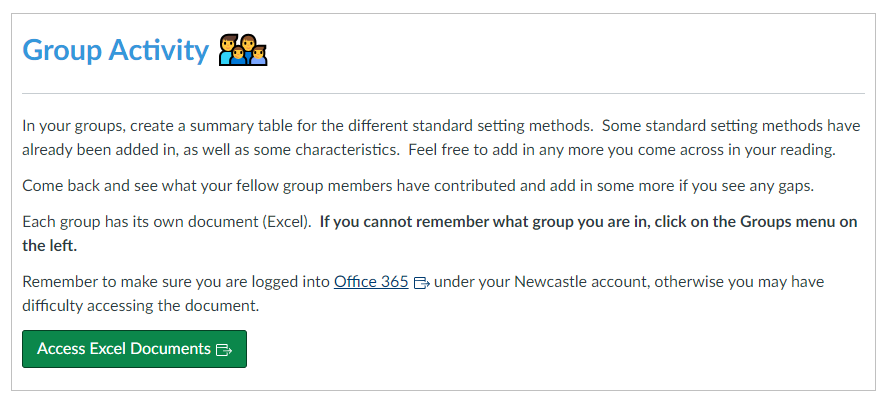
Some group tasks are easier to complete using Word/Excel/PowerPoint. The easiest way I have found to share the files with students is to create a folder in SharePoint and provide a link to the folder in Canvas.

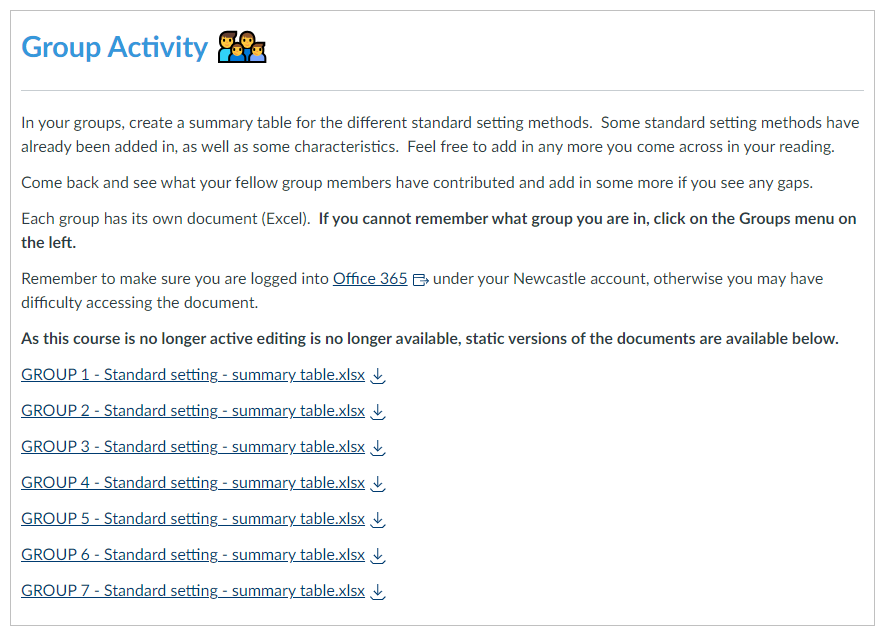
group activity. each group has a document. one link to access folder on onedrive
Task while the module is running

At the end of the academic year, I find its best practice to upload the completed documents and remove the link to SharePoint.

group activity showing links to 7 group documents
Task after module is complete

Benefits

  • Files are not lost, should a member of staff leave the University
  • The SharePoint files can be rolled back to a previous version and reused
  • The link in the original task can be used year after year
  • Files can no longer be edited by past students

Negatives

  • Can be time consuming if you have a lot of group activity files to upload

Preparing for a new term

The FMS TEL Team work with schools across the faculty to maintain and improve our E-Learning offerings. At the moment, this is around 40 modules.

Join us in this blog post for a behind the scenes peek in our last minute checks before publishing the new courses for September 2023.


What have we already done?

During the summer we imported last years content, updated the timetables, and refreshed any padlets or wiki pages. We review the student feedback received from the previous year, and see if there are any quick wins we can do, or any larger problems which are being mentioned multiple times or have been mentioned over multiple years. Suggestions are made to our Module Leaders and agreed improvements are actioned. These will usually consist of activity revamps, updating outdated information, and excessive reading materials replaced with graphics or videos.


The final checks

Our last minute checks will always consist of:

Run the Link Validator 

found 2 broken links, home page, students may not be able to access these links
Example of Link Validation results

What: The Link Validator will find any broken links within your content. It will display a list of the page/discussion/assignment where the broken link is located and what the broken content is, as well as how it is broken.

Where: Settings > Validate links in content > Start link validation

How: We review every broken link. Sometimes an external website may have changed their website layout so a new path is required. Other times a resource might not longer be available and an alternative source will need to be found. We go through the list, fixing what we can and send a list of any unfixable links to our Module Leaders to review.

Learn more in this Canvas Guide: How do I validate links in a course?

Check course accessibility 

preview of ally checks showing 99%
Example of Accessibility Report

What: Canvas has an integrated Accessibility Report using Ally that will check all content; including documents, images and HTML content. The University has no baseline score, however it is highly recommended that your course is as accessible as possible. For E-learning courses in FMS we aim for a score of at least 95%.

Where: Canvas course > Accessibility Report (side menu)

How: The majority of improvements are easy to make and Ally takes you through the process step by step. Most of the time it will be tagging PDF documents, adding alt text to images or editing images that are over exposed (usually screenshots). We start with the red items and move onto the amber items. It is usually a case of following the on screen instructions. We have a walkthrough document available on the FMS Community as well as a few other posts on Accessibility.

Learn more on the LTDS Digital Technologies website: Ally for Canvas

Create Groups and Journals 

students group patient 1 6 students patient 2 7 students
Example of groups in Canvas

What: On larger modules we tend to put students into groups for certain tasks. We find this helps with engagement, there is nothing worse than joining a task late and finding it already completed. Group tasks are also a great way to distribute workload and encourage teamwork. Some tasks also require privacy or independent thinking, for those tasks journals are a great addition.

Where: Canvas > People > +Group Set

How: Using the groups function in Canvas you can create custom groups, automatically assign groups or create journals by creating a group set with a size of 1. We will start assigning groups once students are added to canvas in the first week in September and then do daily checks for new arrivals every couple of days for the first few weeks of term. I also add a little message to the main board on my group activities asking students to get in touch if they haven’t been assigned to a group/journal yet.

discussion message asking to email for allocation
Example message on group discussion board

Learn more in this Discussion Board video series we created or in these canvas guides: Instructor Guides for Groups

Prerequisites and Requirements  

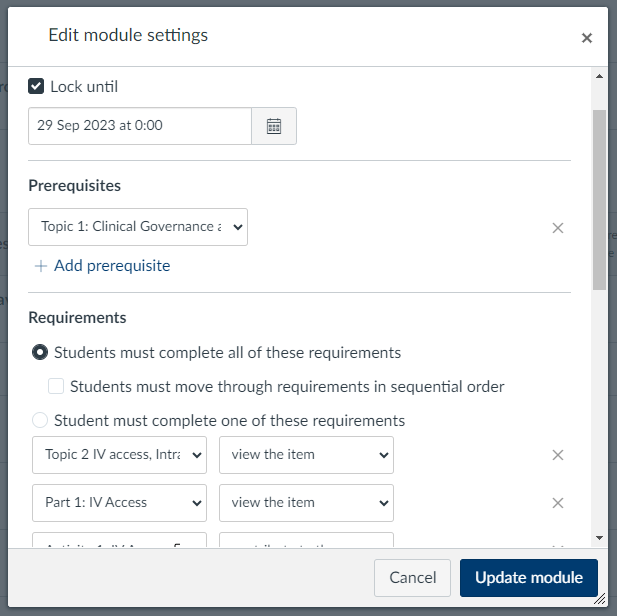
showing settings for lock until, pre req of previous module, requirements on all pages
Example of settings within Canvas

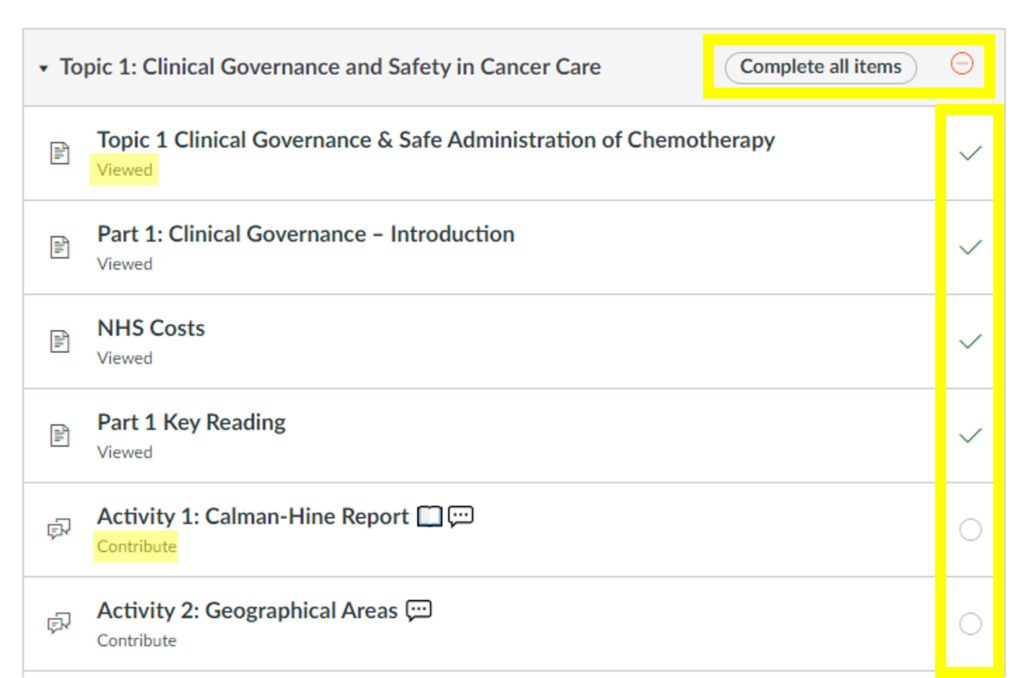
What: There are various ways to organise the flow of your courses. Adding requirements to your content creates a little tick box next to each item, so students can easily pick up where they left off. Using requirements also allows us to add prerequisites, which control when students can move on. They may have to contribute to a discussion board, or pass a test before moving on. We can also control the date and time certain content is made available.

Where: Modules > 3 dot menu > Edit

How: Most modules will have a lock until date, so content is released gradually. All modules include requirements on every page but they will vary from module to module. Some will just be “view” for everything so students can see where they are up to, other modules require students to complete certain tasks to get their tick. A few modules will use the prerequisite option to stop student continuing until they have completed certain tasks.

compete all items bar at the top, each item states view or contribute, various items ticked
Student View of requirements and prerequisites

Learn more in these canvas guides: Prerequisites and Requirements


We hope this little insight into our practice was interesting. Good luck for 2023!

Giving new life to an old presentation: A Module Revamp Case Study

The Situation

Have you ever heard students complain about a particular topic? Module Leaders for our Chemotherapy Nurse Training module often come across such complaints for their Cell Cycle topic. As the issue was becoming a perennial problem, we decided to thoroughly review the topic that was causing frustration among our students. This blog post shares our project and the transformative impact it had on our students’ perception and understanding of the once-hated topic.

Revamping the Content

We started with the learning objectives for the topic. Using Blooms Verb Wheel as a guide we changed the wording so the objectives would be measurable, and therefore the students could better understand what was expected of them. We removed words such as “understand” and replaced them with “describe”.

Next we reviewed the flow of the topic. We started with a text heavy page with stock images covering; cell basics, cancer, chemotherapy, and ending with the phases of the cell cycle. This page was edited, removing over 100 words, and rearranged so we covered; normal cells and their cycles, then moved onto cancer and chemotherapy. The stock images were converted into animated infographics that were tailor made for the content being discussed.

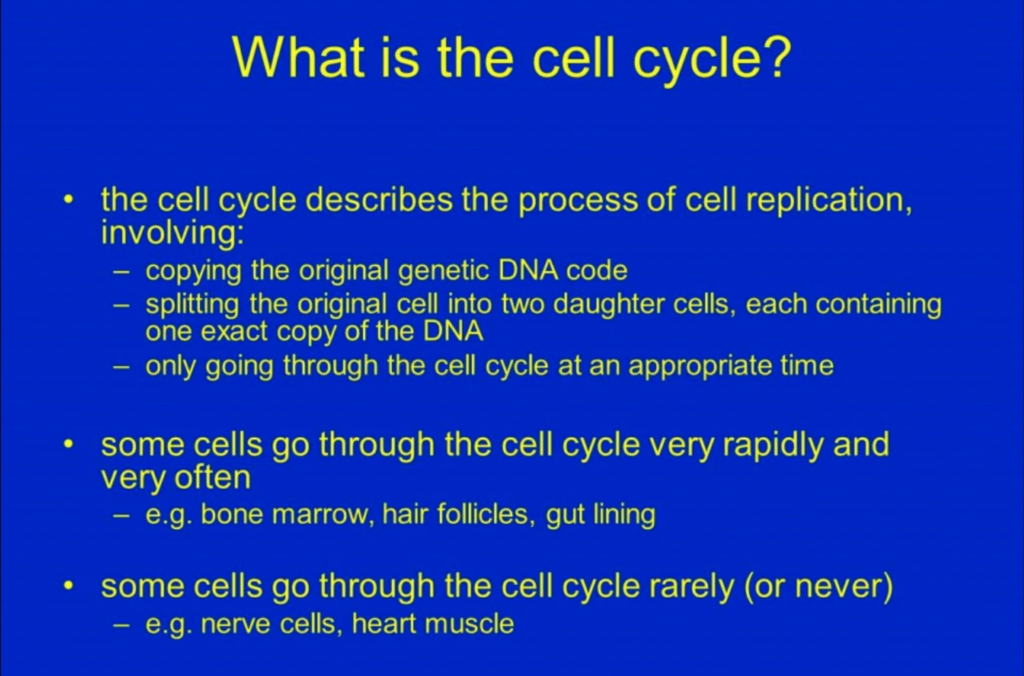
The biggest change was with the asynchronous lecture. The audio was good quality and the messages were still relevant, however the lecture slides were text heavy and had an outdated look.

blue slide with lots of yellow text
Original slide: What is the cell cycle
another blue slide with yellow text in bullet points
Original slide: This is good news, but…

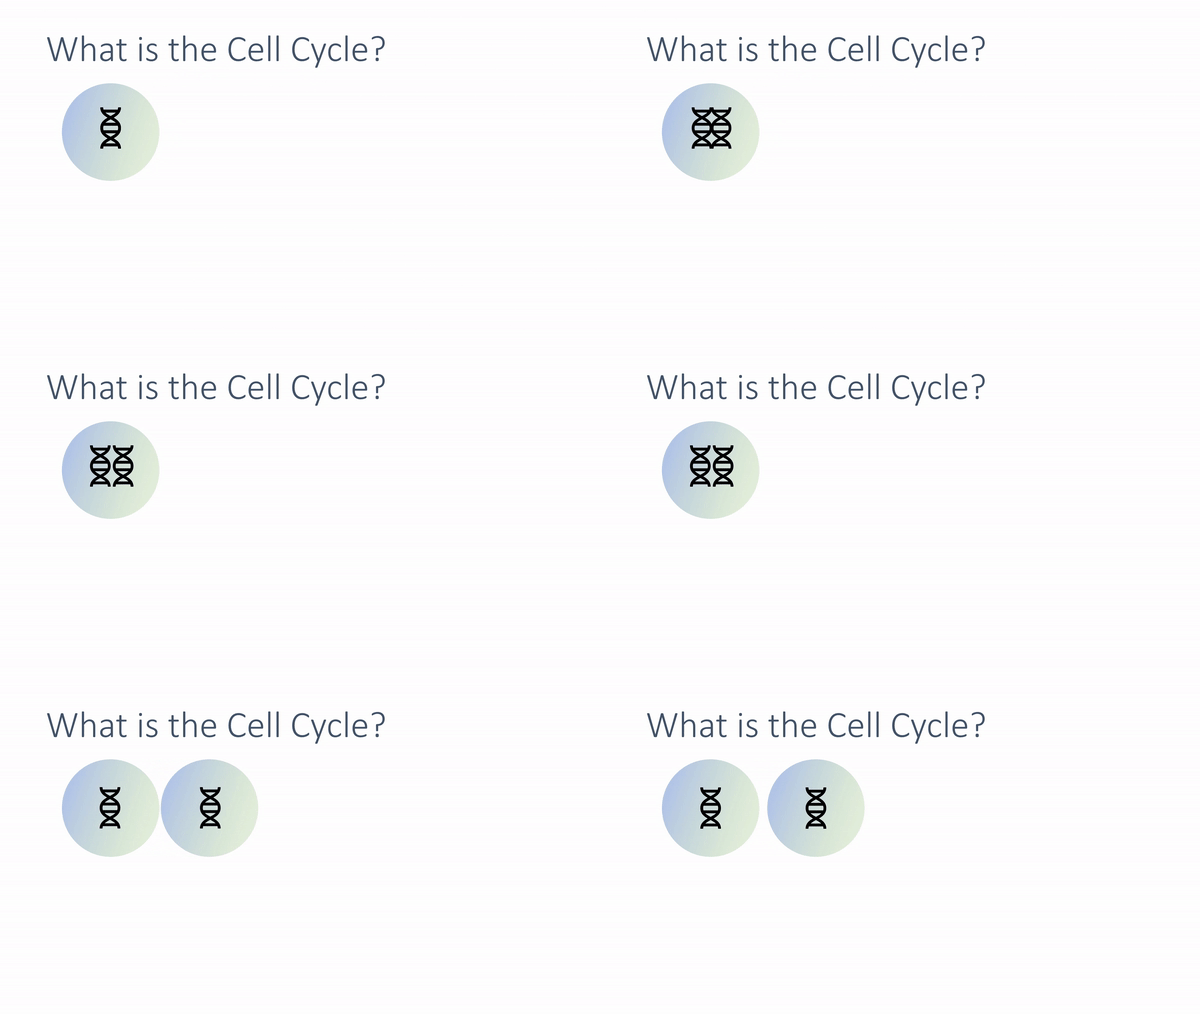
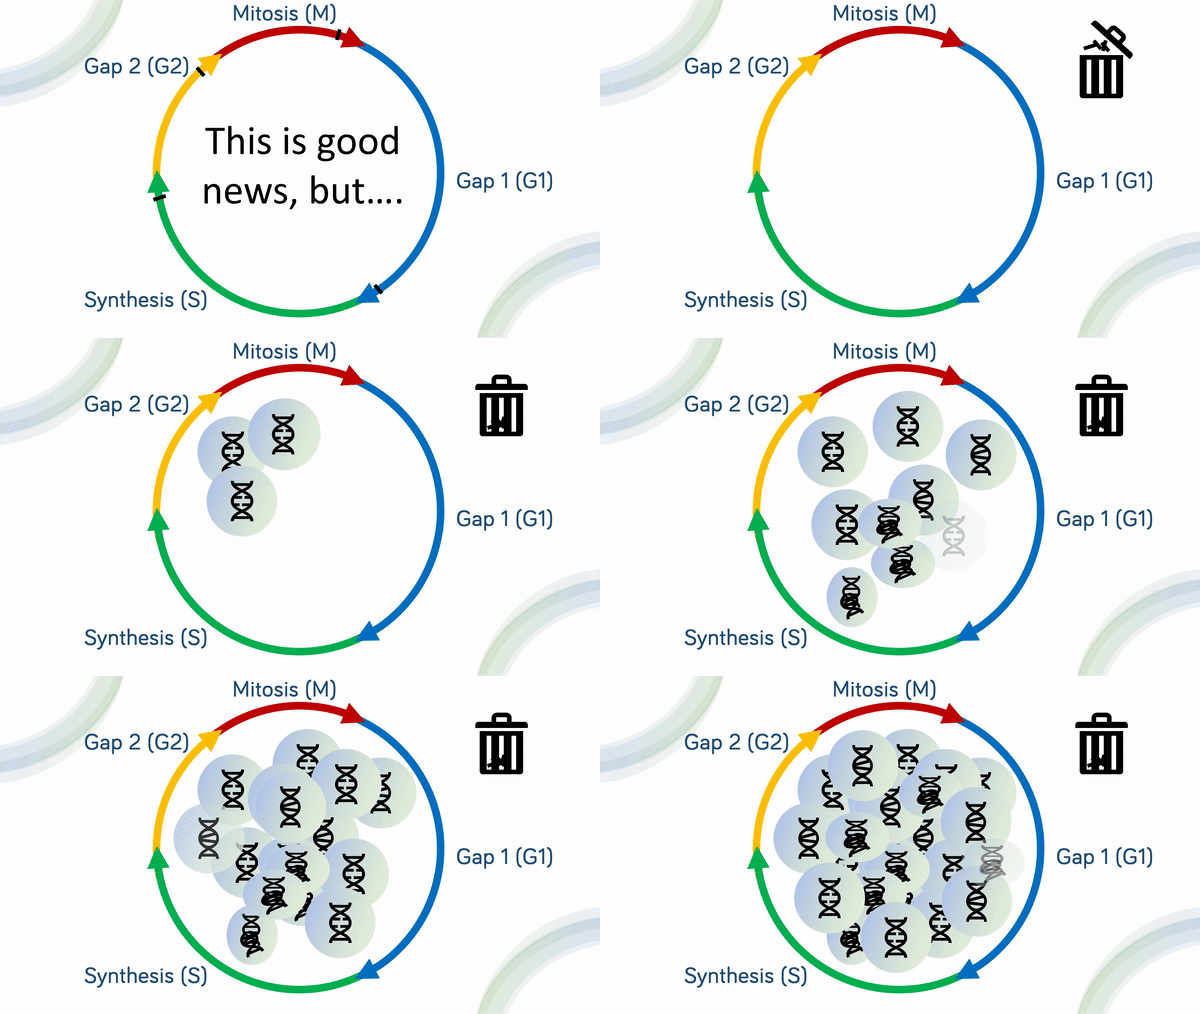
The slides were given a facelift and where possible, animations were used to replace the text. We hoped the animations would assist the students in visualising the processes being described by the voiceover.

slide showing cells splitting
Updated slide: what is the cell cycle
slide showing checkpoints disappearing and slides duplicating with errors
Updated slide: This is good news, but…

Next the students had two tasks to complete. One was to answer some basic questions, and the other was to put their knowledge into action within a group activity. We spruced up the tasks visually, but didn’t make any other changes to them.

We chose to add a “check your knowledge” type quiz, using H5P, at the end of the topic. The questions directly linked to the learning outcomes and we hoped would help the students confidence with the topic.

view of quiz starting page

Student feedback (before):

Found the cell cycle topic very difficult to understand.

I am dreading the cell cycle topic

Student feedback (after):

The topic I have enjoyed most was topic 3 (The cell cycle) 

I have particularly enjoyed topics 3 – going further in depth into the cell cycle and pharmacology of the drugs we use has been really useful  

I quite enjoyed the cell cycle section…I enjoy the lightbulb moments I’ve had understanding how everything links together. 

Final Thoughts

The module team is thrilled with the amazing transformation we witnessed. Our goal was to address the complaints and make things better for the students. But we ended up surpassing our own expectations. The topic that used to be dreaded by the students has now become one of their favourites. The positive feedback from the students has made us proud and motivated us to continue on our journey for improvement. It’s really amazing to see such a big change in how they feel about the subject, with only a few tweaks in how the content was delivered.

Developing Online Asynchronous Materials – An Associate Lecturer’s Perspective

This year, FMS TEL assisted in the development of learning materials about unconscious bias in healthcare settings. This week we are sharing how we worked with Associate Lecturer Ann Johnson to design and create these materials.

As this was Ann’s first year as part of the module team, it was an exciting challenge to be involved in creating her first set of blended learning materials on Canvas. The process was highly collaborative, and the FMS TEL Team were able to contribute our knowledge of pedagogy – particularly online teaching – and the technical know-how to make the materials in Canvas and ensure they would work as needed.

To start the process, Ann outlined her goals for students, which we were able to shape into learning outcomes. She provided the final discussion topic exercise, and we discussed the issues to be considered as part of that discussion.

“How can I get people to challenge their own thinking?”

We discussed the learning outcomes and concepts, and this meant that I was able to suggest scaffolding activities for students to undertake in order to give students a solid foundation and build their confidence to answer the complex question at the end of the topic.

The design process was undertaken through a series of video calls during which we discussed the materials and reviewed how they worked on Canvas, finishing with a few action points for each of us. We discussed the learning journey in detail and stepped through content logically to ensure clarity. The development phase prompted questions and refinements – such as looking for specific resources or articles that could support the teaching.

“it improved my practice”

Activities added included short text and video input – written and sourced by Ann – which highlighted key concepts. A quiz was added so that students could test their knowledge of these important definitions and concepts. This allowed students to feel confident that they had a good grasp of the basics before applying them to their own contexts.

As an experienced facilitator, Ann identified where students might find the materials challenging, as the topic to be explored has a very personal dimension. We worked together to put in place alternative activities for students who preferred to reflect personally, discuss privately, or in an online seminar that Ann would facilitate.

At the end of the design process, the created materials were approved for inclusion in the module by module leader Fraser Birrell and will be part of MCR8032 in coming years. Working together with FMS TEL enabled the creation of high-quality and interactive online learning resources and allowed Ann to upskill in the area of asynchronous online teaching.

Associate Lecturer Profile

Ann Johnson has been a Patient and Public Involvement (PPI) Advocate, Lay tutor, and facilitator for twenty-five years, researching and creating a Patient Involvement Framework for Leicester University Medical School. She has conducted extensive community outreach in London, Leicester, and Florida USA with the goal of bridging communications between patients and practitioners. She is continuing her work as an Associate Lecturer and PPI Advocate at the School of Medicine.

Read more about the materials we developed.

Case Study – Unconscious Bias in Healthcare

This case study concerns a range of activities created for MCR8032 Clinical Research Delivery in Practice. The module leader, Fraser Birrell, put me in touch with his colleague, Associate Lecturer Ann Johnson, to assist in the development of a piece of learning about Unconscious Bias in Healthcare.

Ann Johnson has been a Patient and Public Involvement (PPI) Advocate, Lay tutor, and facilitator for twenty-five years, researching and creating a Patient Involvement Framework for Leicester University Medical School. She has conducted extensive community outreach in London, Leicester, and Florida USA with the goal of bridging communications between patients and practitioners. She is continuing her work as an Associate Lecturer and PPI Advocate at the School of Medicine.

As part of this module, it was important to ensure that a patient-centred approach to healthcare was highlighted. As such, Ann’s experience in the field allowed her to challenge students to look at healthcare – and clinical trials in particular – from the patients’ points of view.

One particular topic inspired Ann to focus on the topic of unconscious bias in more detail. In cases of hypertension, GPs had been trained to prescribe different drugs and treatment plans to people based on ethnicity, even though there is no evidence to support this course of action (Gopal, D.P. et al., 2022). This is an example of taught bias – but at the same time, GPs were making assumptions about patients’ ethnicities which could also be erroneous. Naturally, this is an area of concern for patients.

Equality, Diversity and Inclusion and Bias

The difference between EDI concerns and bias is important to clarify at this stage. While EDI principles are focused on actively working to improve outcomes, unconscious bias is present in all of us as a survival instinct and extends beyond those ‘protected characteristics’ formalised in EDI policies. Unconscious bias allows us to make quick decisions based on assumptions – for example choosing to cross the road to avoid encountering someone walking along with an unleashed Pitbull Terrier.

As a clinician, it is especially important to recognise one’s own potential for unconscious bias as it can affect decision-making, resulting in poorer outcomes for some patients. When this bias extends to choosing who to include in clinical trials, it is easy to see how misconceptions or omissions could be compounded.


Discussion

You have been asked to become involved with the recruitment for the trial of Nosuchximab, a targeted therapy for Paediatric Lymphoma. The research target group is children aged between 02 and 14. There is a significant disparity in survival rates of the South Asian population and white European population. You have been asked to recruit children from the target age range. However, the NHS Foundation Trust site for the Nosuchximab trial is located within in a region where this population is under-represented – however, it is present (although in minimal number).

  • How might Unconscious Bias impact the outcomes of this trial?
  • Is it important to strategically recruit this cohort?
  • How might you put in place a strategy for recruiting those particular subjects?
  • What attempts should be made to minimalize barriers to their inclusion?

The above activity challenges students to consider a range of complex factors and is designed to explore the recruitment process for clinical trials, which can be affected by unconscious bias. As such, we designed a range of scaffolding activities to lead up to students exploring this topic in a more confident and informed manner.

The learning was divided into three stages, supported by Canvas’ tools.

  1. An introduction to unconscious bias with a test-your-knowledge quiz. This built understanding of the basics, and used the quiz to instil confidence into the students that they had understood the basics. The introduction was also written in such a way to highlight that this was a supportive environment.
  2. An opportunity to explore the effect of unconscious bias through a key reading, and a test that students could try to identify their own potential biases, followed by reflection in one of a few ways.
  3. Attempt the activity in discussion with others. A webinar is also available for students to join and discuss the activity with Ann and the other students, as well as to explore the topic further if needed.

We understood that the topic of unconscious bias could be challenging for students to confront, as it is intensely personal and potentially triggering. To allow students to explore this area in a supportive way, we suggested a range of activities, from private reflection to group discussion, about the topic in general, to allow students to examine this in an environment where they felt comfortable. We felt that this was especially important as this meant students would not feel they may be judged or blamed for sharing their experiences and feelings about bias, and this would make the entire topic much more approachable, and the learning more effective.

Next Steps

The activities will soon be live for students to try out the materials and share feedback. Anything highlighted by the student feedback will be discussed, and appropriate changes made to the activities if necessary. These materials will then run as part of the module next year. Further distribution of this content can also be done via Canvas Commons, should other module leaders wish to incorporate them into their teaching.

References

Gopal, D.P., Okoli, G.N. & Rao, M. Re-thinking the inclusion of race in British hypertension guidance. J Hum Hypertens 36, 333–335 (2022). https://doi.org/10.1038/s41371-021-00601-9

NULTConf – Video from FMS TEL

The Learning and Teaching Conference in March gave Gemma and I the chance to present a video about our current ERDP research project.

Our research focuses on engagement with online learning materials within the Faculty of Medical Sciences and NUMed. The full video can be viewed on the conference playlist.

Using overlays to make engaging videos

This post, kindly provided by Module Leader David Thewlis, discusses the use of OpenShot Video Editor to add overlays into videos for teaching.

Check out the resources section at the bottom of this post for step-by-step guides.

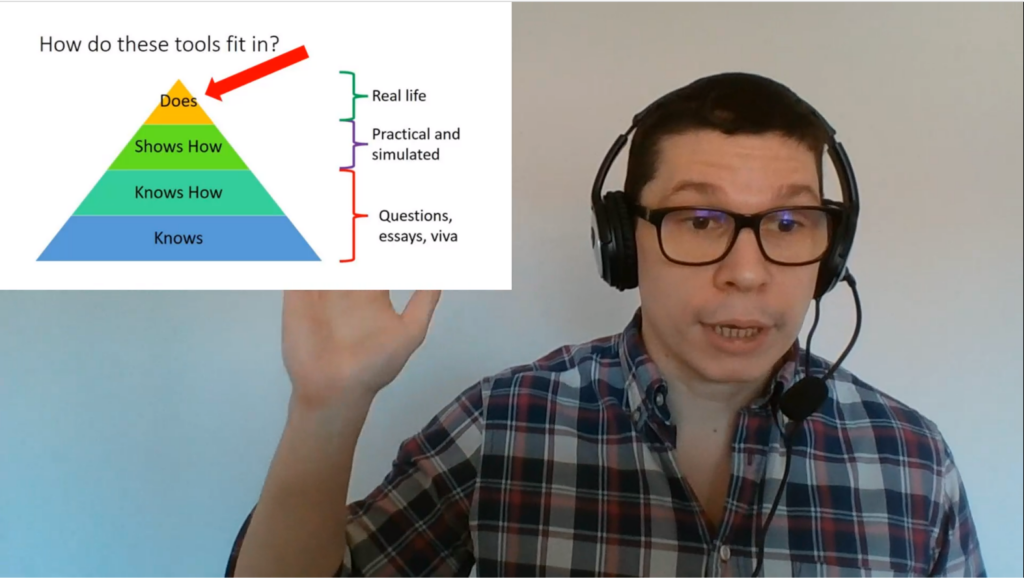
Example taken from MEE8079, Assessment in Medical Education, 2023

Why I use overlays?

I started my approach to online lecturing by recording in PowerPoint. Then I moved to recording in ReCap/Panopto. Neither were quite right for me, I felt limited in my delivery compared to in-person teaching. I found using props difficult when you only take up a small portion of a screen and emphasis on what really matters can be lost when you can’t feel the energy of the room.

I realised my biggest issue with my lectures was that I was relegated to a tiny corner and the slides had become central.

You want the slides to be condiments to what you’re saying, not be the main event.

Patrick Winston, How to Speak

Bell Hooks writes about academics hiding behind the pedestal lose engagement with the class. Unfortunately, online lectures can create a similar barrier between us and our students. Overlays is the approach I decided on to help reduce this barrier in my teaching.

I hope I am not the only person who spends hours watching videos on YouTube for inspiration. The videos I found most interesting (even if they were long) were simple speaker focused talks, which showed media when it was helpful. Replicating this type of content was my aim.

What can you use overlays for?

Overlays replace slides by allowing the speaker to have greater control over where and when to place media. You can incorporate pictures, videos, audio, and titles into a single talk with reasonably little skill (I have managed – you can too!). You can choose to direct focus in the frame. Wes Anderson has made a film director’s career out of this skill, perhaps we can learn from it.

Types of overlays:

  • Picture – these can act very much like slides. Placing them in a corner of the screen, or covering the whole screen can offer different experiences.
  • Titles – these are text which appears in picture. They can be used as a title, but I like to use them to correct a mistake I’ve made in wording I also use them to throw forward to an idea or call back something discussed earlier in the lecture or course.
  • Video – adding another video within your video can serve as a much better example than just simple explanation. I have done this a few times with examples of good teaching models recorded by my colleagues. I have also seen some effective uses of people having brief conversations with themselves using picture in picture overlays.
  • Audio– if you have a flair for the dramatic backing music might help at some point in your talk. Audio Commentaries can also create a richer resource, see our case study.
  • Emojis – They’re there. Why not?

How I set up overlays

You will require some basic video editing software – I like OpenShot Video Editor. It’s free and reasonably simple. Simplicity is the theme of my advice.

1.    Create/choose your media

Create a recording of your lecture using whatever recording device you have available. Errors or issues with the recording can be fixed in the editing process if needed. In this example on YouTube an instructor made a mistake with wording. Rather than re-record the entire video, which is otherwise good value, they corrected with an overlay title.

Making your images can be equally as easy. Saving pictures to an appropriate folder is one approach. I like to insert my pictures into a PowerPoint presentation to give myself the opportunity to get the structure clear in my head. I then save each slide as a picture. 

2.    Organise your content

Keep it simple and experiment with different formats. Layouts, text sizes, fonts, and colours all can have an impact on what you are communicating. Ensure that your titles are legible, and contrast appropriately with your background. I like the background to be the video of me generally, but I’ve seen solid examples of it being a slide or set of slides.

3.    Put the video together

I recommend you take your time editing your first few videos.

Regardless of the software you decide to use I recommend you save your project often! Losing an almost completed video is very frustrating.

You can clip your videos to remove errors. Insert other videos in the middle of your talk. Explore effects if you are delivering a narrative.

The export time can be quite long (mine usually run around 40 minutes for a 10-15 minute video). This is an opportunity to make a coffee, have a stretch, and look away from a screen.

Conclusion

Although it may need more initial time investment it is worth it. Using overlays can add a personal touch to any asynchronous video content.


Resources

References

  • Winston, Patrick (2018) How to Speak. MIT OpenCourseWare
  • Hooks, Bell (1994) Teaching to transgress : education as the practice of freedom. New York: Routledge.