When working on one screen it can be quite fiddly to view windows side by side.
The Solution
A quick way to manage how windows are arranged on screen is to use the Windows key + the directional arrows (the ones on the number pad work too).
Windows + left/right will move your current window to that side of the screen. Keep tapping the direction arrow to move it across further, or to the next monitor along in a multi-monitor setup.
Windows + up makes your current window full screen, while Windows + down will stop it being full screen.
Recently the FMS TEL Team have been wondering how to keep tabs on events we’re not attending, without confusing the meeting organiser (or yourself!) by accepting them to keep them in your calendar. As Outlook takes a ‘decline’ response as an instruction to delete the event, this can be tricky.
For example, you may be part of a team running a series of demos or teaching, but you have split the delivery between you. It’s useful to know when the events are on, but you don’t need to go to them. Alternatively, you can use this to keep track of meetings happening when you are out of the office, in case you need to check on results, or in case your own plans change and you decide to attend.
We thought there must be a better way to decline a meeting but keep it in your calendar. We searched online and found these instructions.
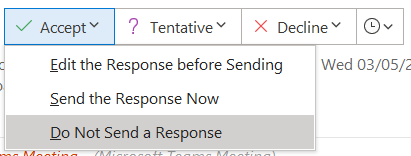
In your calendar, decline the meeting request as you normally would. Then, you can go into your ‘deleted items’ folder in the mail tab and open up the meeting request again. Next, select ‘accept’ or ‘tentative’ at the dropdown arrow, choosing not to send a reply to the meeting organiser.
Doing this puts the meeting back in your calendar, but you still show as ‘declined’ in the meeting organiser’s tracking. I tend to choose ‘tentative’ so that the meetings look visually different to my other events.
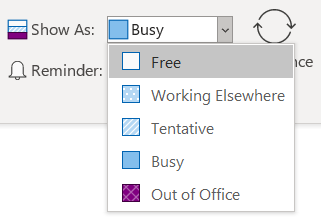
Keeping your calendar full of tentative meetings may make you look more unavailable than you are. You can adjust the settings of the events to say you’re free. That way if anyone needs you, they can see that you’re available. Open up the meeting, and select Show As: Free.
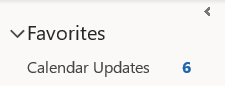
This tip should help you manage complex calendars or use cases. To give your calendaring another boost, consider filtering your invitations and responses into a favourited folder using a rule.
This will let you keep on top of your availability, replies to your invitations and any changes without hunting through your inbox. Instructions on filtering with rules can be found here. You can set a rule to filter based on a ‘type’ of email, which includes calendar updates. We also have a post about email management you may find useful.
The FMS TEL team were recently discussing the amount of teams and chats we end up belonging to after working at the University for a while. As a team we decided to attempt a spring clean of our teams areas.
The digital intensity of our workday is increasing, and we need to be thoughtful about how we help manage it
I spent 5 minutes reviewing the chats I was a part of. Below are a few things I considered:
Is this conversation still on going?
Do I talk to this person/group regularly?
If I answered no to both questions then the chat can be removed from my list. There are a few ways to do this:
Hide – This is my preferred option, the chat is removed from my list but the conversation history is easily restored by searching for the conversation and clicking “Show hidden chat history”. The other members of the chat are unaware that I have hidden the conversation and if the conversation starts again the thread will reappear in my list and I will be notified.
Delete – This is a more permanent option but does have its uses. Perhaps you are in a group chat and your contribution is complete, however the conversation is still ongoing. By deleting the chat you leave the conversation and are no longer able to see any future posts. Other members of the chat will be made aware that you have left and can re-invite you if you are needed again.
I now review my chats on a more regular basis, my aim is to remove the scroll bar to ensure the colleagues I chat with on a regular basis are easily accessible without having to scroll through the clutter.
Next I looked at the “Teams” I was a member of. Some teams had been started with all the best intentions but had never gotten any traction or the teams were used during a project which is now complete, so I decided to leave those teams. Other teams which were active but were not currently offering value I decided to “hide”. This way they do not clutter up my teams window or send me notifications but I can still pop in an read any updates if I need to.
? OneDrive
After decluttering my teams (which didnt take as long as I thought it would) I felt invigorated to do more decluttering so I moved onto my OneDrive.
I have to admit I am guilty of saving and keeping everything, so my OneDrive was very full and quite messy. I knew this was going to be a big task so I set myself a timer for 10 minutes and I would do as much as I could and call it a win.
I started at the top level and decided any loose files needed to be sorted into folders. I then went through the folders I had for teaching materials and anything I knew I had uploaded to Canvas I deleted.
This task is still on going, anytime a meeting finishes early or I am waiting for a meeting to start I use that time to review a few more folders.
I often copy and paste bits of text from one place to another, but don’t necessarily want the formatting that comes with the text. Just using Ctrl + V, or selecting ‘paste’ brings that formatting across. This means that text might look ‘odd’ when pasting it into another document, or something like a Canvas page.
The Method
Windows: Ctrl + Shift + V
Mac: Option + Shift + Command + V
The Solution
This means you just keep the characters, meaning your pasted text looks the same as the rest. This works in lots of desktop applications.
Microsoft Applications
To do this in Word, right-click and select ‘paste without formatting’ as below.
Introducing a new series – Taking Ctrl – a guide to keyboard shortcuts that can save you time!
Many of the tasks we do using the computer have a ready keyboard shortcut to speed up the task, though we might not always know what these are. We have asked the FMS TEL team to share their favourite keyboard shortcuts in this series. This is the team at their most geeky – enjoy, and see how much time you can save!
Our first keyboard shortcut is Windows key + E. This opens up your file explorer – much faster than looking for that icon.
If you need to produce captions and a transcript, complete the caption editing first and then use the corrected caption file as your starting point for your transcript. Creating a transcript with the method below will not give you a file that can be used for captions.
When creating a transcript, you will need to decide a few things before you start.
Are timings important, and if so, what level of accuracy do you need? Does every utterance need a time, or would it suffice to signal timing points at the start of each slide, for example?
Is it important to know who is speaking? Training videos may not need this.
The first step is to download your caption file and copy and paste the text into Word. Then, transform your lines of text into a table using ‘convert text to table‘ and setting the number of columns to 4.
Copy your table from Word and paste it into Excel. Once this is done, you can use Excel to trim down your times and make them more human-friendly, using the MID function in a new column. Copy the formula down the whole row to quickly tidy all of the timestamps. This example trims the hours from the start time, and gets rid of the milliseconds and the end time completely.
The formula above (typed into B1) will look in A1 for the source text, and starting with the 4th character, output 5 consecutive characters into the cell, and then stop. You can change the numbers if you need a different segment or more characters, for example, if you want the hours included.
Pasting the resultant data back into Word means you can then use Word’s formatting tools to shape your transcript, adding columns as needed to denote speakers or other important information, and removing columns that contain redundant data.
Cutting and pasting the individual cells containing speakers’ words into a single cell will help improve the look of the document. Paste without formatting to combine the cells into one. Spare rows can then be deleted. Using Find and Replace to get rid of line breaks (search for ^p) and replacing them with spaces further tidies this up. You can then delete the redundant rows.
If you like, you can then remove the borders from your table. You could also set a bottom cell margin to automatically space out each row.
It is important to check your resulting transcript’s accessibility. As this method uses a table, make sure that a screen reader can read it in the correct order. You can do this by clicking into the first cell of your table and then pressing the tab key to move between cells – this is the order most screen readers will relay the text, so check it makes sense.
You can also choose to add a header row to your table to give each column a title. After adding this, highlight the row, click ‘table properties‘ and in ‘row‘ select ‘repeat as header row’. Ally in Canvas will not give a 100% score without this.
Once your transcript is formatted correctly, you can correct your text and fix mistakes in the usual way if you have not already done so for captions. The previous post on Faster Captioning has some tips and tricks to speed this up.
This post details some easy tips and tricks to speed up your caption editing process using Notepad and Word.
This post assumes users are using Panopto (ReCap), therefore Panopto guidance is linked for uploading and downloading caption files. Guidance for other products such as Streams, Vimeo and YouTube can be found on their own sites.
In FMS TEL many team members regularly work with captioning videos – whether these are our own instructional videos or webinars, or student learning materials. Recently a few of us in the team have been talking about how we caption videos – specifically, what processes we use. There are some of us in the team who use the inline caption editor in Panopto, and use speed controls to manage the flow of speech so they can correct as they go. Others prefer to download the caption files and work with them in a separate program.
Both methods have their pros and cons. Working within the online editor is often best for short videos, or those with very few corrections to be made. Sometimes, though, it is easier to manage longer or more error-prone caption files in their own window. This gives more space to see what you’re doing – as long as you can avoid messing up the file structure. You can also use proofing tools in Word to speed things along or cut out repeated mistakes.
The rest of this post details some tips you can try to speed up your own process if not using the online editor.
You may find that for the bulk of the editing you don’t even need to be listening to the video – the errors can sometimes be evident just from text.
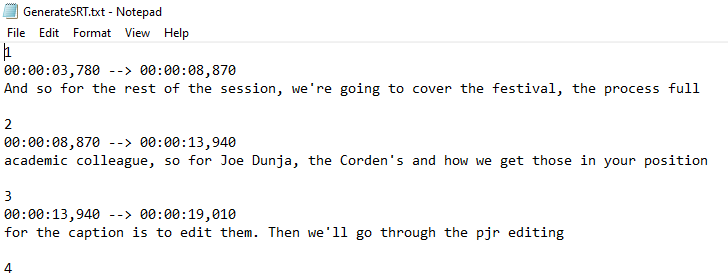
To work with captions outside of Panopto, you’ll first need to download the caption file. If there is no file to download, you’ll need to request automatic captions first. The caption file can be opened in Notepad. From there, you can edit each line of text separately. You must not change the file structure – so do not edit any of the other lines in the file, even the empty ones.
The file repeats in structure every 4 lines. The first is the sequence number of the caption, the second is the timestamp displayed in hours, minutes, seconds and milliseconds, the third is the spoken text and the fourth is an empty line.
If you want to take advantage of some more proofing tools, try copy and pasting your entire file into Word. This will allow you to use tools such as Spelling and Grammar check to remove duplicate words or transcribed stuttering sounds, and can also draw your attention to other oddities. The Spelling and Grammar tool automatically moves you through your document, saving time scrolling and searching. As well as checking spelling, this can also help trim unnecessary words from the text, making it faster to read.
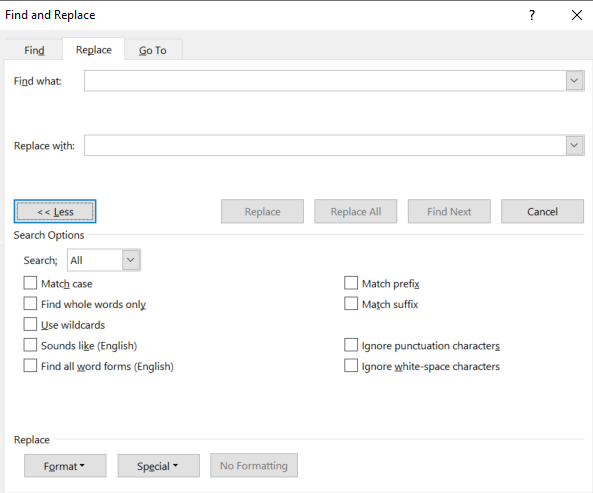
Find and Replace is useful, and can help…
If a name has been consistently misspelled – for example Jo/Joe.
If the speaker has a filler word that can be removed (I say “kind of” as filler so always search for and remove it from the captions!).
To replace key numbers or years that have been spelled out with their numerical representations (e.g. ninety-nine percent -> 99%).
Filtering out inappropriate language if it has been misheard by the auto software – if you see it once you can search the whole document quickly.
Filtering out colloquial spellings (gonna -> going to).
A good tip to ensure you only find whole words is to search them with spaces before and after the word itself. You can also use the ‘more’ option dialog and check the ‘whole words only’ box.
These extra options can help speed things up.
If you have been deleting a lot of items and adding spaces in their place, you might also want to do a find and replace for two spaces together and replace with one space. Run this a few times until there are no results. Similarly, you could look for comma-space-comma if you have removed a lot of filler.
These steps won’t fix everything, but can cut out some of the bulk and help speed up your process. After using these tools, read through the captions carefully again to fix any leftover errors.