As part of the conference, Susan Lennie and Eleanor Gordon presented this video detailing the student response to the introduction.
The written summary of the development of the intervention can be accessed below.

A video explanation and demonstration of how animations can be used to explain concepts, and when this is most effective.
Ashley Reynolds and Eleanor Gordon
This video demonstrates how animations can be used to enhance teaching. Some animations require specialist experience to create, but a great deal can be achieved by adding purposeful animations in PowerPoint, or utilising H5P.
Animated diagrams are a rich resource for explaining processes and relationships. Online teaching sometimes means that gestures such as pointing, highlighting and demonstrating motion are lost. Including these dynamic elements in presentations boosts understanding of concepts and processes when compared with static images. (Goff et al., 2017).
All of our posts about this conference can be seen under the tag NULTConf2022.
This lightning talk was presented in person at the Learning and Teaching Conference 2022. Newcastle University staff wishing to access the resources and the recording of the previous extended online version can do so here.
Key Points:
Conference Materials – Designing Convertible Teaching
All of our posts about this conference can be seen under the tag NULTConf2022.
This workshop was presented in person for the first time at the Learning and Teaching Conference 2022. Newcastle University staff wishing to access the resources and the recording of the online version can do so here.
Looking forward to seeing you all at the Learning and Teaching Conference!
FMS TEL are well-represented at the University Learning and Teaching Conference 2022. We look forward to seeing you at the conference, and hearing what you think of our sessions, videos and posters! All of our posts about this conference can be seen under the tag NULTConf2022.
To book your place at the conference, or find out more, please visit the Learning and Teaching Conference homepage.
This short guide describes how to use the Reviewing tool in Microsoft 365 apps to dynamically collaborate on files.
Would you and your students benefit from the ability to have live, in-line feedback on essays, projects, and other work products? You can provide in-time feedback to students or colleagues as they work on individual or group work using Office 365 Share and Reviewing features. We’ve recently started using this method in our TEL Team to collaborate on documents.
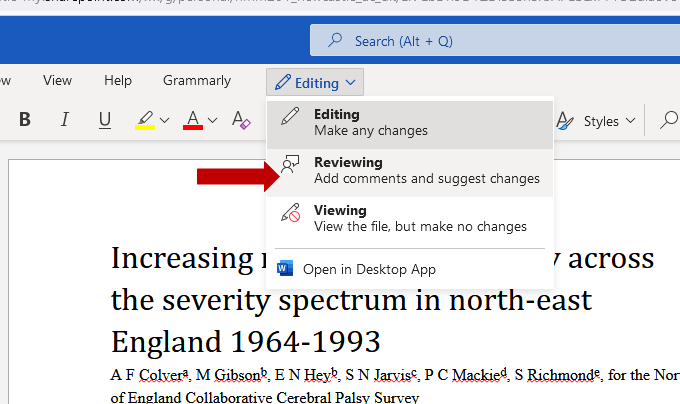
To start the process, author simply need to share their file with the reviewer using the Share button in the file menu bar.
This sends a link to the file to the reviewer. By clicking on the link, the file will be opened in Office 365 online. The file could be a Word document, PowerPoint presentation, or an Excel workbook.
To make revisions that display to other authors/contributors enter the Reviewing setting.
This will turn on your track changes that will then be displayed to other document authors. The other authors can see mark-up and accept or reject changes in-time or asynchronously as needed. Note, the editing and viewing must take place in the Online Word App. Using the desktop app to view the changes will not show track changes.
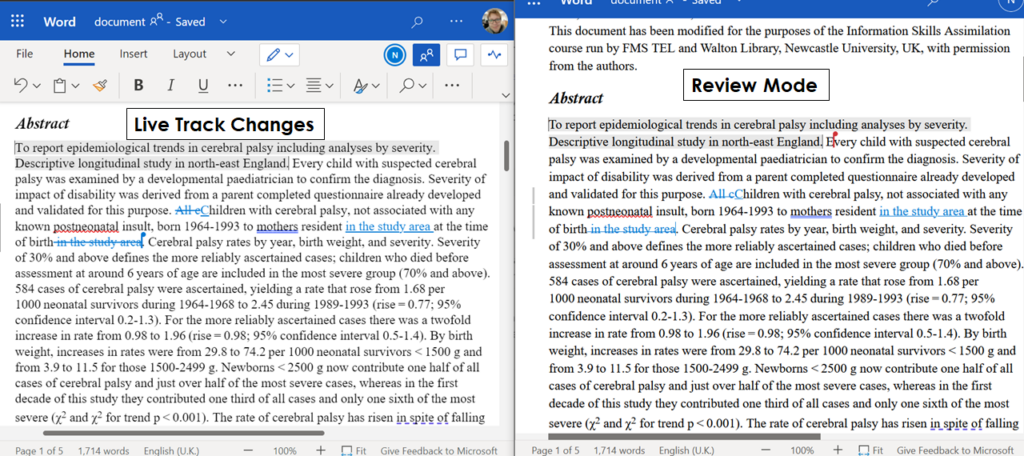
This can greatly benefit students as they work through their assignments, as well as give reviewers with the opportunity to provide input and suggestions as work products develop. It can also allow for dynamic collaboration between colleagues by allowing a “single” author control over accepting or rejecting edits by others.
An example of this could be a group of students working on a Word document together. One student could be in charge of the ‘final’ document while the other students make additions and changes at track changes. Thus increasing the transparency of editing. The coordinating author could then choose to accept or reject the input from their fellow students.
The unique power of live track changes provides authors with the opportunity to modify and edit their work as it develops rather than only at the point of submission or finalisation. This similarly benefits the reviewer as the option to review is not time constrained in the same manner as a submission for review may be.
A written summary of our training on using rubrics with links to the full webinar resources.
We have recently delivered some training for BNS (School of Biomedical, Nutritional and Sport Sciences) in collaboration with Rebecca Gill and Susan Barfield from LTDS. The two sessions covered Rubrics – both their design and how they can be implemented in Turnitin. You can access the training recordings and resources at the foot of this page.
Examples covered included:
Rubrics can be used to evaluate assessments, whether you use a quantitative rubric to calculate marks, or a qualitative one with more wiggle room. Using a rubric makes it easier to identify strengths and weaknesses in a submission, and creates common framework and assessment language for staff and students to use. This in turn can help make learning expectations explicit to learners, and assist in the provision of effective feedback.
There is no one way to design a perfect rubric, as assessments are very individual.
Before you begin you may want to consider how you can design your rubric to lessen the marking or feedback workload. Quantitative rubrics can reduce decision-making difficulties as this means you don’t need to consider what mark to give within a band. On the other hand, you may need this flexibility to use professional judgement. A detailed rubric with less wiggle room per descriptor also acts as detailed feedback for students, reducing the need for writing long additional comments, but also takes longer to design.
When writing descriptors, ensure that there is enough clear and objective difference between each band. You may find that aligning your descriptors with an external framework helps you write them. This is critical for secure marking, and is helpful for students receiving that feedback. Using positive language also helps make this feedback easier to digest, and allows students to see what they need to include to improve.
When creating a rubric, you can follow this basic process. At every stage it is important to consult local assessment guidelines and discuss progress with your colleagues for constructive feedback.
Turnitin allows for the use of Grading Forms and Rubrics. You can watch how to implement these in the Using Turnitin video in the session resources below.
Turnitin grading forms can be created to assist with marking assignments, allowing you to add marks and feedback under various criteria. When using these forms, the highest mark entered will become the grade for the assignment. You can also use this without scoring to give feedback.
Turnitin rubrics allow for marking under multiple criteria and bands. You can have standard rubrics that calculate grades, or qualitative rubrics that do not include scoring. Custom rubrics can be used for more flexibility within a band.
An alternative to using Turnitin is to integrate a rubric into the assignment itself by using a coversheet. (see the ‘Effective Rubrics – Using Turnitin’ video at 28m25s, link in the Canvas below).
Find out the pros and cons of 360 degree meeting room cameras in practical sessions.
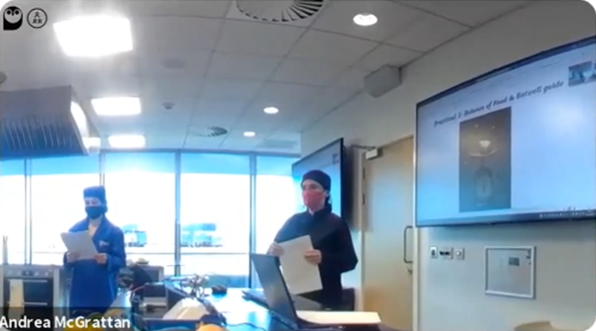
This practical session was based around students creating a meal to align with the recommendations of the EatWell guide, using ingredients provided in the food handling lab. The session involved a short introduction, followed by time for the activity, and feedback. At the last moment there was a request to record the practical session, and therefore a 360° camera was used as a quick solution – an ideal opportunity to test the camera’s capabilities.
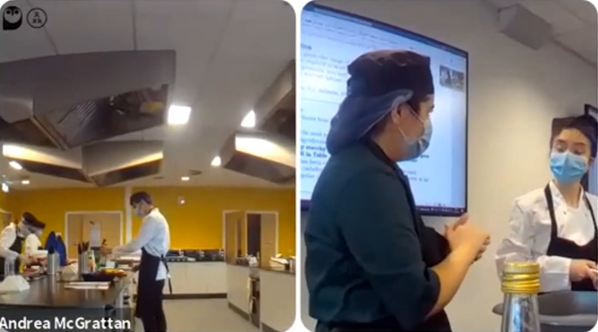
These rooms are not set up for ReCap, so having this portable method of recording allowed for the session to be captured. The camera was connected to Zoom so that a remote student could watch the session or review the recording. As it happened, no one watched the stream live, so there was no interaction with a remote participant. As shown from the screenshots below, the camera could cover the whole room without needing to be moved. It can also zoom in and out to focus on where the action was taking place.
The camera was quick and simple to set up, and lecturers used lapel mics to capture sound when they were addressing the class. The camera was placed on the demonstrators’ bench at the front of the room, where it could see the kitchen spaces as well as the session leads, and the whiteboard.
All present were made aware of the device. It was relatively unobtrusive and didn’t get in the way of the session – most people just forgot about it. This is a bonus as it means the lecturers don’t have to consider what to capture at various points during the session. They could also walk around the room naturally rather than being stuck at the fixed point of presenting from a particular spot at the front as the camera would follow them.
As a quick solution, it was easy to set up, and the predetermined settings allowed for much of the session to be captured. It provided a record of the practical session, though due to the level of automation in where the camera chose to focus, some detail and some sound was lost. For example, on some occasions, the camera would choose to focus based on an incidental sound in the room, like a pot being scraped. This kind of auto-selection would work better in a situation such as a seminar where everyone sits around one table with less background noise and more obvious turn-taking when speaking.
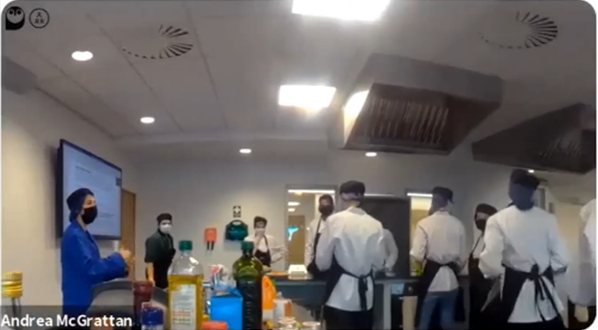
The camera also captured incidental discussions – as it was placed at the front where students were collecting ingredients, it captured discussions between students about what they were choosing to include in their meal.
It was also able to capture two areas simultaneously and display them side by side, allowing for an overview of the room as well as capturing individual discussions.
There are a range of applications for this type of device in a practical setting. For example, for a remote student, the device could be placed in a group of students so that some collaboration would be possible. This would allow them to be more involved in the practical aspect of the session, though of course it would not be a complete substitution for in-person attendance.
Though the session recordings are relatively long, once uploaded to Panopto, bookmarks could be added to allow students to quickly navigate to various parts of the session, for example the input and feedback.
Roisin Devaney, Susan Lennie and Andrea McGrattan, Nutrition and Dietetics, School of Biomedical, Nutritional and Sports Sciences
Art of the Possible Lightning Talk including a brief overview of this work at 24:22.