Incorporating Pointing in Recorded Presentations – Motion tracking

This post shows how cursor movement can be used in online presentations to show gesture, and the skills needed to add motion tracked items to video.

As part of the recently launched Exploring 3D Anatomy MOOC, two video presentations were created. These presentations involved explaining diagrams and pictures. One of these recordings had a moving cursor which the presenter had used to explain various parts of the screen, and the other was recorded without a cursor. To improve the clarity of the explanations, we had a request to display a larger cursor over the recorded material, using it to ‘point’ to the various significant areas shown. 

When you’re planning a virtual presentation it’s worth checking if and how the software handles the cursor – some software will use a glowing highlight as you present, some will show and hide the cursor automatically depending on when you move it. The videos were recorded in ReCap, which automatically hides the cursor unless it is moving. The end of the post has links to various guides to help you choose your settings. The rest of this post details the animation process for how a larger cursor was added after the presentations had been recorded. This technique could be applied to other added graphical elements too if needed. 

Creating the New Cursor

As the cursor is used in a lot of animations, there was already a scalable vector graphic image of a cursor available to use. This had been drawn in Adobe Illustrator. The next step was to use After Effects to add the cursor to the video and animate it.  

Tracking the Cursor

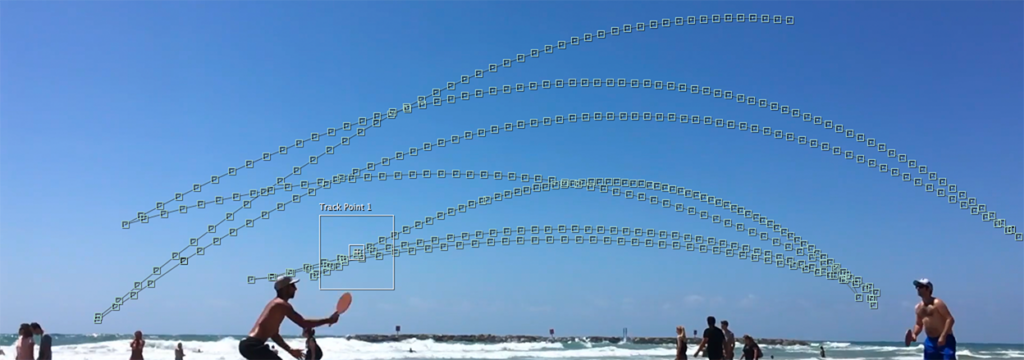
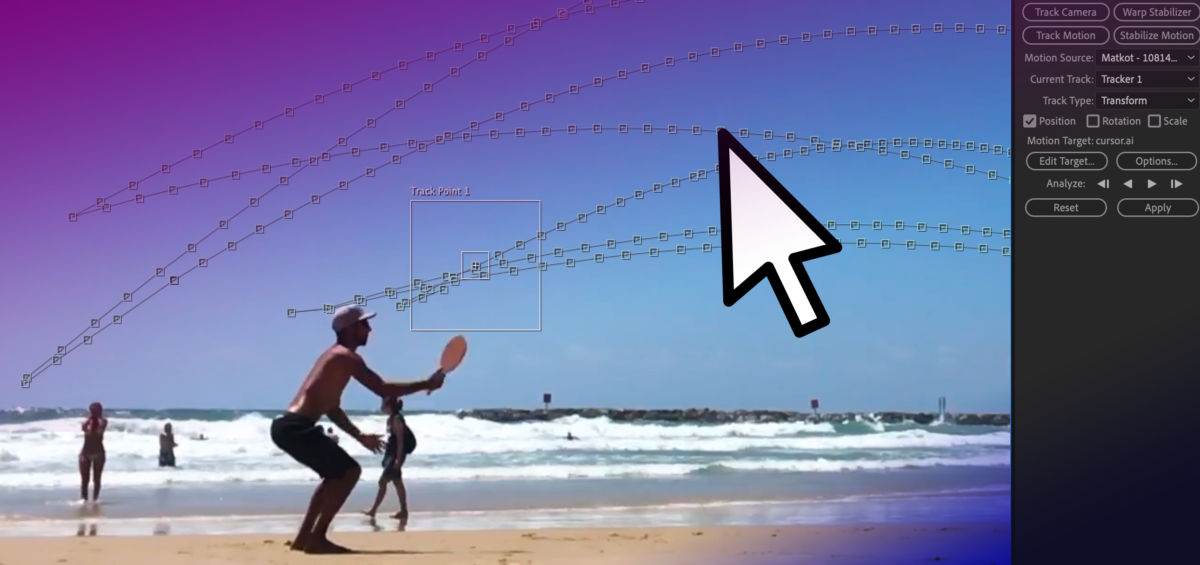
For the video with the cursor visible, the motion tracking function of After Effects was used. After identifying the original cursor, the new larger cursor was set to track it. Here and there the original cursor changed colour to remain visible over different backgrounds. It wasn’t necessary to replicate the colour change with the larger cursor, but this colour change did add extra steps when setting up the motion tracking as it needed to be started afresh each time the original cursor had changed colour. For the video without the cursor, the process was simpler as there was nothing to hide or track. As such the animations could be set up from scratch. Based on the clear explanation from the presenter, it was possible to add a cursor to trace the areas being explained.  

Adding the New Cursor

The animations were set up to take place between certain moments of the video – like scenes. Key points in the video were identified and ‘key frames’ added which allow us to set up when certain animations should take place, and how long for. Simple animations such as changing size, position or rotation can be done relatively quickly using these linear key frames. 

Once the start and end points are set, further customisation can be done to change the feel of the animation. For example, in this case, the speed of the cursor should somewhat mimic a natural movement rather than a precisely uniform speed. Using ‘ease in’ and ‘ease out’ (combined as ‘easy ease’) allows for the animation to look a little more natural, and less jarring, as the cursor starts to move more slowly before speeding up and gradually slowing to a stop.  

When moving from point to point it’s very rare that a straight line is the best path to take, usually a slightly curved path can help add a more natural-looking movement. This might be used to instruct a viewer to click a series of buttons, for example. The ‘spatial interpolation’ in After Effects allows for the path of the moving object to be linear (a straight line) or Bezier (curved). The temporal interpolation tool allows for variations to the speed of the movement – a more customisable version of easing. Adjusting these allows for a nice natural pace and movement, and for more creative effects. For example an item moving from A to B may move slowly at first, then speed up towards the middle of its journey, then slow down again before arriving at its final destination – imagine a train travelling between stations!).

In this video the cursor was hidden from screen for most of the video so it was animated manually.
In this video the cursor was tracked (while visible), note the more erratic movement.

Approximating Gesture

The final videos allowed for a clear approximation of gesture to be added to the presentations, mimicking how a presenter might usually point to a screen or demonstrate a movement. While this is something very natural to do in person, you may need to think more about how you use and move your cursor in online presenting. Often it can be tricky to see the cursor, so you may wish to consider moving it more slowly than usual if you are using it to indicate processes or changes. Selecting some form of pointer or cursor highlighting in your chosen software can improve the visibility of the cursor during your presentation, whether recording or in person. On the other hand, you may wish to put your mouse out of reach so that random or accidental cursor movements don’t detract from your content. 

Motion Tracking Demonstration

This video demonstrates the full motion tracking procedure, showing how you can track an object and then map the position of a cursor to it.

Resources

Writing Complex Documents with LaTeX

In FMS and SAgE, students can produce heavily mathematical theses. These can be difficult to manage in Microsoft Word as it is not designed for documents that include a lot of equations and other mathematical notations. Furthermore, theses are often very large documents with each chapter in a separate file. Compiling those chapters into a single document is something that LaTeX is ideal for. It was designed with professional typesetting so that users can focus on their content and not the style of the document.

Here at FMS TEL, we added a session in LaTeX to our catalogue of digital skills sessions a few years ago, and since the pandemic we have transitioned this to a webinar with some interactivity.

LaTeX is an open-source mark-up language so the training sessions are on primarily on learning the LaTeX code. This enables postgraduates to set up their documents from scratch or, more likely, to modify pre-existing templates such as the template that we provide them on the Digital Skills Hub or working a boilerplate paper. The slides used in the session are also provided on the Digital Skills Hub as well as some additional materials used during the session such as the graph files used.

Sessions are in two parts and cover how to set up your document in LaTeX, incorporating comments, mathematics, images, bibliography and references, tables and matrices, and more. There are many different LaTeX editors but the training session is built around the Overleaf.com editor as that is completely in the cloud and therefore nothing needs to be installed to be able to use it. It is free to use unless collaboration is needed with a document or other advanced needs. Skills learned with this editor should be easily transferable to other editors.

We have had a great response to the LaTeX training session. It is always very popular and we get a lot of positive feedback from participants.

Resources

Medicine Focused H5P Examples

As part of the FMS TEL Conference last week members of the FMS TEL Team created a few medicine focused examples of H5P content.

We have shared these examples with the University to use in course content or to clone and edit to fit specific needs. You can find all of our examples in:
All content > Faculty of Medical Sciences > Generic Content

H5P Folder structure

Example content includes:

  • Accordion: Vertically stacked expandable items
  • Agamotto: Sequence of images and explanations
  • Drag and Drop: Drag and drop task with images
  • Drag Text: Text-based drag and drop task
  • Flashcards: Stylish and modern flashcards
  • Image Hotspots: An image with info hotspots
  • Image Juxtaposition: Interactive images
  • Memory Game: Image pairing task
  • Timeline: Interactive timeline of event with multimedia

More Resources

Media Resources

As a result of a few enquiries about extra resources and uses of some media programmes in FMS, we have compiled a few options below. Newcastle University has its own broadcast library with an array of resources. The BBC Box of Broadcasts has many BBC TV broadcasts which educational institutions can use – maybe you’ve seen a documentary or interesting programme on your subject, search BOB for it. TED talks have a plethora of subjects, many of experts talking about issues in their own fields. MERLOT covers a range of subject, with Health Sciences being particularly relevant for FMS.

IPTV – Newcastle University Broadcast library

Newcastle’s IPTV gives you access to more than 8,000 movies and TV shows in dozens of languages, available both on and off campus.

https://iptv.ncl.ac.uk/ (Links to an external site.) (requires university login)

More resource options from the university are available on campus at https://www.ncl.ac.uk/language-resource-centre/resources-facilities/multimedia-resources/ (Links to an external site.) 

BOB – Box of Broadcasts

Have you seen a programme on television which you would like to recommend to your students or use in your teaching?

The BBC have a library of shows available in their Box of Broadcasts. You can search for your programme on there to see if it is available.

https://learningonscreen.ac.uk/ondemand (Links to an external site.) (You will need to login by selecting your institution and entering your university login)

These are only available for broadcast in the UK. 

TED Talks

Talks by experts and influential people on education, business, science, technology and creativity.

https://www.ted.com/talks (Links to an external site.) 

MERLOT

As their website says, “MERLOT is an international community of educators, learners, and researchers” across a multitude of subject areas including Health Sciences, Biology, Agriculture and Environmental Sciences, Business, Chemistry, Communication Sciences and Disorders, Computer Science, Criminal Justice, Engineering, English, Fire Safety, History, Information Technology, Instructional Design and Technology, Mathematics, Music, Physics, Professional Coaching, Psychology, Sociolog, Statistics, Teacher Education, Technical Allied Health, World Languages.

There is a variety of learning materials available including simulations, animations, case studies, presentations, tutorials, quizzes etc

https://www.merlot.org/merlot/ (Links to an external site.) 

The Health Sciences Portal can be found here https://www.merlot.org/merlot/HealthSciences.htm (Links to an external site.) 

H5P is here!!

Adding engaging and interactive content to your online course materials just got easier with H5P.  

This new online tool allows you to create custom learning resources such as branching scenarios, accordions, interactive images and videos, 360 degree virtual tours, simple formative quizzes, and so much more.   

Try it out:

Below is an example of a simple drag and drop exercise.

eLearning Webinars (by eLearning Brothers)

eLearning Brothers regularly host online events for eLearning solutions, which some of the FMS TEL team attend. They own software such as Lectora and CenarioVR, and also provide some development services. They produce webinars on their own software and services, but also produce a number of more general webinars related to eLearning.

You may find inspiration in some of their webinars, which have included:

You can find upcoming events and recordings of previous events at the link below

https://www.elearningbrothers.com/elearning-resources/webinars-events (Links to an external site.)