The FMS TEL team participate in an annual study day on the Utilising Technology in Medical Education (UTME) module offered by the School of Medical Education.
The module aims to raise students’ awareness of how technology enhanced learning is currently used in health care education and gives students the opportunity to explore technologies and investigate theoretical underpinnings. Based on these aims we put together a 3 part presentation.
Part 1 – Tools for Student Interaction
PowerPoint Slide: FMS TEL Interactive Content, Instant/Quick Wins
Emily introduced a number of TEL tools including; Menti, vevox and padlet. Each tool was discussed; outlining its uses, pros and cons. Current examples of content designs, interactive activities and animations used throughout the faculty were shared.
Part 2 – Collaborating and Facilitating Group Work
PowerPoint Slide: FMS TEL Collaborating with Microsoft
Simon demonstrated how to use Microsoft 365 to co-author and co-edit documents, presentations and spreadsheets. Students were shown various features including; reviewing mode, version history and how to use Sharepoint to monitor breakout room activities.
Part 3 – Teaching Tools
PowerPoint Slide: FMS TEL Teaching Tools
Eleanor shared her experience of teaching with Zoom/Teams and tips on how to humanise online sessions. She discussed common barriers, such as awkwardness or long silences and strategies or tools to use as solutions.
Below are some of our favourite uses of H5P from within the Faculty. If you have an example to share, please get in touch.
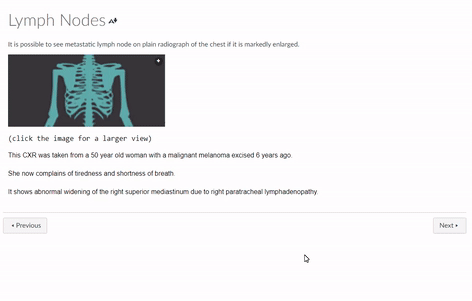
Fill in the Blanks for Click to Enlarge images
Students often complain that diagnostic images are too small to see clearly. A solution we found was to use H5P Fill in the Blank activity (without a blank).
Example from ONC8004. (Original image has been replaced to protect patient confidentiality)
This video was originally designed to be watched in a classroom setting, where the video would be paused for an in class discussion. When the course was moved online we used H5Ps interactive video to auto pause at the right moment and we embedded the video in a discussion board.
Video auto pauses (at the white dot) and asks students to contribute to a discussion board task
We created a 360 tour through a large lab in the School of Biomedical and Nutritional Sciences. This was to familiarise students with the lab before attending in person, but also to show the labs to students working at a distance.
We created a 360 image of the new Nutrition Kitchen with hotspots highlighting some common hazards. Clicking on the hotspots will show a close up image of the hazard and/or some information on why it is a hazard.
How do oral presentations work for 100% online modules?
Presentations helps students put across an idea while expressing their personalities, which is hard to do in an essay.
Introduction
Oral presentations are a popular choice of assessment in the Faculty of Medical Sciences, especially in our e-Learning modules. Students are asked to submit a pre-recorded presentation to Canvas and the markers watch the presentations at a time and place that suits them.
Diarmuid Coughlan, module leader for ONC8028 Practical Health Economics for Cancer, has kindly agreed to walk us through how the Virtual Oral Presentation element works on his module.
The Assessment
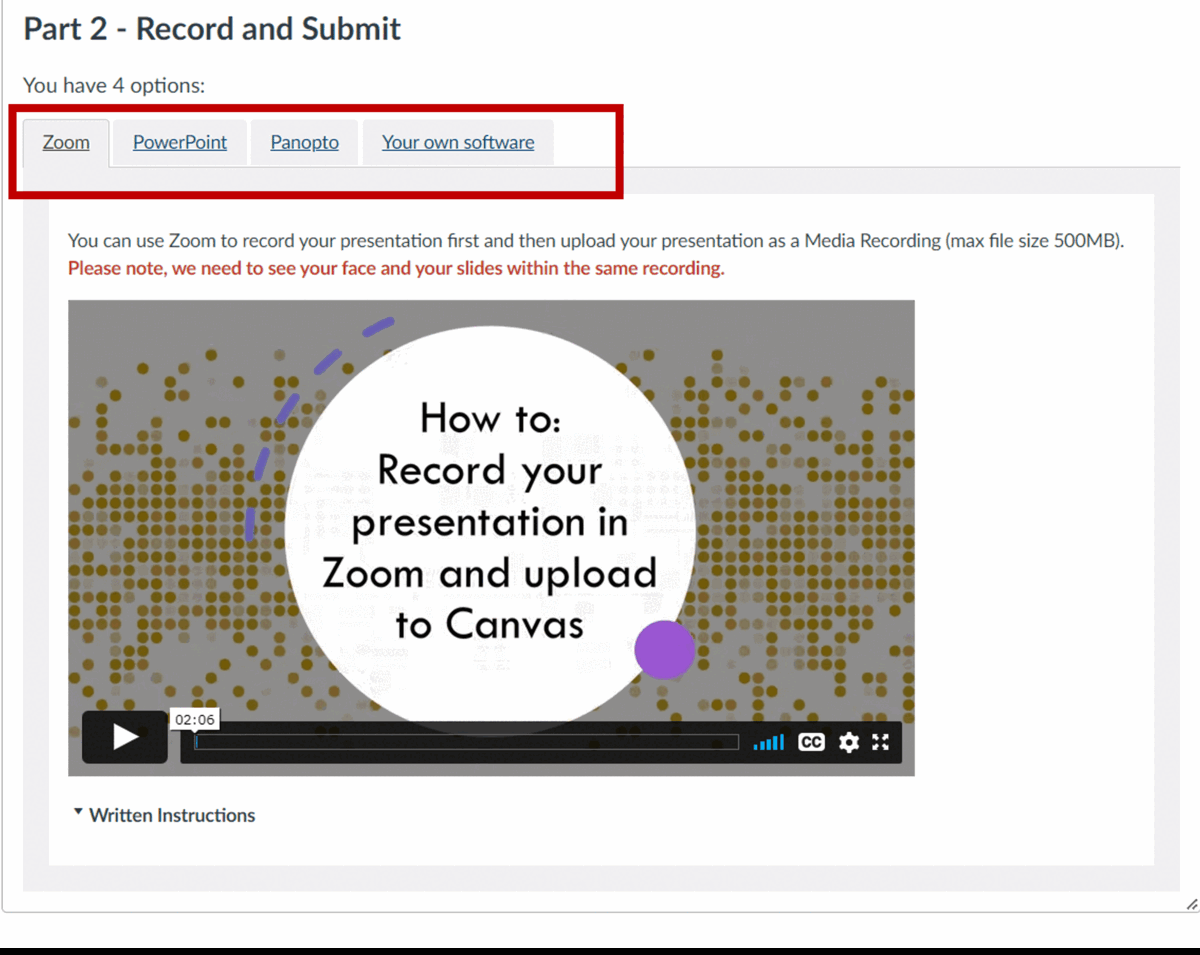
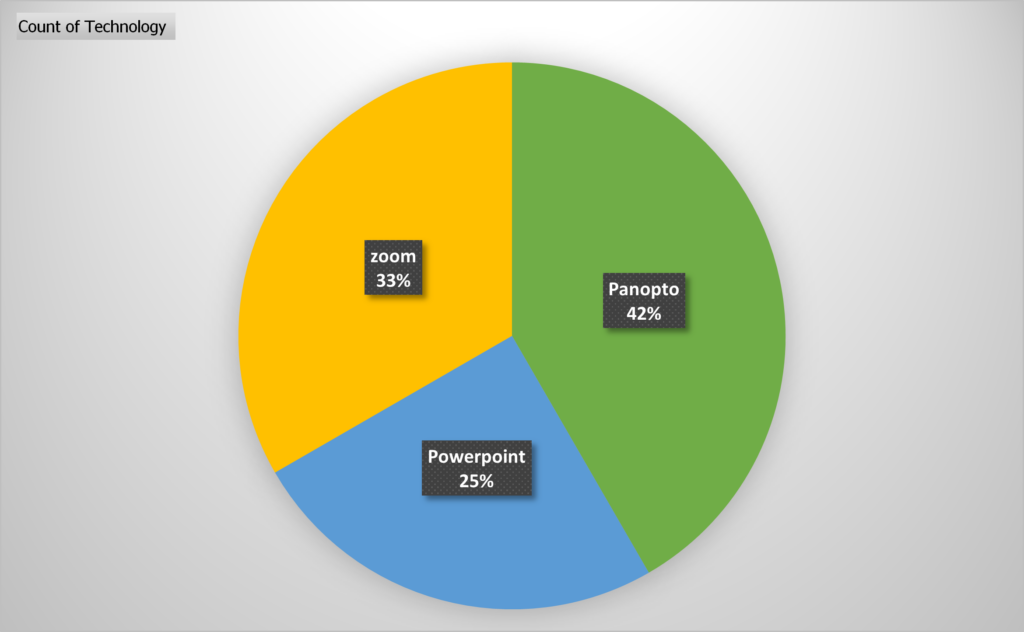
This year we had 14 students on the module. We asked the students to create a 15 minute presentation using either Zoom, Panopto (Recap) or PowerPoint.
We informed the students right at the start of the module that an oral presentation was part of the assessment and 4 weeks into the module we provided a formative assessment. The formative assessment allowed students to familiarise themselves with their chosen software, gain experience talking to a camera and also get some limited feedback on their presentation skills.
The submissions are double marked by 2 markers. Marking is completed separately by each marker outside of Canvas, then markers meet to discuss which marks/comments would be entered into Canvas and made visible to each student.
The Set Up
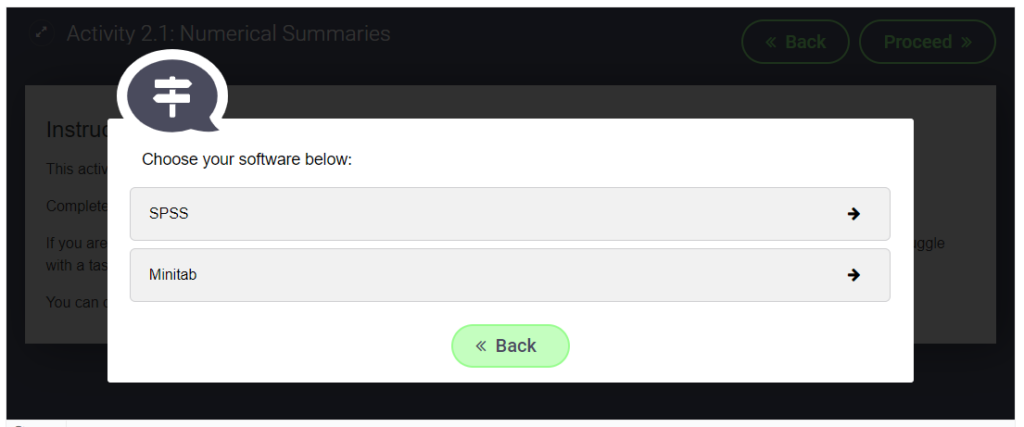
We provided 2 submission points in Canvas:
Recording Submission Point:
This area was used for the marking. It was set up as Media Recording for MP4 uploads (max of 500 mb) with a Text Entry option for Panopto users (no size limit).
We allowed students to choose which technology they were most comfortable with and provided video and written instructions for Panopto and Zoom. PowerPoint instructions were added later as an option with links to guidance provided by Microsoft.
View of instructions in Canvas
We also provided some instructions so students could crop their recordings to comply with the 15 minute time limit.
You are limited by time so remember to edit your recording so it is no longer than 15 minutes. Instructions: Windows | Mac | Panopto
Slide Submission Point:
This area had a 0 point value. It was set up as a File upload area for students to submit their slides as .ppt or .pdf, this allowed us to get a turnitin plagiarism score for each presentation as well as a reference copy of the slides, should anything be unclear in the video recordings.
How did it go?
There was a lot of fear from students initially. We encouraged students to give it a go, informing them that we were not trying to trick them. We provided clear guidance on what we expected and provided a rubric with a breakdown of points, clearly showing only a small percentage of the grade would be based on their presentation style and delivery. The content of the presentation was the most important part!
The use of technology was varied:
As markers we also had to overcome our fears of technology.
PowerPoint is easier once you know how to access recordings (you have to download the file, then click start slideshow).
Sometimes the Panopto recordings were hard to find, especially if students had experience of using the technology in Blackboard and did not follow the Canvas instructions correctly.
What are your next steps?
We only provided grades with a short feedback comment last year, we plan to provide more extensive feedback going forward
We will add more video content into the module as examples of how to create engaging slides and showcase our presentation styles – hopefully leading by example
We would also like to provide examples of a good presentation vs a bad presentation
When captioning and transcribing, what is meant by ‘accuracy’? When are captions good enough?
In FMS TEL and LTDS many team members regularly work with captioning videos, in particular for our own instructional videos or webinars. Recently a few of us have been talking about how we caption videos and how we decide what to correct. After discovering we all had differences of opinion about what to keep and what to edit, it seemed like a good idea to think through the issues.
This webinar from the University of Kent features Nigel Megitt from the BBC talking about priorities when captioning and audio describing TV programme. It includes research on how people with different levels of hearing feel about captions.
Commercial captioning companies offer a range of levels of detail. We do not outsource these tasks, but the predefined service levels can help clarify what decisions are made when captioning. Is verbatim captioning better than a lightly edited video? An accurate set of captions or transcript should include hesitations and false starts, but a more readable one might remove these for fast comprehensibility and more closely resemble the script of a speech.
Key Considerations
Destination – who is the audience? What do they need?
Speaker(s) – how can they be best represented? How do they feel about you editing their speech for clarity (e.g. removing filler words) vs correcting captions to verbatim?
Timescale – how fast do you need to turn this around? Longer videos and heavier editing takes longer.
Longevity – will this resource be around for a long time and reach a wider audience? If so it may merit extra polish.
Once you have broadly decided on the above, you can deal with the nitty-gritty of deciding what to fix, edit or remove. Deciding on your approach to these common issues means you won’t have to make a decision each time you find an error in your transcript. If working with a few other colleagues on a larger project you might want to agree with each other what standard you are aiming for to create uniformity.
Editing Decisions
The ASR occasionally misunderstands speech and adds incorrect captions that may be distracting, embarrassing or inappropriate, for example adding swearing or discriminatory language that the speaker has not in fact used. Checking the captions for these is a great start, and is likely to be appreciated by all speakers!
We don’t usually speak in the same way we write. Normal speech is full of little quirks that don’t appear in text. Some of these include…
False starts (If we take… no actually let’s start with… yes, OK, if we take question 4 next…)
Hesitations (um….ah…)
Filler Words (you know, like, so…)
Repeated words (You can do this by… by reading the text)
Other Considerations for Captioning
Remember that captions will be read on screen at the pace of the video. This means that anything that you can do to increase readability may be useful for the viewer. This includes simple things like…
Fixing initialisms and acronyms (PGR not p g r, SAgE not sage)
Fixing web and email addresses (abc1@ncl.ac.uk, not A B C One At Newcastle Dot A See Dot UK)
Adding quotation marks around quotes.
You may also consider…
Presenting numbers using figures rather than words (99% not ninety-nine percent)
Removing awkward breaks (When Panopto separates a final word from its sentence.)
Fixing inaccurate punctuation like full stops in the wrong places, or commas and apostrophes (this is quite time consuming).
Considerations for Transcription
As well as the editing and tidying jobs above, before beginning to work with your file, consider whether or not the timing points are going to be important, and how you are going to denote different speakers, or break up the text. For example, for an interview you may need to denote various speakers very clearly. By contrast, for a training webinar, even if there are two presenters it might not be crucial to distinguish them. Instead it might be better to add headings for each slide so that the two resources can be used side by side.
Once you have decided on what to edit and what to ignore, your process will move along much faster as you won’t need to decide on the fly.
Keep an eye on the blog over the next few weeks for tips on how to quickly manage and edit your caption and transcription files.
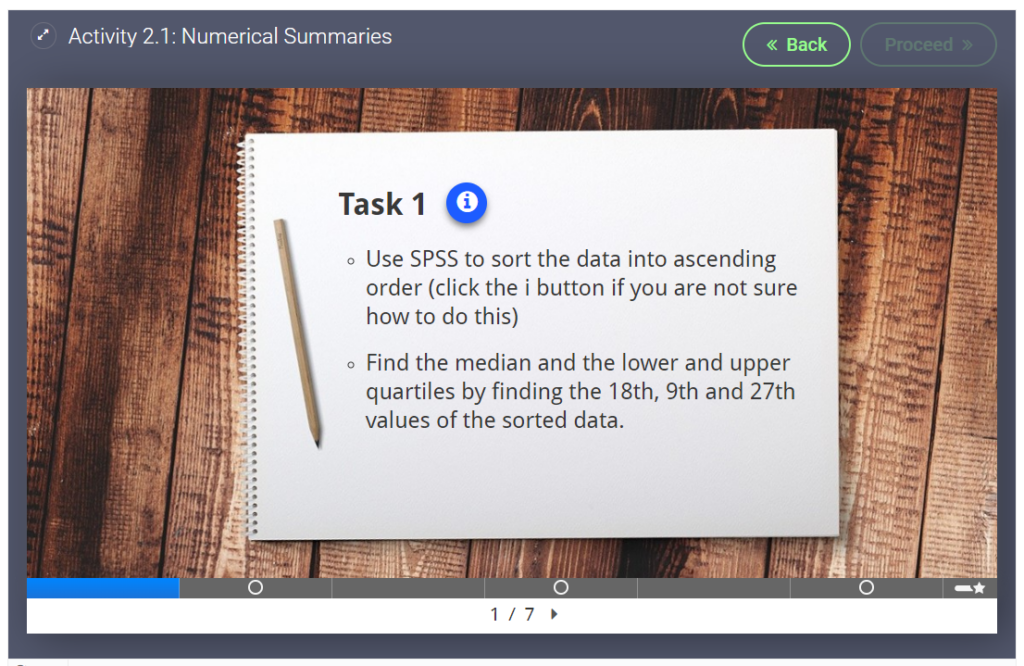
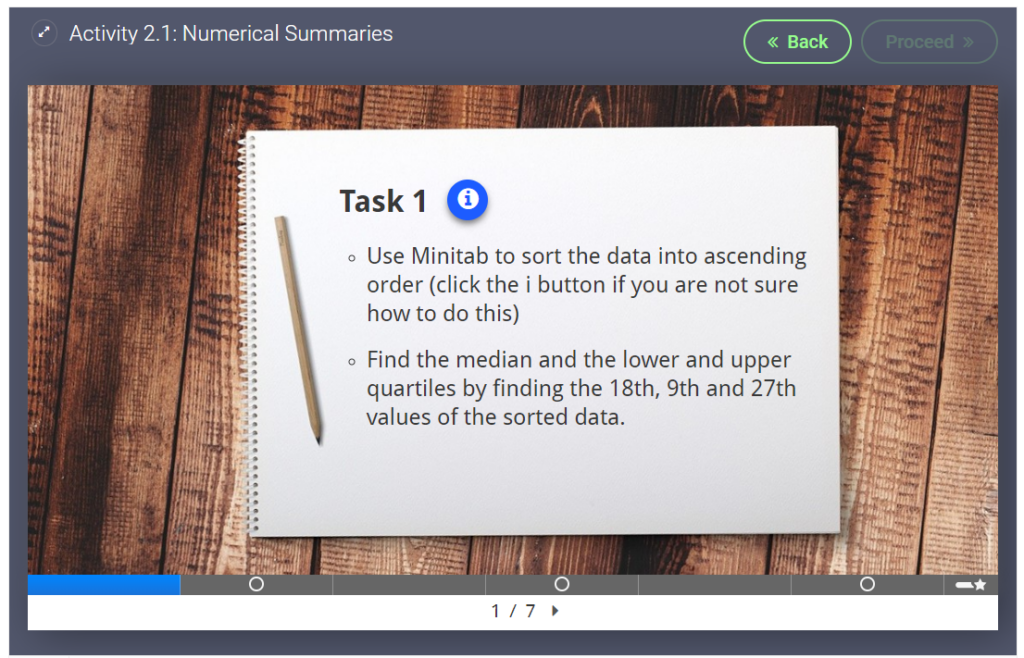
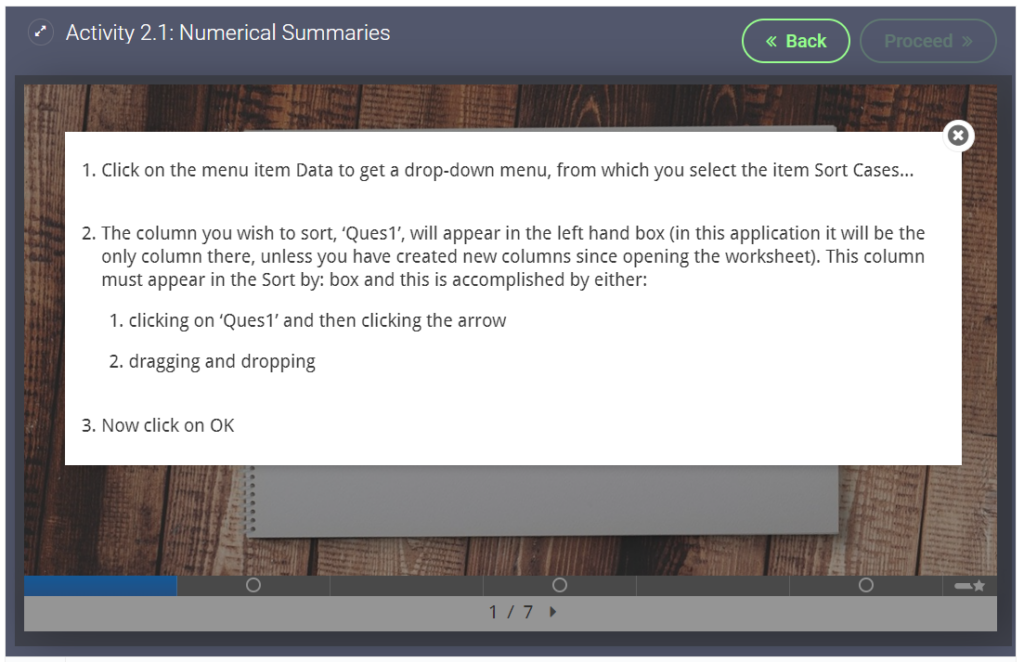
This weeks post shares a session FMS TEL were asked to participate in a study day on the Utilising Technology in Medical Education (UTME) module offered by the School of Medical Education.
The FMS TEL team were asked to participate in a study day on the Utilising Technology in Medical Education (UTME) module offered by the School of Medical Education.
The module aims to raise students’ awareness of how technology enhanced learning is currently used in health care education and gives students the opportunity to explore technologies and investigate theoretical underpinnings. Based on these aims we put together a 3 part presentation.
Part 1 – Tools for Student Interaction
PowerPoint Slide: FMS TEL Interactive Content, Instant/Quick Wins
Emily introduced a number of TEL tools including; Menti, vevox and padlet. Each tool was discussed; outlining its uses, pros and cons. Current examples of content designs, interactive activities and animations used throughout the faculty were shared.
Part 2 – Collaborating and Facilitating Group Work
PowerPoint Slide: FMS TEL Collaborating with Microsoft
Michelle demonstrated how to use Microsoft 365 to co-author and co-edit documents, presentations and spreadsheets. Students were shown various features including; reviewing mode, version history and how to use Sharepoint to monitor breakout room activities.
Part 3 – Teaching Tools
PowerPoint Slide: FMS TEL Teaching Tools
Eleanor shared her experience of teaching with Zoom/Teams and tips on how to humanise online sessions. She discussed common barriers, such as awkwardness or long silences and strategies or tools to use as solutions.
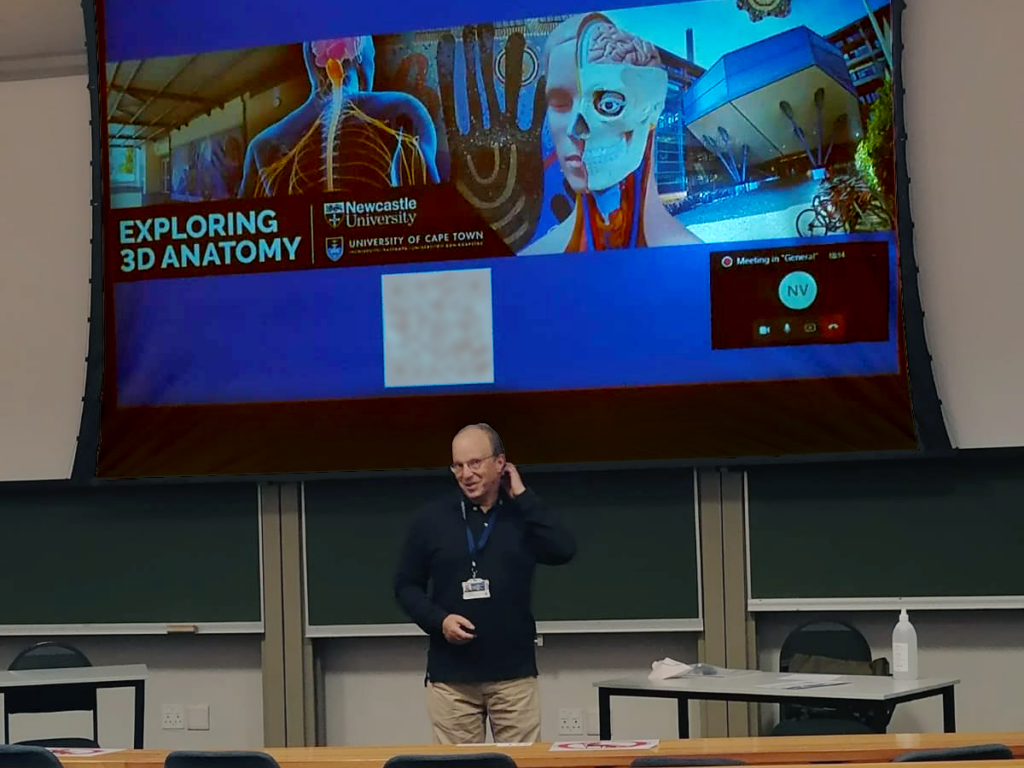
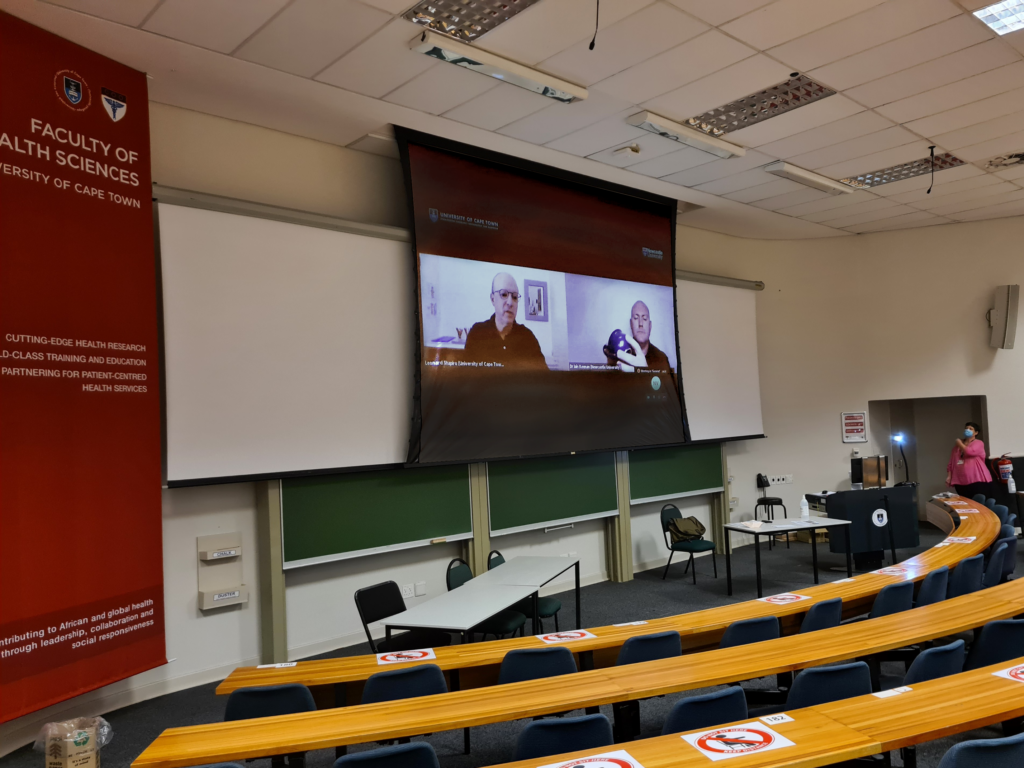
This week students from the University of Cape Town have joined the pilot of the Exploring 3D Anatomy course.
The second pilot of the Exploring 3D Anatomy course is now live, with students participating at the University of Cape Town in South Africa.
Leonard Shapiro presented an introduction to the course on 18th March to a class of second-year medical students – many of whom joined the class remotely via Teams.
Leonard presents the courseAn example of one of the course exercises is sharedLeonard presents the course exercisesDr Iain Keenan in the course trailer
The course trailer was also shown, and students were invited to sign up using a QR code posted on the slide show as well as on posters in the lecture theatre. Senior lecturer in Anatomy, Dr Geney Gunston, also posted the sign-up link for the students on VULA, the university messaging system.
Many students have signed up, and we look forward to working with them over the next few weeks as they Explore 3D Anatomy from home.
After this pilot and a further development phase, we hope to make the course more widely available to many more students.
Images provided by UCT medical student Mulaudzi God-mother Matodzi-muswa and Leonard Shapiro.
All of our posts about this conference can be seen under the tag NULTConf2022.
This workshop was presented in person for the first time at the Learning and Teaching Conference 2022. Newcastle University staff wishing to access the resources and the recording of the online version can do so here.
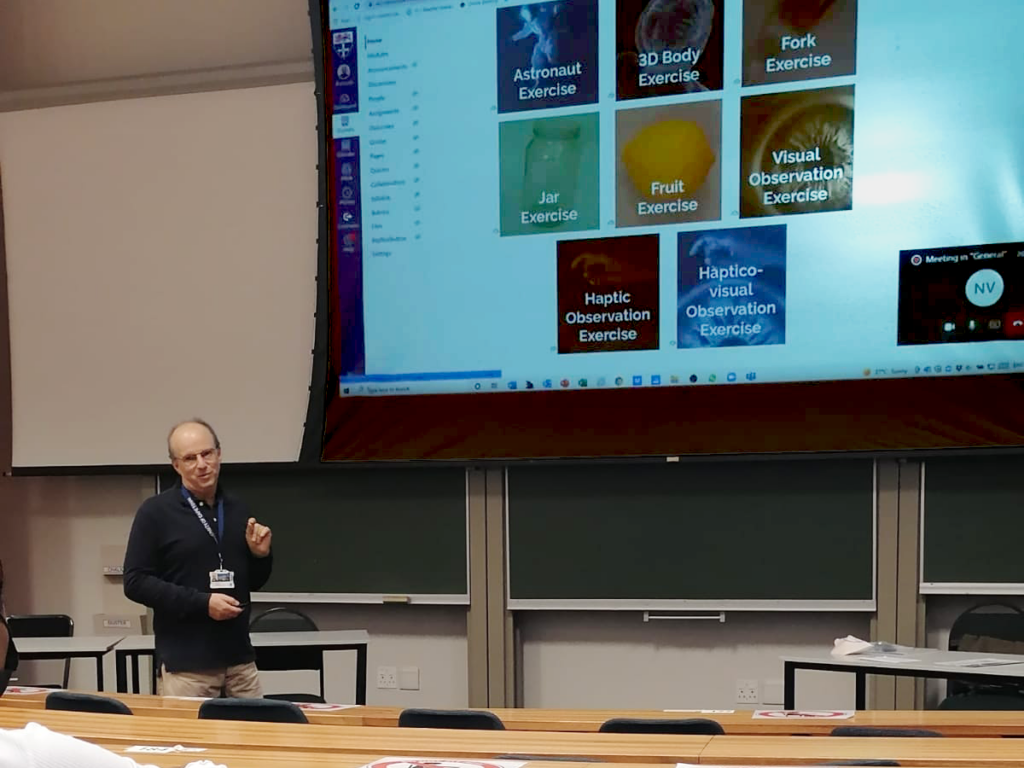
Over the past few months, the FMS TEL team have been working on bringing a Massive Open Online Course (MOOC) to life. The course, Exploring 3D Anatomy, is an active, hands-on, and engaging online course now available to Newcastle students and staff! The course was designed by Dr Iain Keenan of Newcastle University and Mr Leonard Shapiro of the University of Cape Town.
3D spatial awareness is a cognitive function. Improving it improves students’ 3D visualisation ability and spatial skills in anatomy learning.
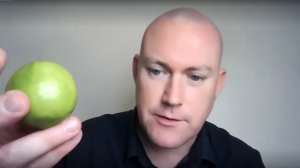
In our experience, medical, dental, and other healthcare students can experience significant challenges in 3D spatial anatomy. Because of the three-dimensional arrangement of the human body, student spatial awareness can be a major influence on their anatomical education. In this online course, students can practice several easy-to-follow, hands-on exercises that we have designed to address and improve 3D spatial awareness. Video demonstrations by Iain and Leonard guide students through each activity, which involve the use of readily available household objects such as a piece of fruit, a jar, or a fork.
As simple as these exercises are to follow and carry out, the effect of such activities on improving 3D spatial awareness can be notable. What’s more, the exercises can be enjoyable too!
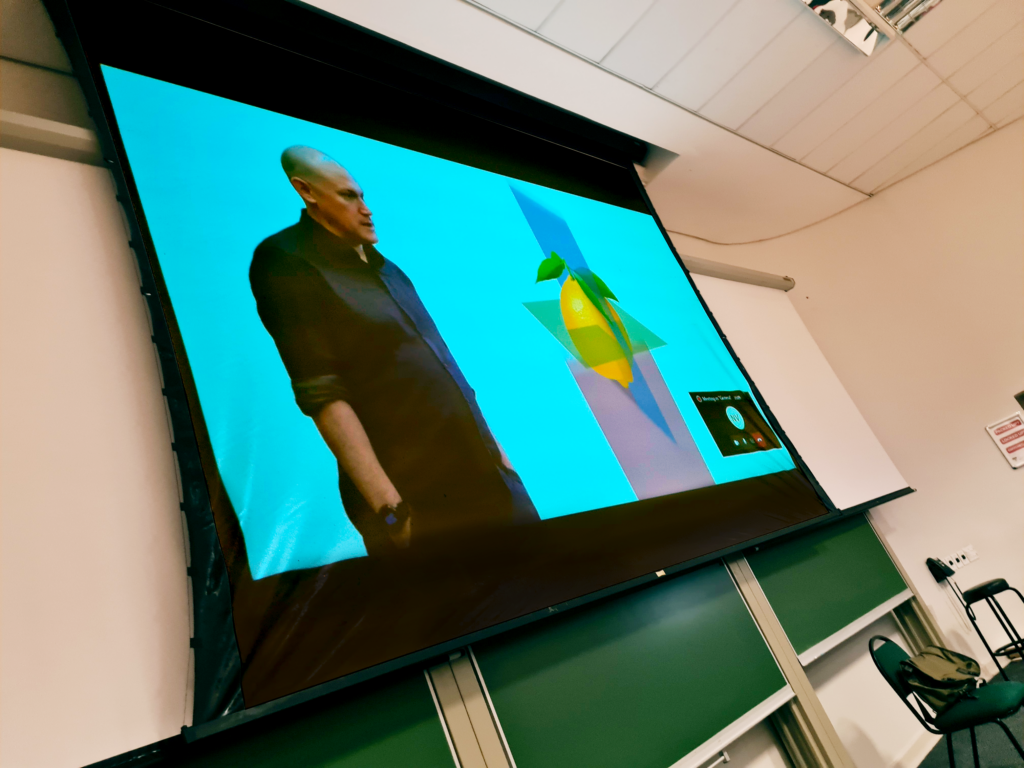
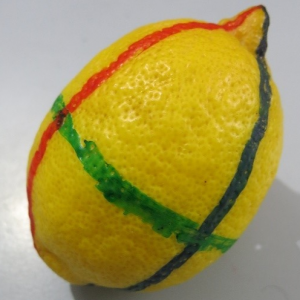
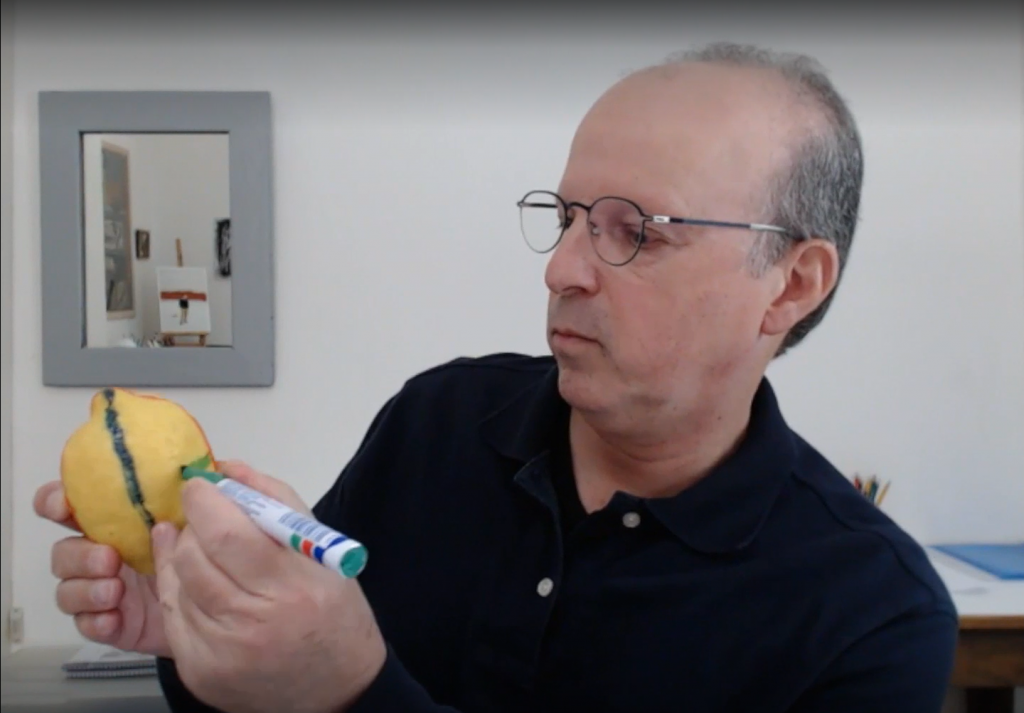
The Fruit Exercise: a guided dissection of this 3D object can improve 3D spatial understanding of the anatomical planes.
The practical exercises in the course are demonstrated by Iain and Leonard on video, allowing students to access the content at their own pace. These videos show the exercises in detail and allow students to hear the conversation as the exercise unfolds. Videos are short and simple to follow, and have been captioned by the team to ensure clarity.
Leonard Demonstrating the Fruit Exercise with a LemonIain Starting the Fruit Exercise with a Lime
All Newcastle University staff and students can join the Canvas course, which is structured in three parts and requires around 4 hours of activity in total. We hope to expand access to an extended version of the course in 2022/23. For further information, please contact Dr Iain Keenan.
Contacts
Dr Iain Keenan, Senior Lecturer in Anatomy, School of Medical Education, Newcastle University
Mr Leonard Shapiro, Observation and Spatial Awareness Teacher, Department of Human Biology, University of Cape Town
Further Reading
This course is supported by the following research:
Backhouse, M., Fitzpatrick, M., Hutchinson, J., Thandi, C.S. and Keenan, I.D. (2017), Improvements in anatomy knowledge when utilizing a novel cyclical “Observe-Reflect-Draw-Edit-Repeat” learning process. Anat Sci Educ, 10: 7-22. https://doi.org/10.1002/ase.1616
Ben Awadh, A., Clark, J., Clowry, G. and Keenan, I.D. (2021), Multimodal Three-Dimensional Visualization Enhances Novice Learner Interpretation of Basic Cross-Sectional Anatomy. Anat Sci Educ. https://doi.org/10.1002/ase.2045
Branson TM, Shapiro L, Venter RG. Observation of Patients’ 3D Printed Anatomical Features and 3D Visualisation Technologies Improve Spatial Awareness for Surgical Planning and in-Theatre Performance. Adv Exp Med Biol. 2021;1334:23-37. Available at https://pubmed.ncbi.nlm.nih.gov/34476743/
Reid, S., Shapiro, L. and Louw, G. (2019), How Haptics and Drawing Enhance the Learning of Anatomy. Anat Sci Educ, 12: 164-172. https://doi.org/10.1002/ase.1807
Shapiro, L., Bell, K., Dhas, K., Branson, T., Louw, G. and Keenan, I.D. (2020), Focused Multisensory Anatomy Observation and Drawing for Enhancing Social Learning and Three-Dimensional Spatial Understanding. Anat Sci Educ, 13: 488-503. https://doi.org/10.1002/ase.1929
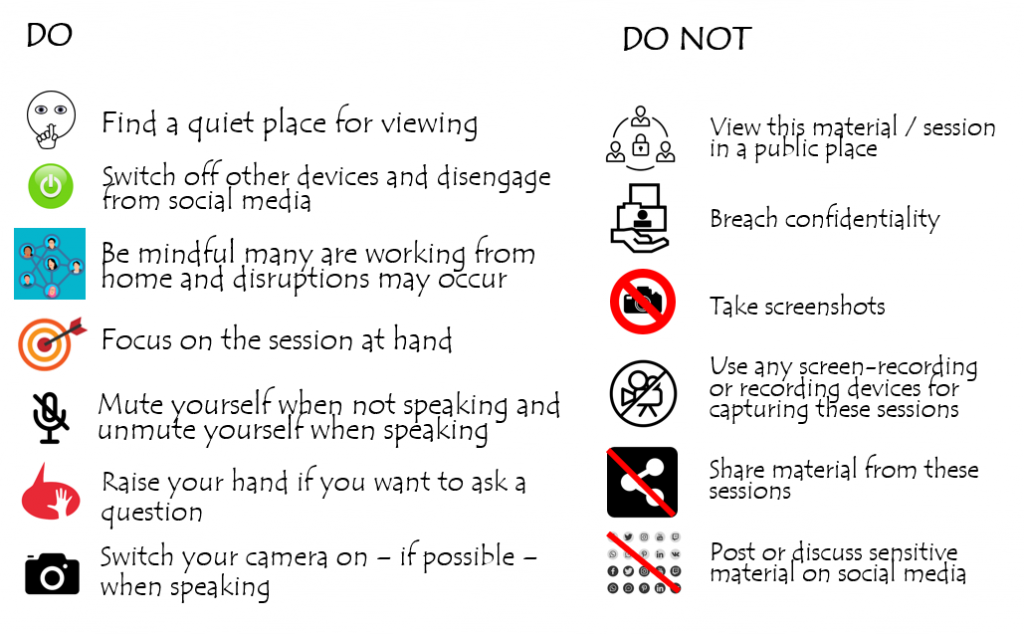
In response to the global pandemic, we have found ourselves faced with unprecedented challenges and a need to rapidly adapt our teaching delivery to accommodate students working remotely. Currently, we are aiming to return to a ‘business as usual’ model but in reality, there may be circumstances where some students are still unable to be present in person (PiP). Our international students are one particularly vulnerable group facing a continuous level of uncertainty regarding travel opportunities and restrictions. With this in mind, colleagues at INTO Newcastle University devised a delivery approach encompassing the Hyflex Model.
What is the Hyflex Model?
“The hybrid flexible, or HyFlex, course format is an instructional approach that combines face-to-face (F2F) and online learning. Each class session and learning activity is offered in-person, synchronously online, and asynchronously online” (EDUCAUSE, 2020). The main aim is that no student is disadvantaged, no matter which format they select. INTO Newcastle’s take on this approach was to connect PiP students with online peers through use of a camera, microphone, tripod and a hosting site such as Zoom or Teams. Asynchronous delivery is not a part of this approach. Session plans, pace of delivery and learning outcomes had to be adjusted because of the changed learning environment. A sample of FMS staff were able to experience this approach in real time at a training session delivered by INTO Newcastle’s Pre-Sessional Programme Manager, Darran Shaw. They gave the following reflections:
Overall
“While in no way perfect, this approach is something worth experimenting with”.
“The relatively cheap equipment was functional and would allow 3-way engagement”.
Audio-related
“I chose to join the ‘online’ part of the class via the Zoom meeting link on my phone. This was quick and easy to join, though we would possibly need to think about which accounts students have on their phones – whether they could join with their personal or university accounts. Once in the meeting I had minimal problems with sound or hearing the classroom participants. I can imagine this being difficult if the quality dropped though – even small cut-outs in the signal or sound pickup can make understanding difficult. This is even more of a concern for students joining who have poorer internet access, or who do not have English as a first language”.
“To enhance the experience, I felt that the quality of the audio was the most important. The levels of concentration required to filter out background noise and focus on the primary speaker is very tiring and difficult (this was already experienced with recorded lectures prior to COVID and even more diverse with academic recording or conducting zoom classes from their own PC over the last 18 months). For those in the room, sound from all participants was equal and what we would expect, but it was not picked up equally by the microphone for those on-line. Repositioning the single microphone was a trade-off to pick up more participants at the expense of reduced quality of the primary speaker. This could be enhanced by investment in a multiple microphone set up”.
“When the purpose of the teaching session is inter-participant communication, eg seminar, then we need to experiment more with all participants (PiP and remote) using zoom-like breakout rooms and headsets. In small classrooms/lecture theatres this is easier to control and can be achieved for lecture and seminar teaching”.
Video
“Having a visual link to speakers and the PiP class gives an important feeling of participation and value. I do not think the quality of the video is as important as the audio. Having said that, from the experience of this session a visual link to whoever is speaking makes it easier to focus on what is being said and allows non-verbal communication”.
“I feel it would also be good to have sight of the teacher and the class simultaneously. We spoke about this being important to pick up on cues when online participants can speak. We can see how easy it is to forget the online participants”.
Etiquette
“Appropriate etiquette is important and become vital for large class sizes. Emphasis should be placed on respect for other users, time management to attend equally (IT/bandwidth allowing) and professional level of engagement. The latter should be specifically mentioned in Graduate Skills and academics should be allowed to comment on student engagement (recognising this is aspirational as it is almost impossible for one lecturer to monitor for large classes)”.
Top Tips for future Hyflex classes
There is a risk that an ‘us and them’ divide will form so it is recommended that staff look at mixing online participants and groupings in breakout rooms. PiP students could take turns signing in to Zoom/Teams calls.
A major requirement is sound. It would be worth investing in a few microphones to ensure the sound quality is equal between the participants in the room and the teaching lead. There would need to be potential wire issues and feedback issues sorted out. This is of fundamental importance due to the extra concentration and effort needed of online participants to hear what is said in the room. It is worth considering the use of a microphone that could be passed around easily.
Having multiple users logged on to zoom in the same physical space increases the chance for echo/feedback and therefore users need to experiment with the set up.
Whilst a hi-spec system, such as that available in the Boardroom is desirable, a low-cost camera recording the whole class will enhance feeling of participation, ‘time and place’ for learning. The primary speaker can use a second camera (laptop or phone). The two logged on as separate users.
Ground rules are needed: when to speak, recapping when unheard would be important, etiquette when joining a classroom remotely and being expected to participate fully as if present in person (but not in pyjamas or lying in bed).
Consider pre-planning task set up instructions. It may not always be obvious when students need to be looking at the shared screen, the speaker’s video input, or a gallery view of other online participants.
Be open-minded. Experiment with colleagues and test out the experience to determine what makes it easier for the teacher and the students.
With thanks to the session leaders and participants: Darran Shaw, David Broadbent, Geoffrey Bosson, John Moss, Paul Hubbard, Luisa Wakeling, Eleanor Gordon
Jo Matthan (Director of Academic Studies, School of Dental Sciences) talks about the teaching of Head and Neck Anatomy (DEN1101) within the School of Dental Sciences (SDS) at the Faculty of Medical Sciences (FMS), and how the move to online teaching necessitated the development of a specialised Digital Code around the use of cadaveric imagery.
Background
In Present-in-Person (PiP) teaching, students attending this foundational head and neck anatomy course would typically have access to the Dissecting Room for their learning. This would be delivered over a six-month period in their first year on either the Dental Surgery (BDS) or the BSc Oral and Dental Health Sciences degrees. This face-to-face time has been reduced to 12 hours from the approximately 50 hours of hands-on anatomy teaching delivered, which left a considerable amount of content to be covered in the digital format. In normal times, a code of conduct is signed by every student the first time they enter the restricted Anatomy and Clinical Skills Centre teaching facility. This was utilised in a digital format during the pandemic but, due to the major overhaul in teaching delivery, there was no way of reinforcing the messages contained within the code of conduct on a regular basis. It felt like a tall order to expect students to remember and understand a list of statements that is seemingly far-removed from them at the start of their anatomy learning journey, and to retain this volume of information in the digital era.
Due to the highly sensitive nature of working with donated cadaveric material and the associated professional standards and ethical considerations linked to this usage, it was necessary to develop a set of guidance to protect the dignity of donors, whilst simultaneously guiding educators, students and institutions on the manifold issues to consider when transitioning to online cadaveric teaching. The sensitive material (i.e., cadaveric images) would not normally be available to students on an ad hoc basis on their own devices. As this content still needed to be covered to ensure the healthcare professionals received all of the necessary training they needed to practice their profession safely and keep patients safe, questions arose around the potential for covert screen-capture, unauthorised viewing and wider sharing of cadaveric content. Such breaches of professionalism have widespread implications, not merely for the course and programme but potentially for the institution. It became clear that it was necessary to collate clear guidance for staff and students to steer through the digital landscape.
Developing an In-house Digital Code
An in-house digital code was developed as part of the SDS Digital Delivery Working Group – a student-staff collaboration that convened over summer 2020 to specifically mitigate for any anticipated issues that could arise from the shift to online delivery for both students and educators within the School. Three different digital codes were created, each in the form of a holding slide that could be utilised in (1) Cadaveric Anatomy Teaching, (2) Clinical Teaching and (3) Seminar or Lecture-based teaching situations. These slides were circulated to the FMS TEL Group and then circulated for feedback from the other Schools that grapple with similar concerns around donor dignity and patient confidentiality. A basic confidentiality agreement was later put in place institutionally, but this was not specific to anatomy or teaching involving potential breaches of patient information. It was felt that, in the new era of digital delivery, it would be more beneficial to reinforce the message of a common digital code at every learning encounter to clearly communicate to students the expectations and behaviours appropriate for this form of teaching. For this purpose, the Digital Code for anatomy was developed, with the aim of utilising it as a holding slide for every synchronous encounter, and as a recorded slide at the start of each non-synchronous session that included cadaveric content.
Digital Code in Practice
The Digital Code slide is displayed at the beginning of every teaching session, whether synchronous or non-synchronous. In synchronous sessions, it is used as the ‘holding slide’ displayed as students enter the video call. When teaching begins, the slide is also reinforced verbally to signal the start of the learning and shared professionalism code of conduct. In practice, it may feel that the points around ethical standards and professionalism are somewhat overemphasised but, given how important they are, the Digital Code does bear repeating. In non-synchronous sessions, a pre-recorded initial slide is added to every lecture recording to reinforce the message not to view the recording in public and to adhere to the digital code. This is added to all recordings from all contributors.
The Digital Code slide (download .ppt slide at the end of the post)
The Digital Code slide gives a simple overview of both the required professional behaviours for healthcare professionals and unacceptable behaviours, bringing the more abstract guidance document into clear actionable focus. As a result, students are very clearly aware of the professional expectations expected of them in their chosen field of study, and these regular reminders serve to reinforce this. This is much more effective than simply citing a document which may have only been seen once at the beginning of the course. The existence of this Code is beneficial not only for students who, it is hoped, develop a sense of responsibility with the access to sensitive content, but also for donors, teachers and institutions who can rely on clear guidance but also appreciate that institutions have pre-defined consequences for any breaches – of which none have been reported thus far. Students have displayed high levels of professional conduct throughout the anatomy teaching in SDS and have adopted the digital code without any apparent reluctance or challenges. It is highly likely that, once students return to physical classrooms, this practice will be continued and developed.
Taking it a step further: Developing National Guidance for Online Cadaveric Imaging
Due to manifold misunderstandings on the legislation and guidance around the use of cadaveric images, it became clear at an informal National Designated Individual (DI) / Head of Anatomy Forum (convened to improve communication during the pandemic and consisting of heads of anatomy units and DIs from across the UK, as well as representatives of the regulatory bodies from each country) that educators could benefit from a unified front with regards to digital cadaveric education. A small group from within this informal forum (consisting of representatives from Brighton Sussex Medical School, Newcastle University and University of Nottingham) collated anecdotal and professional experiences with patient confidentiality and social media guidance documentation and developed a three-pronged approach to using cadaveric content online. The first step was to search for guidance from the relevant professional bodies. The Human Tissue Authority (HTA), the national body who regulate teaching related to cadaveric specimens in England, is virtually silent on the use of images of a cadaveric nature, and decisions relating to how images can be used are made by the local HTA DI within institutions. There is also a paucity of guidance on image usage in this context from the devolved nations’ regulatory bodies/inspectors. Some institutions do have some guidance around social media and images, but there is no unified and unambiguous guidance on cadaveric teaching in the online era.
The draft guidance document was circulated to the DI Forum and to the HTA for comments and the final document amended with suggested changes. The current version, along with a suggested PowerPoint slide, is already utilised at SDS for teaching purposes. It has recently been presented at the March 2021 meeting of the Trans-European Pedagogic Anatomical Research Group (TEPARG), at which it proved very popular across the European countries represented, and has been widely lauded for its clarity and utility during this period of intense change. The guidance document, with the digital code appended to it, is now in use across many institutions nationally and internationally and is being reviewed for formal dissemination.