Using overlays to make engaging videos

This post, kindly provided by Module Leader David Thewlis, discusses the use of OpenShot Video Editor to add overlays into videos for teaching.

Check out the resources section at the bottom of this post for step-by-step guides.
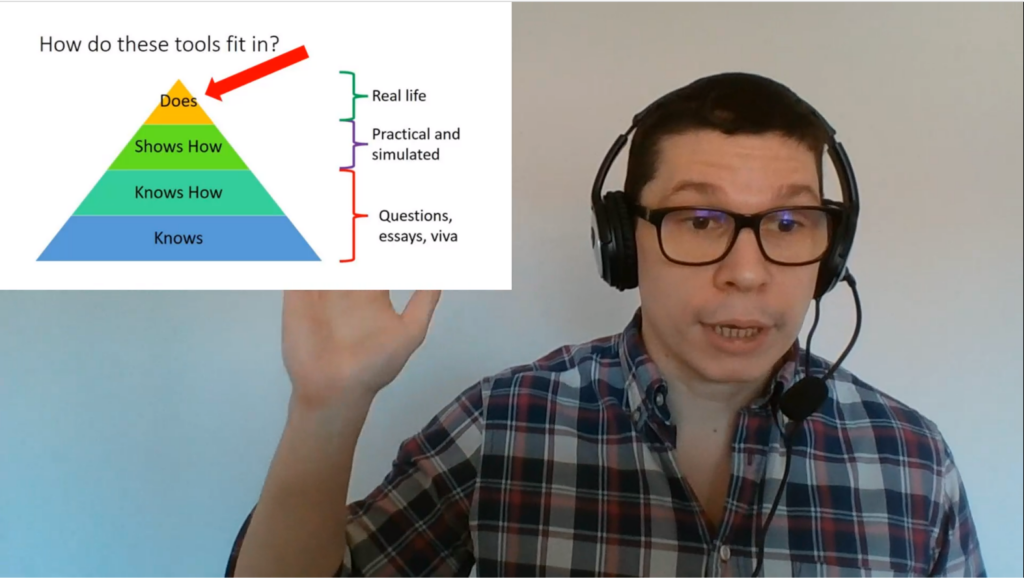
Example taken from MEE8079, Assessment in Medical Education, 2023

Why I use overlays?

I started my approach to online lecturing by recording in PowerPoint. Then I moved to recording in ReCap/Panopto. Neither were quite right for me, I felt limited in my delivery compared to in-person teaching. I found using props difficult when you only take up a small portion of a screen and emphasis on what really matters can be lost when you can’t feel the energy of the room.

I realised my biggest issue with my lectures was that I was relegated to a tiny corner and the slides had become central.

You want the slides to be condiments to what you’re saying, not be the main event.

Patrick Winston, How to Speak

Bell Hooks writes about academics hiding behind the pedestal lose engagement with the class. Unfortunately, online lectures can create a similar barrier between us and our students. Overlays is the approach I decided on to help reduce this barrier in my teaching.

I hope I am not the only person who spends hours watching videos on YouTube for inspiration. The videos I found most interesting (even if they were long) were simple speaker focused talks, which showed media when it was helpful. Replicating this type of content was my aim.

What can you use overlays for?

Overlays replace slides by allowing the speaker to have greater control over where and when to place media. You can incorporate pictures, videos, audio, and titles into a single talk with reasonably little skill (I have managed – you can too!). You can choose to direct focus in the frame. Wes Anderson has made a film director’s career out of this skill, perhaps we can learn from it.

Types of overlays:

  • Picture – these can act very much like slides. Placing them in a corner of the screen, or covering the whole screen can offer different experiences.
  • Titles – these are text which appears in picture. They can be used as a title, but I like to use them to correct a mistake I’ve made in wording I also use them to throw forward to an idea or call back something discussed earlier in the lecture or course.
  • Video – adding another video within your video can serve as a much better example than just simple explanation. I have done this a few times with examples of good teaching models recorded by my colleagues. I have also seen some effective uses of people having brief conversations with themselves using picture in picture overlays.
  • Audio– if you have a flair for the dramatic backing music might help at some point in your talk. Audio Commentaries can also create a richer resource, see our case study.
  • Emojis – They’re there. Why not?

How I set up overlays

You will require some basic video editing software – I like OpenShot Video Editor. It’s free and reasonably simple. Simplicity is the theme of my advice.

1.    Create/choose your media

Create a recording of your lecture using whatever recording device you have available. Errors or issues with the recording can be fixed in the editing process if needed. In this example on YouTube an instructor made a mistake with wording. Rather than re-record the entire video, which is otherwise good value, they corrected with an overlay title.

Making your images can be equally as easy. Saving pictures to an appropriate folder is one approach. I like to insert my pictures into a PowerPoint presentation to give myself the opportunity to get the structure clear in my head. I then save each slide as a picture. 

2.    Organise your content

Keep it simple and experiment with different formats. Layouts, text sizes, fonts, and colours all can have an impact on what you are communicating. Ensure that your titles are legible, and contrast appropriately with your background. I like the background to be the video of me generally, but I’ve seen solid examples of it being a slide or set of slides.

3.    Put the video together

I recommend you take your time editing your first few videos.

Regardless of the software you decide to use I recommend you save your project often! Losing an almost completed video is very frustrating.

You can clip your videos to remove errors. Insert other videos in the middle of your talk. Explore effects if you are delivering a narrative.

The export time can be quite long (mine usually run around 40 minutes for a 10-15 minute video). This is an opportunity to make a coffee, have a stretch, and look away from a screen.

Conclusion

Although it may need more initial time investment it is worth it. Using overlays can add a personal touch to any asynchronous video content.


Resources

References

  • Winston, Patrick (2018) How to Speak. MIT OpenCourseWare
  • Hooks, Bell (1994) Teaching to transgress : education as the practice of freedom. New York: Routledge.

FMS ❤ H5P

Below are some of our favourite uses of H5P from within the Faculty. If you have an example to share, please get in touch.

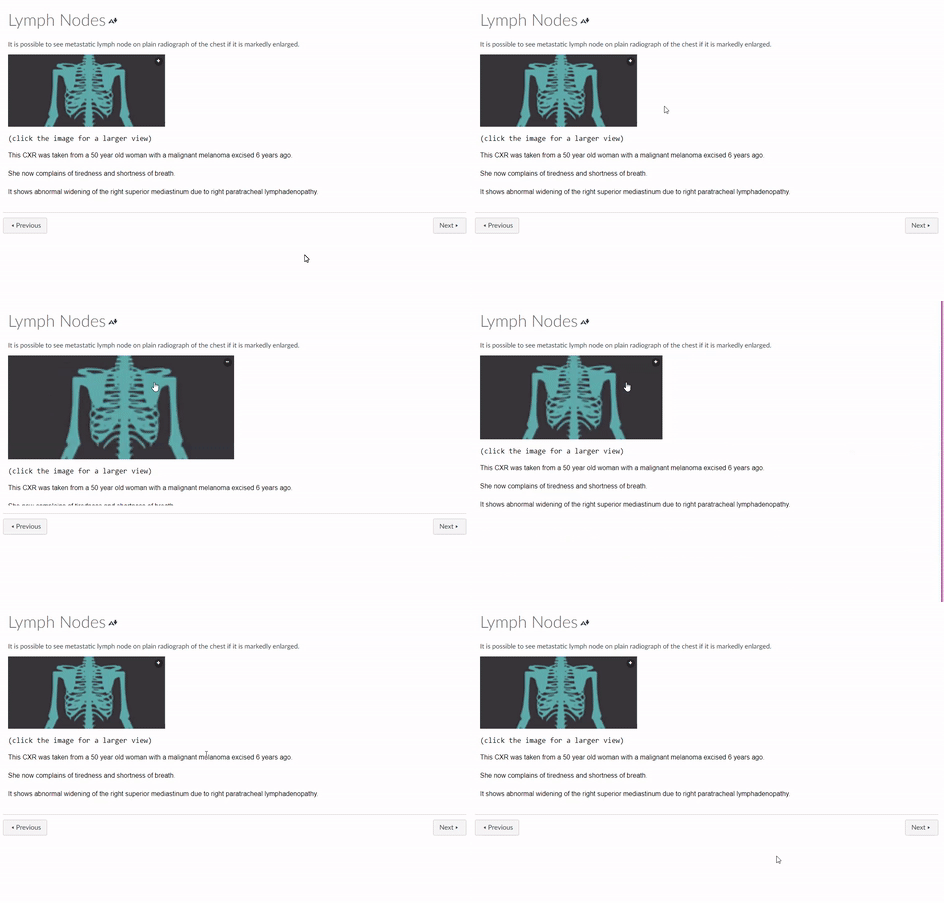
Fill in the Blanks for Click to Enlarge images

Students often complain that diagnostic images are too small to see clearly. A solution we found was to use H5P Fill in the Blank activity (without a blank).

Example from ONC8004. (Original image has been replaced to protect patient confidentiality)

Instructions

  • H5P Fill in the blanks tutorial
  • Set the Task description to say: (click the image for a larger view)
  • Use the Text blocks to describe the image
  • For behavioural settings, untick all except “automatically check answers after input”
  • LTI Settings: Set a max width of 1920 px (this will left align the content in canvas)

Branching Activity for personalised tasks

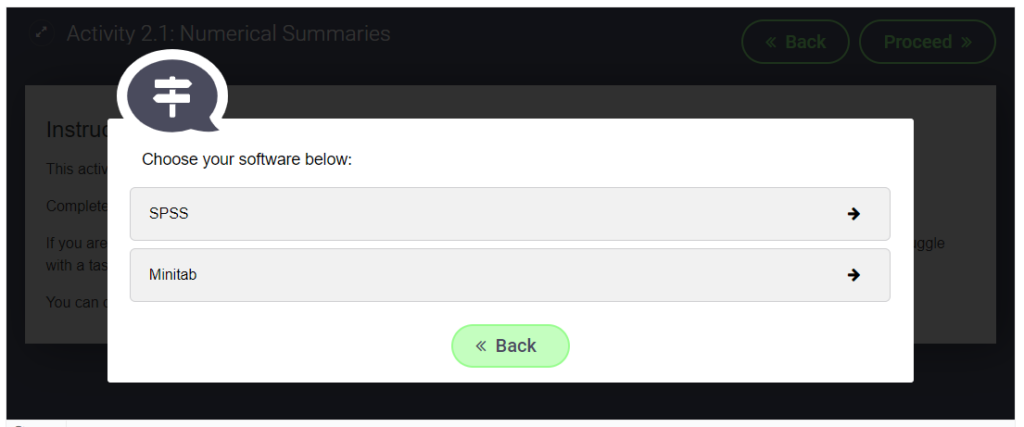
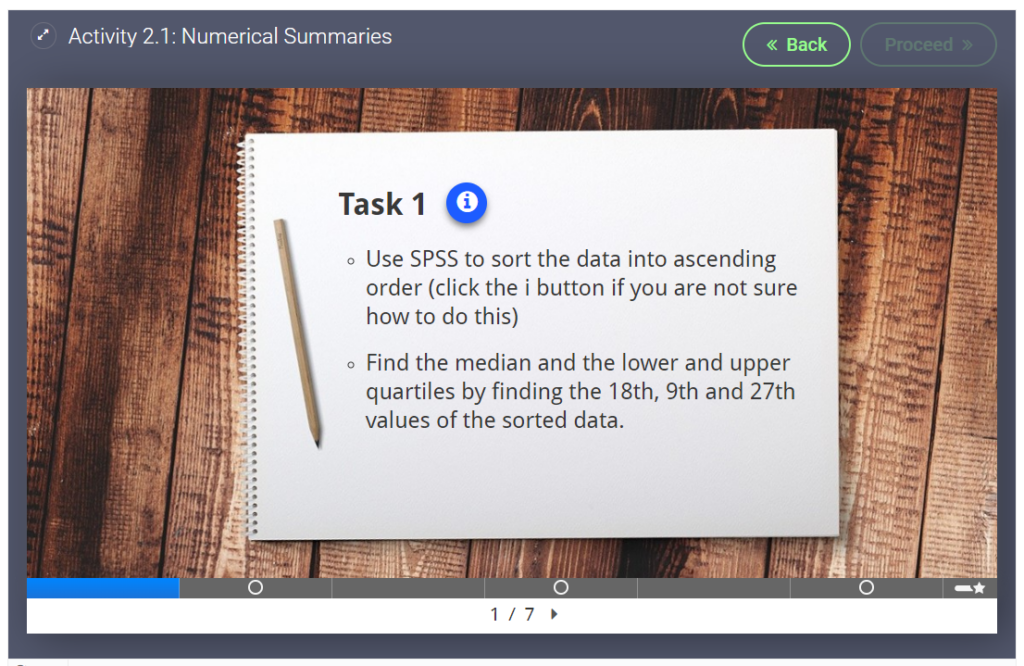
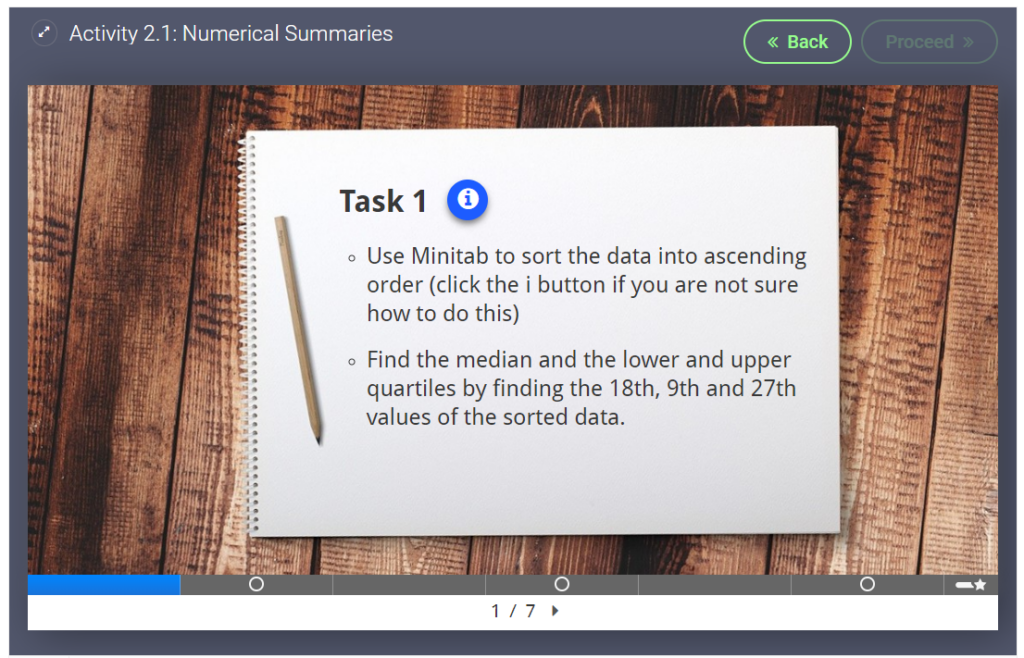
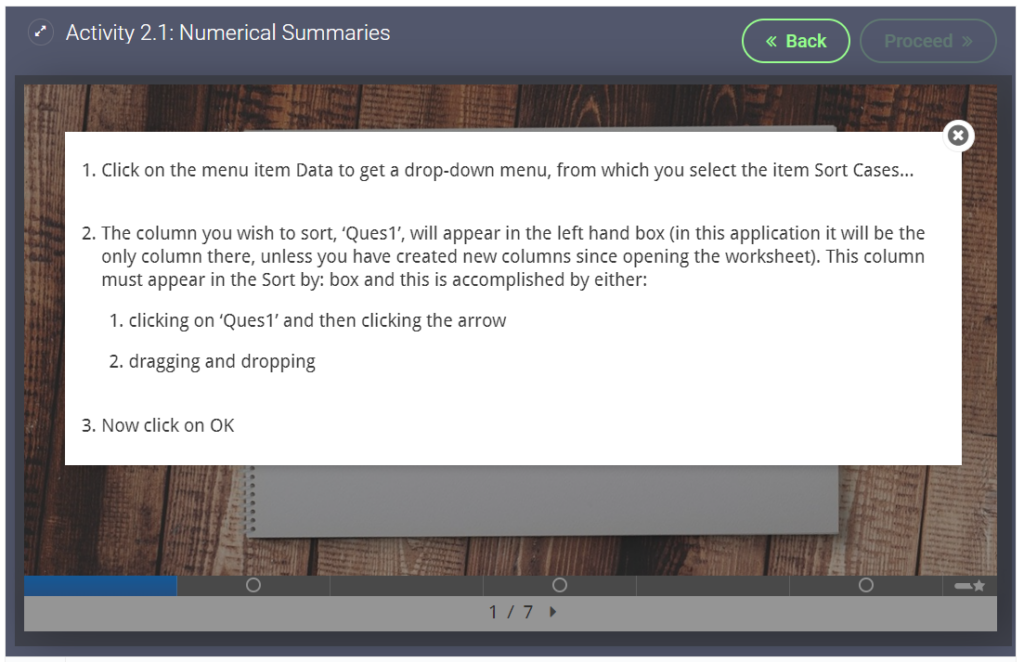
We used a branching activity for a statistics task. Students were given personalised tasks and instructions based on their software preferences.

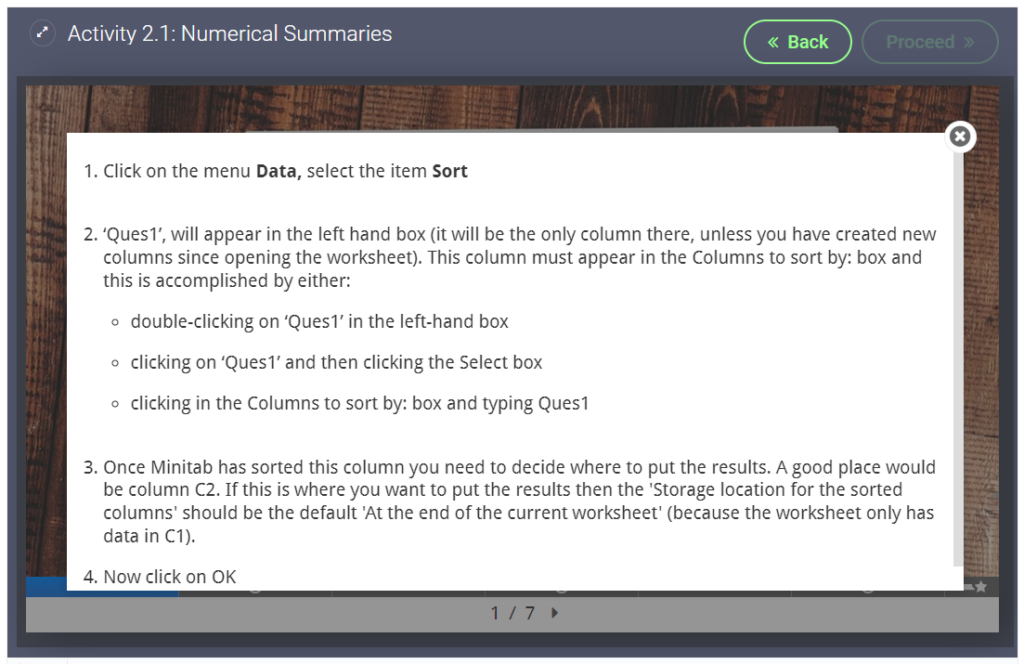
Students choose a software

Instructions


Interactive Video to spark discussion

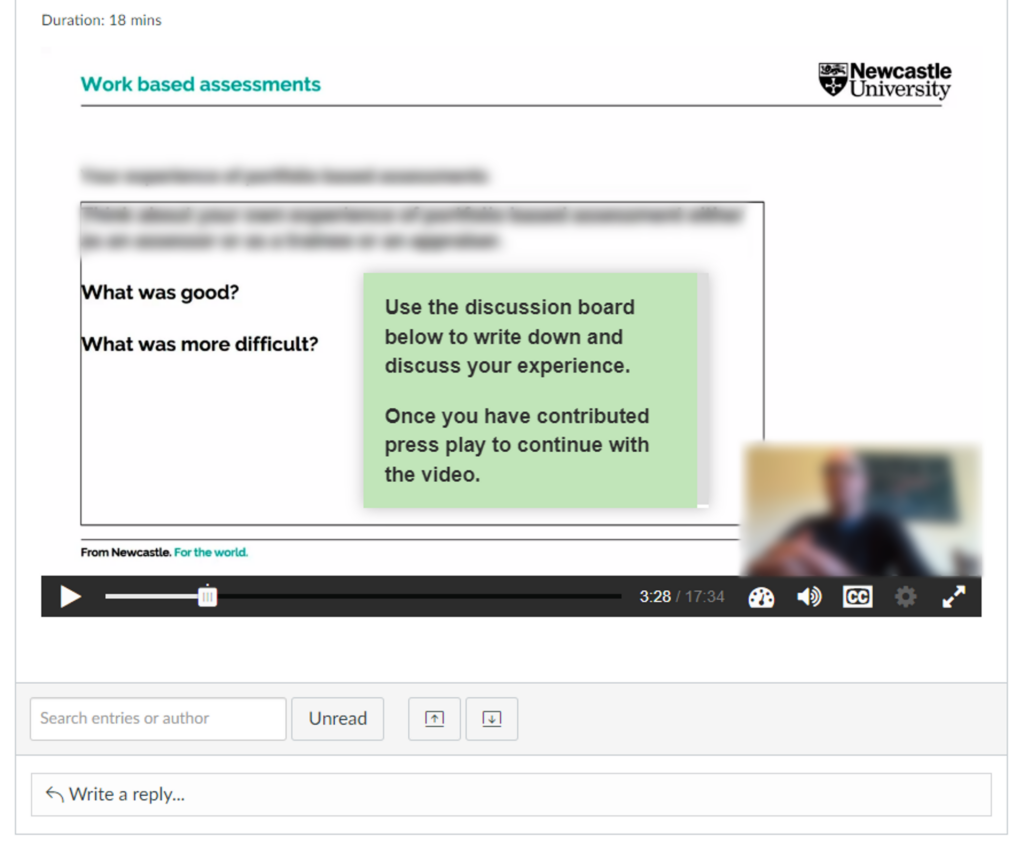
This video was originally designed to be watched in a classroom setting, where the video would be paused for an in class discussion. When the course was moved online we used H5Ps interactive video to auto pause at the right moment and we embedded the video in a discussion board.

Video auto pauses (at the white dot) and asks students to contribute to a discussion board task

Instructions


Virtual Tour (360) of a University Lab

We created a 360 tour through a large lab in the School of Biomedical and Nutritional Sciences. This was to familiarise students with the lab before attending in person, but also to show the labs to students working at a distance.

Screen capture of 360 tour in use

Instructions


Virtual Tour (360) to highlight hazards in a Lab

We created a 360 image of the new Nutrition Kitchen with hotspots highlighting some common hazards. Clicking on the hotspots will show a close up image of the hazard and/or some information on why it is a hazard.

Screen capture of hotspots in use

Instructions

Spring Clean your Digital Clutter

The FMS TEL team were recently discussing the amount of teams and chats we end up belonging to after working at the University for a while. As a team we decided to attempt a spring clean of our teams areas.

The digital intensity of our workday is increasing, and we need to be thoughtful about how we help manage it

Kate Maxwell, Microsoft Industry Blogs

?‍?‍?‍? Teams

I spent 5 minutes reviewing the chats I was a part of. Below are a few things I considered:

  • Is this conversation still on going?
  • Do I talk to this person/group regularly?

If I answered no to both questions then the chat can be removed from my list. There are a few ways to do this:

  • Hide – This is my preferred option, the chat is removed from my list but the conversation history is easily restored by searching for the conversation and clicking “Show hidden chat history”. The other members of the chat are unaware that I have hidden the conversation and if the conversation starts again the thread will reappear in my list and I will be notified.
  • Delete – This is a more permanent option but does have its uses. Perhaps you are in a group chat and your contribution is complete, however the conversation is still ongoing. By deleting the chat you leave the conversation and are no longer able to see any future posts. Other members of the chat will be made aware that you have left and can re-invite you if you are needed again.

I now review my chats on a more regular basis, my aim is to remove the scroll bar to ensure the colleagues I chat with on a regular basis are easily accessible without having to scroll through the clutter.

Next I looked at the “Teams” I was a member of. Some teams had been started with all the best intentions but had never gotten any traction or the teams were used during a project which is now complete, so I decided to leave those teams. Other teams which were active but were not currently offering value I decided to “hide”. This way they do not clutter up my teams window or send me notifications but I can still pop in an read any updates if I need to.

? OneDrive

After decluttering my teams (which didnt take as long as I thought it would) I felt invigorated to do more decluttering so I moved onto my OneDrive.

I have to admit I am guilty of saving and keeping everything, so my OneDrive was very full and quite messy. I knew this was going to be a big task so I set myself a timer for 10 minutes and I would do as much as I could and call it a win.

I started at the top level and decided any loose files needed to be sorted into folders. I then went through the folders I had for teaching materials and anything I knew I had uploaded to Canvas I deleted.

This task is still on going, anytime a meeting finishes early or I am waiting for a meeting to start I use that time to review a few more folders.

Resources

2022 Roundup

This post summarises posts from 2022 – thank you to all of our contributors!

We hope you have enjoyed learning more about the work we do in FMS TEL, below are a few areas we covered and successes we had in 2022. If you have any suggestions for content for 2023 we would love to hear from you.


Awards and Prizes

Ashley Reynolds and Eleanor Gordon were delighted to be announced winners of the ‘Best Video Award’ during the NU Teaching & Learning Conference for their video ‘Creating and using animations to explain concepts’.

Eleanor Gordon (left) and Ashley Reynolds (right)

Work done by the School of Dentistry and FMS TEL Team won first prize at the Trans-European Pedagogic Anatomical Research Group Hybrid Conference this year, for the presentation on ‘Adopting a flexible approach to professional anatomy spotter exams during COVID’. Newcastle Staff can view the poster here for an overview or read the internal news item on SharePoint.


2022 Conferences

For the second year running we ran our very own FMS TEL conference. We had sessions on Accessibility, Augmented Reality, Lab Teaching, Escape Rooms and more. The materials are available on the FMS TEL Conference 2022 page.

Several members of the FMS TEL team also attended the NULT Conference this year, giving strong representation of the team. We delivered sessions on Developing audio commentated interviews, Designing Convertible Teaching and Using Canvas Commons.


Technology, Software and Systems

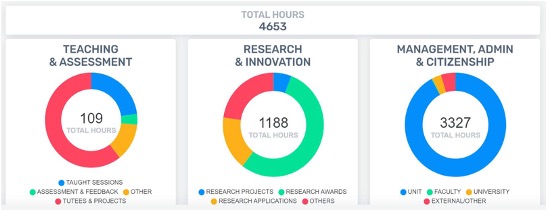
WRS Screenshot: individual workload summary

This year we showcased The FMS Workload Reporting System (WRS) and the new Personal Tutoring Application.

We explored 3D scanners and 360° Cameras and advanced our use of Canvas and PowerPoint.


Tips and Guides

We did quick fix posts for Screen Sharing with Presenter View, Additional scroll bars in canvas and Searching Outlook Emails.

We have shared guides on Captioning, Transcription and, how to improve teaching with Motion tracking in Recorded Presentations and the use of timers in synchronous teaching.

Assessment and Feedback were important topics this year with posts on Instant Feedback, Live Feedback, Virtual Oral Presentations and Effective Rubrics.


Thank You!

The blog is edited by a different FMS TEL team member every month, and many team members have taken on this task, as well as contributing posts to the blog – thank you to all of you! Our thanks also go to those colleagues who have offered their examples of practice for us to showcase here. We look forward to working with many more of you in 2023.

Assessment and Marking Refresher

The January assessment period will be upon us all very soon. Why not take some time over the next few weeks to refresh your knowledge.

Below are a few resources previously delivered or created by the FMS TEL team:


? Canvas Assessment Training 

  • Setting Up Assessments
  • Creating Rubrics
  • Turnitin Plagiarism Detection
  • Marking and Moderation

? Effective Rubrics

  • Designing Effective Rubrics for Marking and Feedback
  • Best practice when deciding how to put your rubric together
  • Rubric design workflow
  • Setting up and using Rubrics in Turnitin

? Adaptive Release Feedback

  • Comments before grades
  • Technological affordances available
  • Recorded audio feedback

? Multiple Markers 

  • How to allocate students to a marker
  • How to filter Speedgrader to see only your marking section

Downloading from Teams: Is it done yet?

How to manage and track your downloads from Microsoft Teams.

Video content created for the e-learning modules in FMS is often shared between colleagues in Teams. A problem I have come across is the lack of a progress bar within Teams for downloads.

When downloading a small file, such as an image or a document, it is not really a problem. You get a pop up notification of the download starting and shortly after a similar pop up notification saying the download is complete.

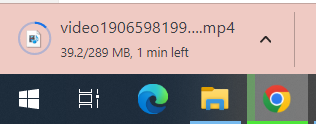
Screenshot of teams download notifications

If you are downloading a larger file such as 1 hour+ videos, which may take a while to download, you are left in limbo for how long it will take and if you move away from your screen you may miss the pop up notification entirely.

One solution is to keep an eye on the files icon on the teams navigation pane. It will be blank by default, show a downward arrow when downloading and briefly show a green tick when downloads are complete.

Teams File Icons

A second solution is to download the file from SharePoint instead. If you right click the file you should see an option to Open in SharePoint (this only works in teams areas, not chats). From SharePoint, select your file and click download. Your download will be controlled by your chosen browser.

In Chrome the progress bar displays the size and time limit left and the icon on the task bar turns into a progress bar as well. With this method I can get on with other tasks while the file downloads and be aware of its progress as well. I can also cancel the download if I need to.

Progress notifications in Chrome

Adding and Updating Files in Canvas

This post covers the pros and cons of different ways to upload and manage files in Canvas

As the e-learning modules in FMS are now going live, the team have been looking at ways to manage uploaded files in Canvas.

There are two main ways to add files to your module flow in Canvas:

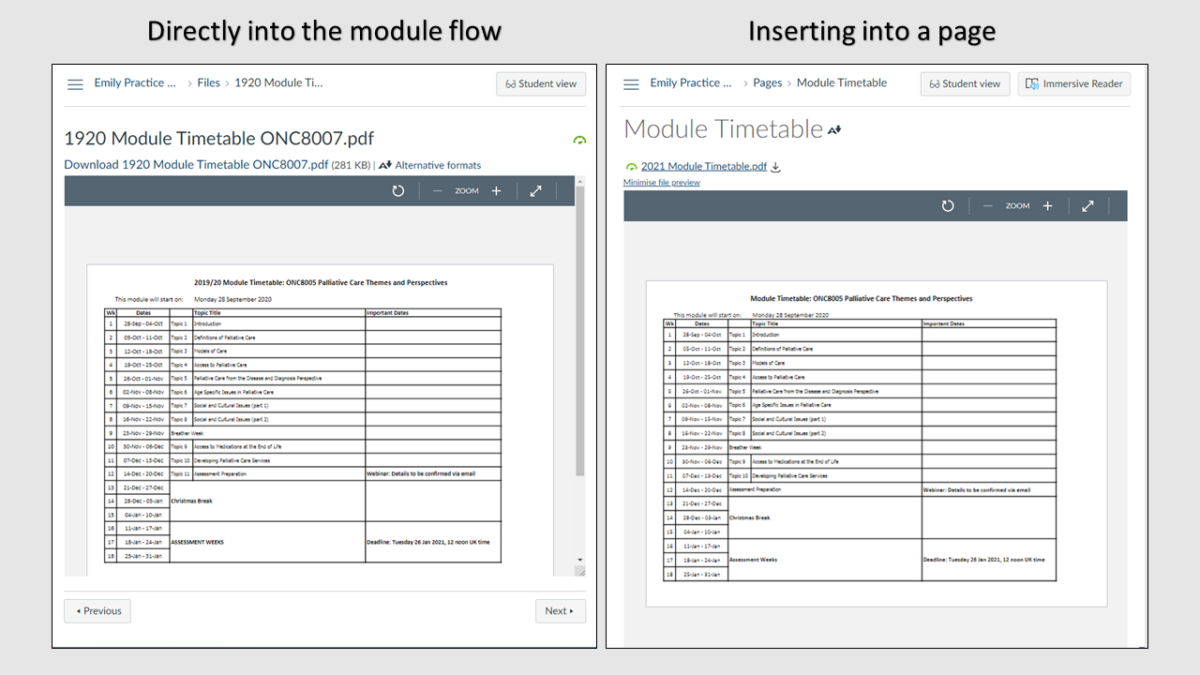
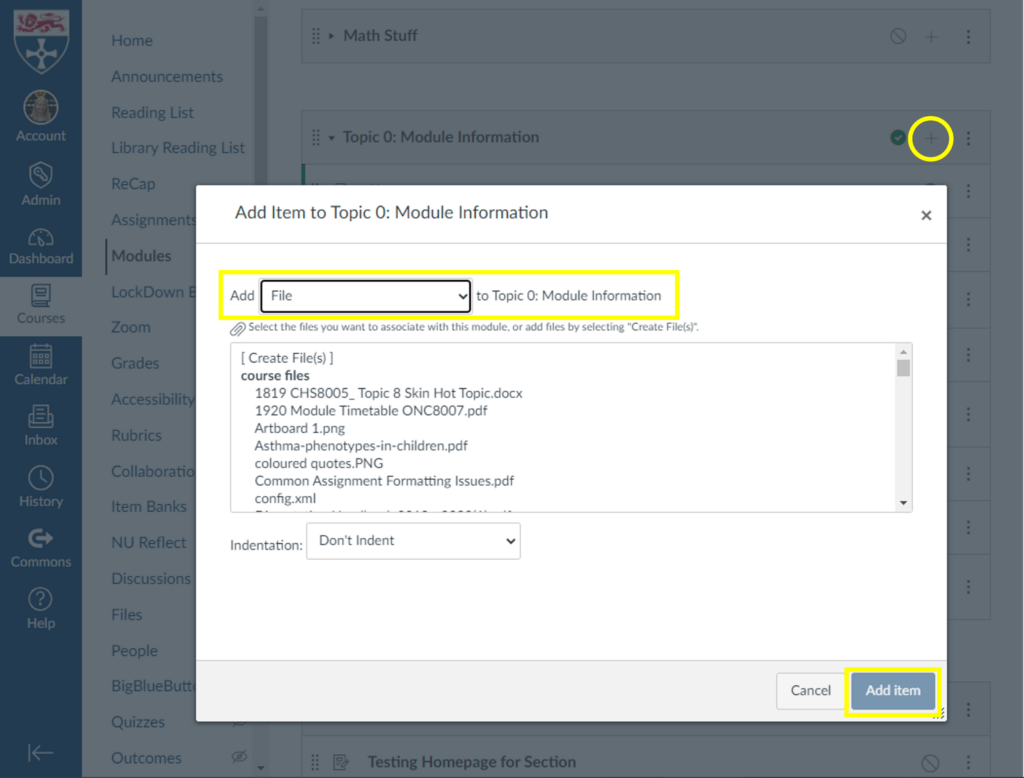
Directly into the module flow

+ > Add File > Add Item

This method is by far the easiest and quickest way to add a file to your course, and is a great choice if the file will not require updates.

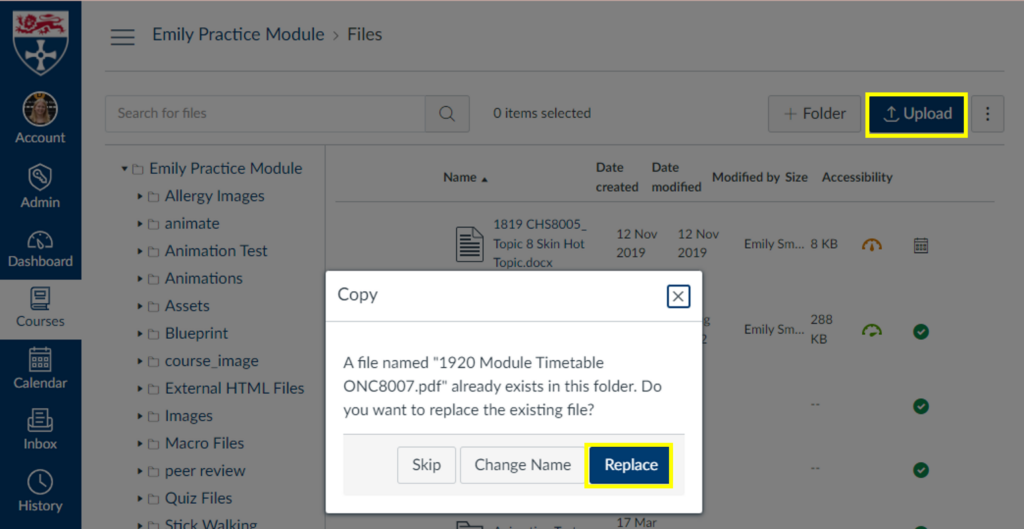
If you need to replace the file with an updated version, it is best practice to upload the new version directly to the files area and replace the original file. The file names need to be identical and uploaded to the same folder for the “replace” option to appear. Updating the file this way means any links to the file within the content will not need updated.

Upload > Replace

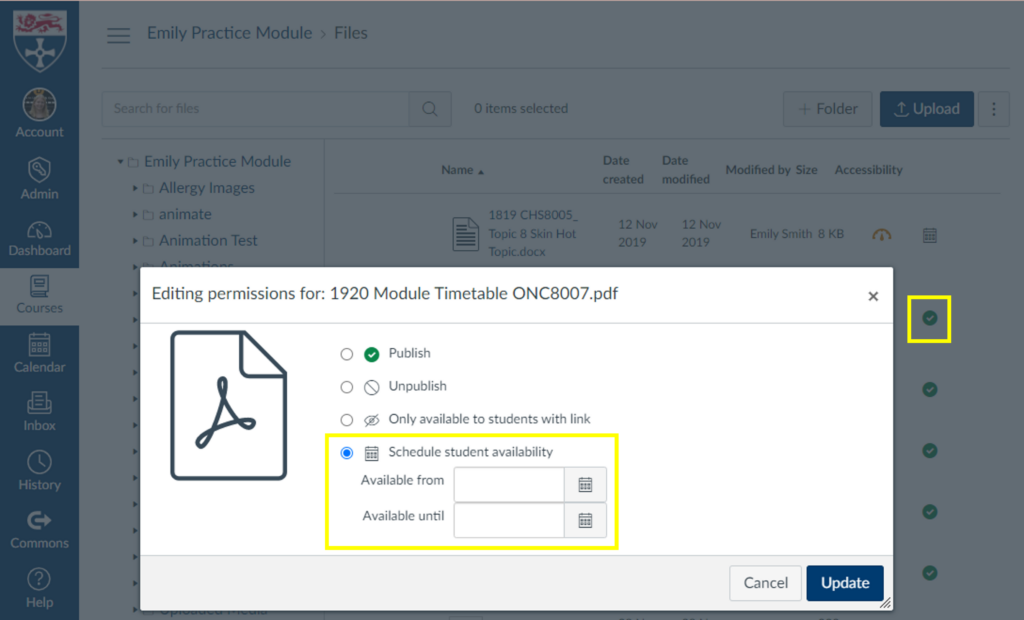
In the files area you also have the option to adjust the availability of files, including adding available from and until dates.

Click the green tick next to the file to open the availability options

Inserted into a page

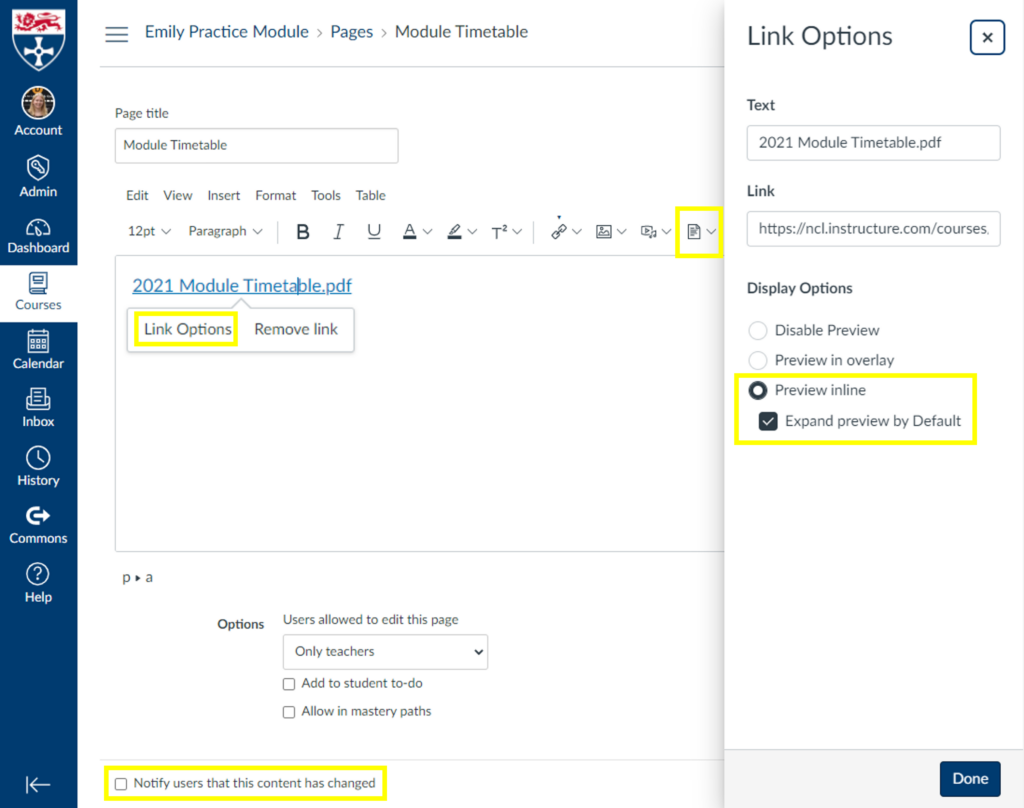
View of options available for a file inserted into a page in Canvas

This is my preferred method for adding a file to a course. You can use ‘Link Options’ to make the file open a preview by default so the page has the appearance of a directly added file but you have the following benefits over adding the file directly:

  • Able to add notes or comments above or below the file
  • The page title does not have to be the file name
  • Any links will be directed to this page so you can update the file/page as many times as needed and links to the content will still work
  • You can create an archive at the bottom of the page for previous file versions
  • Canvas can notify students of changes to the page/file
  • You have access to the page history so you can roll back to previous versions
  • You can add multiple files to one location
  • You can add a to-do deadline to the students to do lists and calendars

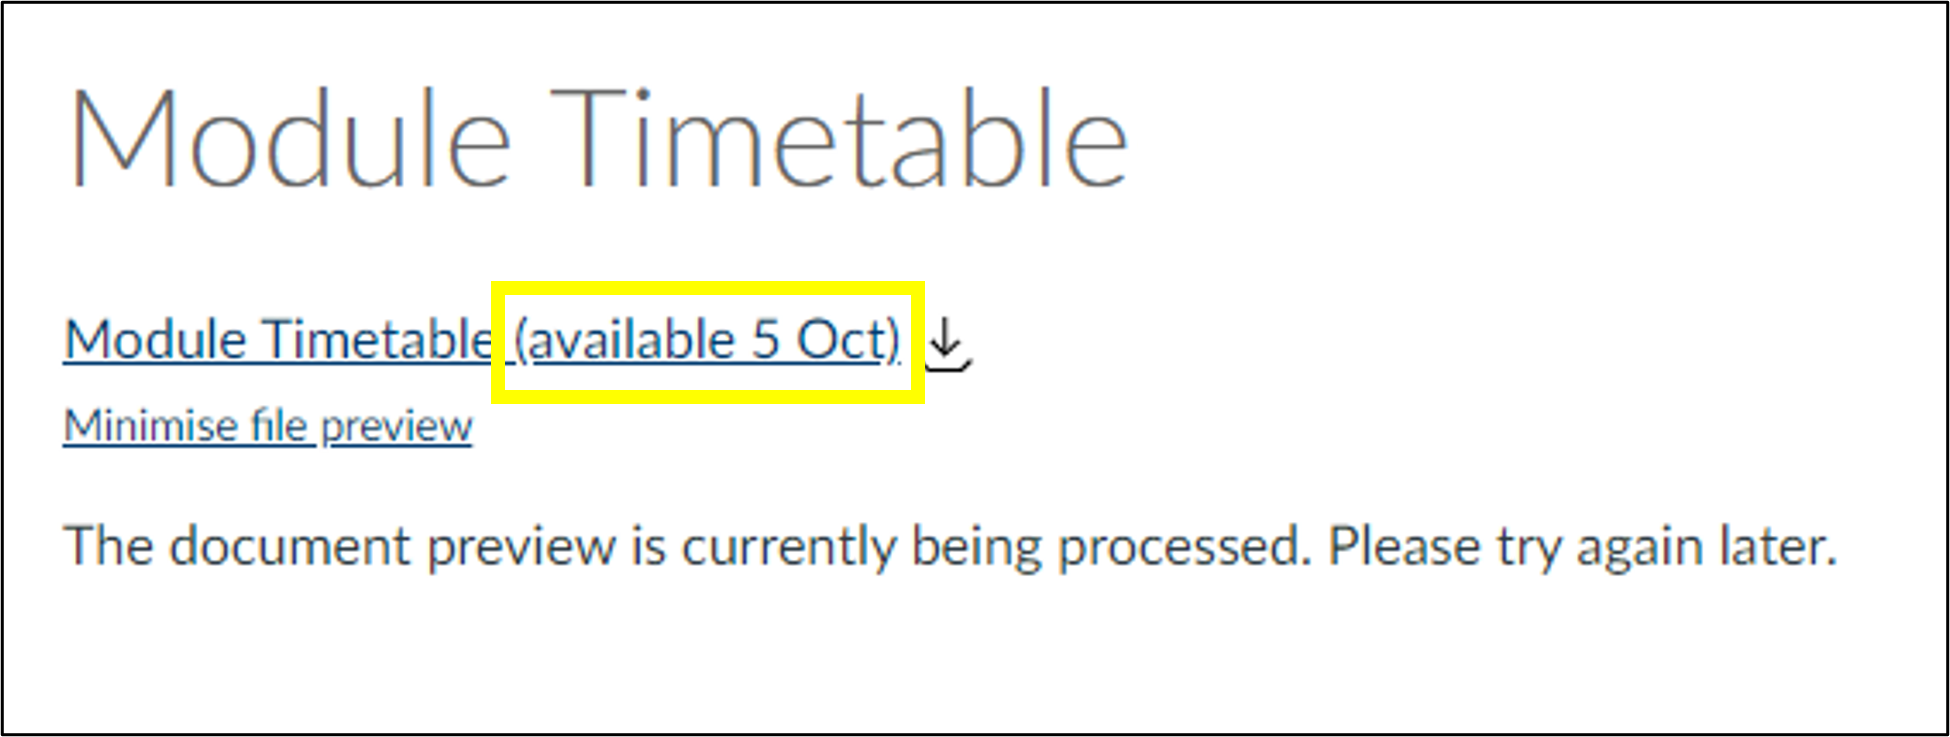
If you choose to use the file availability options mentioned in the previous method you may want to add a message on the page stating when the file will be available as the message canvas provides is not very informative:

Canvas Message: The document preview is currently being processed. Please try again later.

Keeping track of your files and file names within your module helps you save time and avoid confusion later.

Additional scroll bars in canvas

Why they are there and how to get rid of them!

The Problem

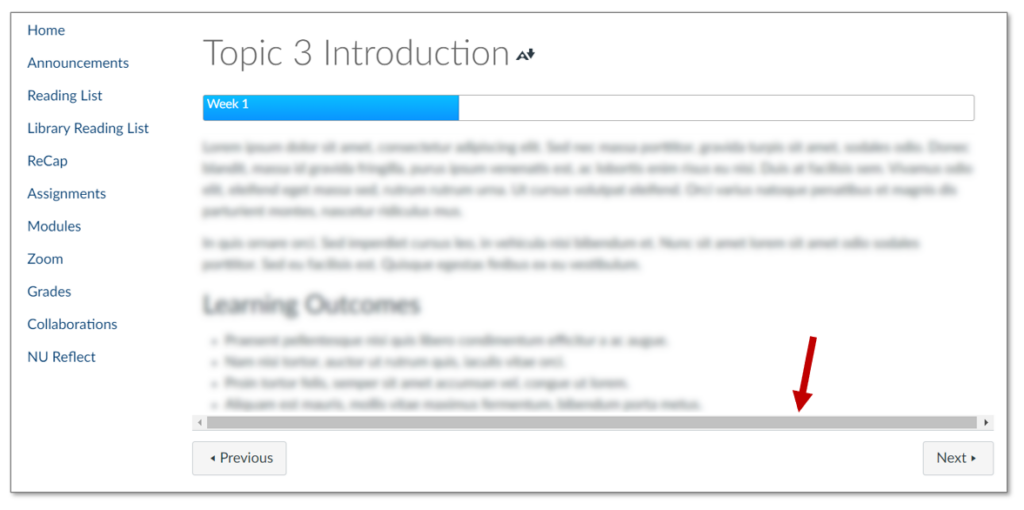
I recently noticed a few pages in my content in Canvas had developed scroll bars at the bottom. The bars were greyed out and had no function.

Scroll bar visible at the bottom of the canvas page.
Scroll bar visible at the bottom of the page

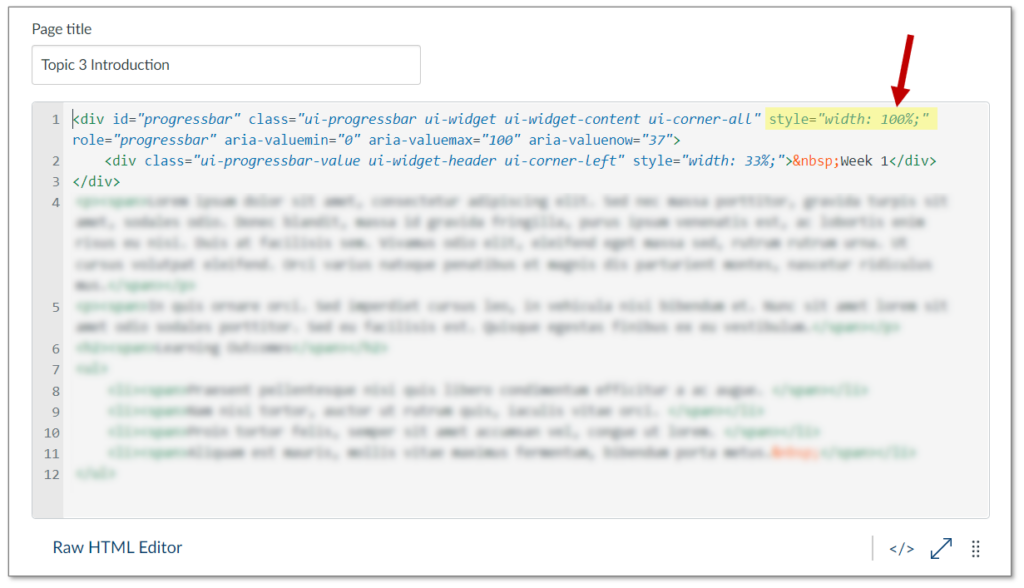
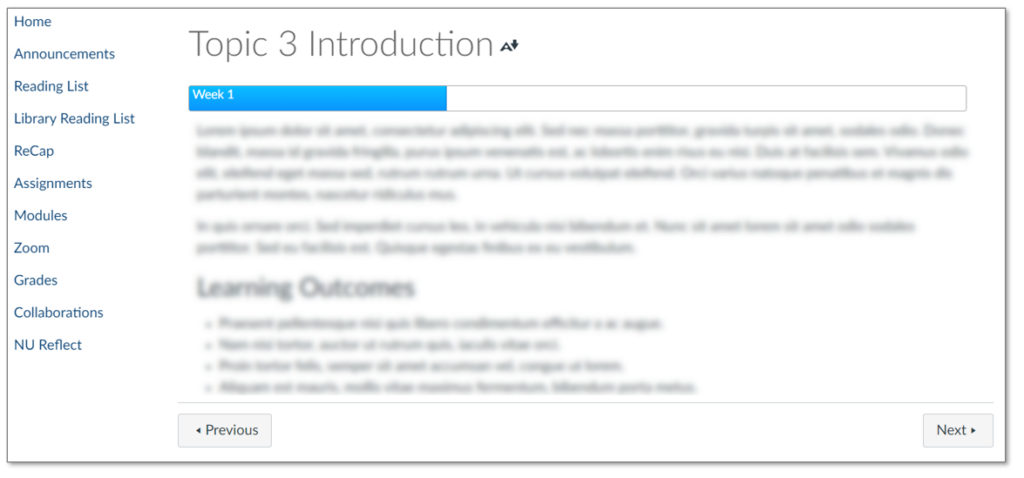
I started to notice a pattern. Any content which took up the whole width of the page (100%) was triggering the scroll bars. It could be any type of content; a banner image, an embedded padlet, or like in my example progress bars.

The Fix

Canvas must have changed the HTML “overflow” settings somewhere on their end. An easy fix is to adjust any 100% width content to be 99% instead. This can be done in the HTML editor area accessed by this icon in the edit screen: </>

Canvas HTML editor showing width element.
Canvas HTML editor showing width element
Scroll bar has disappeared on the canvas page.
Scroll bar has disappeared

Solved: Screen Sharing with Presenter View

I only have 1 screen, can I view my notes while sharing my screen?

Whether you are creating a pre-recorded presentation or delivering live on zoom/teams, having only one screen can be quite limiting.

Delivering my FMS TEL webinars in the office was easy with my two monitor set up but when working from home I struggled with only my laptop. I prefer to have notes to keep me on track and to make sure I cover everything I want to say. I knew there must be a way to access my notes while presenting.

Below are step by step instructions on how I shared my presentation with my audience while viewing my notes, all done using only a laptop!

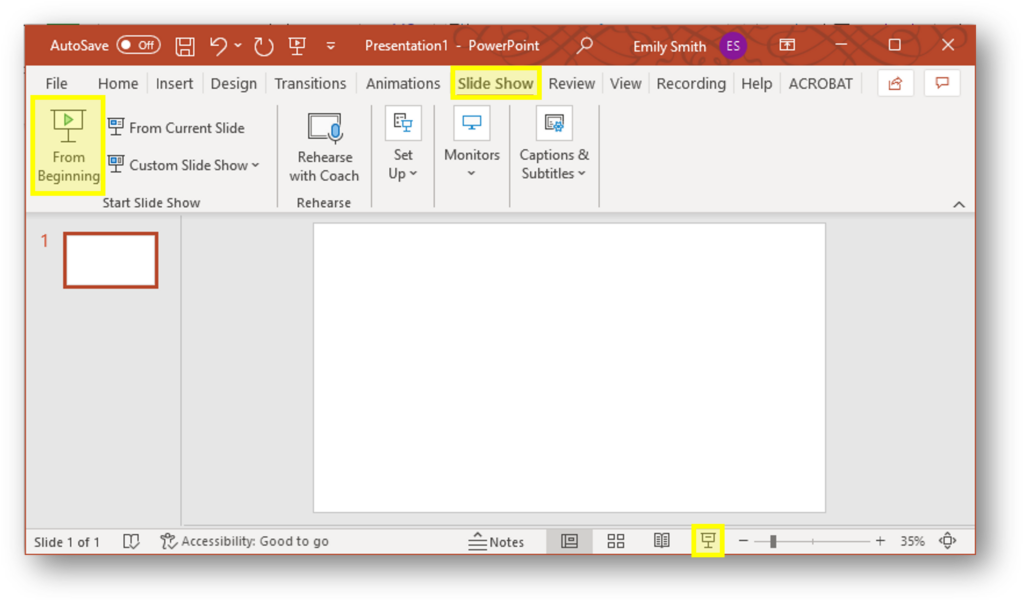
powerpoint view, slideshow button highlighted
Open PowerPoint and start your slide show
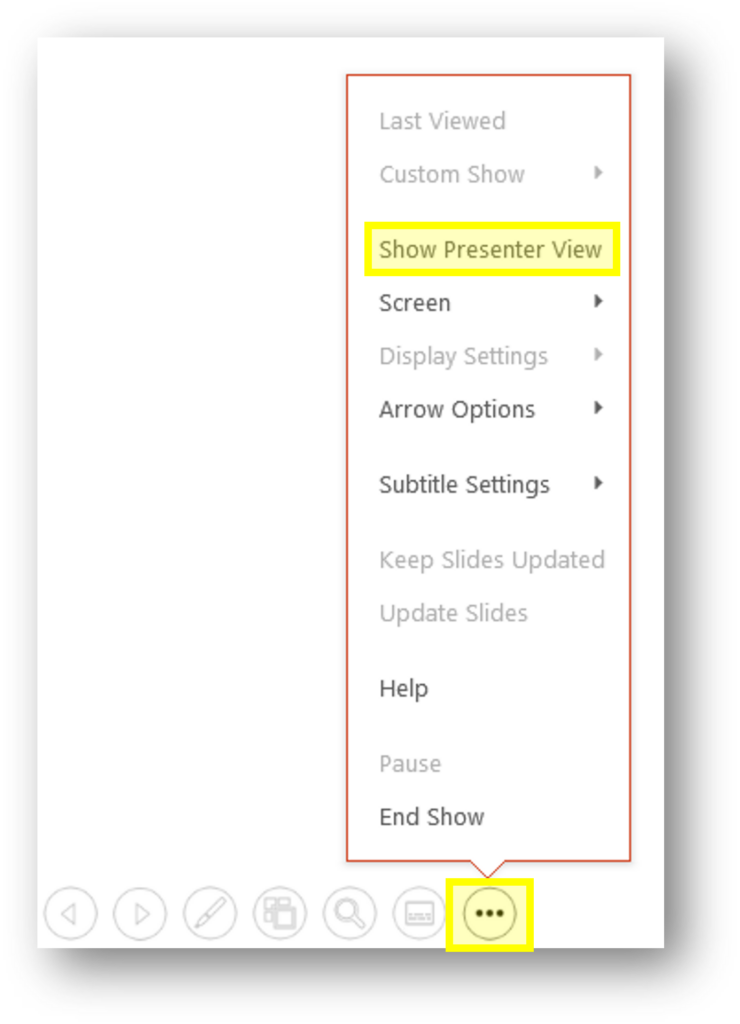
view of show presenter view menu
Click the Ellipsis menu, then
“Show Presenter View”
Show taskbar button
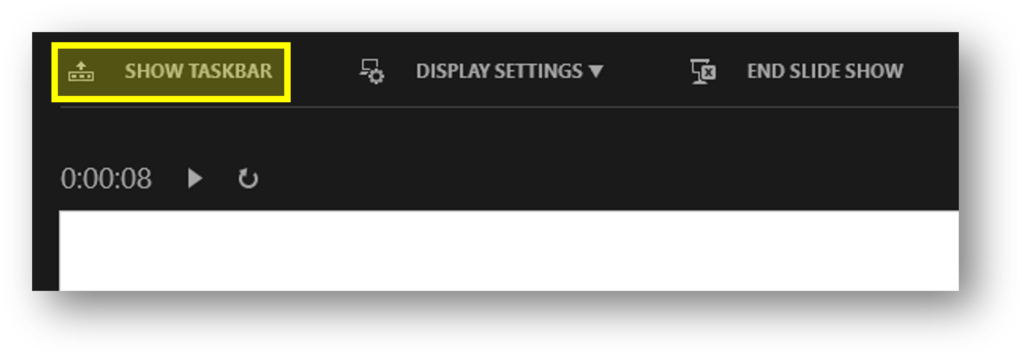
Click “Show Taskbar” or press the Windows key on your keyboard
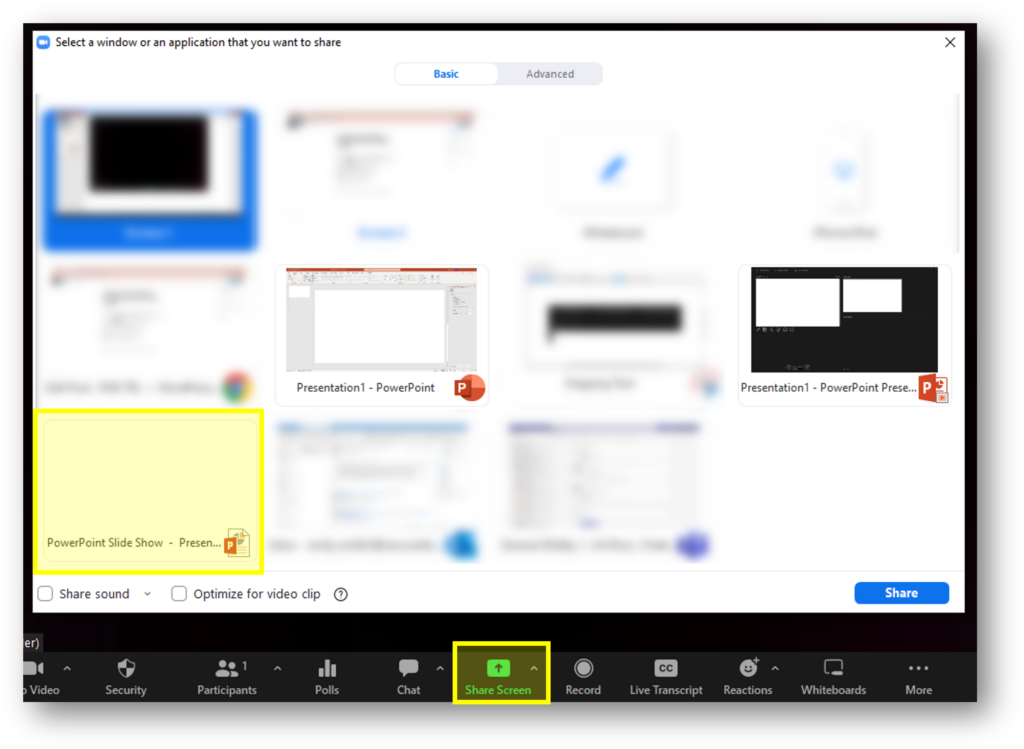
Open Zoom/Teams, Click “Share Screen”. You should see 3 options from PowerPoint,
choose PowerPoint Slide Show
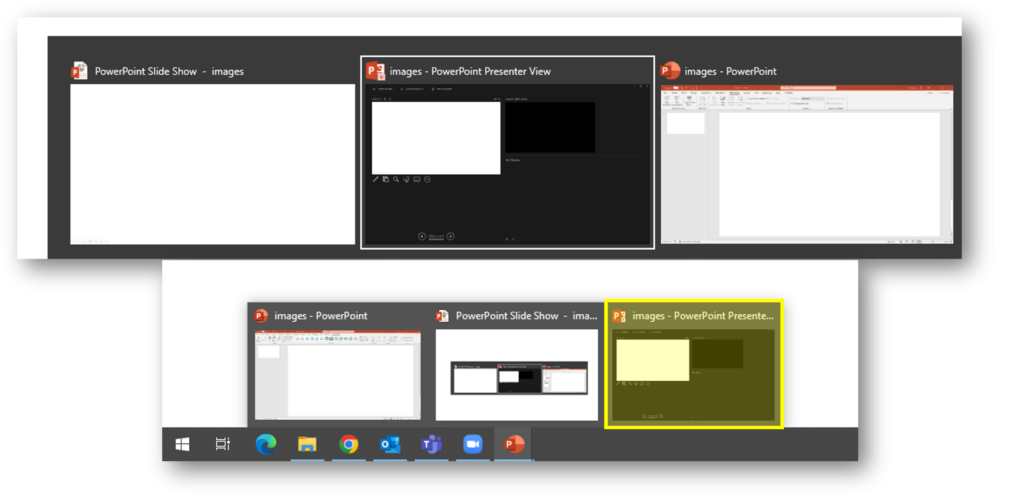
To open Presenter View, navigate using the Alt + Tab buttons on your keyboard,
or press the windows key and select presenter view from the Task Bar

Tips

  • Practice the steps before your session (you may want to open this post on a second device so you can access the instructions while you practice)
  • Add a blank slide or holding slide at the start of your presentation, especially if your first slide contains animations or slide transitions
  • Add a finishing slide, when your presentation ends the screen will stop sharing automatically (Zoom will display a pop up message to confirm this has happened)

Our team is growing!

Last month we welcomed Michael Hughes to the FMS TEL team, as Learning Technologies Developer.

Michael is one of six Web Developers within the team who create and maintain Web-based systems which support learning and teaching across the Faculty, University and beyond. He brings with him great enthusiasm and experience of developing innovative systems. One of his first projects is to work with the RolePlayNorth team to redevelop an old, but business-critical, system that has reached end of life. He will be co-developing this with Dan Plummer (FMS TEL systems usually have a least two developers, to help ensure nothing is one person deep!) and collaborating with the wider team in other activities.

“Coming from a manual labour background and specifically working in the Traffic management and Utilities industry for the past 8 years. Seeing a lack of development and online tools to help assist doing the job led me to learning how to code.

Industries like those are the backbone of the economy and the lack of basic tech was eye opening. Working one day I asked one of my more experienced co workers about the marker post locations (white sticks 100 meters apart on the motorway) which we used everyday to plan out roadworks. Finding out that most workers didn’t have the information where they are and if your traveling from say A69 or the A66 coming to the A1 you have no idea if you have to travel south or north to come south as to not miss your starting location for roadworks or even worse a car crash which could mean a 30 minute turn around if guessed incorrectly.

This idea pushed me to working on the project that got me the learning technologies position here at Newcastle University.”

Michael Hughes

We are excited to have Michael on the team and cannot wait to see what he will accomplish!