Michelle Miller shared her work in digital skills and accessibility at the Learning and Teaching Conference in March this year. This poster shows how you can improve your PDFs’ accessibility using Adobe Acrobat Pro, including common issues flagged by Ally, the accessibility checker in Canvas. All colleagues have access to this software.
This quick guide gives you tips on how to boost the power of your Outlook searches.
The FMS TEL team was recently discussing the options for searching for emails in Outlook. Most of us are familiar with the search tool and can use the basic function. But there are ways to supercharge your searches in Outlook.
Advanced Search
The first option is to use the Advance Search feature. To use this feature simply click on the Search bar then click on the open menu carrot on the right side of the Search bar.
Use the Advanced search options to specify criteria for your search. This interface is easy to use and understand. Search for emails based on sender, dates, subjects, attachments, and more.
Search Operators
You can also conduct specific searches using Outlooks search language operators. Here is a list of some of the search operators you can use to quickly search for specific results.
Search for
Findings
Pat
Anything containing the string pat including Pat, pattern, sympathy
Pat Smith
Anything containg the string pat or the string smith, including as part of a larger word
Pat AND Smith
Anything containg both strings pat and smith, including as part of a larger word
Pat NOT Smith
Anything containing the string pat but not the string smith, including as part of a larger word
Pat OR Smith
The same as searching Pat Smith
“Pat”
Anything containing the string pat alone, not including as part of a larger word
from:”pat smith”
Anything sent from Pat smith
from:”pat smith” about:”status report”
Anything sent from Pat smith that includes the phrase status report in the subject line
Hasattachment:yes
Anything with an attahcment
attachments:document.docx
Anything containing an attachment called document.docx
subject:”status report”
Anything with the subject including the phrase status report
received:15/2/2022
Anything received on 15 February 2022
from:pat (received:15/2/2022 or received:16/3/2022)
Anyting received from a sender with string pat on 15 February 2022 or 16 March 2022
We hope these search tips will prove useful to you in your future Outlook email searches.
Quick wins in accessibility by using Adobe Acrobat Pro’s built-in tool.
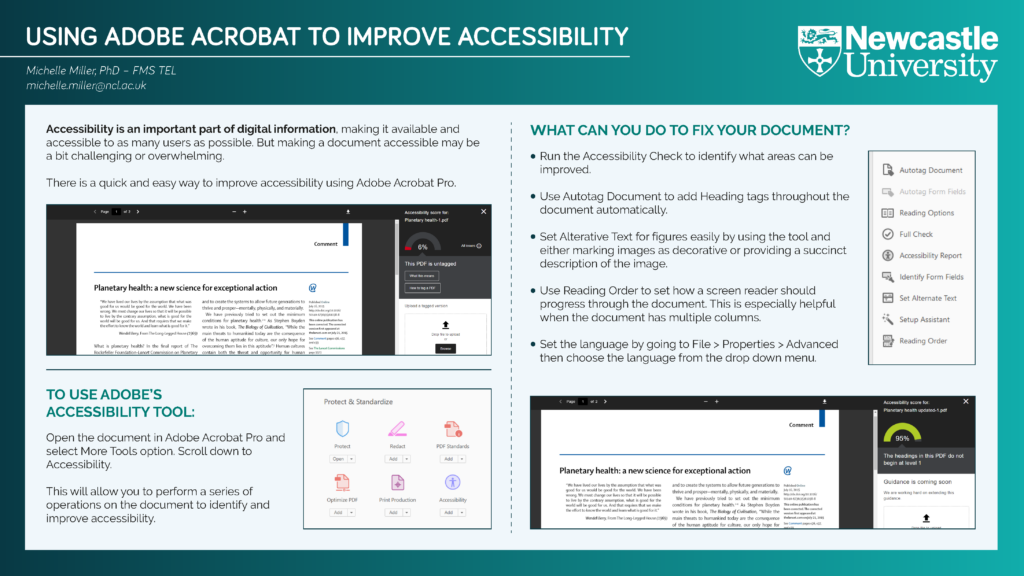
In FMS TEL we are currently working on accessibility as new module materials are being prepared for release. Did you know that Adobe Acrobat Pro has a built in Accessibility tool that not only checks your document’s accessibility, but helps you improve accessibility with the click of a few buttons?
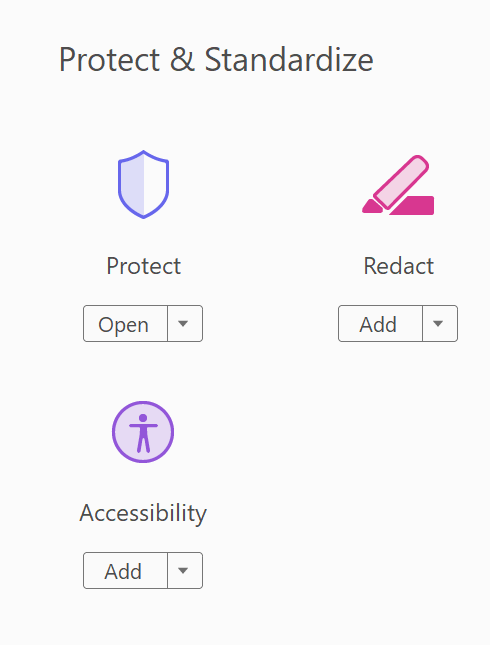
If you find that your PDFs are receiving low accessibility scores in Canvas, you can use Adobe Acrobat to improve their scores quickly and efficiently. Simply open the file in Adobe Acrobat Pro. Then select the Accessibility tool from the Tools options. (Click on More Tools then scroll down to the Protect and Standardize section.)
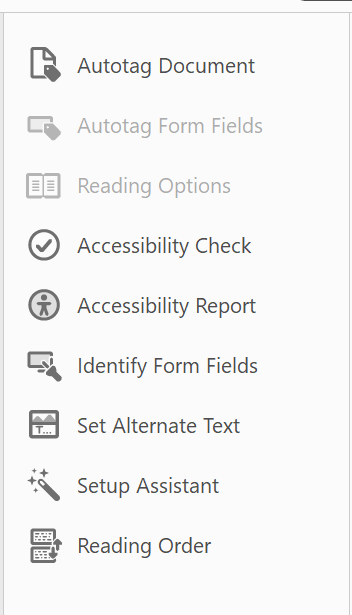
Begin by selecting the Accessibility Check. This will tell you what can be improved in your document.
Next you can use the Autotag tool if your document is missing tags such as headings.
You can choose Set Alternative Text to add alt text to your images.
If necessary use the Reading Order tool to set the order in which the document should be read by a screen reader.
With these three easy steps you have vastly improved the accessibility of your document! Try adding it back into Canvas and you will be surprised by the results you get.
This brief guide discusses some of tips and tricks for creating successful documentation for systems, software, or processes.
I recently had the opportunity to create some guidance packages for the new FMS Workplace Reporting System and FMS Personal Tutoring Allocation Database, and I wanted to share my insights and experience of what creating documentation entails.
Develop Knowledge
The first step in the process is to gain knowledge of the ins and outs of the software, system, or process you are documenting. In my case this required a walk-through of the WRS and PTAS led by members of the respective development teams. But it could be through experiencing the process yourself and taking notes. You should have some confidence in the process or system prior to beginning documentation. Once I had a working knowledge of the systems and was given access to them, I was ready to begin.
Logical Order
The next step is to plan out the structure of the guidance. Determine what area or process should be discussed first, next, etc. It is useful to outline these steps in a Word document or on a scrap piece of paper. This structure should give your documentation natural flow. It is the flow that will make your documentation stand out as an easy-to-use guide.
Clear and Concise
Choose language that is clear and concise to detail the steps and processes covered in your documentation. There is no need to be overly descriptive, but at the same time you want to ensure that all the necessary detail is included. For example, if a button is a specific colour this detail could help users locate it. However, if all the buttons on the page are the same colour, there is no need to specify this information.
Process
Writing documentation is all about the process. And there may be several processes covered in a single guidance. So, it is important to compartmentalise these as much as possible to avoid overwhelming your user. Approach the project in parts. Provide an introduction, themes, and a summary. This will help the user understand what is being addressed and how to work through your process or system.
Images or Video
Including images and/or video in your documentation is a great way to make useful and helpful guidance. Images and video can do in a few seconds what paragraphs of text would take to explain. However, you should always make sure your images and videos are clear and consistent. Use the same software to generate images and video and make sure the quality is high. There is not much worse in the field of documentation than an image or video that is not high enough resolution to see what exactly is being described. Also, make sure your images show the specific item or area in context. This will help the user locate what they are looking for easily. Note however, that text should always accompany an image to facilitate use by visually or otherwise limited users. The combination of text and image makes for clear guidance.
Annotations
Another great feature of images and video is that they can be annotated. Use software like PowerPoint to add arrows, circles, and even text to images. This will point out precisely what you are referring to in your guidance. You can use Adobe Animate or Camtasia to annotate videos. This increases the impact of a video or image.
Exact Language
Using precise language is necessary in creating guidance. Identifying processes and functions is critical to the reader, so you need to be very specific about what you say. For example, if a button is in the top right corner of the screen, don’t say “at the top of the screen”. Tell your user exactly where to look. At the same time, if the user needs to drag an item, click on a button, or even scroll up or down the page – make that clear in your text. Both what to do, and when to do it. Use numbered lists when possible to make the order of a process transparent.
Repetition/Highlighting Important Bits
When a specific task is important it may be worth repeating or emphasising the related information. For example, if a user needs to press a save button one or more times in a process, you can emphasis this by repeating the instructions, using bold text (Note: using only coloured text disadvantages colourblind individuals), or setting the instructions apart in a box or larger text. Making the most important tasks hard to miss in your documentation is always a good idea. You can achieve this through a combination of repetition and emphasis.
Summary
The process of creating documentation or guidance for a system or process can be a really rewarding experience. You will get practice teaching by giving clear, concise instructions. You will have the opportunity to work with colleagues when learning about the process or system – or testing your work on someone unfamiliar with the system or process. Finally, you will develop a greater understanding of the system or process itself. I really enjoy creating documentation, and I hope if you get the opportunity to create guidance – large or small – in the future, you will take it.
All of our posts about this conference can be seen under the tag NULTConf2022.
This lightning talk was presented in person at the Learning and Teaching Conference 2022. Newcastle University staff wishing to access the resources and the recording of the previous extended online version can do so here.
Key Points:
Commons in a cloud storage for Canvas items
Can upload and download pieces to and from your courses
Allows you to promote your material to the Canvas Community if you choose to do so
This short guide describes how to use the Reviewing tool in Microsoft 365 apps to dynamically collaborate on files.
Would you and your students benefit from the ability to have live, in-line feedback on essays, projects, and other work products? You can provide in-time feedback to students or colleagues as they work on individual or group work using Office 365 Share and Reviewing features. We’ve recently started using this method in our TEL Team to collaborate on documents.
To start the process, author simply need to share their file with the reviewer using the Share button in the file menu bar.
This sends a link to the file to the reviewer. By clicking on the link, the file will be opened in Office 365 online. The file could be a Word document, PowerPoint presentation, or an Excel workbook.
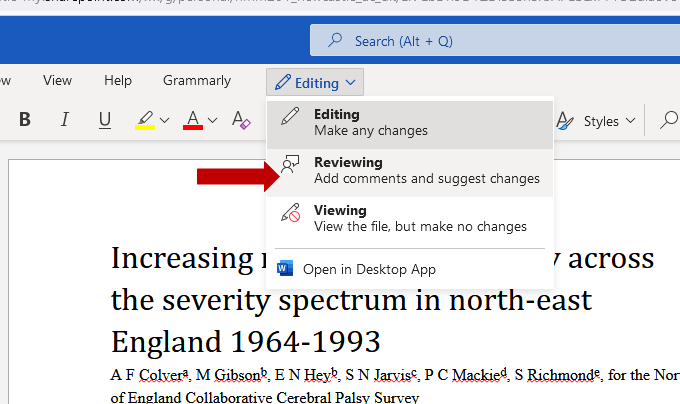
To make revisions that display to other authors/contributors enter the Reviewing setting.
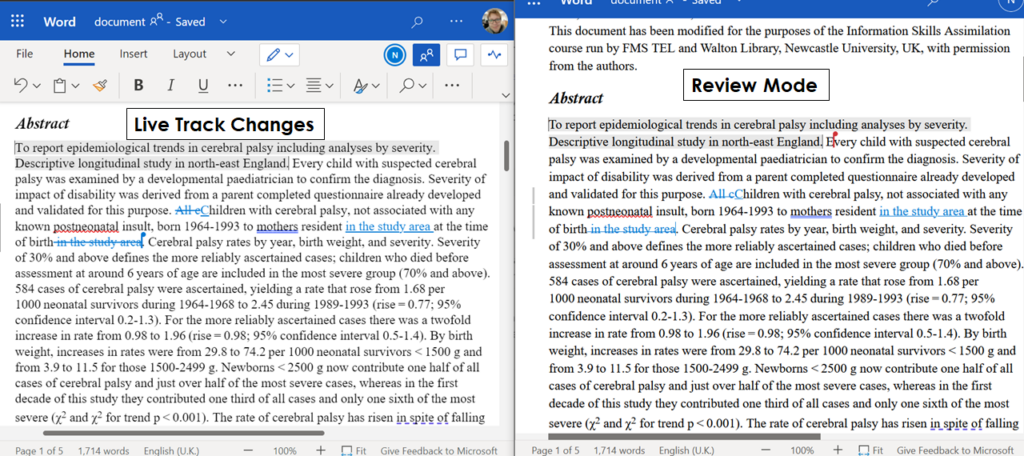
This will turn on your track changes that will then be displayed to other document authors. The other authors can see mark-up and accept or reject changes in-time or asynchronously as needed. Note, the editing and viewing must take place in the Online Word App. Using the desktop app to view the changes will not show track changes.
This can greatly benefit students as they work through their assignments, as well as give reviewers with the opportunity to provide input and suggestions as work products develop. It can also allow for dynamic collaboration between colleagues by allowing a “single” author control over accepting or rejecting edits by others.
An example of this could be a group of students working on a Word document together. One student could be in charge of the ‘final’ document while the other students make additions and changes at track changes. Thus increasing the transparency of editing. The coordinating author could then choose to accept or reject the input from their fellow students.
The unique power of live track changes provides authors with the opportunity to modify and edit their work as it develops rather than only at the point of submission or finalisation. This similarly benefits the reviewer as the option to review is not time constrained in the same manner as a submission for review may be.
This resource provides you with tips and tools for managing your email. Includes instructions and anecdotes on email management.
The FMS TEL team have developed a short course showing how you can make Outlook work for you. If your inbox is a chore and not a help, why not take a couple of minutes to tame the beast?
The short course is available on Canvas (also available in the MLE), and comes with an accompanying 9-minute audio programme which talks you through some examples of what the tools can be used to achieve.
The course is also available for you to import into your own courses via Canvas Commons, so feel free to use it!
But I haven’t got time!
10 minutes – listen to the programme for food for thought, or do a quick spring clean
20 minutes – click through the guides and listen to the programme, try some things out
1 hour – give your inbox a good spring clean using our tips and guides, and implement some rules and filters to organise your incoming email
Feel your inbox stress just melt away
6 Steps to Spring Clean your Inbox
Look at what you’re receiving and who and where it is coming from.
Decide what is important or necessary, and what is less so
Unsubscribe from unimportant or useless notifications or services. Adjust your email notification settings in Teams and Canvas to reflect what you really want to be emailed about.
Try out categorising emails from certain people, projects or services.
Use folders or search folders to move things out of your main inbox using rules based on email features like the sender, or categories you set.
Review regularly and change your system to suit what fits your needs – if a folder or rule no longer serves you, change or delete it.
Are you supervising a postgraduate student? If so, consider recommending Digital Skills workshops to help them with the process of formatting their thesis.
Digital Skills offers a series of four workshops specifically designed to help postgraduate students to format their thesis effectively and efficiently in Microsoft Word to University standards.
Sessions cover the use of Styles, caption and cross-referencing, customising multilevel lists, managing images and tables, modifying EndNote output, and merging chapter files. These skills provide students with the ability to create a successfully formatted thesis.
The first in the series of sessions takes place on 21st October 10-12pm. Encourage your students to sign up now via Workshops. Alternatively, students can complete the tutorial in their own time via the Digital Skills website.
The Faculty of Medical Sciences Digital Skills provides lifelong learning to students throughout the faculty on a bespoke basis. Our tutorials cover the use of Microsoft Office programmes such as Word, Excel, and PowerPoint, as well as tutorials on how to work with specific media such as images and posters.
Recently, we have increased focus on the value of our tutorials by highlighting lifelong learning skills for accessibility. As part of our Word tutelage, we teach students to use Styles to format their documents. Styles are packets of information that control how text looks and behaves. Namely, we teach students to work with heading and caption styles. In addition to being effective and efficient methods of formatting text, styles have an important role to play in accessibility. Screen readers can analyse a Word document using styles and accurately interpret headings. This allows users to easily navigate through documents. And, when converted to a PDF, styles automatically create tags in the document affording the same benefit for screen reader navigation.
Additionally, we teach students how to add alternative text (alt text) to images they insert into Word or PowerPoint. Alt text allows users with impaired visibility to understand what an image depicts. By using alt text, student increase accessibility of their digital documents. And, like styles, when converted to PDF, images retain tags of their alt text.
These skills are truly lifelong learning skills as they provide students with the knowledge and ability to create accessible documents. These skills will serve them in their future careers where digital documents will be required to meet specific accessibility regulations.
Michelle Miller shares her learning about Canvas Commons, which she has been using to share FMS digital skills content across multiple courses in Canvas.
Canvas Commons
Canvas Commons is a repository where Canvas course creators can upload all or part of their course for easy access and sharing within their organisation or to the Canvas public. You can use Canvas Commons to store your content (for your eyes and access only) or for wider use. It is an easy way to access and import Canvas content to multiple courses. This post will walk you through the steps of publishing part of your course in Canvas Commons.
Sharing to Canvas Commons
Begin by identifying the module, assignment, quiz, page, or other module content you want to share in Commons. In this explanation we will discuss sharing a module, but the same steps can be used for sharing a part of a module like an assignment, page, or quiz.
In the module title, select the three vertical dots and choose Share to Commons.
You’ll now be taken to the Commons uploading page where you will select settings for your Commons item.
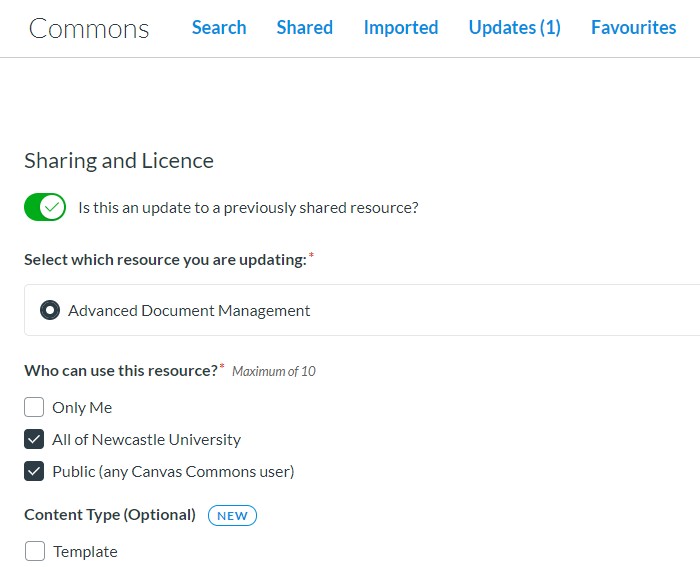
Sharing and License:
Toggle – Is this an update to a previous shared resource? This tool allows you to make updates to items you have already shared in Commons. These updates are pushed out to anyone who has imported your Commons content, thus allowing you to make changes and updates to content globally.
Who can use this resource? – You can choose ‘Only Me’ for content you want to be able to import into future courses, but do not want others to have access to. Or, you can choose All of Newcastle University to give access to anyone at the university, or Public to give access to any Canvas User.
Content Type – This allows you to mark the content specifically as a template or open textbook. This is optional.
License – Choose the level of license you wish to apply to the content. This is especially important to consider when making the content Public.
Add Additional Information – This is where you can enter the details for attribution, such as the author to credit and date of publication/copyright.
Metadata:
Title – Give the item(s) a short but descriptive title that would help others locate and understand its content.
Description – Provide a detailed description of the content. This should help others understand what is covered by the content.
Tags – These optional items allow you to tag specific words or phrases that help identify and describe the content to improve search recall.
Image – Choose an image to display on the Commons card for your content. You can upload your own image or choose one from the Canvas photo library.
Grades:
Grade/Level – Use the slider to mark the appropriate grade level for your Commons content. This can span multiple grades, e.g. Undergraduate and Graduate.
Press the Share button when you have completed all the settings for your Commons content. You will now find your content under the Share tab in Canvas Commons. Remember, you can make changes to your Commons content and push updates in the future. You will be asked to enter version comments when doing this. It is recommended you note the date the update is processed.
Importing Canvas Commons Material
Importing Canvas Commons material is easy to do. Simply go to the Home page of your course and choose Import from Commons button on the right side of the screen. Search for the item by title, name, institution, or tag. Select the correct item then choose the Import/Download button on the right side of the screen.
Select the course or courses you want to import the content into and choose Import into Course. You will receive a message saying the content has successfully imported.
The content will now be shown in the relevant page in Canvas, e.g. a module import will be shown on the Modules page. You can then choose to edit the module, assignment, quiz, or page as you normally would in Canvas. Imported assignments will be shown at the bottom of the assignments page under “Imported Assignments”. You can make changes to content as you would edit your normal Canvas content.
Summary
Sharing to Canvas Commons is an easy and effective way to make your course content available to yourself in other courses, others within the university, or with the wider Canvas public. It allows you to access not only your own material, but material created by others that you might find useful for your course. It also allows you to showcase your material to the Canvas public.